OAKWORKS ProLuxe Series User manual

Series
™
ProLuxe
Electric Salon Top
Shown with optional
Adjustable Side Arm Rests
and Universal Table Extender
Lift Assist Salon Top
Shown with optional
Adjustable Side Arm Rests
and Universal Table Extender
Lift Assist Backrest Top Flat Top
Shown with optional QuickLock™ Face
Rest and Boiance crescent
USER MANUAL
www.OAKWORKS.com · 717.235.6807
made in the USA
with US & imported parts

© Copyright 2018
OAKWORKS®, Inc.
Printed in U.S.A.
All rights are reserved. No part
of this document may be
photocopied, reproduced or
translated to another language
without prior written consent
of OAKWORKS®, Inc.
OAKWORKS®is a registered
trademark of OAKWORKS®, Inc.
Notice
The information contained within this
document is subject to change
without notice and should not
be construed as a commitment by
OAKWORKS®, Inc.
OAKWORKS®, Inc. encourages requests
for technical specifications and the
like documentation to ensure accu-
racy. The appropriate documentation
is available upon request.
OAKWORKS®, Inc. shall not be
liable for incidental or consequential
damages in connection with or arising
out of the furnishing, performance, or
use of this document and the program
material which it describes.

TABLE OF CONTENTS
Product Use Description .............................................................................................................................1
Important Safety Instructions
Symbol Identification .........................................................................................................................1
Safety Instructions .......................................................................................................................... 1-2
Product Description & Photo
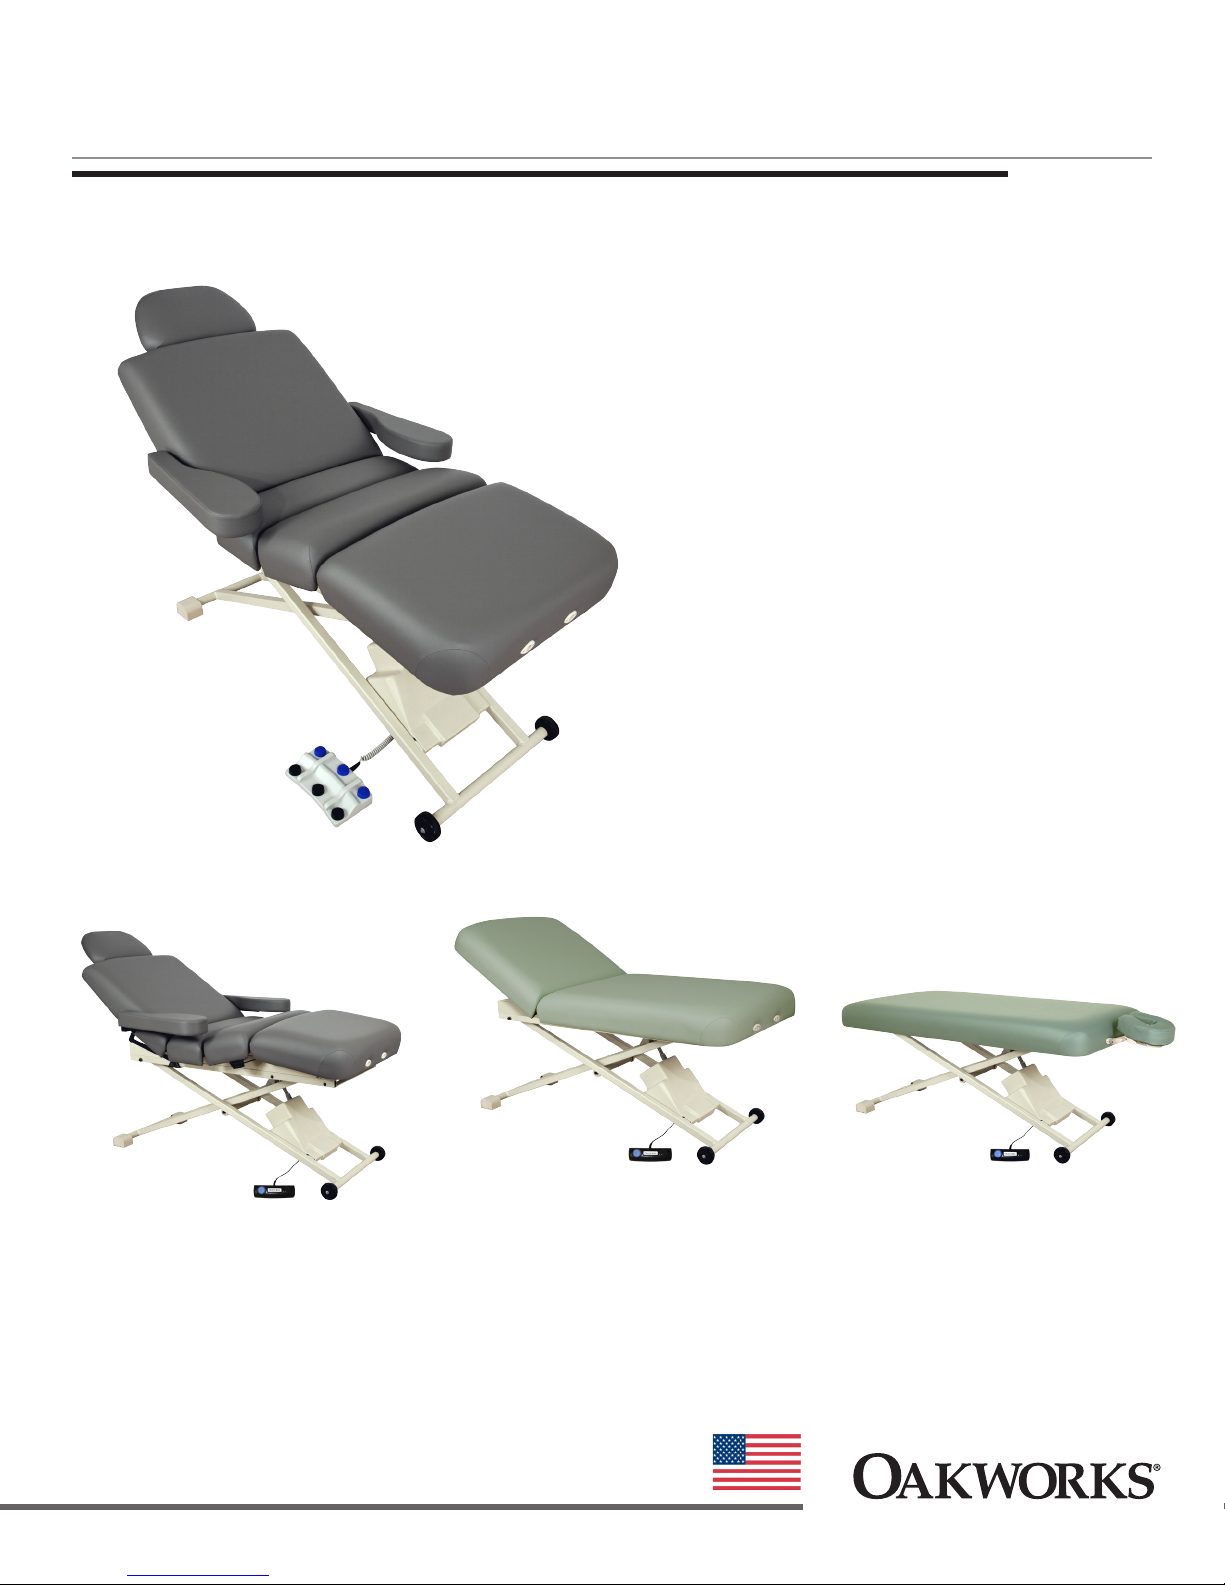
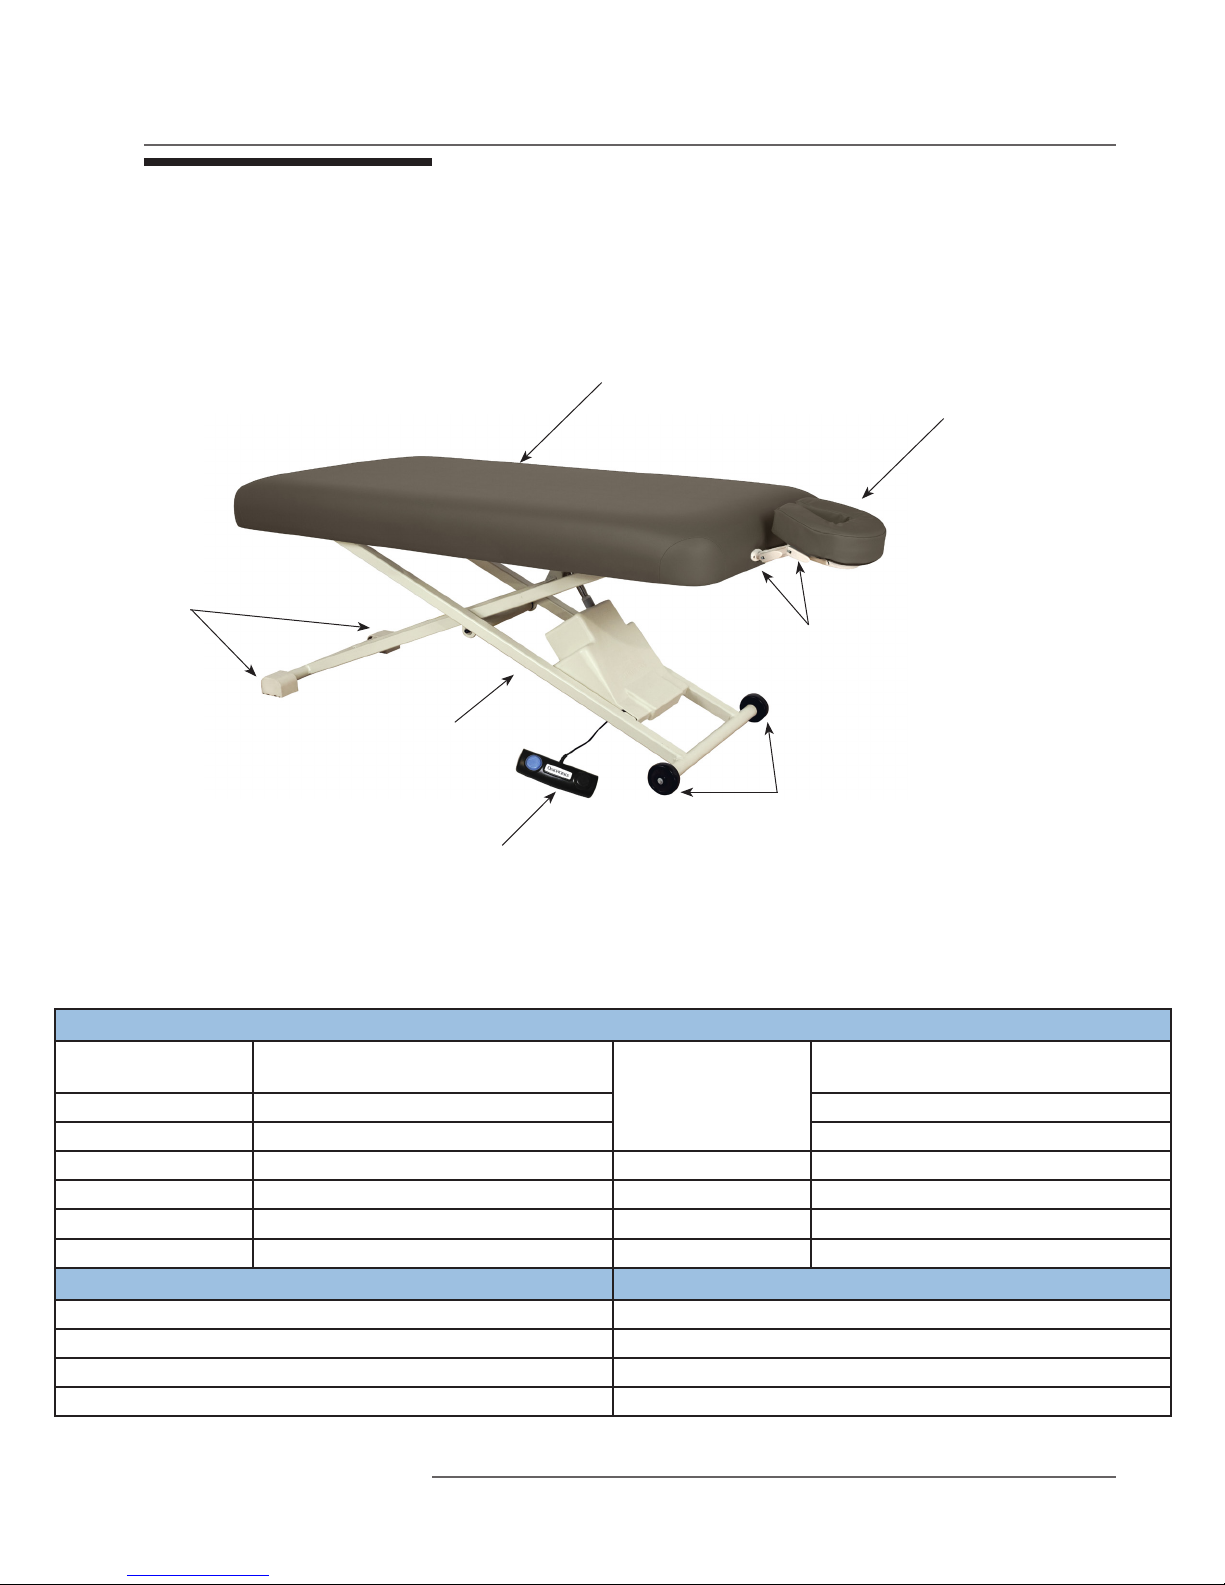
ProLuxe™ Flat Top ....................................................................................................................................3
ProLuxe™ Lift Assist Backrest Top ............................................................................................................4
ProLuxe™ Lift Assist Salon Top.................................................................................................................5
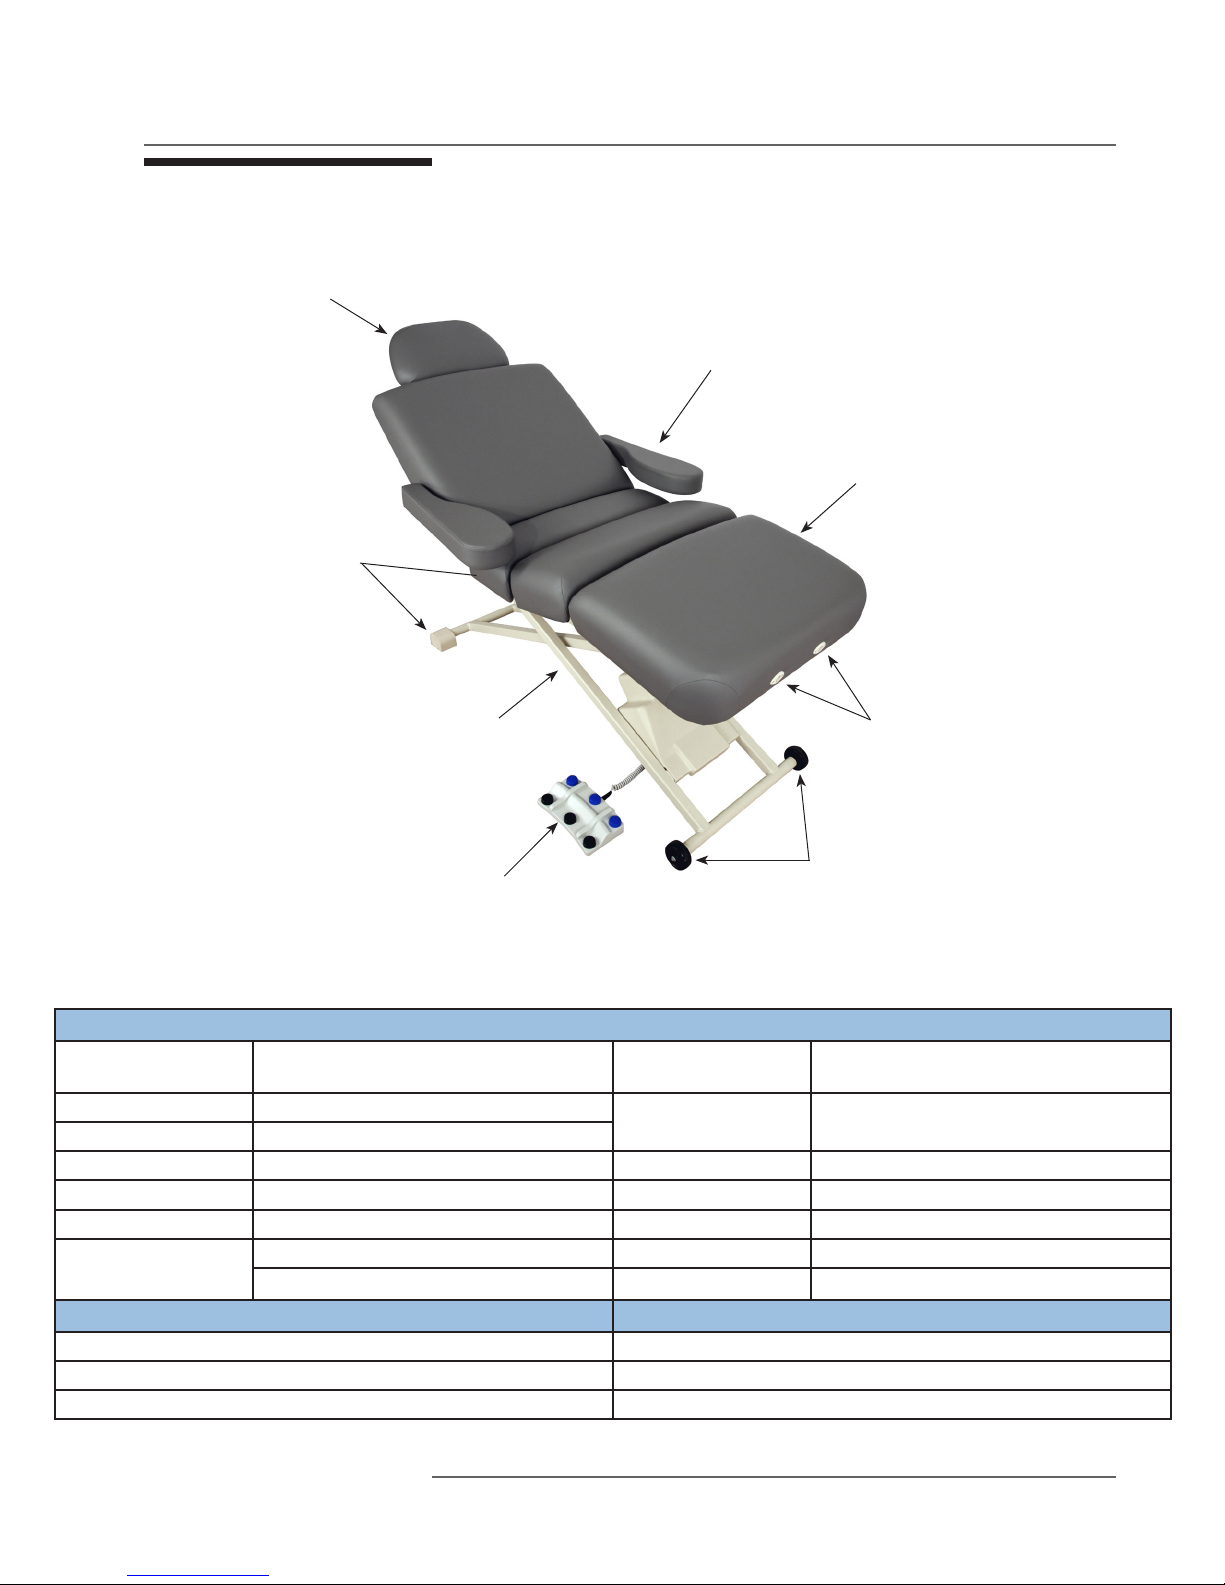
ProLuxe™ Electric Salon Top ....................................................................................................................6
Installation
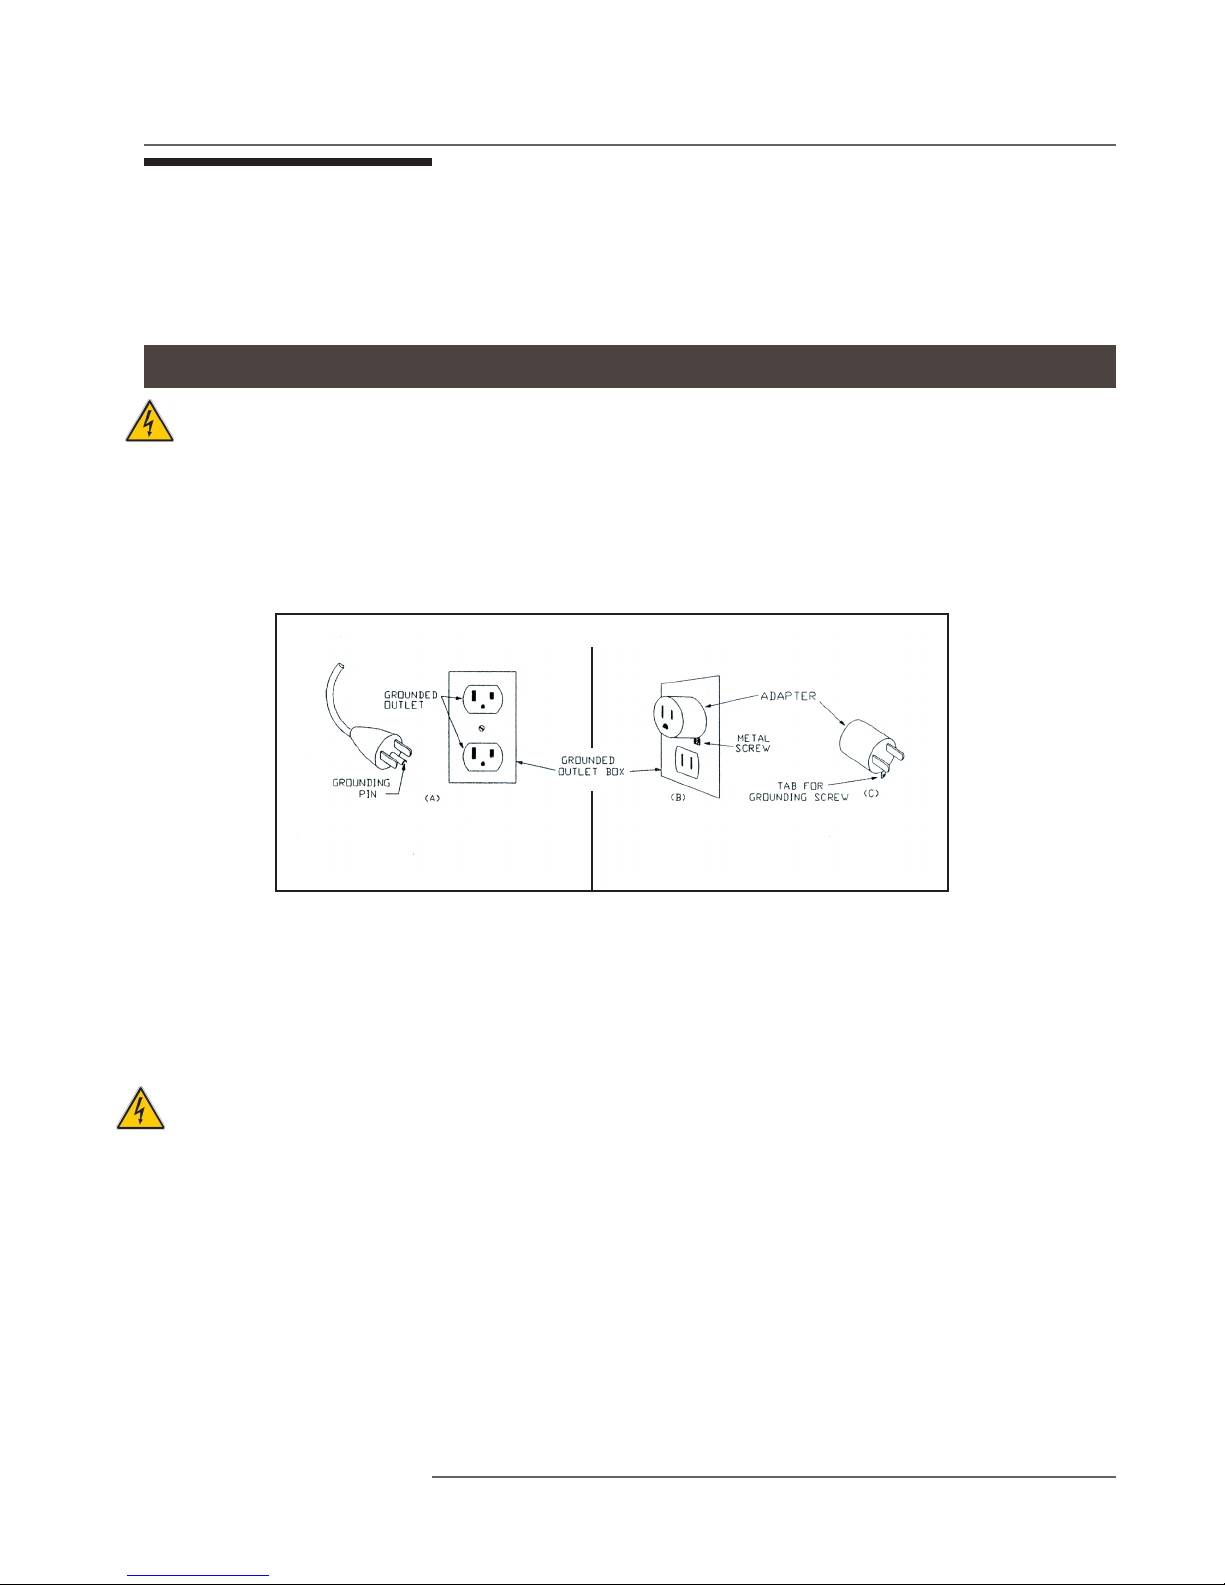
Grounding .............................................................................................................................................7
Directions for Use
Control Operations - Flat Top, Lift-Assist Backrest & Salon Only ...........................................8
Foot Control Operations - Electric Salon Tables Only ...............................................................9
Hand Control Operations - Electric Salon Tables Only............................................................10
Hand Control Operations
- Adjustable Breast Comfort (ABC) Systems Only...........................................................11
Adjusting the Back Rest section ....................................................................................................12
Adjusting the Leg Rest section......................................................................................................12
Moving the table ...............................................................................................................................13
Dual Locking Casters Use ................................................................................................................13
Hot Towel Cabi & Storage Shelf.....................................................................................................14
QuickLock Face Rest Use .................................................................................................................14
Adjustable Arm Rest Installation and Adjustment ...................................................................15
Adjustable Breast Comfort (ABC) System Use .................................................................... 16-17
Table Extender Use ...........................................................................................................................17
Cleaning & Disinfection
Recommended Cleaners/Disinfectants .......................................................................................18
Cleaning Process................................................................................................................................19
Inspections & Maintenance ......................................................................................................................19
Warranty Information ................................................................................................................................19
Model Number & Serial Number
Proluxe Series .....................................................................................................................................20
Specifications
Product Specifications .....................................................................................................................21
Environmental Conditions ..............................................................................................................21
Electrical Specifications ...................................................................................................................21
Guidance and manufacturer’s declaration -
Electromagnetic emissions .............................................................................................................22
Recommended separation distances...........................................................................................22
Guidance and manufacturer’s declaration -
Electromagnetic immunity....................................................................................................... 23-24
Contact Information....................................................................................................................back cover

This symbol, when used in this manual and on product labels, represents a caution
warning. Be sure to read and comply with all precautions and warnings.
This symbol, when used in this manual and on product labels, warns against an elec-
trical shock hazard. Be sure to observe and comply with all warnings.
This symbol, when used in this manual or on product labels, indicates a Protective
Earth (Ground) Terminal.
This symbol, when used in this manual or on product labels, indicates the date of
manufacture of the device.
This symbol, when used in this manual or on product labels, indicates alternating
current (AC).
This symbol, when used in this manual or on product labels, indicates direct current
(DC).
This symbol is used to indicate that the operator should consult the user manual.
UL 2601-1
CSA C22.2NO.601.1
IEC 60601-2(2001-09)
CUS
L
I
S
T
E
D
R
UL 2601-1
CSA C22.2NO.601.1
IEC 60601-2(2001-09)
CUS
L
I
S
T
E
D
R
~
----
PRODUCT USE DESCRIPTION / IMPORTANT SAFETY INSTRUCTIONS
PRODUCT USE DESCRIPTION
Oakworks ProLuxeTM Series offers a variety of positioning capabilities for massage therapists and spa
professionals of all specialties. On these multifunctional professional tables the practitioner can per-
form numerous protocols with ease and comfort. The fully electric ProLuxe Series is especially effec-
tive when professional protocols require specific positioning for the client or patient. While the client
receives comfortable, relaxing support, the comfort level of the therapeutic professional is enhanced
by superior ergonomics.
It is intended to be operated by Massage Therapists in a professional environment. No special training is
required but a review of the following Safety Instructions is important for the safety of the operator and
patient. The massage professional should read and understand this entire manual before use with a client.
There are no known contraindications to the use of this equipment.
The ProLuxe Series should not be used in any other manner than that described within this manual.
Use of any unnecessary force or unauthorized procedures could result in injury to practitioner, client
or equipment.
SYMBOL IDENTIFICATION
CAUTION
READ AND SAVE THESE INSTRUCTIONS
IMPORTANT SAFETY INSTRUCTIONS
The use of accessories, transducers, and cables other than those specified by the manufacturer, may result in increased emissions or
decreased immunity of the table.
The Table should not be used adjacent to or stacked with other equipment and that if adjacent or stacked use is necessary, the table should
be observed to verify normal operation in the configuration in which it will be used.
1

The Table is designed to be a stand-alone table. This table must not be modified or incorporated into any other equipment.
As with any moving mechanism there are potential pinch points around and underneath the table. It is the responsibility
of the operator of this equipment to insure that bystanders are not in the area below or around this equipment during opera-
tion.
Proper operation of this equipment is very important for the safety of the operator, patient, and any other individuals in the
area of this equipment. Directions for use of this equipment are described in this manual. The operator should read these sections
carefully.
Weight Limit: (patient and accessories) 550 lbs. (250 kg) Do not exceed.
Adjustable Breast Comfort (ABC) System Weight Limit - 100 lbs. (45 kg.) Do not sit on the ABC System. Do not place
foreign objects into the ABC System. Only use as intended. For safety of your client, use a cloth sheet between the
ABC System and your client.
Be certain that the table is completely lowered without any tilt being present prior to
discharging an ambulatory patient. The patient may lose balance and fall.
This table is not suitable for use in the presence of flammable anesthetic mixture with air or oxygen or nitrous oxide.
Do not operate where aerosol (spray) products are being used or where oxygen is being administered.
Do not lift table by the table top. This can damage the table.
When lowering the table, make sure there is nothing underneath the table top that can impede motion (like stools, cabi-
nets, accessory parts, cleaners, etc)
Use this furnishing only for its intended use as described in these instructions. Do not use attachments not recommended by
the manufacturer.
Close supervision is necessary when this furnishing is used by, or near children, invalids, or disabled persons.
WARNING
To reduce the risk of burns, fire, electric shock or injury to persons:
1. Unplug this furnishing from the electrical outlet before cleaning.
2. Unplug from outlet before adding or removing parts.
3. Never operate this furnishing if it has a damaged cord or plug, if it is not working
properly, if it has been dropped or damaged, or dropped into water. Contact Oakworks Customer Service before use
at 717.235.6807.
4. Keep the cord away from heated surfaces.
5. Never drop or insert any object into any opening.
6. Do not use outdoors.
7. Do not operate where aerosol (spray) products are being used or where oxygen is being administered.
DANGER
Risk of electric shock - Connect this furnishing to a properly grounded outlet only. See Grounding Instructions in this
manual.
Electrical Shock Hazard. The power supply/control module is located on the lift frame. No user serviceable parts are inside.
Refer servicing to qualified personnel. Unplug wall plug prior to contact with any cables connected to the power supply.
IMPORTANT SAFETY INSTRUCTIONS
2

PRODUCT DESCRIPTION
Proluxe
TM Flat Top
Upholstered Top
Wheels (2)
Self-locking
molded rubber
feet (2)
Steel Scissor-style
powder-coated base
with dual crossbeams (1)
Foot Control
QuickLock™ Face
rest with Boiance™
Crescent
Accessory attachment
outlets
STANDARD SPECIFICATIONS
Height Range Powered 18”-35” (46-89 cm.) Based on 3”
Plush Foam Padding
3”(8 cm.) Plush Foam OR
Foot Control Height Motion 4”(10 cm.) Aerocel Foam OR
Length 73”(185 cm.) 6”(15 cm.) Aerocel Foam
Table Voltage Options 120V/60Hz or 230V/50Hz Upholstery Terra Touch™
Table Capacity 550 lbs. (250 kg.) (patient and accessories) Table Weight*170 lbs. (70 kg.)
Widths 29”(74 cm.) or 31” (79 cm.) Warranty 3 year parts, 1 year labor
Safety Listings FDA, cETLus, CE marked
OPTIONS ACCESSORIES
Dual Locking Casters QuickLock Face Rest
2 Button Hand Control Table Extender
Second Foot Control
Adjustable Breast Comfort System
3
For electrical specs, see Specifications section.

4
PRODUCT DESCRIPTION
For electrical specs, see Specifications section.
Proluxe
TM Lift-Assist Backrest Top
STANDARD SPECIFICATIONS
Motion 1 Powered 21”-38” (55-97 cm.) Height Range
Based on 3”Plush Foam Padding
3”(8 cm.) Plush Foam OR
Motion 2 Manual 0º - 79º Backrest 4”(10 cm.) Aerocel Foam OR
Foot Control Height Motion 6”(15 cm.) Aerocel Foam
Table Voltage Options 120V/60Hz or 230V/50Hz Upholstery Terra Touch™
Table Capacity 550 lbs. (250 kg.) (patient and accessories) Table Weight*170 lbs. (70 kg.)
Widths 29”(74 cm.) or 31” (79 cm.) Warranty 3 year parts, 1 year labor
Length 73”(185 cm.) Safety Listings FDA, cETLus, CE marked
OPTIONS ACCESSORIES
Dual Locking Casters QuickLock Face Rest
2 Button Hand Control Table Extender
Second Foot Control
Adjustable Breast Comfort System
Manual Lift-Assist
Back Rest control
Upholstered Top
Wheels (2)
Self-locking
molded rubber
feet (2)
Steel Scissor-style
powder-coated base
with dual crossbeams (1)
Foot Control
Accessory attachment
outlets

5
PRODUCT DESCRIPTION
For electrical specs, see Specifications section.
Proluxe
TM Lift-Assist Salon Top
STANDARD SPECIFICATIONS
Motion 1 Powered 21”-38” (55-97 cm.) Height Range
Based on 4”Aerocel Foam
Motion 3 Manual 0º - 51º Thigh / 0º - 19º Lift-Assist
Footrest
Motion 2 Manual 0º - 53º Lift-Assist Backrest Multi-function Foot
Control All powered motions
Table Voltage Options 120V/60Hz or 230V/50Hz
Table Capacity 550 lbs. (250 kg.) (patient and accessories) Upholstery Terra Touch™
Widths 29”(74 cm.) or 31” (79 cm.) Table Weight*202 lbs. (92 kg.)
Length 73”(185 cm.) Warranty 3 year parts, 1 year labor
Padding 4”(10 cm.) Aerocel Foam OR Safety Listings FDA, cETLus, CE marked
6”(15 cm.) Aerocel Foam
OPTIONS ACCESSORIES
Dual Locking Casters QuickLock Face Rest
6 Button Hand Control Table Extender
Adjustable Breast Comfort System Adjustable Side Arm Rests
Manual Lift-Assist
Back Rest control
Upholstered Top
Wheels (2)
Self-locking
molded rubber
feet (2)
Steel Scissor-style
powder-coated base
with dual crossbeams (1)
Foot Control
Accessory attachment
outlets
Adjustable
Arm Rests (2)
(accessory)
Table Extender
(accessory)

6
PRODUCT DESCRIPTION
For electrical specs, see Specifications section.
Proluxe
TM Electric Salon Top
STANDARD SPECIFICATIONS
Motion 1 Powered 21”-38” (55-97 cm.) Height Range
Based on 4”Aerocel Foam
Motion 3 Powered 0º - 51º Thigh / 0º - 19º Footrest
Motion 2 Powered 0º - 53º Backrest Multi-function Foot
Control All powered motions
Table Voltage Options 120V/60Hz or 230V/50Hz
Table Capacity 550 lbs. (250 kg.) (patient and accessories) Upholstery Terra Touch™
Widths 29”(74 cm.) or 31” (79 cm.) Table Weight*202 lbs. (92 kg.)
Length 73”(185 cm.) Warranty 3 year parts, 1 year labor
Padding 4”(10 cm.) Aerocel Foam OR Safety Listings FDA, cETLus, CE marked
6”(15 cm.) Aerocel Foam
OPTIONS ACCESSORIES
Dual Locking Casters QuickLock Face Rest
6 Button Hand Control Table Extender
Adjustable Breast Comfort System Adjustable Side Arm Rests
Upholstered Top
Wheels (2)
Self-locking
molded rubber
feet (2)
Steel Scissor-style
powder-coated base
with dual crossbeams (1)
Multi-function
Foot Control
Accessory attachment
outlets
Adjustable
Arm Rests (2)
(accessory)
Table Extender
(accessory)

7
The Tables come completely assembled and ready to use. Plug the cord into a functioning outlet that is
rated for the table. (see Grounding below)
Arrange the power cord and control cords so that they will not create a tripping hazard and where
the controls are located to your liking and are conveniently accessible.
Be sure access to plug is not blocked for disconnecting the table from power.
INSTALLATION
GROUNDING
Grounding for 120 Volt products:
This product is for use on a nominal 120-volt circuit and has a grounding plug that looks
like the plug shown below. See Grounding Methods - US 120V Example. Make sure that the
product is connected to an outlet having the same configuration as the plug. No adapter
should be used with this product.
Grounding for 230 Volt products:
This product is rated for less than 15 amperes and is for use on a circuit having a nominal
rating of 230 volts and is factory-equipped with specific electric plug to permit connec-
tion to a proper circuit. Make sure that the product is connected to an outlet having the
same configuration as the plug. No adapter should be used.
WARNING
1. Improper connection of the equipment-grounding conductor can result in a risk of
electric shock. Check with a qualified electrician or service person if you are in doubt as
to whether the product is properly grounded.
2. Do not modify the plug provided with the product - if it will not fit the outlet; have a
proper outlet installed by a qualified electrician.
Correct Implementation Incorrect Implementation
Risk of Electric Shock - Connect this furnishing to a properly grounded outlet only.
DANGER
Grounding Methods - US 120V Example

P/N: 71567-1 P/N: 71569-1P/N: 71568-1
Clear Window
Blue PMS #283C
UP DOWN
CAUTION
CONTROL OPERATIONS FLAT TOP, LIFTASSIST BACKREST AND
SALON TABLES ONLY
Be sure the self-locking molded rubber feet are flat side down to ensure safety and stability.
The tables offer height positioning with electronic ease. Operate the Foot control and Optional Hand
Control as shown below to raise or lower the height of the table.
8
DIRECTIONS FOR USE
FOOT CONTROL OPERATION
UP DOWN
HAND CONTROL OPERATION OPTIONAL

CAUTION Do not sit on the backrest or leg rest sections. Be sure the self-locking molded rubber feet are flat side
down to ensure safety and stability. The hood area under the backrest top is not designed for stor-
age. DO NOT use this area for holding anything. Damage can occur to the table.
The OAKWORKS®ProluxeTM Electric Salon tables offer height, backrest and footrest positioning with elec-
tronic ease. Operate the Foot control as shown below to raise or lower the height, backrest or footrest
functions of the table.
9
DIRECTIONS FOR USE
Height UP
Height DOWN
Footrest UP
Footrest DOWN
Backrest UP
Backrest DOWN
FOOT CONTROL OPERATIONS ELECTRIC SALON TABLES ONLY

P/N: 71567-1 P/N: 71569-1P/N: 71568-1
Clear Window
Blue PMS #283C
CAUTION
HAND CONTROL OPERATIONS ELECTRIC SALON TABLES ONLY
Do not sit backrest or leg rest sections. Be sure the self-locking molded rubber feet are flat side down
to ensure safety and stability. The hood area under the backrest top is not designed for storage. Do
not use this area for holding anything. Damage can occur to the table.
The OAKWORKS®ProluxeTM Electric Salon tables offer height, backrest and footrest positioning with elec-
tronic ease. Operate the Optional Hand control as shown below to raise or lower the height, backrest
or footrest functions of the table.
10
DIRECTIONS FOR USE
Height UP Height DOWN
Footrest UP Footrest DOWN
Backrest UP Backrest DOWN

P/N: 71567-1 P/N: 71569-1
Clear Window
Blue PMS #283C
P/N: 71568-1 P/N: 71567-2 P/N: 71569-2
CAUTION
HAND CONTROL OPERATIONS
ADJUSTABLE BREAST COMFORT ABC SYSTEMS ONLY
ABC System Weight Limit - 100 lbs. (45 kg.) Do not place foreign objects into the ABC
System. Only use as intended. For safety of your client, use a cloth sheet between the ABC
System and your client.
The OAKWORKS®Adjustable Breast Comfort (ABC) System is designed to lower the pressure on breasts and
pectoral muscles, allowing the client to relax and create a more comfortable position for their spine. The
height of the cushion is easily adjusted up and down in small increments by using the hand control.
11
DIRECTIONS FOR USE
P/N: 71567-1 P/N: 71569-1
Clear Window
Blue PMS #283C
P/N: 71568-1 P/N: 71567-2 P/N: 71569-2
ELECTRIC SALON
TABLES ONLY
FLAT TOP, LIFTASSIST
BACKREST & SALON
TABLES ONLY
Standard
Table Functions
ABC SYSTEM UP ABC SYSTEM DOWN
ABC System
UP
ABC System
UP ABC System
DOWN
ABC System
DOWN

Back Rest
Control
TO LOWER THE BACK REST:
Press the lever under the head section and
push the back rest down.
TO RAISE THE BACK REST
Raise the back rest by pressing the lever
under the head section and lifting up to the
desired height. It is recommended that clients
take some of their weight off the back rest
while you lift.
CAUTION
ADJUSTING THE BACK REST SECTION
Do not sit on the Back Rest section.
12
DIRECTIONS FOR USE
ADJUSTING THE LEG REST SECTION
TO CHANGE LEVER POSITION:
The back rest lever can be moved to the
opposite side of the back rest by removing
the screws and relocating the hand lever to
the opposite side of the top into the four pre-
drilled holes.
Leg Rest
Lever
TO LOWER THE LEG REST:
Pull the lever on the side of the leg section
and push the leg section down. Release the
lever once leg rest is at desired location and
the leg section will stay in place.
TO RAISE THE LEG REST:
Raise the leg rest by pulling the lever on the
side of the leg section and raise to the desired
height. It is recommended that the client take
some weight off the leg rest while you lift.
TO CHANGE LEVER POSITION:
The leg rest lever can be moved to the oppo-
site side of the table. First, remove the screws
from the lever and replace just the screws.
Move lever to the opposite side of the table.
Remove the screws that are there and install
the lever.
CAUTION Do not sit on the Leg Rest section.

All casters should be locked at all times during use with a patient.
DUAL LOCKING CASTERS USE
LOCKING THE CASTERS
1. Place your shoe on the end of the casters locking tab.
2. Press firmly downward until you here a clicking noise
and the caster is locked.
UNLOCKING THE CASTERS
1. Place your shoe on top of the casters locking tab.
2. Press firmly inward and downward until you here a click-
ing noise and the caster is unlocked.
The tables are equipped with two wheels at one end and two self-locking, molded rubber feet at the
other. When ready to move the table, first lower the table to its lowest position. On models with a back
rest, it is recommended to raise the back rest to a high position. Then be sure the power source is
disconnected. Place the cord & all controls out of the way on top of your table before moving the table.
Lay a towel or a cloth down on your table top to protect the surface from any debris from the bottom of your
foot control.
Two people are required to safely move the table. Grasp the table frame securely at the end with
the molded rubber feet. Raise the table to allow the wheels at the foot end to move freely. Bending at
the knees before lifting to prevent back strain or possible injury.
Move the table carefully to the next location, lower the table and release. Check the self-locking
molded rubber feet to be sure they are flat side down. This position “locks” the table and allows sturdy
height adjustments. Place the foot controls in position on the floor. Connect the power cord to the outlet
and test the foot control.
Grasp the
table frame
securely here
at both sides
of the brace.
CAUTION
MOVING THE TABLE
Before moving any of the Tables, disconnect the power cord from the power outlet. The
table weighs as much as 200 lbs. (91 kg.) Use extreme caution when lifting the table to
move it. Two people are required to move the table safely. DO NOT use the table to
transport a patient.
13
DIRECTIONS FOR USE

14
DIRECTIONS FOR USE
Double articulating action provides nearly limitless positioning options with the QuickLock™ Face Rest. The adjustable
pad takes pressure off sensitive facial areas while providing superb support. The QuickLock™ Face Rest can be used in
both prone and supine positioning and folds out of the way when not in use. Adjustments are made easily by loosening
the cam locks, adjusting for height and angle and then locking the cam locks into the desired position.
Important Safety Note:
Maximum Distance from edge
of Table = 3” (7.6 cm.)
QuickLock™
Face Rest
Insert dowels into
Accessory attachment out-
lets.
Loosen Cam Locks &
adjust face rest into place.
The Face Rest can be used
for either prone or supine
positioning.
Tighten the Cam Locks.
QUICKLOCK FACE REST * U.S. Patent #5,177,823
CAUTION Do not put excessive weight or pressure on the Quicklock Face Rest. Do not extend the
dowels of the Quicklock Face Rest 3” (7.6 cm.) from the Fowler (Backrest) section.
Accessory
attachment
outlets
HOT TOWEL CABI SHELF & STORAGE SHELF
CAUTION The Anti-Tip Strap must be installed when using a Hot Towel Cabi.
Do not overload the storage Shelf. [Max load weight is 25 lbs. (11.3 kg)]
The Cabi Shelf holds a Hot Towel Cabi
with dimensions no greater than 17.9”
wide x 12.6” deep x 11.4” high. Place
the Hot Towel Cabi on the Cabi Shelf and
center it. Wrap the Anti-Tip Strap tightly
around the Cabi and shelf as shown to
secure it against tipping.
The Power Strip will power the Hot
Towel Cabi and other devices. Make
sure all cords are safely located out of
the way to avoid trip hazards. Make
sure that no cords are pinched when
the table is raised or lowered.
The Storage Shelf provides storage for
items needed during treatments and
extra equipment.
Anti-Tip
Strap

15
DIRECTIONS FOR USE
ADJUSTABLE ARM REST INSTALLATION AND ADJUSTMENT
CAUTION Do not use the arm rest for patient support during the mounting or dismounting of the chair.
The arm rest is not designed to support the patient’s weight.
TO INSTALL THE ARM RESTS:
The Arm Rests adjust automatically as the back rest moves to remain parallel to the floor.
1. Insert end of arm rest into backrest
hole while holding the arm rest at a
60° angle to the backrest.
2. Push end all the way into the hole and drop the arm rest into the horizontal position.
Pull outward to make sure the arm rest is secure.
TO LEVEL THE ARM RESTS:
The Arm Rest height is adjusted at the factory for each table. If the armrest starts to sag with repeated use, follow the
steps below to readjust.
1. Loosen the bottom 2 set screws. 2. Turn the side set screw (clock-
wise to raise or counter-clockwise
to lower) while adjusting the arm
rest. Lift the arm rest slightly
when doing this adjustment to
reduce the weight.
3. Tighten the two bottom set
screws to lock the position.

16
DIRECTIONS FOR USE
ADJUSTABLE BREAST COMFORT ABC SYSTEM USE
CAUTION ABC System Weight Limit - 100 lbs. (45 kg.) Do not sit on the ABC System. Do not place
foreign objects into the ABC System. Only use as intended. For safety of your client, use
a cloth sheet between the ABC System and your client.
SUPINE POSITIONING
When turning clients over to supine,
you may use the cushion to level after
or during their change of position. IT
is not important that the cushion be
completely level. As in prone positions,
make small changes in height and check
in with the client.
PRONE POSITIONING
In Prone positions, for male or female
clients when the face rest is in use, lower
the cushion approximately 3/4” at a
time (This is approximately 1 second of
lowering) and check in with the client
regarding their comfort right after mak-
ing the change. Incrementally lower the
cushion until the client reports they are
comfortable. Sometimes going back up a
little will be preferred. This whole pro-
cess takes no more than 15-20 seconds.
After lowering, check headrest position
to ensure comfort & support. Once a cli-
ent’s preferences are known, the cushion
can be brought to that level before they
are on the table. NOTE: Breast size is not
the only determinate of cushion location.
Every person’s comfort spot is different,
regardless of breast size.
HEAD REST USE IN SUPINE
If you are using the head rest in the
Supine position, you may use the cush-
ion at relatively high heights to facilitate
stretching for short periods of time. It
is not recommended that clients experi-
ence this position for more than a few
minutes.
The OAKWORKS®Adjustable Breast Comfort (ABC) System is designed to lower the pressure on breasts and pectoral
muscles, allowing the client to relax and create a more comfortable position for their spine. The height of the cushion
is easily adjusted up and down in small increments by using the hand control. We recommend that the cushion height
be adjusted in the following ways:
*Always start with the cushion top level with the top of the table for Prone or Supine Positioning*
FACE REST USE
To attach the Adjustable face rest, insert the dowels into the holes on the end of the table. Wrap the Facerest Strap that
is attached to the table around the horizontal bar on the face rest as shown to secure into place. Attach crescent to top
of platform. Adjust the Facerest pad on the platform closer to the table for shorter clients and farther away for taller
clients.

17
DIRECTIONS FOR USE
ADJUSTABLE BREAST COMFORT ABC SYSTEM USE CONTD...
CLEANING THE ABC SYSTEM:
If cleaning inside the ABC system is desired, remove the 6 Phillips Head screws with a Phillips head
screwdriver. Remove the ABC cover and wipe down the inside of the system. When finished, reattach the
cover with the 6 screws.
ABC Cover
Screws
CAUTION
TABLE EXTENDER USE
Do not put excessive weight or pressure on the table extender.
The Table Extender
lengthens the table for
your tallest clients and
can improve access to
your patient.
Insert the Table Extender tubes.
Accessory
attachment
outlets
Locate the Accessory attachment outlets.
Other manuals for ProLuxe Series
2
This manual suits for next models
4
Table of contents
Other OAKWORKS Spa Accessories manuals
Popular Spa Accessories manuals by other brands

GHARiENi
GHARiENi MO 1 instruction manual

Gecko
Gecko M-CLASS MC-MP-SBD owner's manual

Gecko
Gecko in.k1000 Tech book

Leisure Concepts
Leisure Concepts Smartop SwimSpa Upright 3.0 installation instructions

Leisure Concepts
Leisure Concepts Smartop Upright 3.0 installation instructions

Exerpeutic
Exerpeutic Heavenly manual