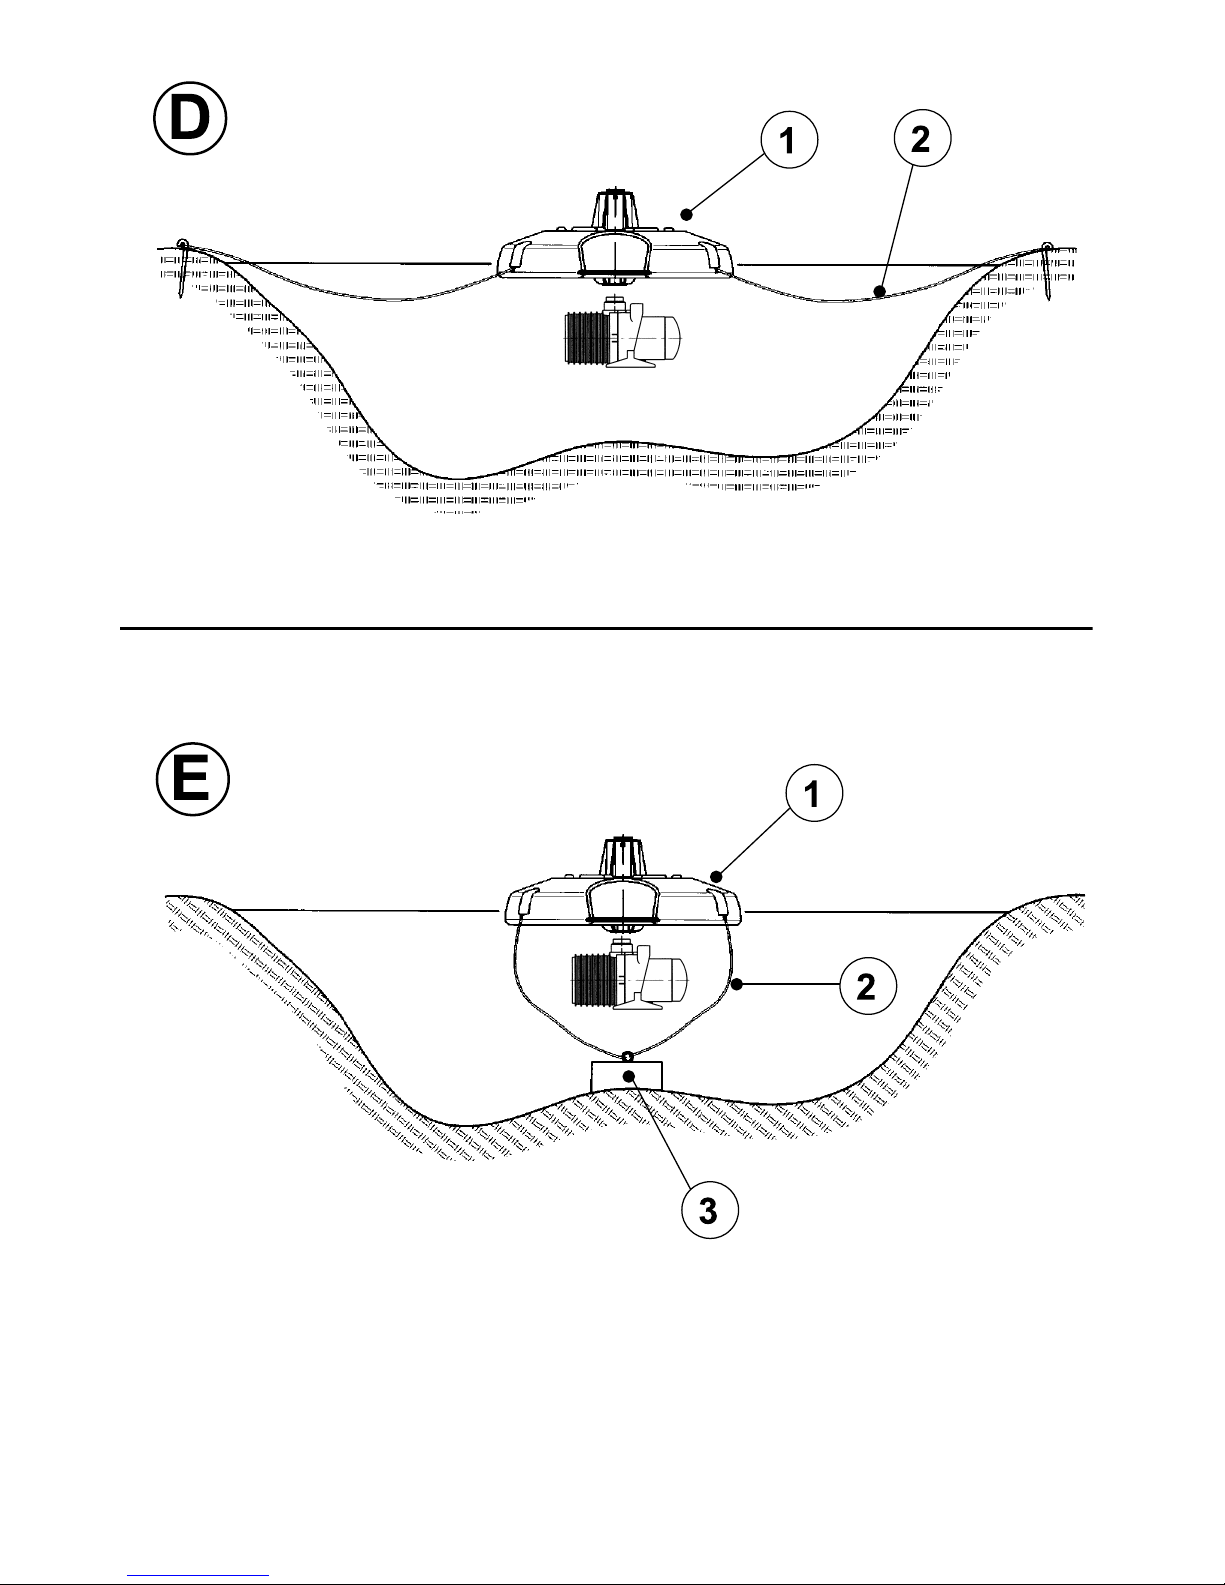
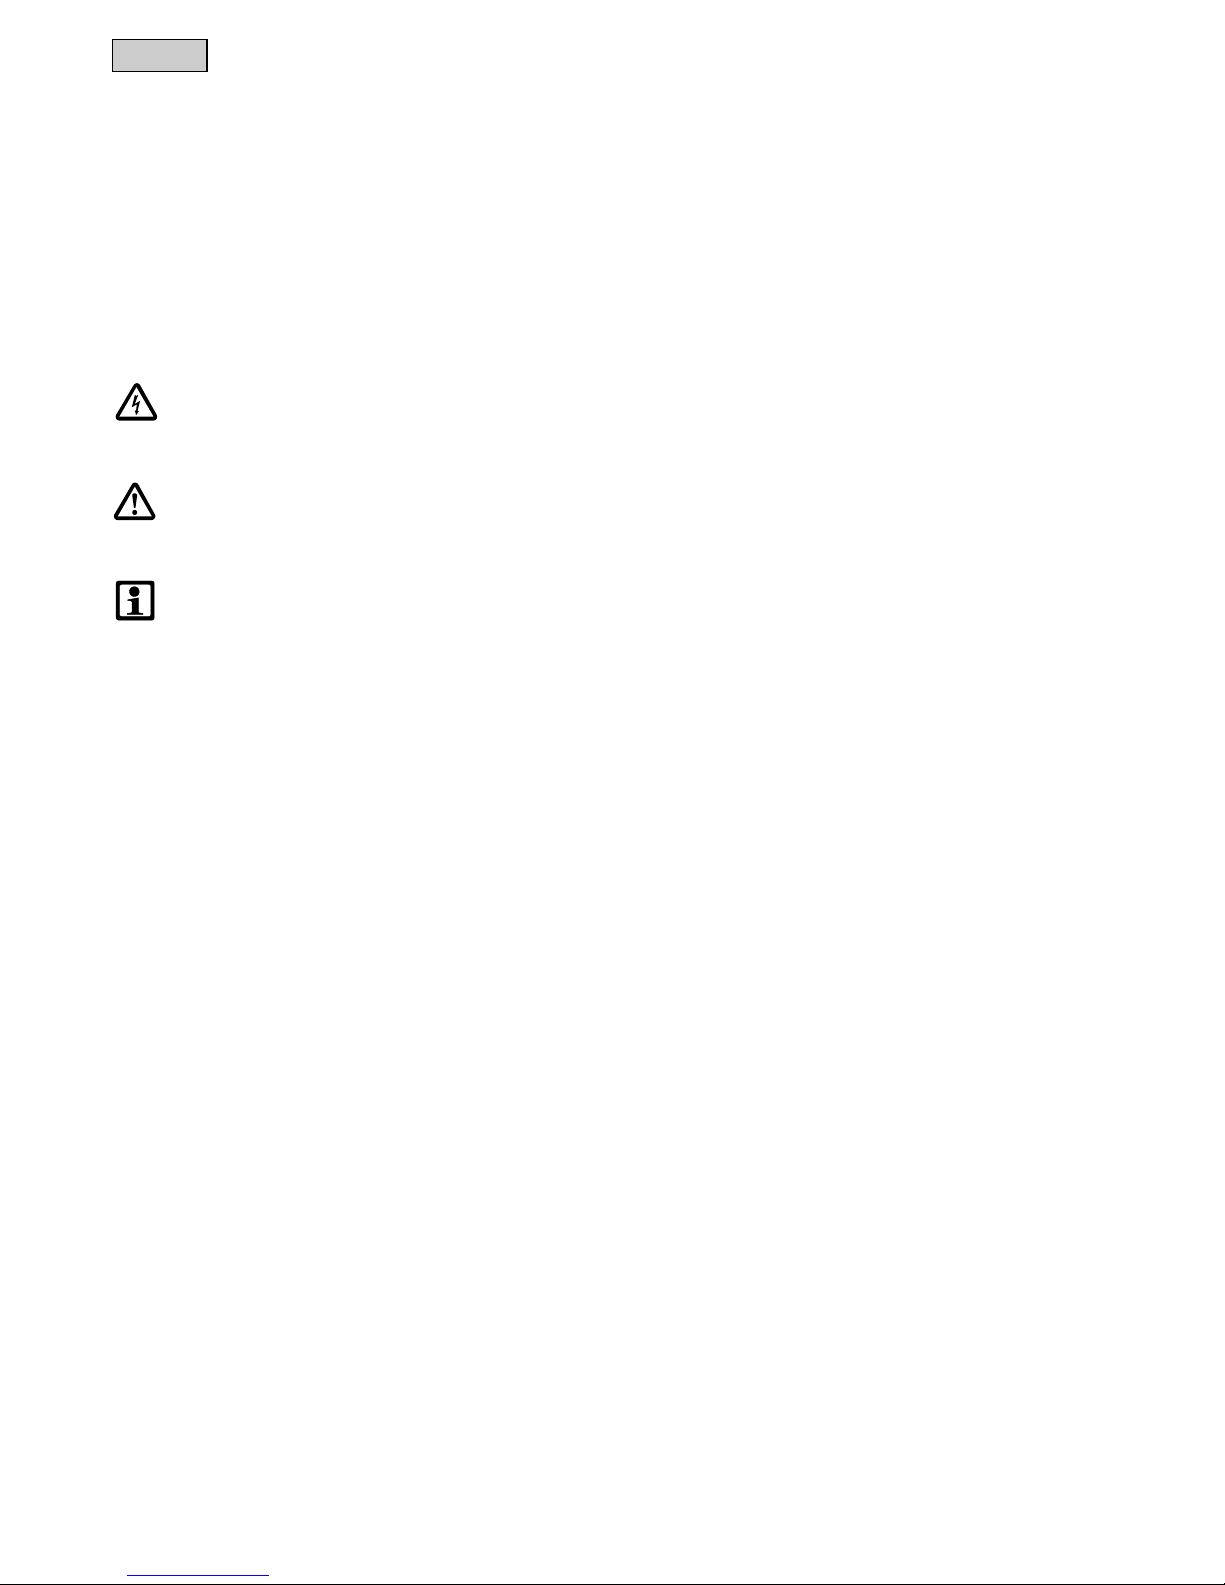
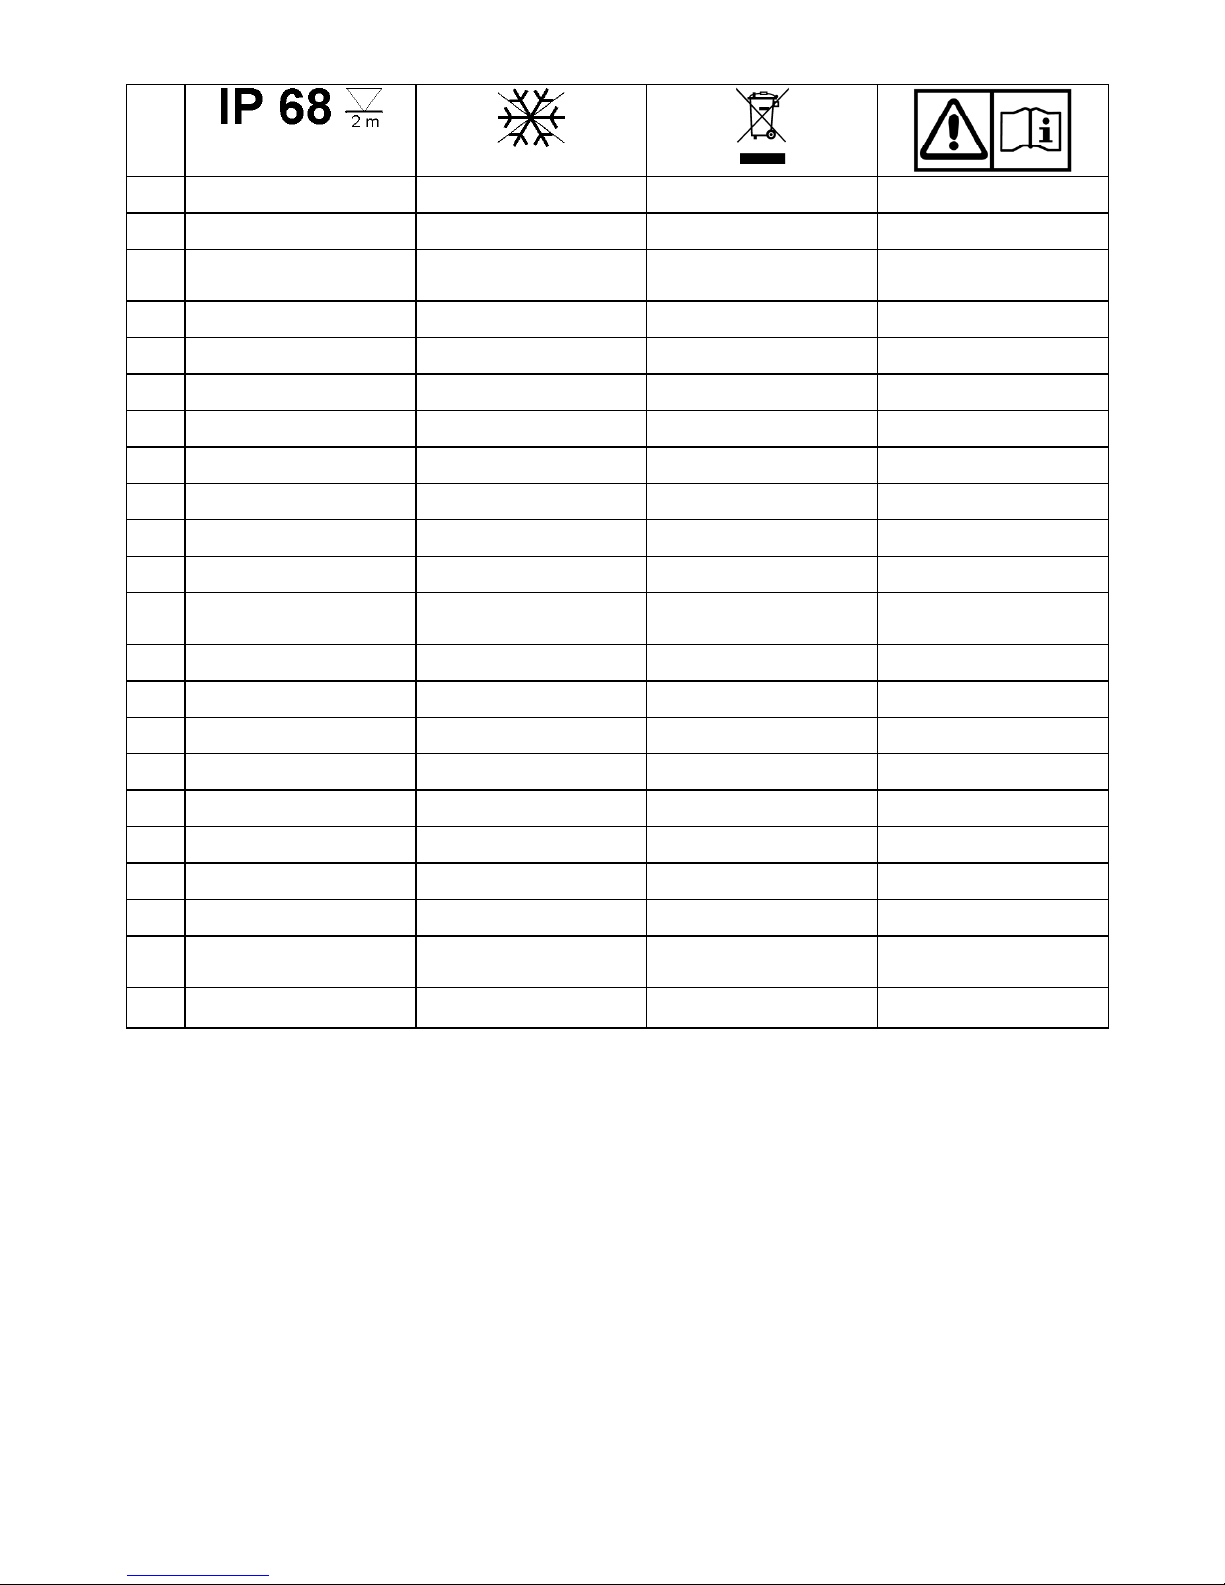
Oase PondJet User manual

10375/07 G
PondJet
10375 GAW_PondJet_end:. 27.07.11 15:37 Seite 2

2

3

4

8
- GB -
Translation of the original Operating Instructions
Information about these operating instructions
Welcome to OASE Living Water. You made a good choice with the purchase of this productPond-Jet.
Prior to commissioning the unit, please read the instructions of use carefully and fully familiarise yourself with the unit.
Ensure that all work on and with this unit is only carried out in accordance with these instructions.
Adhere to the safety information for the correct and safe use of the unit.
Keep these instructions in a safe place! Please also hand over the instructions when passing the unit on to a new
owner.
Symbols used in these instructions
The symbols used in this operating manual have the following meanings:
Risk of injury to persons due to dangerous electrical voltage
This symbol indicates an imminent danger, which can lead to death or severe injuries if the appropriate meas-
ures are not taken.
Risk of personal injury caused by a general source of danger
This symbol indicates an imminent danger, which can lead to death or severe injuries if the appropriate meas-
ures are not taken.
Important information for trouble-free operation.
Intended use
Pond-Jet, in the following termed "unit", and all other parts from the delivery scope may be used exclusively as follows:
−For creating a water fountain in lakes or large ponds with or without fish.
−For aeration and supplying oxygen to garden ponds.
−Operation under observance of the technical data.
−For operation with clean water.
The following restrictions apply to the unit:
−Do not use in swimming ponds.
−Never use the unit to convey fluids other than water.
−Never run the unit without water.
−Do not use for commercial or industrial purposes.
−Do not use in conjunction with chemicals, foodstuff, easily flammable or explosive substances.
Safety information
The company OASE has built this unit according to the state of the art and the valid safety regulations. Despite the
above, hazards for persons and assets can emanate from this unit if it is used in an improper manner or not in accor-
dance with its intended use, or if the safety instructions are ignored.
For safety reasons, children and young persons under 16 years of age as well as persons who cannot recog-
nise possible danger or who are not familiar with these operating instructions, are not permitted to use the
unit. Keep children under supervision to ensure that they do not play with the unit.
Hazards encountered by the combination of water and electricity
−The combination of water and electricity can lead to death or severe injury from electrocution, if the unit is incorrectly
connected or misused.
−Prior to reaching into the water, always switch off the mains voltage to all units used in the water.
Correct electrical installation
−Electrical installations must meet the national regulations and may only be carried out by a qualified electrician.
−A person is regarded as a qualified electrician, if, due to his/her vocational education, knowledge and experience, he
or she is capable of and authorised to judge and carry out the work commissioned to him/her. Working as a qualified
person also includes the recognition of possible hazards and the adherence to the pertinent regional and national
standards, rules and regulations.
−For your own safety, please consult a qualified electrician.
−The unit may only be connected when the electrical data of the unit and the power supply coincide. The unit data is
to be found on the unit type plate or on the packaging, or in this manual.
−Ensure that the unit is fused for a rated fault current of max. 30 mA by means of a fault current protection device.
−Extension cables and power distributors (e.g. outlet strips) must be suitable for outdoor use.
−Ensure that the power connection cable cross section is not smaller than that of the rubber sheath with the identifi-
cation H05RN-F. Extension cables must meet DIN VDE 0620.
−Protect the plug connections from moisture.
- GB -

9
- GB -
−Only plug the unit into a correctly fitted socket.
Safe operation
−Never operate the unit if either the electrical cables or the housing are defective!
−Do not carry or pull the unit by its electrical cable.
−Route all cables such that damage is excluded and nobody can trip over them.
−Never open the unit housing or its attendant components, unless this is explicitly required in the operating instruc-
tions.
−Only use original spare parts and accessories for the unit.
−Never carry out technical modifications to the unit.
−Only have repairs carried out by customer service points authorised by OASE.
−The power connection cables cannot be replaced. When the cable is damaged, the unit or the component needs to
be disposed of.
−Only operate the unit if no persons are in the water!
−Keep the socket and power plug dry.
Assembly and installation (A-E)
Unit assembly (A)
Insert the fountain holder (1) in the opening in the floating body (2). Turn in screw (4) including washer (5) into the
boring. Turn on the cap nut (6) including washer (5) on screw (4) from below.
Attention: Only hand tighten the screw or cap nut respectively.
Screw the pump type Classic 70 (3) on the fountain holder from below. Lower the fountain into the water.
Operation with a 12 jet fountain (B)
Remove the perforated disc (3) and the large O ring (4). Screw plug (1) and the small O ring (2) in again. Keep the
perforated disc (3) and the large O ring (4) for nozzles with a 1” connection (not part of our delivery).
Operation of the unit with a 1” nozzle ( C ) (not part of our delivery).
Place the perforated disc (3) and the large O ring (4) on the fountain (5). Screw nozzle (7) including the small O ring (2)
in the centre. Keep the plug (1) for operating the 12 jet fountain.
Operation of the unit with the Lunaqua 5 triple string.
Attention! Adhere to the instructions of use for the spotlight. Ensure that the spotlights are fully submerged.
Setting up the unit (D, E)
The unit floats on the water. To keep it in position, the cables (e.g. plastic cables, not included in our scope of delivery)
are fastened to the unit and either to the bank or to the pond bottom.
Anchoring the unit to the bank (D): Fasten the cables (2) on the 3 eyebolts in the floating body (1). Uniformly distribute
and fasten the free cable ends at the pond bank or basin rim. Attention! Ensure that the cables do not pose any dan-
ger. Secure the area around the fountain unit. Moderately tension the cables to allow for water level changes. Atten-
tion: Pull relieve the connection cable and protect the power plug from moisture!
Anchoring the unit to the pond bottom (E): Fasten the cables (2) on the 3 eyebolts in the floating body (1). Measure the
water depth. Cut the cables (2) to length = water depth + 1 m. Attach the anchor weight to the free cable ends (weight
approx. 20 kg). Position the fountain unit on the water and lower the weight to the bottom of the water. Attention! Do
not tension the cables to allow for water level changes. Attention: Pull relieve the connection cable and protect the
power plug from moisture!

10
- GB -
Commissioning/start-up
Attention! Dangerous electrical voltage.
Possible consequences: Death or severe injury.
Protective measures:
−Prior to reaching into the water, disconnect the power supply to all units used in the water.
−Disconnect the power plug prior to carrying out work on the unit.
Switching on: Connect power plug to the socket. The unit switches on immediately when the power connection is
established.
Switching off: Disconnect the power plug.
Cleaning (B)
Disconnect the power plug (7) prior to starting cleaning work!
Remove fountain unit from the water. Hose down the floating body, the nozzle holder and the filter housing and clean
using a soft brush.
Cleaning the fountain: Undo the three fastening screws (6). Use a screw driver to lever the fountain out of its centring,
then remove the fountain (5). Remove soiling from the fountain holder. Reassemble the fountain in the reverse order.
Cleaning the pump: Detach the pump from the nozzle holder. Clean as instructed in the pump instructions for use.
Malfunction
Malfunction Cause Remedy
Pump does not start No mains voltage
Check mains voltage
Clean, check supply lines
Excessively soiled water Clean pumpPump switches off after a short running time
Water temperature too high Note maximum water temperature of +35°C
Storage/Over-wintering
Remove the fountain unit from the water if frost is to be expected. The unit freezing up could entail damage to the
floating body and the pump. Store the fountain unit in a frost protected place. Adhere to the instructions of use for the
pump.

71
DE Staubdicht. Wasserdicht bis 2 m
Tiefe.
Bei Frost, das Gerät deinstallieren! Nicht mit normalem Hausmüll
entsorgen!
Achtung!
Lesen Sie die Gebrauchsanweisung
GB Dust tight. Submersible to
2 m depth.
Remove the unit at temperatures
below zero (centigrade).
Do not dispose of together with
household waste!
Attention!
Read the operating instructions
FR Imperméable aux poussières.
Etanche à l'eau jusqu'à une
profondeur de 2 m.
Retirer l’appareil en cas de gel Ne pas recycler dans les ordures
ménagères !
Attention !
Lire la notice d'emploi
NL Stofdicht. Waterdicht tot een diepte
van 2 m.
Bij vorst het apparaat deïnstalleren! Niet bij het normale huisvuil doen! Let op!
Lees de gebruiksaanwijzing
ES A prueba de polvo. Impermeable al
agua hasta 2 m de profundidad.
Desinstale el equipo en caso de
heladas.
¡No deseche el equipo en la basura
doméstica!
¡Atención!
Lea las instrucciones de uso
PT À prova de pó. À prova de água até
2 m de profundidade.
Em caso de geada, desinstalar o
aparelho!
Não deitar ao lixo doméstico! Atenção!
Leia as instruções de utilização
IT A tenuta di polvere. Impermeabile
all'acqua fino a 2 m di profondità.
In caso di gelo disinstalllare
l'apparecchio!
Non smaltire con normali rifiuti
domestici!
Attenzione!
Leggete le istruzioni d'uso!
DK Støvtæt. Vandtæt ned til 2 m dybde. Afmonter apparatet ved frostvejr! Må ikke bortskaffes med det
almindelige husholdningsaffald.
OBS!
Læs brugsanvisningen
NO Støvtett. Vanntett ned til 2 m dyp. Ved frost, demonter apparatet! Ikke kast i alminnelig husholdning-
savfall!
NB!
Les bruksanvisningen
SE Dammtät. Vattentät till 2 m djup. Demontera apparaten innan första
frosten!
Får inte kastas i hushållssoporna! Varning!
Läs igenom bruksanvisningen
FI Pölytiivis. Vesitiivis 2 m syvyyteen
asti
Laite on purettava ennen pakkasia. Älä hävitä laitetta tavallisen talous-
jätteen kanssa!
Huomio!
Lue käyttöohje
HU Portömített. Vízálló 2 m-es mélysé-
gig.
Fagy esetén a készüléket le kell
szerelni!
A készüléket nem a normál ház-
tartási szeméttel együtt kell
megsemmisíteni!
Figyelem!
Olvassa el a használati útmutatót
PL Pyłoszczelny. Wodoszczelny do
2 m głębokości.
W razie mrozu zdeinstalować
urządzenie!
Nie wyrzucaćwraz ze śmieciami
domowymi!
Uwaga!
Przeczytaćinstrukcjęużytkowania!
CZ Prachotěsný. Vodotěsný do hloubky
2 m.
Při mrazu přístroj odinstalovat! Nelikvidovat v normálním komunál-
ním odpadu!
Pozor!
Přečtěte Návod k použití!
SK Prachotesný. Vodotesný do hĺbky
2 m.
Pri mraze prístroj odinštalovať! Nelikvidovaťv normálnom komu-
nálnom odpade!
Pozor!
Prečítajte si Návod na použitie
SI Ne prepušča prahu. Ne prepušča
vode do globinen 2 m.
Ob zmrzali demontirajte napravo! Ne zavrzite skupaj z gospodinjskimi
odpadki!
Pozor!
Preberite navodila za uporabo!
HR Ne propušta prašinu. Ne propušta
vodu do 2 m dubine.
U slučaju mraza deinstalirajte
uređaj!
Nemojte ga bacati u običan kućni
otpad!
Pažnja!
Pročitajte upute za upotrebu!
RO Etanşla praf. Etanşla apă, pânăla
o adâncime de 2 m.
În perioadele cu îngheţdezinstalaţi
aparatul !
Nu aruncaţi în gunoiul menajer ! Atenţie !
Citiţi instrucţiunile de utilizare !
BG Защитено от прах.Водоустойчив
до дълбочина 2 м.
При опасност от измръзване
деинсталирайте уреда!
Не изхвърляйте заедно с
обикновения домакински боклук!
Внимание!
Прочетете упътването
UA Пилонепроникний.
Водонепроникний до 2 м.
Перед морозами пристрій
необхідно демонтувати
Не викидайте разом із побутовим
сміттям!
Увага!
Читайте інструкцію.
RU Пыленепрониц. Водонепрониц. на
глубине до 2 м.
При наступлении морозов прибор
демонтировать!
Не утилизировать вместе с
домашним мусором!
Внимание!
Прочитайте инструкцию по
использованию
CN 防尘。至 2 米深防水。 霜冻时,拆卸设备 ! 不要与普通的家庭垃圾一起丢弃! 注意!
请阅读使用说明书。

10375/07G
Other manuals for PondJet
2
Table of contents
Other Oase Water System manuals

Oase
Oase Aquamax Expert 20000 User manual

Oase
Oase Water Quintet Creative User manual

Oase
Oase ProfiClear Premium User manual

Oase
Oase Aquamax 2000 User manual

Oase
Oase FiltoClear Series User manual

Oase
Oase Water Jet Lightning Maintenance and service guide

Oase
Oase ProfiClear Premium TF-XL User manual

Oase
Oase SwimSkim 25 User manual

Oase
Oase ProfiClear Guard User manual