Oasser P1 User manual

Made in China

P1
Operation Manual
Electric Inflator

Contents
English
Operation Manual
Product Structure
Technical Parameters
Note
Advice To Users
Portable Electric Inflator Guide
01
01
03
03
04
05
04
Deutsch
Bedienungsanleitung
Produktstruktur
Technische Daten
Hinweis
Hinweise für Anwender
Handbuch der tragbaren und elektrischen Luftpumpe
06
06
08
08
09
10
09
Italia
Manuale d’uso
Struttura del prodotto
Parametri Tecnici
Nota
Avviso per gli utenti
Guida pompa elettrica portatile
11
11
13
13
14
15
14
Español
Manual de uso
Descripción
Parámetros técnicos
Nota
Aviso a los usuarios
Guía del inflador portátil eléctrico
16
16
18
18
19
20
19

Contents
Français
Mode d’emploi
Structure du produit
Paramètres techniques
Notes
Avertissements
Guide du gonfleur électrique portable
21
21
22
23
24
25
23

Operation Manual
English
Thanks for choosing Oasser P1 Mini Electric Inflator.
Please read this manual carefully before using it.
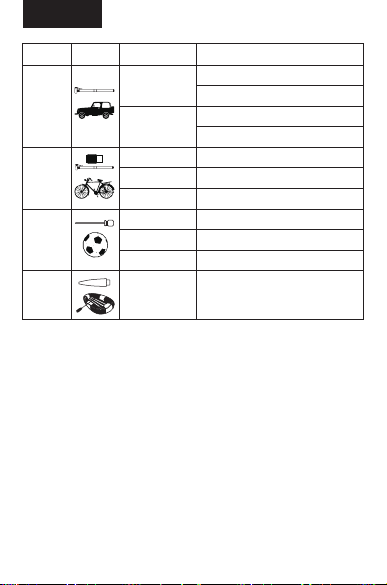
This inflator can be applied to cars, bicycles, moto-
rbikes, balls, inflatable toys and etc. Digital inflator can
measure the tyre pressure and be used as flashlight.
1. Rechargeable inflator should be well charged in
advance.
2. Please connect one end of air tube to inflator and
plug the other end of it to tyre valve core. For
French valve, it should be connected to the French
inflator at first.
3. Please press “UNIT” button to set pressure in PSI,
BAR, KPA, or kg/cm2 on activated screen.
4. Please press “+” & “-” to set the desired pressure.
5. Please press power switch to start inflating.
1
6. Repeatedly press “UNIT” button, the ATMOS will
transform to PSI, BAR, KPA, or kg/cm2. The screen
will show the real data.
7. “+” & “—” are preset keys. You can shortly press
them to set the desired pressure slowly, and long
press to set the desired pressure quickly (Reference
pressure : ordinary bicycle is 30~35psi,mountain
bicycle is 50~60psi,road bicycle is 80~100psi,car
is 32~38psi). Setting will be completed after the
screen flashes for 4 seconds. Or you can press the
“UNIT” button to finish the setting. Then please
press power switch for inflating.

English
8. Digital inflator will stop inflating automatically when it
inflates the tyre to the preset pressure. Please press
power switch to turn off the LED light.
9. Please note that the tube will get hot after the
inflator has worked for a long time. So please don’t
pull out the tube from valve core and from inflator
until it’s cooled down. And then please store the
inflator and keep it dry.
2
Product Structure
“+” and “—”
”UNIT” key
Power switch
Charging port
LCD screen
Inflator
Air tube
Home adaptor
Car charger

1. Input voltage: adaptor 15V DC, cigarette lighter 12V
DC.
2. Max current: 5A.
3. Inflator efficiency: Inflate 26*1.95 mountain bicycle
tire from 0 to 50 psi in 2.5 minutes.
4. Max pressure: 150psi.
5. Operation temperature: -20℃~+60℃.
6. Size: 54.8(L)×44.8(W)×198(H)mm.
Technical Parameters
English
3
1. Children are forbidden to use this inflator. Please
keep it away from children.
2. Do not use it at inflammable and explosive areas.
(eg. Oil station)
3. To ensure the product has a long lifetime, please
have it rest for 8 minutes in every 8 minutes inflating
time.
4. Please stop the products for 15 minutes when the
temperature is too high or it has unnormal noise
when inflating.
5. Please keep it away from rain, water, falling, and
bumping.
6. Please have it charged every half year.
7. Please make sure the power is enough before using
the rechargeable inflator. If not, please check the
cigarette plug and fuse and ensure the inflator is
charging while inflating
Note

For your and other’s safety, please use the inflator and
accessories according to the the manual provided by
manufacturer. It may cause danger if you use methods
not mentioned in the manual.
Advice To Users
English
4
1. Tire pressure value is based on the recommended
value of the car factory, and the tire sidewall will
only shows the maximum inflation pressure in the
case of tire cooling; where you can find the standard
tire pressure information: Vehicle User Manual,
Driver Door Stickers, Storage Drawer, and Cylinder
Door.
2. Note: This electric inflator cannot be used for trucks,
vans, and buses.
3. 1PSI = 0.07Kgf/cm²= 0.07BAR = 7KPA
1Kgf/cm2 = 1BAR = 98KPa = 14.22PS
Portable Electric Inflator Guide

English
5
Category
Car
Bicycle
Ball
Kids Toys
Situation
Winter
Summer
Ordinary Vehicle
Mountain Bike
Road Bike
Volleyball
Basketball
Football
Normal pressure (for reference only)
The Front Tire: 2.5kg/cm²
The Rear Tire: 2.8kg/cm²
The Front Tire: 2.2kg/cm²
The Rear Tire: 2.5kg/cm²
30-35 PSI
50-60 PSI
80-100 PSI
6PSI (0.0425MPa)
9PSI(0.06MPa)
10PSI(0.07MPa)
6PSI
Picture

Bedienungsanleitung
Deutsch
Vielen Dank, dass Sie sich für unsere elektrische,
tragbare Luftpumpe entschieden haben.
Das Produkt kann angewendet werden: bei Autos,
Fahrrädern, Motorrädern, Bällen, aufblasbares
Spielzeug usw. Digitaler Inflator kann den Reifendruck
messen und als Taschenlampe verwendet werden.
1. Wiederaufladbare Luftpumpe sollte im Voraus gut
aufgeladen werden.
6
2. Verbinden Sie ein Ende des Luftschlauches mit der
Luftpumpe, stecken Sie das andere Ende an das
Reifenventil. Für das französische Ventil verbinden
Sie es erst mit dem passenden französischen
Adapter.
3. Drücken Sie die Taste "UNIT", um den Druck in PSI,
BAR, KPA oder kg/cm2 auf dem aktivierten
Bildschirm einzustellen.
4. Drücken Sie "+" und "-" um den gewünschten Druck
auszuwählen.
5. Drücken Sie nun den Netzschalter um mit dem
Aufpumpen zu beginnen.
6. Drücken Sie wiederholt die Taste „Unit (Einheit)“,
um zwischen den Einheiten PSI, Bar, KPA oder
kg/cm² zu wechseln. Der Bildschirm zeigt die
genauen Daten an.

Deutsch
7
Produktstruktur
“+” und “—”
„Unit“
(Einheit) Taste
Netzstecker
Aufladestation
LCD
7. "+" und "-" sind voreingestellte Tasten. Sie können
sie kurz drücken, um den gewünschten Druck
langsam einzustellen, und lange drücken, um
den gewünschten Druck schnell einzustellen.
(Referenzdruck: normales Fahrrad: 30 ~ 35psi,
Mountainbike ist 50 ~ 60psi, Straßenrad ist 80
~ 100psi, Auto ist 32 ~ 38psi). Sobald der Bildschirm 4
Sekunden flackert ist die Einstellung abgeschlos-
sen oder wenn Sie die Taste “Unit (Einheit)” drücken,
um die Einstellungen zu beenden. Danach drücken
Sie den Netzschalter zum Aufpumpen.
8. Durch die intelligente Digitalmessung wird der
Aufpumpvorgang abgebrochen, sobald der Sollwert
erreicht ist. Wenn jetzt der Netzschalter gedrückt
wird, erlischt das LED-Licht.
9. Bitte beachten Sie, dass der Schlauch sehr heiß wird,
nachdem die Pumpe für eine lange Zeit gearbeitet hat.
Bitte schrauben Sie den Schlauch nicht vom Ventil
und von der Pumpe ab, bis es abgekühlt ist. Halten
Sie bitte die Luftpumpe trocken.

1. Kinder ist es untersagt, diese Luftpumpe zu
benutzen. Bitte halten Sie ihre Kinder fern.
2. Bitte benutzen Sie es nicht in brennbaren und
explosionsgefährdeten Bereichen (Beispiel
Tankstelle).
3. Um eine lange Lebensdauer des Produktes zu
gewährleisten, empfiehlt es sich das Gerät alle 8
Minuten für 8 Minuten ruhen zu lassen.
Hinweis
1. Eingangsspannung: Adapter 15V DC, Zigarette
nanzünder 12V DC.
2. Max. Strom: 5A.
4. Max. Aufblasdruck: 150psi.
5. Betrieb-Temperatur: -20℃~+60℃.
6. Größe: 54.8(L)×44.8(W)×198(H)mm.
Technische Daten:
Deutsch
8
Luftpumpe
Luftschlauch
Hauptadapter
(für zu Hause)
Autoladegerät
3. Inflator-Effizienz: Aufpumpen 26 * 1.95 Mountain-
bike-Reifen von 0 bis 50 psi in 2,5 Minuten.

Für Ihre und die Sicherheit anderer benutzen Sie bitte
die Luftpumpe und das Zubehör entsprechend der
Anweisung des Herstellers. Bitte für keine anderen
Anwendungen nutzen, die nicht in der Anleitung
erwähnt sind.
4. Sollte das Gerät zu heiß werden oder außergewöhnliche
Geräusche von sich geben, stoppen Sie bitte den Gebrauch
des Gerätes für 15 Minuten.
5. Halten Sie es fern von Regen oder Wasser und
vermeiden Sie, dass das Gerät runterfällt bzw.
irgendwo gegenstößt.
6. Bitte laden Sie es jedes halbe Jahr auf.
7. Stellen Sie sicher, dass die Energie genügend
Energie vorhanden ist und überprüfen Sie den
Zigarettenstopfen und -sicherung, bevor Sie die
Luftpumpe benutzen. Bitte nicht den Motor
ausschalten, während des Aufpumpvorgangs.
Hinweise für Anwender:
Deutsch
9
1. Der Reifendruckwert basiert auf dem empfohlenen
Wert der Autofabrik und die Reifenseitenwand zeigt
nur den maximalen Aufblasdruck im Fall der
Reifenkühlung an; Wo Sie die Informationen des
Standard-Reifendruckes: Fahrzeug-Benutzerhand
buch, Aufkleber auf der Fahrertür, Aufbewahrungss
chublade und Türzylinder.
Handbuch der tragbaren und
elektrischen Luftpumpe

2. Hinweis: Diese elektrische Luftpumpe kann nicht für
Lastkraftwagen, Transporter und Busse verwendet
werden.
3. 1PSI = 0.07Kgf/cm²= 0.07BAR = 7KPA
1Kgf/cm2 = 1BAR = 98KPa = 14.22PS
Deutsch
10
Kategorie
Auto
Fahrrad
Ball
Kinderspiel-
zeuge
Situation
Winter
Sommer
Normales Fahrzeug
Mountainbike
Straßenrad
Volleyball
Basketball
Fußball
Normaldruck (nur als Referenz)
Vorderreifen: 2.5kg/cm²
Hinterreifen:2.8kg/cm²
Vorderreifen: 2.2kg/cm²
Hinterreifen:2.5kg/cm²
30-35 PSI
50-60 PSI
80-100 PSI
6PSI (0.0425MPa)
9PSI(0.06MPa)
10PSI(0.07MPa)
6PSI
Foto

Manuale d’uso
Italiana
Grazie per aver scelto Oasser P1 Mini Pompa Elettrica.
Si prega di leggere questo manuale con attenzione prima
di usarla.
Questa pompa può essere usata con le macchine,
biciclette, moto, palloni, giocattoli gonfiabili etc. La pompa
digitale può misurare la pressione degli pneumatici ed
essere usata come una torcia.
1. La pompa ricaricabile deve essere caricata bene in
anticipo.
11
2. Si prega di collegare un'estremità del tubo dell'aria
della pompa e collegare l'altra estremità di esso con
il nucleo della valvola del pneumatico. Per la valvola
francese, deve essere collegato prima alla pompa
francese.
3. Si prega di premere il pulsante “UNIT” per
impostare la pressione in PSI, BAR, KPA, o kg/cm2
sullo schermo attivato.
4. Si prega di premere “+” & “-” per impostare la
pressione desiderata.
5. Si prega di premere l’interruttore di alimentazione
per iniziare a gonfiare.
6. Premendo ripetutamente il pulsante “UNIT”, ATMOS
cambierà in PSI, BAR, KPA, or kg/cm2. Lo schermo
mostrerà i dati reali.

7. “+” & “—” sono tasti preimpostati. Puoi premerli
brevemente per impostare la pressione desiderata
lentamente, e premere a lungo per impostare la
pressione velocemente. ( Pressione di riferimento :
bicicletta normale 30~35psi,mountain bike 50~
60psi,bicicletta da strada 80~100psi, macchina
32~38psi). L’impostazione sarà completata dopo
che lo schermo avrà lampeggiato per 4 secondi. O
puoi premere il pulsante “UNIT” per terminare
l’impostazione. Quindi premi l’interruttore per
gonfiare.
Italiana
12
Struttura del prodotto
“+” e “—”
Pulsante ”UNIT”
Interruttore
Porta carica batteria
Schermo LCD
8. La pompa digitale smetterà di gonfiare automaticamente
quando il pneumatico sarà gonfiato alla pressione
prestabilita. Si prega di premere l’interruttore per spegnere
il LED.
9. Si prega di notare che il tubo diventerà caldo dopo il
gonfiaggio perchè ha lavorato per un lungo periodo di
tempo. Quindi per favore non tirare fuori il tubo dal
nucleo della valvola e dal gonfiaggio fino a quando non
si sarà raffreddato. E quindi si prega di riporre la pompa
e tenerla in un luogo asciutto.

Nota
1. Input voltaggio: adattatore 15V DC, accendi sigari
12V DC
2. Corrente massima: 5A
3. Efficienza pompa: gonfiaggio 26*1.95 pneumatico
mountain bike da 0 to 50 psi in 2.5 minuti.
4. Pressione massima: 150psi
5. Temperatura in uso: -20℃~+60℃
6. Grandezza : 54.8(L)×44.8(W)×198(H)mm
Parametri Tecnici
Italiana
13
Pompa
Tubo dell’aria
Adattatore
Carica batteria
per la macchina
1. I bambini non possono usare questa pompa. Si
prega di tenerla lontana dalla portata dei bambini.
2. Non usare in aree infiammabili. (es. distributore
di benzina)
3. Per garantire al prodotto una lunga durata, farlo
riposare per 8 minuti ogni 8 minuti ditempo di
gonfiaggio.

Per la vostra ed altrui sicurezza, si prega di utilizzare
la pompa e gli accessori seguendo il manuale fornito
dal produttore. Può causare pericolo se si utilizzano
metodi non menzionati nel manuale.
Avviso per gli utenti
Italiana
14
Guida pompa elettrica portatile
1. Il valore di pressione della gomma è basato sul
valore raccomandato della fabbrica di automobili,
e il fianco del pneumatico mostrerà solo la
massima pressione di gonfiaggio in caso di
raffreddamento del pneumatico; dove è possibile
trovare le informazioni di pressione dei pneumatici
di serie: Manuale dell'utente, Driver Door Stickers,
Storage Drawer, and Cylinder Door.
4. Si prega di interrompere l’uso del prodotto per
15 minuti quando la temperatura è troppo alta o
ha rumore inusuale durante il gonfiaggio.
5. Si prega di tenerlo lontano da pioggia, acqua,
cadute e urti.
6. Si prega di caricarlo ogni 6 mesi.
7. Si prega di accertarsi che l'alimentazione sia
sufficiente prima di utilizzare la pompa ricaricabile.
In caso contrario, si prega di controllare la spina
dell’accendi sigari e fusibile ed accertarsi che
la pompa sia carica durante il gonfiaggio.

Italiana
15
Categoria
Macchina
Bicicletta
Palloni
Giochi
Situazione
Inverno
Estate
Veicolo ordinario
Mountain Bike
Road Bike
Volleyball
Basketball
Football
Pressione normale (solo per informazione)
The Front Tire: 2.5kg/cm²
The Rear Tire:2.8kg/cm²
The Front Tire: 2.2kg/cm²
The Rear Tire:2.5kg/cm²
30-35 PSI
50-60 PSI
80-100 PSI
6PSI (0.0425MPa)
9PSI(0.06MPa)
10PSI(0.07MPa)
6PSI
2. Nota: Questa pompa elettrica non può essere
utilizzata per camion, furgoni e autobus.
3. 1PSI = 0.07Kgf/cm²= 0.07BAR = 7KPA
1Kgf/cm2 = 1BAR = 98KPa = 14.22PS
Foto

Manual de uso
Español
Graciar por escoger Oasser P1 Mini Inflador Eléctrico.
Por favor lea este manual con detenimiento antes de
usar el producto.
Este inflador puede ser usado en coches, bicicletas,
motocicletas, balones, juguetes hinchables, etc… El
inflador digital puede medir la presión del neumático y
ser usado también como linterna.
16
1. La batería del inflador debe estar previamente
correctamente cargada. para ser usado sin
conectar al enchufe.
2. Por favor conecte un extremo de la tubería al inflador
y el otro extremo a la válvula del neumático.Para el
tipo de válvula francesa o Presta hay que conectar
también el adaptador suministrado especialmente
para este tipo de válvula.
3. Pulsar el botón “UNIT” para fijar la presión en PSI,
BAR, KPA, or kg/cm2 en la pantalla.
4. Pulsar el botón “+” o “-” para fijar la presión deseada.
5. Pulsar el botón de encendido para comenzar a inflar.
6. Pulsar repetidamente el botón “UNIT”, y el valor en
ATMOS pasará a PSI, BAR, KPA, or kg/cm2. La pantalla
mostrará el dato real.
7. “+” o “—” son los botones para fijar un valor. Para
ajustar el valor despacio hay que pulsar brevemente
esos botones. Para ajustar el valor rápidamente
hay que pulsar prolongadamente esos botones.
Table of contents
Languages:
Other Oasser Power Tools manuals