OBELAB NIRSIT User manual


History of Revision
i
History of Revision
Version
Revised date
Details
Remarks
2.2
18.01.11
Revision based on v2.2
2.6
21.04.15
Update based on v2.2 (Visualize NIRSIT
information (FW version and Battery),
Select of the type of Event markers)

Notation
ii
Notation
Notation is a series of special symbols or conventions used in this manual to denote different
items.
This manual uses the following notation for users’ better understanding of the device:
Notation
Description
“ ”
Used to denote a reference.
Example: See "Chapter 1. Overview."
Bold
Used to denote GUI elements such as menus and buttons.
Example: Click the STOP button.
>
Used to list several menus or buttons in sequence.
Example: Click the STOP > OPEN buttons.
Used to divide or list items of the same level in an organized way.
Used to describe a work procedure in order.
Used to name or describe components of an image.

Table of Contents
iii
Table of Contents
History of Revision ...................................................................................................... i
Notation ..................................................................................................................... ii
Table of Contents .......................................................................................................iii
1. Installation ...................................................................................................... 1
1.1 NIRSIT EYE PC Installation ............................................................................................ 1
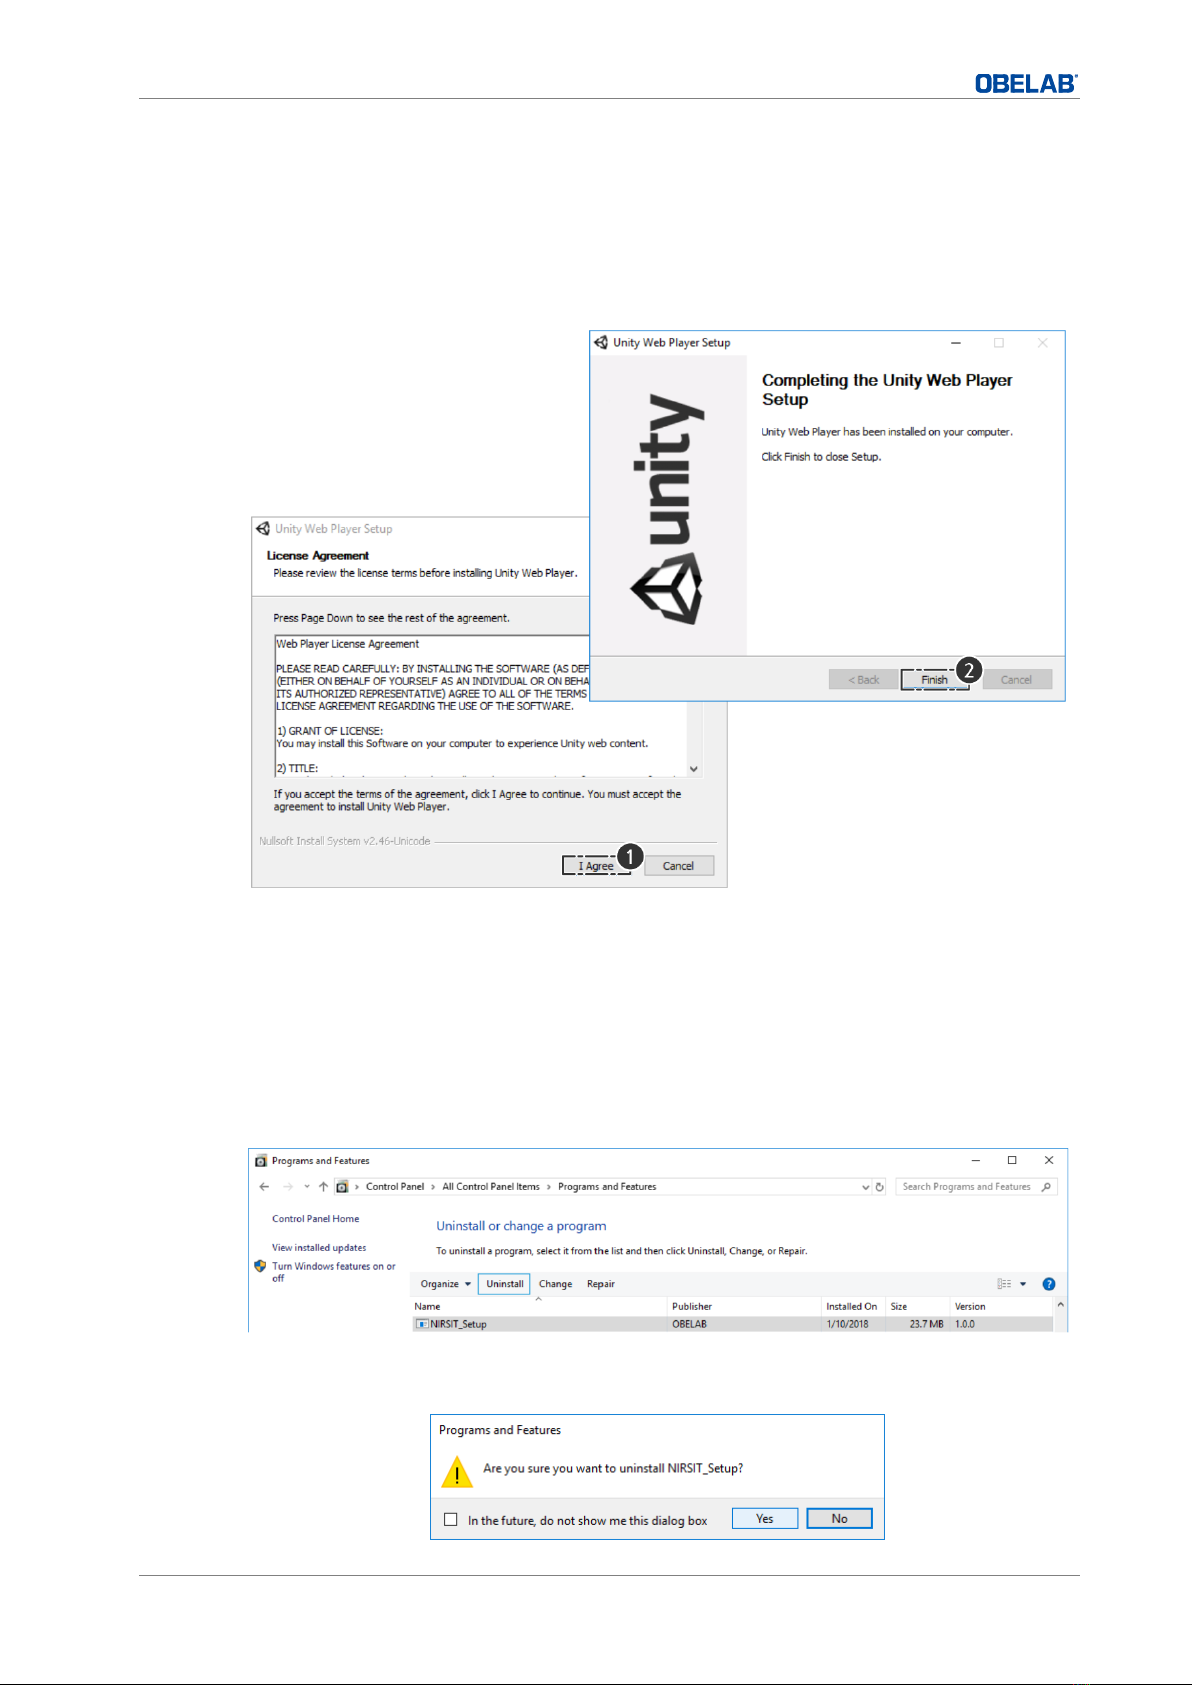
1.2 Install Unity Web Player................................................................................................. 3
1.3 Remove existing program .............................................................................................. 3
2. NIRSIT EYE PC Introduction............................................................................ 5
2.1 Overview of NIRSIT EYE PC ........................................................................................... 5
2.2 Communication Config Panel.......................................................................................... 6
2.3 Gain Calibration............................................................................................................. 7
2.4 Measurement ................................................................................................................ 8
2.4.1 Timer and DSP .................................................................................................. 9
2.4.2 Device Control..................................................................................................10
2.4.3 Visualization Mode............................................................................................12
2.5 REPLAY process............................................................................................................13
2.6 SYNC process...............................................................................................................15
2.6.1 Localhost .........................................................................................................15
2.6.2 PC1 to PC2.......................................................................................................16
2.6.3 Broadcast ........................................................................................................17
3. DbExtractor Introduction .............................................................................. 19
3.1 Run Extraction .............................................................................................................19
3.2 Convert DB Data File to CSV file ....................................................................................21

Table of Contents
iv

Installation
1
1. Installation
1.1 NIRSIT EYE PC Installation
IMPORTANT
▪Program installation conditions: Install “NIRSIT_Setup.msi” in a solid-
state drive (SSD) PC. It is not compatible with a hard disk drive (HDD)
PC.
▪If you already have a previous version of the NIRSIT program on your
PC, you should remove it from the control panel first.
1 Click NIRSIT_Setup.msi file to install NIRSIT EYE PC tool.
2 Click Next button following each step.
The access path is as follows:
Welcome to the NIRSIT_Setup Setup Wizard ▶Select Installation Folder ▶Confirm
Installation

Installation
2
3 To complete the program installation, click Yes and then Close button.
4 The NIRSIT_PC shortcut icon will be installed on the start screen.

Installation
3
1.2 Install Unity Web Player
To display the unity 3D brain model, setup the Unity Web Player.
▪Click the UnityWebPlayerFull.exe icon to install the Unity Web Player.
1.3 Remove existing program
1 If you already have a previous version of NIRSIT program on your PC, you should remove
it from the control panel first.
The access path is as follows:
Control Panel ▶Programs ▶Programs and Feature ▶“NIRSIT_Setup”Uninstall.
2 Once the previous version is completely removed, install the new “NIRSIT_Setup.msi”
version.

Installation
4

NIRSIT EYE PC Introduction
5
2. NIRSIT EYE PC Introduction
The NIRSIT EYE PC tool is a measurement software with a connecting NIRSIT device. It helps
to save the measured data and change or extract the data into a functional csv format. The
tool extracts the information from the events based on the TCP/IP of an additional task
program, synchronizes them with the task, and then changes to a suitable data form for
analysis.
2.1 Overview of NIRSIT EYE PC
No.
Description
1
Communication Config panel
2
SYNC Mode panel
3
Log panel
4
Device control panel
5
Gain calibration result panel
6
Execute dbExtractor button
7
Gain calibration panel
8
Replay control panel
9
Timer and DSP panel
10
NIRSIT equipment information panel

NIRSIT EYE PC Introduction
6
2.2 Communication Config Panel
Choose Serial or Wireless for connection between the NIRSIT EYE PC tool and NIRSIT
device.
Connecting to Serial port
1 Select the Serial checkbox to connect to the serial port.
2 Select the COM port and click Open button.
“Comport Connected” is displayed in the Log panel.
If the COM port is not recognized, refer to “FT232 Setup Guide”.
Connecting to Wireless
1 Select the Wireless checkbox to connect to wireless.
2 Select the matched WLAN’s SSID with with the NIRSIT device and click Connect button.
“TCP Socket Connected” is displayed in the Log panel (WLAN password: 12345678)

NIRSIT EYE PC Introduction
7
2.3 Gain Calibration
1 Click Gain Cal Start button to start the calibration on the Gain calibration panel.
2 Click Apply button to register the available channel referred to SNR level (30 DB)
3 Click Gain Cal Stop button to stop calibration on the Gain calibration panel.
4 Check the result for Gain calibration.
No.
Description
1
LD, PD status
2
Information of rejected channel
3
SNR result of 780, 850’s laser detector

NIRSIT EYE PC Introduction
8
2.4 Measurement
▪The access path is as follows:
Communication Config ▶Time and DSP ▶Device Control
No.
Description
1
Time and DSP
2
Device Control
3
Visualization Mode

NIRSIT EYE PC Introduction
9
2.4.1 Timer and DSP
The DSP is marked automatically when measured.
No.
Name
Description
1
Timer
measures time
2
LPF
removes high frequency signal
3
CHRej
displays when the signal quality is good
4
MBLL
displays oxy and deoxy hemoglobin
5
HeartBeat
removes heartbeat singnal

NIRSIT EYE PC Introduction
10
2.4.2 Device Control
1 Click Measure Start button to start measure.
The input window for Subject name and Memo appear.
2 Insert the subject name and memo.
The information is registered to the Subject Name & DB List.
NOTE
The Log panel displays all the procedure.

NIRSIT EYE PC Introduction
11
No.
Name
Description
1
Measure Start/
Measure Finish
Start measurement/ Finish measurement
2
Baseline
Reset the hemodynamic result
3
Y Axis Set/ Auto
Y Axis scale can be changeable when the value is set. (default
Auto)
Y Axis Scale Range: -0.002~0.002
4
Marker
The marker links to the database.
▪When the checkbox is selected, the number (1-4) is saved in
the marker region of the database.
Task A Start: The number “1” is saved.
Task A End: The number “2” is saved.
Task B Start: The number “3” is saved.
Task B End: The number “4” is saved.

NIRSIT EYE PC Introduction
12
2.4.3 Visualization Mode
NIRSIT EYE PC Tool has three modes for visualization.
3D Brain Model
Graph
2D Map

NIRSIT EYE PC Introduction
13
2.5 REPLAY process
To control the replay process, use the buttons on the replay control panel.
1 Select DB: click the button and select the database file (nirsit_export.db).
(C:\OBELAB\NIRSIT_Setup\nirsit_export.db)
2 Select the subject list. Then, click the buttons; “play”, “stop”, “forward” and “backward”.
NOTE
▪When clicking the forward button, it moves 5 seconds forward.
▪When clicking the backward button, it moves 5 seconds back.

NIRSIT EYE PC Introduction
14
Delete List
Select the subject list to delete and click Delete List button.
The subject list will be deleted.
Open DB SNR
Select the DB list and click Open DB SNR button on the reply control panel.
It shows the information of channel rejection by subject.
Table of contents
Other OBELAB Medical Equipment manuals