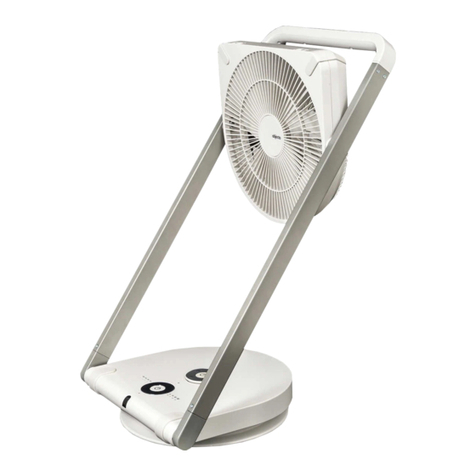
Objecto F5 User manual

USER MANUAL
192001aF5FKLS-302DEng.indd1192001aF5FKLS-302DEng.indd1 2019/04/1018:36:352019/04/1018:36:35

2
English
Safety Information
Before use, be sure to carefully read this manual on safety to ensure
that you use this product correctly. Always follow these instructions
when using the product.
WARNING
In order to avoid any electrical shock, short-circuit, burns, or cause a
fire:
Do not disassemble. This product may only be disassembled by qualified repair technicians. To•
request repair, see Warranty Page at the back of this manual.
Do not use if the power cord or plug is damaged, or if the plug is not fully inserted into the•
outlet.
Do not scratch, damage, modify, forcibly bend, pull, twist, bind/clamp, or place heavy objects on•
the power cord.
Do not insert metal objects, such as pins, wires, or other foreign materials into any gaps of the•
product.
Do not allow children to use this product by themselves, and keep product and power cords out•
of the reach of small children.
Use only with the designated power supply 110 – 120 V.•
If you notice anything unusual during operation (burning smell, smoke, etc.), immediately stop•
use, and unplug the power cord.
Insert the power plug all the way into the outlet. Use a wall outlet rated at 15A or
greater, with no other devices plugged in.
Wipe off any dust adhering to the power plug blades and plug surface.
If any liquid leaks from the battery of the remote control and gets in your eyes, do not
rub them; rinse them out with water and see a doctor.
When cleaning the product, for safety’s sake be sure to unplug it from the outlet.
Do not plug or unplug the product while your hands are wet.
Never use in a location that produces flammable or corrosive gases, or where they
accumulate.
Always allow the unit to cool down before picking it up for service or storage.
Do not use close to walls or furniture.
Do not use in unstable locations or on flooring that may be easily damaged by heat.
Do not use for other purposes, such as drying things. Do not put clothing or laundry
on or over the fan.
When cleaning the product, do not use household detergent, thinner, benzene,
alcohol or a polishing powder or spray.
192001aF5FKLS-302DEng.indd2192001aF5FKLS-302DEng.indd2 2019/04/1018:36:362019/04/1018:36:36

3
English
For remote control batteries, do not use any other than specified.
Do not leave the battery of the remote control in a hot location or in direct sunlight.
When unplugging the power cord, always unplug by grasping the power plug, not by
pulling on the power cord.
Face the terminals +/- correctly when putting the battery in the remote control.
Remove the battery from the remote control when it will not be used for a long time.
Do not touch areas that get extremely hot, such as the heat grill, the top panel and the
back of the unit while in use and for some time afterwards.
192001aF5FKLS-302DEng.indd3192001aF5FKLS-302DEng.indd3 2019/04/1018:36:362019/04/1018:36:36

4
English
Name and Function of Each Part
Front
Front grille
Center mark shell (aroma circle disk)
Blade
Unit top
Base part
Air volume adjusting knob
Remote control receiver
Middle tube part
Middle tube
To use the maximum height, insert the middle
tube into the base, the top into the middle tube.
Rear
Rear grille
Handle
Remote storage area; store the remote control here
when it is not in use
Hanging hook
DC plug
Lock
To remove the top grill, push button.
DC plug
DC cord
AC adapter
AC adapter
192001aF5FKLS-302DEng.indd4192001aF5FKLS-302DEng.indd4 2019/04/1018:36:362019/04/1018:36:36

5
English
(A)
⑥(B)
(C)
(D)
①②③④⑤
Operation part of main unit
①
②③④⑤
⑦
⑨
⑧
Remote control
(A) Air volume light
Indicates the air volume; when the air volume increases, the light turns on
from left to right
(B) Swing light
The light turns on when swing function is enabled.
(C) Timer light
Schedule on timer is green and the schedule off timer is red.
(D) Natural/sleep wind light
The white light turns on in natural wind mode and the blue light turns on in
sleep wind mode.
①Power button
Start/stop running.
②Swing button
Start/stop swing.
③Timer button
Set the time for schedule power on/off.
④Natural/sleep wind button
Switch between natural wind and sleep wind.
⑤Dimmer button
Enable or disable dimmer mode.
⑥Air volume adjusting knob
Adjust the air volume while unit is on.
⑦Air volume - button (remote control)
Reduce the air volume while unit is on.
⑧Air volume + button (remote control)
Increase the air volume while unit is on.
⑨Signal receiver (remote control)
Point the remote control at the signal receiver.
192001aF5FKLS-302DEng.indd5192001aF5FKLS-302DEng.indd5 2019/04/1018:36:362019/04/1018:36:36

6
English
Accessories included in box
Main unit.............................................................................................1
Middle tube.........................................................................................1
Dedicated AC adapter..........................................................................1
Remote Control ...................................................................................1
Coin lithium battery.............................................................................1
Replacement felt (1 in aroma circle disk)...............................................4
Manual (including Warranty Card)........................................................1
192001aF5FKLS-302DEng.indd6192001aF5FKLS-302DEng.indd6 2019/04/1018:36:362019/04/1018:36:36

7
English
Installation and Setup
Attention
Turn on the power only when the blades and guards have been properly
installed.
Assembly of base, middle tube and unit top1.
The middle tube can be removed or installed, and the height can be adjusted.
Enlarged View of Connection
Confirm the rod and hole size first, and insert the rods into the holes
at the same time.
Lock
The height is about 39” when the product is extended.
Put the base on a stable position.
1
Insert the middle tube into the base.
2
Insert the unit top into the middle tube.
3
Unit top
Middle tube part
Base part
1
2
3
Rear
192001aF5FKLS-302DEng.indd7192001aF5FKLS-302DEng.indd7 2019/04/1018:36:362019/04/1018:36:36

8
English
The height is about 22” when the middle tube is not used.
Put the base on a stable position.
1
Press the lock button to remove the unit top and middle tube.*
Rear
1
2
Attention
There should be no gaps between the connected parts.
If the installation is not connected properly, the fan may shake or dislodge.
Put the main unit on a stable level place2.
Hold the handle to pick up and move the main unit.•
Use a dedicated AC adapter3.
DC jack
DC plug
Cable hook
DC cord
1
2
Please insert the DC plug of the AC adapter is into the DC jack on the back of
1
the base.
In order to avoid tripping over the cord, hook it to the base.
2
192001aF5FKLS-302DEng.indd8192001aF5FKLS-302DEng.indd8 2019/04/1018:36:362019/04/1018:36:36
9
English
Install the battery into the remote contro4.
Remote control shell
Battery case
1
Pull out the battery case from the main unit of the remote control and pull out
1
the battery holder from the gap.
2
3
Insert the coin lithium battery into the battery case.
2
Pay attention to the polarity of the battery Insert the coin lithium battery into the
battery case.
Re-Insert the battery case into the main unit of the remote control until you hear
3
a click sound.
Attention
Remove the battery when it is not used for a long time.•
The positive and negative terminals of the battery must be installed•
correctly.
When liquid leakage occurs, clean it completely before inserting a new•
battery.
When the remote control is not in use
Please place the remote control in the storage area behind the grille.
4
The remote control will adhere to the magnet.
Attention
Do not place the remote control in chest pocket if you are using a cardiac
pacemaker.
Range
About 15 feet in front of the main unit.•
About 30° to the left and right sides in front of the main unit.•
If there is an obstacle between the remote control and the main unit, the remote control•
may not work properly.
When the DC plug is inserted into the power outlet, the product emits a5.
sound.
192001aF5FKLS-302DEng.indd9192001aF5FKLS-302DEng.indd9 2019/04/1018:36:362019/04/1018:36:36

10
English
Correct Use of the Fan
Start/stop operation
Start operation1.
Simply press the power button on the main unit or remote control to start the
operation.
In normal use, the air volume and swing angle will default to the setting when it•
was turned off last time because of the memory function.
When the AC adapter is removed from the plug, the device will automatically*
restore the initial settings.
[Initial setting] Air volume: Minimum; Swing: None.
Adjustment of air volume2.
When the fan is on, you can turn the air volume knob on unit to the right or press
+ on the remote control to increase the air volume. Press the knob to the left or
press − on the remote control to reduce the air volume.
Air volume light band
Weak Strong
E.g. current air
volume
Operation part of main unit
Turn left − Weak Turn right + Strong
Air volume adjusting knob
Remote control
+ Air volume
Strong
− Air volume
Weak
192001aF5FKLS-302DEng.indd10192001aF5FKLS-302DEng.indd10 2019/04/1018:36:362019/04/1018:36:36

11
English
Start natural /sleep wind function3.
Press the natural/sleep wind button on the main unit or the remote control
during operation to switch functions.
About natural wind/sleep wind
Natural wind (white LED turns on)
Both high level and low level can reproduce natural wind.
Press the + and the − button on the unit or the remote control to adjust the air
volume.
Sleep wind (blue LED turns on)
Both high level and low level can reproduce natural wind.
Press the + and the − button on the unit or the remote control to adjust the air
volume.
Slight Weak Moderate Strong
Strong wind Strong Moderate Weak Slight, charge with time
Moderate wind Moderate Weak Slight, charge with time
Weak wind Weak Slight, charge with time
Slight wind Slight, same with natural wind
Air volume light band still displays as set.*
Start/stop swing4.
The left/right swing angle of the fan can be set to 30°, 60° or 90°.
When you plug the AC adapter into the outlet and press the <swing> button•
on the main unit or the remote control, the 30° LED turns on and the fan start
swing.
Swing 30°
(“30°” LED on)
Swing 60°
(“60°” LED on)
Swing 90°
(“90°” LED on)
Swing canceled
(Swing LED off)
192001aF5FKLS-302DEng.indd11192001aF5FKLS-302DEng.indd11 2019/04/1018:36:362019/04/1018:36:36

12
English
90°
60°
30° Swing to left and right
The swing angle can be manually adjusted by 70° upwards, 10° downwards and
60° horizontally.
10° downwards 70° upwards
Enabling/disabling dimmer mode5.
If the air volume light band or LED light is too bright, you can press the Dimmer
button on the unit or the remote control to dim the light; press it again to cancel
dimmer function.
192001aF5FKLS-302DEng.indd12192001aF5FKLS-302DEng.indd12 2019/04/1018:36:372019/04/1018:36:37

13
English
Timer Setting - Off timer
You can set the off timer and the fan stops automatically after the set
time.
When the fan is running, you can press the timer button1. to set the off
timer, and the red LED light will turn on.
Press the button on the unit or remote control to set the time of schedule
operation.
To cancel the timer, press the2. button on the unit or remote control and
the timer LED light will turn off.
Timer Setting - On timer
You can set the on timer and the fan starts automatically at the set time.
When the fan is off, you can press the timer button1. to set the on timer
and the green LED turns on.
The product integrates memory function, and the air volume LED and swing•
LED of last mode will flash. The time of on timer displays in the on timer setting
menu.
About timer LED
Timer LED
When you press the Timer button on the unit or the remote control, the timer
LED changes as follows.
1H
(1 hour)
2H
(2 hour)
4H
(4 hour)
(LED off)
(Timer disabled)
8H
(8 hour)
After setting the off/on timer, the LED changes with time. the timer shows the time
when the operation stops.
8H
(8 hour)
4H
(4 hour)
2H
(2 hour)
(LED off)
(Timer enabled)
1H
(1 hour)
The LED is red when the off timer is enabled and green when the on timer is
enabled.
Off timer and on timer can’t be enabled at the same time.
192001aF5FKLS-302DEng.indd13192001aF5FKLS-302DEng.indd13 2019/04/1018:36:372019/04/1018:36:37

14
English
Use of aroma oil
Remove the center mark shell (aroma circle disk) from the center of front1.
grille, turn the center mark shell to the left to unfasten it.
Make sure that the felt tab is installed. Carefully sprinkle 2-3 drops of2.
aromatic or natural essential oil onto the felt tab.
Center mark shell (aroma circle disk)
Felt cover
Aroma essential oil or natural
essential oil
Felt tab
Center mark shell
Install the felt cover, and put the aroma circle disk back into place. When3.
installing the felt cover, place it in the center mark shell and turn to right.
Then put the center mark shell back on the front grille and turn to right.
192001aF5FKLS-302DEng.indd14192001aF5FKLS-302DEng.indd14 2019/04/1018:36:372019/04/1018:36:37

15
English
Felt tab replacement
If the aroma oil felt tab is dirty or a different aroma oil is used, replace the felt*
tab.
To replace the felt tab, turn the felt cover to left, and then take out the felt tab.*
In addition to the felt tab inside the disk we also provide 3 replacement felt tabs.*
Clean the center mark shell with neutral detergent, fully dry and install according*
to steps 1 to 3.
Felt tab replacements are sold separately.
Please contact the service department.
Felt cover
Center mark shell
192001aF5FKLS-302DEng.indd15192001aF5FKLS-302DEng.indd15 2019/04/1018:36:372019/04/1018:36:37

16
English
Cleaning and Storage
WARNING
Disconnect the plug from the power outlet before maintenance.
Storage
When the product is not in use, use warm water or neutral detergent.
Then gently wipe away any stains on the product. Then wipe with a dry
cloth.
Disassembly of blades
Remove the front grille before removing the blades. It is best to operate
with two persons at the same time. One person holds the product and the
other removes the grille.
Attention
Do not insert the power plug into the outlet until the blades and grille are
secure.
192001aF5FKLS-302DEng.indd16192001aF5FKLS-302DEng.indd16 2019/04/1018:36:372019/04/1018:36:37

17
English
Disassembly of the blades/front grille
1
2
3
4
Rear grille
Motor shaft
Blade
Blade bundle
Front grille
To remove the front grille and turn the front grille to the left. See1.
1
.
Attention
Do not turn the front grille excessively in the opposite direction.
This may cause product damage or malfunction.
Hold the blades with your left hand, turn the blade bundle with your right2.
hand, remove the blade bundle and then remove the blades.
The structure of the blade bundle is different from that of the ordinary rotating
components.
Contray to ordinary rotating direction, rotation to the left is to tighten and rotation
to the right is to disassemble.
Rear grille can’t be disassembled as there are lines inside.*
Please be sure to store in a dry environment.*
192001aF5FKLS-302DEng.indd17192001aF5FKLS-302DEng.indd17 2019/04/1018:36:372019/04/1018:36:37

18
English
Assembly of the blades/front grille
Rear grille
Motor shaft
Blade
Blade bundle
Front grille
4
3
3
2
11
Align the blade to the motor shaft and install it. See Fig.1.
1
.
Align the center of the blade with the center of the motor shaft and insert the
blade into the root of the motor shaft.
Motor center shaft
Pin
When the blades are assembled, align the blade center with the center of the motor shaft, and
insert the blade into the motor shaft center. See Fig.
1
.
(1)
Hold the blade with your left hand, and align the blade center with the2.
motor shaft and turn to the left with right hand to fix the blade. See Fig.
2
.
192001aF5FKLS-302DEng.indd18192001aF5FKLS-302DEng.indd18 2019/04/1018:36:372019/04/1018:36:37

19
English
Align the recess of front grille with the U-shaped print on rear grille.3.
Fasten the front grille to the rear grille. See Fig.
3
.
Rotate the front grille to the right. See Fig.4.
4
.
Turn the front grillr to the right untill it is locked.
There will be abnormal noise if the front grille is not locked.
Front grille
U-shaped part
Front grille recess
Align the recess of front grille with the U-shaped part of rear grille, and fasten the front grille
3
; turn to the right
4
.
4
3
Storage method
After disassembling, please clean and dry the parts.•
Put the dried parts in a plastic bag and put it in the packing box.•
Before packing, adjust the unit top to the front.•
When it is not in use for a long time, take out the battery of the remote control.•
192001aF5FKLS-302DEng.indd19192001aF5FKLS-302DEng.indd19 2019/04/1018:36:372019/04/1018:36:37

20
English
Troubleshooting
Please check if the product has any of the following symptoms before
sending it for repair.
Problem Cause Solution
Blades won’t turn. The blades are not•
correctly installed.
The blades are stuck.•
Install blades and grilles properly as
described on page 18 “Assembly
of the blades/front grille”.
The fan/middle tube/
base are not installed
properly.
Refer to pages 7-8 and reinstall
fan/middle tube/base properly.
DC plug disconnected
from the DC jack.
Plug DC connector firmly into the
DC jack (page 8).
Power plug disconnected
from the outlet.
Reinsert the power plug (page 8).
Operation stops
suddenly.
Unit is turned off for 12
hours and the auto-off
function is activated
(pages 10-12).
The Power button on the unit or
the remote control was pressed in
error.
Air volume light
band or indicators
are dark.
Dimmer mode is set. Cancel dimmer mode (page 12)
Loud noise when fan
is on.
The blades are•
installed incorrectly.
The blades are stuck.•
The grille isn’t installed•
properly.
Insall blades and grilles properly as
described on page 18 “Assembly
of the blades/front grille”.
Blade is loose. Tighten the bundle as described on
page 18 “Assembly of the blades/
front grille”.
The swing angle is
greater than set or
normal operation
starts after a certain
period when the
swing button is
pressed.
This is not a defect.•
The unit first turns to•
the left for 45° from
the stop position and
then turns to the
center to start.
Please wait for the swing to
resume normal.
Remote operation
invalid.
The battery voltage is
low.
Replace the battery (page 9).
The battery is installed
incorrectly.
Install the battery properly (page
9).
The remote control•
doesn't point at the
receiver.
Too far away from the•
receiver.
Point at the receiver
Operate in effective range (page
9).
192001aF5FKLS-302DEng.indd20192001aF5FKLS-302DEng.indd20 2019/04/1018:36:372019/04/1018:36:37
Table of contents
Other Objecto Fan manuals
Popular Fan manuals by other brands

Home Decorators Collection
Home Decorators Collection 34545-HBUN Use and care guide

Bionaire
Bionaire BWF0522M-CN Instruction leaflet

Mitsubishi Electric
Mitsubishi Electric LGH-50RVS-E operating instructions

Vortice
Vortice CA MD E W Series Instruction booklet

Rohnson
Rohnson R-838 instruction manual

McQuay
McQuay MWM-G2W Catalog

Panasonic
Panasonic FV-05-11VKS1 Installation insrtuctions

Three Sixty
Three Sixty Kensington DC KEN720BLED Owner's instruction manual

AirSense
AirSense ESSENTIAL instruction manual

AERMEC
AERMEC Omnia HL 11 C Use and installation manual

nilan
nilan CTS602 HMI installation instructions

Broan
Broan QTRE100H instructions