Ocean Blue 400950 Setup guide

SAVE THESE INSTRUCTIONS
DEALER/INSTALLER: GIVE TO HOMEOWNER
Ocean Blue
Outside Safety Ladder
Assembly and Installation Manual
Part no. 400950
Use with 30”/38”
Ocean Blue Mighty Step
to make a complete pool
entrance system.
Outside Safety Ladder
alone cannot be used to
enter/exit swimming pool.
Not for Use
with Soft
Sided Pools

- 1 -
Ocean Blue Outside Safety Ladder
Use with 30”/38”Ocean Blue Mighty Step
ASSEMBLY INSTRUCTIONS - PLEASE READ BEFORE ATTEMPTING ASSEMBLY
Tools Needed for Assembly
■Rubber Mallet
■Cordless Drill w/Phillips
Driver
■5/16” Drill Bit
■Pencil
Parts List
■2 - Side Rails
■2 - Handrails
■2 - Return Handrails
■2 - Mounting Blocks Rails
■2 - Mounting Blocks
■1 - Platform
■1 - Right Adjustable Rail Boot
■1 - Left Adjustable Rail Boot
■2 - Swing up Rails
■3 - Swing up Treads
■1 - Bottom Swing-up Tread
■1 - Fixed Ladder Tread
■1 - Hardware Safety Pack
Hardware Bag
■10 - 1/4-20 hex nuts
■20 - 1/4 -#10 x3/4 Phillips
self-tapping screws
■4 - 1/4-20 x 1.5”
■4 - 1/4-20 x .625”
■2 - 1/4 - 20 x 3-1/2” Bolts
■2 - 1/4” Flat Washers
■Instructions
■Padlock
2 – Handrails
2 – Swing-
up Rails
1 - Platform
1 - Fixed Ladder
Tread
2 - Right
Adjustable
Rail Boots
1 - Bottom
Swing-Up Tread
3 - Swing-up
Treads
1 - Hardware/Safety Pack
2 - Left Adjustable
Rail Boots
2 - Side Rails
2 – Return
Handrails
2 - Mounting
Blocks
2 - Mounting
Block Rails

- 2 -
Tools Needed: Rubber Mallet
Step #1
#1: Lay out the Swing-up
Rails and Swing-up Treads as
shown.
NOTE: The bottom Swing-up
Tread has a“house shaped”
tab and is positioned at the
bottom of the Swing-up Rail.
#3: Place the remaining Swing-up
Rail over the tabs of the Swing-up
Treads and tap into place using the
rubber mallet. Set this assembly
aside.
#1: Slip one of the Adjustable Rail
Boots over the end of a Side Rail.
It will need to be all the way on
if the outside dimension of your
pool is 50” or
backed off to
the marked
number that
corresponds
with the height
of your pool.
#2: Using two 1/4-20 x 1 1/2” long
bolts and two 1/4-20 hex nuts,
fasten the Adjustable Rail Boot to
the Side Rail. Repeat for remaining
Side Rail.
Step #3 continued
Step #2
Tools Needed: Rubber Mallet, cordless drill with Phillips bit.
#2: Using a rubber mallet, tap the
Swing-up Treads into place.
Adjustable Rail Boots are not required if the outside height of your pool
(measured from the ground to the top of the pool ledge) is 48”or less. If
this measurement is more than 48”rail boots will be required. If the out-
side measurement of your pool is 48” or less, skip to step 3.
#1: Overlap the at end of the
Handrail onto the top of the Side
Rail. Using two 1/4 - 20 x 5/8” bolts
and two 1/4- 20 hex nuts, attach the
Handrail to the Side Rail. Repeat for
the remaining Side Rail.
Step #3
Tools Needed: Rubber Mallet, cord-
less drill with Phillips bit.

- 3 -
Step #3 continued
#2: Slide two Handrails up through
the bottom of the Platform using the
openings nearest to the tabs.
#3: Stand up the assembly and us-
ing a rubber mallet tap the Platform
down until seated on the lugs on
the Side Rails. IT MAY REQUIRE
SEVERAL HARD BLOWS WITH A
RUBBER MALLET TO SEAT THE
PLATFORM ALL THE WAY DOWN
ONTO LUGS.
#4: Laying the
assembly on its
side, insert the
Return Hand-
rails through the
bottom of the
remaining holes
in the Platform
until seated on the lugs.
#5: Using two #10 x 3/4” self-tap-
ping screws, connect the Handrails
together by using one screw on
the outside and one screw on the
inside. Repeat for the remaining
handrails.
#6: Using the rubber mallet, attach
the xed ladder tread to the bottom
of the ladder as shown. NOTE: The
small groove should face the inside
of the ladder.

- 4 -
Step #4
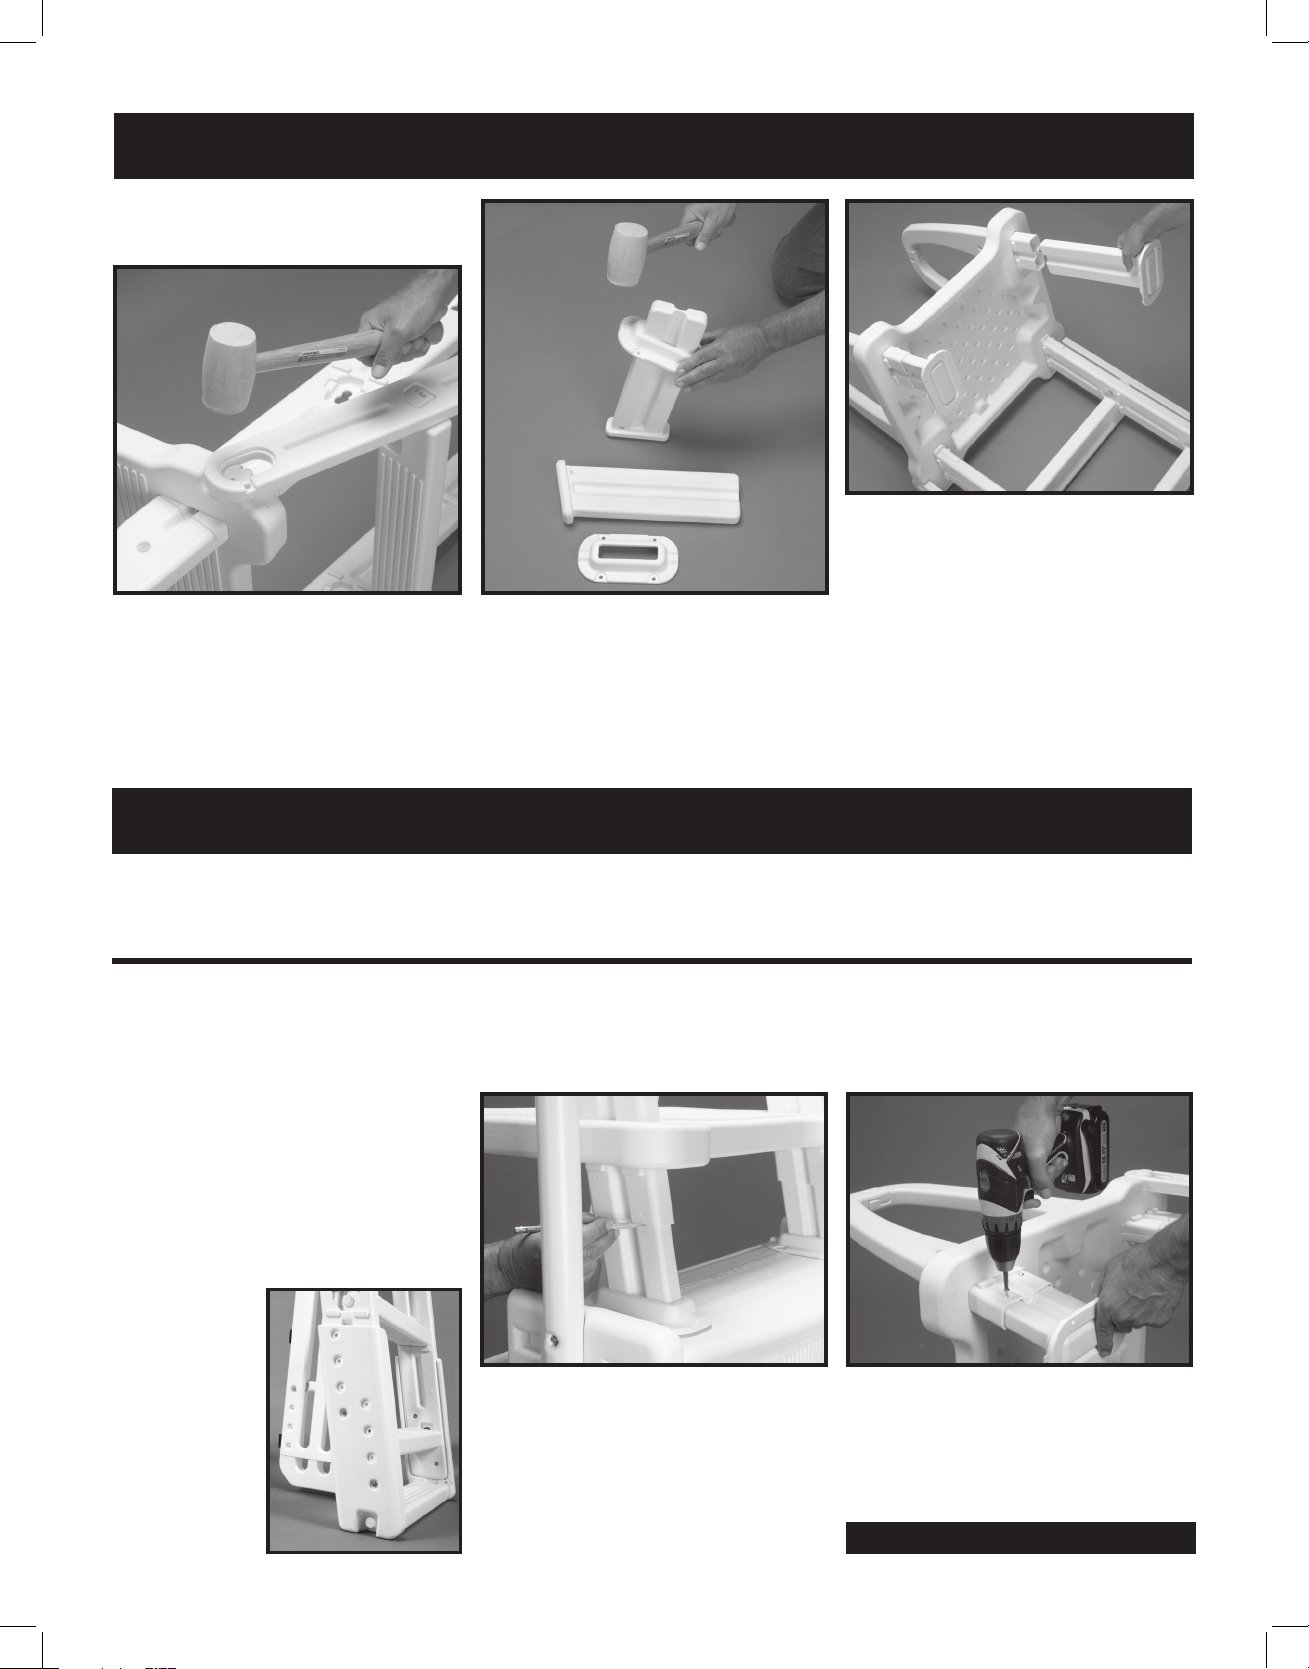
#2: Using the rubber mallet, tap
the Mounting Blocks onto the
Mounting Block Rails.
#3: Slide the Mounting Block as-
semblies up into the open end of
the Return Handrails as shown.
Ladder is now ready to attach to
Ocean Blue Mighty Step.
Step #5
Tools Needed: Rubber Mallet, cordless drill with Phillips bit and a pencil.
Step #5 continued
Tools Needed: Rubber Mallet,
cordless drill with Phillips bit.
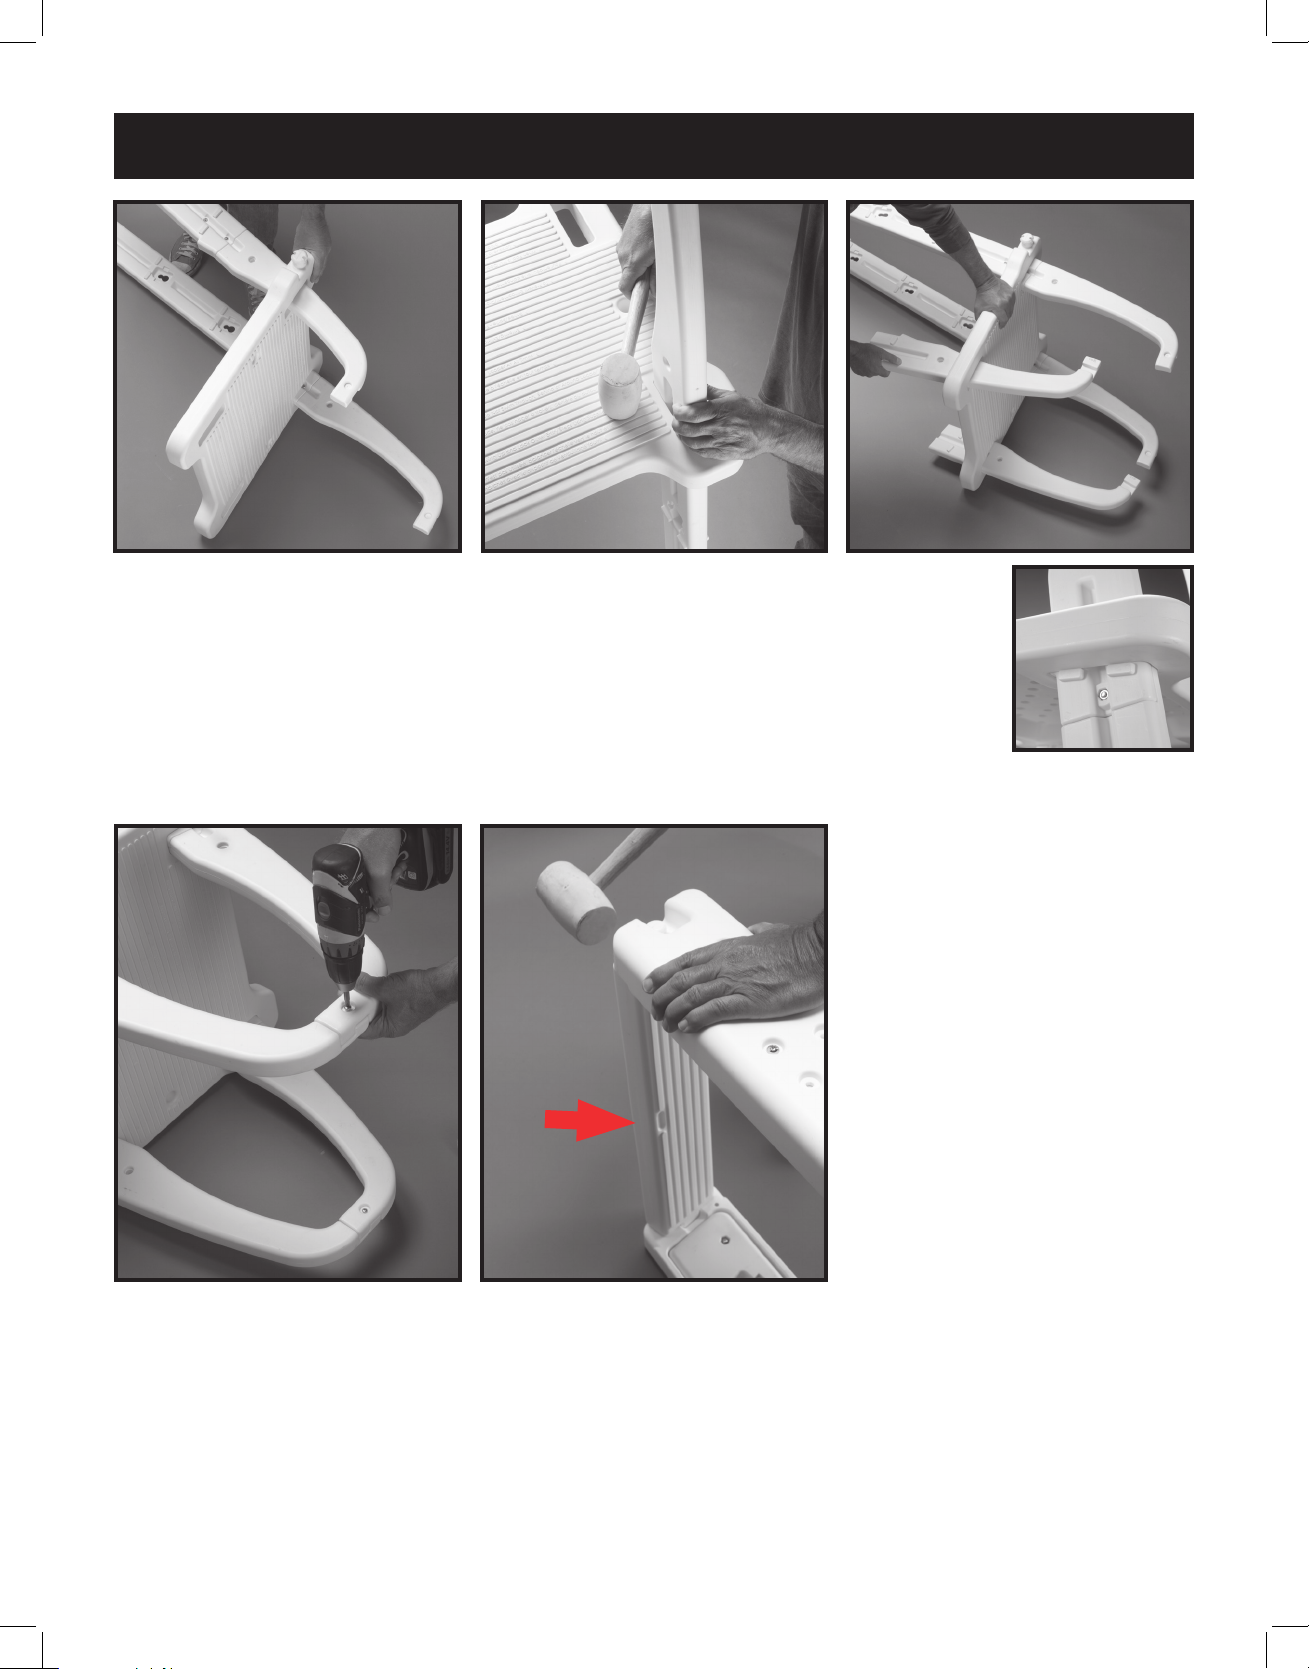
#1: Flex the oval openings on the
Swing Ladder assembly over the
two round tabs on the Platform.
Using a rubber mallet tap down on
the Swing-up Rail until seated over
the round tab.
Attaching Outside Safety Ladder to your
Ocean Blue Mighty Step
CHOOSE A LOCATION THAT IS LEVEL AND IN FULL VIEW.
POOL MUST HAVE COMPETENT ADULT SUPERVISION AT ALL TIMES WHEN IN USE.
Step #5
#1: Place your ladder over the
pool wall and rest the Mounting
Blocks on the pool step. The ladder
Platform must be level and rest on
top of the swimming pool ledge for
support. Depending on the outside
height of swimming pool ledge, rail
boots may
need to be
readjusted at
this time.
#2: Position the ladder so the
Mounting Blocks sit at. Using
a pencil, mark the height on the
Mounting Block Tubes. NOTE: If
necessary you may need to cut
down the Mounting Block Rails
with a hacksaw.
#3: Laying the ladder on its side,
attach both Mounting Block
assemblies to the ladder using two
#10 x 3/4” self-tapping screws in
each assembly.

#5: Check to make sure the hole
locations in the Platform are clear
of pool wall and supports. Drill two
5/16 holes through the Platform
and pool ledge. Fasten the ladder
platform to the pool ledge using two
¼-20 x 2-1/4” bolts, ¼-20 hex nuts.
OUTSIDE TREADS MUST
BE IN THE UP POSITION
AND LOCKED AT ALL
TIMES WHEN POOL IS
NOT IN USE.
- 5 -
Step #5 continued
#4: Position the ladder over the pool step with the Mounting Blocks sitting at on the top tread. Center the
ladder side-to-side and align the back of the Mounting Blocks next to the groove in the back of the Platform as
shown. Attach using four #10 x 3/4” self-tapping screws in each Mounting Block.
#6: When the pool is not in use,
rotate the Swing-up Ladder to the
up position and secure it in place
with the padlock as shown.

- 6 -
IMPORTANT For Your Safety
■Check the contents of the carton with the parts list for this ladder.
■DO NOT attempt to assemble or install the ladder if there are
ANY shortages of parts or hardware.
■For proper assembly and installation follow all instructions in the
sequence shown.
■Before using the product, after assembly and installation, go
over the instructions and procedures again to make sure nothing
has been overlooked.
■Be sure and safe. The manufacturer IS NOT responsible for
improper assembly, installation and use.
To keep your new ladder working properly, just hose off once a
week with clean water. Check the Swing-Up portion of the Outside
Safety ladder for proper operation. Check padlock for proper
operation, lubricate if necessary.
MAINTENANCE:
Unfasten the ladder from the pool ledge and from the Ocean Blue
Mighty Step. Store in a safe place out of the elements.
WINTERIZING:

Safety Rules
■Locate ladder on a solid base.
■One person on the ladder at
a time.
■Ladder MUST be installed per
manufacturer’s instructions.
■Secure ladder to top rail of
pool for greater stability and
safety as outlined in this
assembly manual.
■DANGER: No Jumping or
Diving from ladder.
■Face ladder when entering
and leaving pool.
■To prevent entrapment or
drowning — DO NOT swim
through, behind or around
ladder.
■Ladder to be used as a
swimming pool ladder only.
■Weight limit -
300 lbs. maximum
■Warning: Exceeding the
maximum weight restriction
may cause the ladder to fail.
■When ladder is not in use,
slide up outside ladder
section and lock using
padlock. Ladder must be
locked at all times when not in
use or when there is no
qualied adult supervision.
■Consult your local Building
Department before installation
of your pool and equipment.
■DANGER: Use a cordless
drill for assembly and
installation. NEVER use an
electric drill in or around the
pool.
OCEAN BLUE WATER PRODUCTS WARRANTY
Ocean Blue Water Products warrants their swimming pool ladders to be free from defects in
workmanship for one year from date of purchase.
DO NOT RETURN DEFECTIVE PART TO DEALER
The defective part should be returned, post paid, to:
Ocean Blue Water Products
7447A S Central Ave
Bedford Park IL 60638
Enclose proof of purchase (receipts, etc.) showing date purchased, your name, address, and
daytime phone number. You will be notied of cost to replace part. This warranty gives you specic
legal rights, and you may also have other rights which may vary from state to state.
Made in U.S.A • Printed in U.S.A.
- 7 -
Not for Use with Soft Sided Pools
Table of contents
Other Ocean Blue Lighting Equipment manuals
Popular Lighting Equipment manuals by other brands

Kasco
Kasco RGB3C5 owner's manual

Lightolier
Lightolier Mini-Beam Mini-Beam Luminaires user manual

SMART HOME LIGHTS
SMART HOME LIGHTS 828306 FITTING INSTRUCTION

Hosen
Hosen HS-LMS30 user manual

Home Decorators Collection
Home Decorators Collection W770A03HGD Use and care guide

Red Arrow
Red Arrow POLO 15W LED installation instructions

Ledj
Ledj Aspect user manual

DIODE LED
DIODE LED NEON BLAZE RGB 24V LED Strip Light installation guide

SysMaster
SysMaster A60H-080M0-027 quick start guide

Twinkly
Twinkly icicle Instruction guide

Star Headlight & Lantern
Star Headlight & Lantern DLX3-RRK Installation and instruction manual

Robus
Robus RSN10050DAS4-04 manual