Olympia WEBRADIO 100 User manual

RInternet Radio Receiver
OPERATING INSTRUCTIONS
07.03.2008 en/en
WebRadio 100


Contents
www.olympia-vertrieb.de
OPERATING
INSTRUCTIONS iPage
Introduction 1. . . . . . . . . . . . . . . . . . . . . . . . . . . . . . . . . . . . .
Important Safety Precautions 1. . . . . . . . . . . . . . . . . . . . . . . . . . . . . . . . . .
Exemption From Liability 1. . . . . . . . . . . . . . . . . . . . . . . . . . . . . . . . . . . . . .
Intended Use 1. . . . . . . . . . . . . . . . . . . . . . . . . . . . . . . . . . . . . . . . . . . . . . .
Information on Disposal 1. . . . . . . . . . . . . . . . . . . . . . . . . . . . . . . . . . . . . . .
Installation 2. . . . . . . . . . . . . . . . . . . . . . . . . . . . . . . . . . . . . .
Package Contents 2. . . . . . . . . . . . . . . . . . . . . . . . . . . . . . . . . . . . . . . . . . .
Positioning the Equipment 2. . . . . . . . . . . . . . . . . . . . . . . . . . . . . . . . . . . .
Connecting the Equipment 3. . . . . . . . . . . . . . . . . . . . . . . . . . . . . . . . . . . .
Conditions / Connecting to Internet 3. . . . . . . . . . . . . . . . . . . . . . . . . . . . .
Features 4. . . . . . . . . . . . . . . . . . . . . . . . . . . . . . . . . . . . . . . .
Information on References to Software and Hardware4
Operating Systems and Media Player Programmes 4.
Glossary 5. . . . . . . . . . . . . . . . . . . . . . . . . . . . . . . . . . . . . . . .
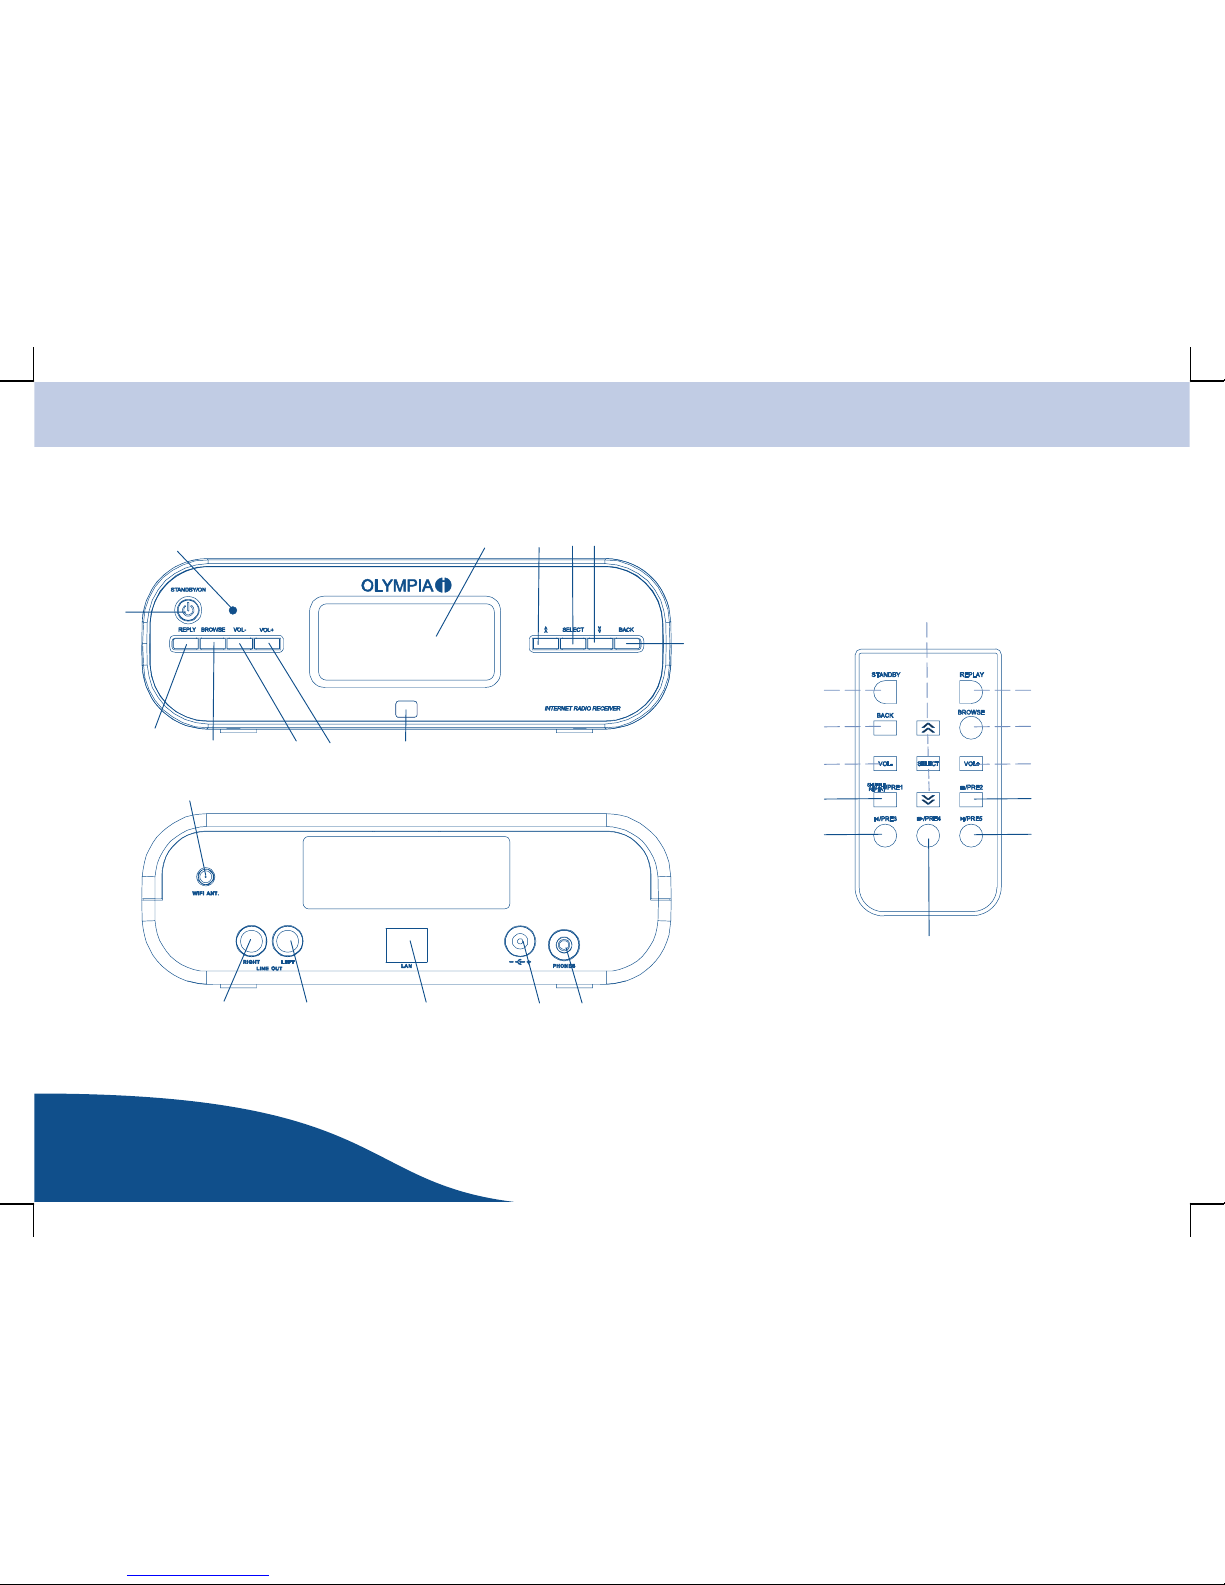
Operating Elements and Indicators 6. . . . . . . . . . . . . . .
Internet Radio Mode 7. . . . . . . . . . . . . . . . . . . . . . . . . . . . . . . . . . . . . . . . .
Media Player Mode 7. . . . . . . . . . . . . . . . . . . . . . . . . . . . . . . . . . . . . . . . . .
Network 8. . . . . . . . . . . . . . . . . . . . . . . . . . . . . . . . . . . . . . . . .
Integrating the Receiver in a Wi−Fi/WLAN Network 8. . . . . . . . . . . . . . . .
Entering characters 9. . . . . . . . . . . . . . . . . . . . . . . . . . . . . . . . . . . . . . . .
Connecting Via Ethernet (LAN) 9. . . . . . . . . . . . . . . . . . . . . . . . . . . . . . . .
Radio Stations 10. . . . . . . . . . . . . . . . . . . . . . . . . . . . . . . . .
Selecting Radio Stations 10. . . . . . . . . . . . . . . . . . . . . . . . . . . . . . . . . . . . .
Location 10. . . . . . . . . . . . . . . . . . . . . . . . . . . . . . . . . . . . . . . . . . . . . . . .
Genre 11. . . . . . . . . . . . . . . . . . . . . . . . . . . . . . . . . . . . . . . . . . . . . . . . . .
Storing and Assigning a Radio Station to a Preset Button 11. . . . . . . . . .
Assigning radio stations to Preset buttons 11. . . . . . . . . . . . . . . . . . . .
Selecting a stored radio station 11. . . . . . . . . . . . . . . . . . . . . . . . . . . . .
On Demand Programmes 12. . . . . . . . . . . . . . . . . . . . . . . . . . . . . . . . . . . .
Queries on New Radio Stations 12. . . . . . . . . . . . . . . . . . . . . . . . . . . . . . .
Settings 13. . . . . . . . . . . . . . . . . . . . . . . . . . . . . . . . . . . . . . . .
Volume Control 13. . . . . . . . . . . . . . . . . . . . . . . . . . . . . . . . . . . . . . . . . . . . .
Language 13. . . . . . . . . . . . . . . . . . . . . . . . . . . . . . . . . . . . . . . . . . . . . . . . .
Clock 13. . . . . . . . . . . . . . . . . . . . . . . . . . . . . . . . . . . . . . . . . . . . . . . . . . . . .
Media Player 14. . . . . . . . . . . . . . . . . . . . . . . . . . . . . . . . . . .
Configuring the PC 14. . . . . . . . . . . . . . . . . . . . . . . . . . . . . . . . . . . . . . . . .
Searching for Shared PCs 14. . . . . . . . . . . . . . . . . . . . . . . . . . . . . . . . . . .
Playing a Single Track 15. . . . . . . . . . . . . . . . . . . . . . . . . . . . . . . . . . . . . . .
Playing a Whole Album 16. . . . . . . . . . . . . . . . . . . . . . . . . . . . . . . . . . . . . .
Playback Functions 16. . . . . . . . . . . . . . . . . . . . . . . . . . . . . . . . . . . . . . . . .
Navigation in the current list 16. . . . . . . . . . . . . . . . . . . . . . . . . . . . . . . .
Adding a Track to the Play List 17. . . . . . . . . . . . . . . . . . . . . . . . . . . . . . . .
Adding an Album to the Play List 17. . . . . . . . . . . . . . . . . . . . . . . . . . . . . .
Deleting a Track From the Play List 17. . . . . . . . . . . . . . . . . . . . . . . . . . . .
Deleting All the Tracks in a Play List 17. . . . . . . . . . . . . . . . . . . . . . . . . . .
Shuffling the Sequence of Tracks 18. . . . . . . . . . . . . . . . . . . . . . . . . . . . .
Repeating Tracks 18. . . . . . . . . . . . . . . . . . . . . . . . . . . . . . . . . . . . . . . . . . .

Contents
OPERATING
INSTRUCTIONS
www.olympia-vertrieb.de
iiPage
Configuration 19. . . . . . . . . . . . . . . . . . . . . . . . . . . . . . . . . .
Network Settings 19. . . . . . . . . . . . . . . . . . . . . . . . . . . . . . . . . . . . . . . . . . .
Version 19. . . . . . . . . . . . . . . . . . . . . . . . . . . . . . . . . . . . . . . . . . . . . . . . . . .
Firmware Update 19. . . . . . . . . . . . . . . . . . . . . . . . . . . . . . . . . . . . . . . . . . .
Factory Settings 19. . . . . . . . . . . . . . . . . . . . . . . . . . . . . . . . . . . . . . . . . . . .
Registering 19. . . . . . . . . . . . . . . . . . . . . . . . . . . . . . . . . . . . . . . . . . . . . . . .
Sleep Timer 20. . . . . . . . . . . . . . . . . . . . . . . . . . . . . . . . . . . . . . . . . . . . . . .
Back−lighting 20. . . . . . . . . . . . . . . . . . . . . . . . . . . . . . . . . . . . . . . . . . . . . .
Access via a UPnP Server 21. . . . . . . . . . . . . . . . . . . . . . .
Configuring the PC Using Windows 21. . . . . . . . . . . . . . . . . . . . . . . . . . . .
Localising and Playing Files 21. . . . . . . . . . . . . . . . . . . . . . . . . . . . . . . . . .
Navigation in the Current List 22. . . . . . . . . . . . . . . . . . . . . . . . . . . . . . . . .
Troubleshooting 23. . . . . . . . . . . . . . . . . . . . . . . . . . . . . . . .
Guarantee 24. . . . . . . . . . . . . . . . . . . . . . . . . . . . . . . . . . . . . .
Technical Modifications 24. . . . . . . . . . . . . . . . . . . . . . . . .
Conformity of the telephone with the applicable EU direc-
tives is confirmed by the CE symbol.
The corresponding Declaration of Conformity is enclosed
in the packaging as a supplementary sheet.

Introduction
www.olympia-vertrieb.de
OPERATING
INSTRUCTIONS 1Page
Introduction
Important Safety Precautions
Please observe the following to ensure the equipment can be operated
reliably:
SPlease read this operating instruction manual thoroughly and
observe the information contained when using the equipment.
SIf the radio receiver is moved from a cold to a warm area, wait for 2
to 3 hours before switching the equipment on. This enables any
condensation which may have developed inside the equipment to
evaporate.
SDo not use the equipment if it is damaged in any way.
SPlace the radio receiver on a non−slip base and lay the connection
cables so that they cannot be the source of an accident.
SEnsure access to the power connection is not obstructed by
furniture or such.
SDo not cover the air vents and ensure a minimum clearance of 5
cm on all sides of the equipment.
SOnly connect approved accessories.
SDo not expose the equipment to extreme temperatures or humid
conditions and protect it from vibrations, direct sunlight and dusty
conditions.
SOnly clean the equipment with a soft, moist cloth. Never use any
solvents or aggressive cleaning agents.
SNever open the equipment. Opening the equipment exposes the
person to the risk of an electric shock. The terms of guarantee are
also annulled.
SRepairs to defect equipment may only be carried out by service
centres authorised by the sales outlet.
Exemption From Liability
We cannot guarantee that the information which relates to the technical
properties of the product or to the product itself contained in this document
is correct. The product and its accessories described in this document are
subject to constant improvement and further development. For this reason,
we reserve the right to modify components, accessories, technical
specifications and related documentation of the product described herein at
any time without notice.
Intended Use
This equipment has been designed to be connected to an internet access
point via a Wi−Fi/WLAN network and play programmes from the radio
stations streamed. It can also be used to access shared folders on the PC
connected within the network after taking the corresponding approvals into
account. Any other use is considered unintended use. Unauthorised
modifications or reconstruction not described in this manual are not
permitted.
Information on Disposal
The implementation of European law in national laws and directives obliges
you to dispose of consumable goods appropriately. This serves to protect
both persons and the environment.
The adjacent symbol indicates that electrical and electronic
apparatus no longer required must be disposed of separate
from domestic waste. .
Old or unwanted devices must be disposed of at collection
points provided by public waste authorities.
Packaging materials must be disposed of according to local
regulations.

Installation
OPERATING
INSTRUCTIONS
www.olympia-vertrieb.de
2Page
Installation
Package Contents
SInternet radio receiver
SPower adapter plug
SRemote control
SOperating instructions
Please check the contents of the package carefully. If anything is missing
or shows signs of transport damage, do NOT put the equipment into
service! In such a case, contact your sales outlet, with the purchase receipt
to hand, or the OLYMPIA Service Center directly.
Note: Keep the equipment packaging so that it can be used to prevent
equipment damage in the event of future transport.
Positioning the Equipment
Position the equipment in an easily accessible location. Ensure that it is set
down on a stable, level, non−slip surface. In addition, ensure that the
equipment is positioned where all the necessary cables can be laid in such
a way that nobody can trip over them. Do not cover the air vents and
ensure a minimum clearance of 5 cm on all sides of the equipment.
Do not expose the equipment to direct sunlight. Protect the
equipment from getting wet. It must not be set up in rooms
subject to condensation, corrosive vapours or high
concentrations of dust. The ambient temperature must be
between 0 _C and 60 _C.

Installation
www.olympia-vertrieb.de
OPERATING
INSTRUCTIONS 3Page
Connecting the Equipment
Check that the voltage specifications on the equipment matches
that of the local power supply.
Connect the power adapter plug to the radio receiver and the power socket.
The equipment is now ready to be configured.
Hi−fi system
Conditions / Connecting to Internet
The following conditions must be fulfilled in order to use the equipment:
SThere must be an internet access available with a high
transmission speed.
SThe equipment must have an internet connection (preferably via a
router).
Note: If your Wi−Fi/WLAN network has been configured for WEP (Wired
Equivalent Privacy) or WPA (Wi−Fi/WLAN Protected Access) encryption,
you must know your WEP or WPA code.
SIf your Wi−Fi/WLAN network has been configured so that only
authorised devices are accepted, you must notify the router of your
radio receiver’s MAC address. The way in which to find the
equipment’s MAC address is described in Section Access Via a
UPnP Server.
SRefer to the operating manual supplied with the router for
information on how the transfer the equipment’s MAC address to
the router.
Note: The range of the Wi−Fi/WLAN network is influenced by environmental
conditions and certain building material (number/thickness of walls, solid
doors, windows). Refer to the operating manual supplied with the router for
information on how improve the range of your Wi−Fi/WLAN network.
Note: To increase the range of your network without any extensive effort, we
recommend using Olympia HomePlug components. Information on this is
available on our web site.
SEnsure that the Wi−Fi/WLAN network and connection to the
Internet function properly. Refer to the operating manual supplied
with the respective component.
SThe equipment is now ready to operate.

Features
OPERATING
INSTRUCTIONS
www.olympia-vertrieb.de
4Page
Features
Congratulations on having purchased this high quality equipment which is
provided with the following features:
SReception of over 5000 radio stations worldwide
SSupports on demand streaming
SSupports Real Audio, MP3 and Windows Media
SClock, sleep timer
SRemote control
S5 radio station Preset buttons on the remote control
SMedia player: sending audio files from your PC via Ethernet or
WLAN
SFile sharing via Windows Media Connect function
SWEP and WPA coding
SUser−friendly interfaces
SPower supply: 230 V 50 Hz
SStandards: IEEE 802.11b and IEEE 802.11g
Information on References to Software and
Hardware
The software and hardware referred to in this manual are registered
trademarks and, as such, are subject to the provisions of law.
Operating Systems and Media Player
Programmes
The equipment can be used with various operating systems and media
players.
Please refer to the corresponding descriptions for the necessary
information concerning system and programme configurations as well as
the procedures for authorising the sharing of file access.
Further information is available on the manufacturer’s web site.

Features
OPERATING
INSTRUCTIONS 5Page
www.olympia-vertrieb.de
Glossary
Wireless AP Wireless AP refers to a Wireless LAN Access Point.
This is normally integrated in the router.
DHCP Dynamic Host Configuration Protocol (DHCP) enables
the dynamic assignment of an IP address in a network
with the aid of a corresponding server or router.
IP Address An IP address is a number which enables computers
and other devices to be accessed within an IP
network. It has four groups of numbers separated by a
dot, e.g: 192.168.178.100
MAC Address The MAC address is the hardware address of each
individual network device and serves for the unique
identification of every device within a network.
WEP Wired Equivalent Privacy is the previous standard
encryption algorithm for WLAN and is still used today
in many WLAN networks.
WPA Wi−Fi Protected Access is an encryption system used
for Wireless LAN. It provides a high degree of security
from external access and is preferable to the WEP
encryption system.
SSID SSID (Service Set Identifier) or ESSID (Extended
Service Set Identifier) relates to the identification
(name) of a radio network based on IEEE 802.11.
Gateway Gateway relates to the basic IP address of the router
via which the network computer establishes an internet
connection.
UPnP Universal Plug and Play. This relates to a standard
implemented by manufacturers to enable interoperation
of their devices with others introduced by Microsoft. In
this way, audio equipment such as the WebRadio can
communicate with the PC via an IP network.
Windows Shares Enables the sharing of folders and files on a PC for
common use in the network.
Wi−Fi Wireless Fidelity.
Shuffle This relates to the playback of recordings from a list of
audio files in a random sequence.
Repeat Repeat playback of a recording in an audio file.

Operating Elements and Indicators
OPERATING
INSTRUCTIONS
www.olympia-vertrieb.de
6Page
Operating Elements and Indicators
DC:9V
1234
78
12
18
5
69
11
10
1920212223
2, 3, 4
5
78
9
1011
13
14
17
16
15

Operating Elements and Indicators
www.olympia-vertrieb.de
OPERATING
INSTRUCTIONS 7Page
Internet Radio Mode
1 Display
2 Button
[>>]
, select options
3 Button [SELECT], confirm selection
4 Button
[>>]
, select options
5 Button [BACK], return to previous menu
6 Sensor Receiver for remote control
7 Button [VOL+], volume control +
8 Button [VOL−], volume control −
9 Button [BROWSE], not currently applicable
10 Button [REPLY], not currently applicable
11 Button [STANDBY/ON], switch the radio on/off
12 LED Operating status
13 Button [PRE2], radio station Preset button 2
14 Button [PRE5], radio station Preset button 5
15 Button [PRE4], radio station Preset button 4
16 Button [PRE3], radio station Preset button 3
17 Button [Shuffle]/[Repeat] [PRE1], radio station Preset button 1
18 WLAN antenna
19 Headphone socket
20 Power adapter socket
21 RJ45 connection port
22 Line Out, Left
23 Line Out, Right
Media Player Mode
1 Display
2 Button
[>>]
, not currently applicable
3 Button [SELECT], confirm selection
4 Button
[>>]
, not currently applicable
5 Button [BACK], return to previous menu
6 Sensor Receiver for remote control
7 Button [VOL+], volume control +
8 Button [VOL−], volume control −
9 Button [BROWSE], displays the play list
10 Button [REPLY], not currently applicable
11 Button [STANDBY/ON], switch radio on/off
12 LED Operating status
13 Button [PRE2], stop
14 Button [PRE5], select the next track
15 Button [PRE4], play/pause
16 Button [PRE3], select previous track
17 Button [Shuffle]/[Repeat] [PRE1], activate/deactivate repeat or
shuffle function
18 WLAN antenna
19 Headphone socket
20 Power adapter socket
21 RJ45 connection port
22 Line Out, Left
23 Line Out, Right

Network
www.olympia-vertrieb.de
8Page OPERATING
INSTRUCTIONS
Network
Integrating the Receiver in a Wi−Fi/WLAN Network
The radio receiver must be integrated in a network with Internet access:
1. Press the [STANDBY/ON] button.
2. The display changes after approx.
2 seconds.
3. The display changes again after approx.
1 second.
4. Press the [SELECT] button.
5. The equipment automatically scans for
Wi−Fi/WLAN networks.
6. The Wi−Fi/WLAN network access points
which can be accessed are displayed with
your SSID. If several networks are found,
select the network required by pressing
the
[>>]
/
[>>]
buttons.
7. Confirm the selection by pressing the
[SELECT] button.
Note: SSID −Service Set Identifier. This is the network name entered by the
network provider to identify the network.
Note: This message appears when no
Wi−Fi/WLAN network access points are
found. Check the network settings.
Information on this is available in the
instruction manuals supplied with the
corresponding devices.
8. If the network selected is not encrypted,
the connection is automatically
established.
9. If the network selected is encrypted, you
are prompted to enter the corresponding
code (key).
10.The device automatically switches to input
mode after approx. 3 seconds.
11.Enter the code completely and correctly.
12.Press the
[>>]
/
[>>]
buttons to select the
END menu option.
13.Confirm the selection by pressing the
[SELECT] button.
Reciva Radio
ARM Powered
Initialising
network
< Scan for networks >
Enter network
Scanning
Olympia network
No networks
found
Connecting to
network
Load list of
radio stations
Enter WPA key
Enter WEP key

Network
www.olympia-vertrieb.de
OPERATING
INSTRUCTIONS 9Page
Note: WEP −Wired Equivalent Privacy, WPA −Wi−Fi Protected Access. An
encryption system for networks. If you do not know the code (key), contact
the person who setup the network.
If the connection could not be established
because the code entered or other settings
are wrong, the corresponding message
appears in the display.
Entering characters
You are prompted to enter information when working in some menus. When
working in such menus, press the
[>>]
/
[>>]
buttons until the required
character is identified. Confirm the selection by pressing the [SELECT]
button.
If you have entered an incorrect character, delete it by pressing the [BACK]
button.
Note: Pay careful attention to upper and lower case when entering the code.
Connecting Via Ethernet (LAN)
You can also connect the radio receiver to the network via the RJ45
connection port (Ethernet). In this case, activate the ONLY WIRED
network setting.
1. Press the
[>>]
/
[>>]
buttons to select the
CONFIGURATION menu option.
2. Press the [SELECT] button.
3. Press the
[>>]
/
[>>]
buttons to select the
NETWORK SETTINGS menu option.
4. Confirm the selection by pressing the
[SELECT] button.
5. Press the
[>>]
/
[>>]
buttons to select the
WIRED/WIRELESS menu option.
6. Confirm the selection by pressing the
[SELECT] button.
7. Press the
[>>]
/
[>>]
to select the ONLY
WIRED option.
8. Confirm the selection by pressing the
[SELECT] button.
Network error
Invalid key
< Network Settings >
< Wired/Wireless >
< Configuration >
Only Wireless
Auto
< Only Wired >

Radio Stations
OPERATING
INSTRUCTIONS
www.olympia-vertrieb.de
10Page
Radio Stations
Selecting Radio Stations
Scan for the radio stations available and select the radio stations you
require.
During the entire process, you have the opportunity to undo the action last
initiated. To do this, press the [BACK] button.
1. Press the [SELECT] button.
2. Press the
[>>]
/
[>>]
buttons to select the
STATIONS menu option.
3. Confirm the selection by pressing the
[SELECT] button.
4. Press the
[>>]
/
[>>]
buttons to select the
LOCATION or GENRE menu options.
5. Confirm the selection by pressing the
[SELECT] button.
Selecting the LOCATION menu option enables you to select a
geographical region and then a country from a list. A list of radio stations
from the selected country is then displayed from which to select.
Selecting the GENRE menu option enables you to filter radio stations
available according to their broadcasting content. Example: classic, rock,
sport, news, etc.
Location
1. Press the
[>>]
/
[>>]
buttons to select the
required geographical region.
In order to ensure no geographical limits,
select ALL.
2. Confirm the selection by pressing the
[SELECT] button.
3. Press the
[>>]
/
[>>]
buttons to select the
required country.
4. Confirm the selection by pressing the
[SELECT] button.
5. Press the
[>>]
/
[>>]
buttons to select the
required radio station.
6. Confirm the selection by pressing the
[SELECT] button.
The radio then connects to this radio
station.
7. The selected station is then played.
Note: Please remember that not all radio stations transmit around the clock
or are permanently online.
If the On Demand menu option appears in the display, i.e. you have the
opportunity of listening to programmes already broadcast, refer to Section
“On Demand Programmes”.
Sleep Timer
< Stations >
Media Player
Genre
Location
< All >
< Country >
< Stations >

Radio Stations
www.olympia-vertrieb.de
OPERATING
INSTRUCTIONS 11Page
Genre
1. Press the
[>>]
/
[>>]
buttons to select the
required genre.
2. Confirm the selection by pressing the
[SELECT] button.
3. Press the
[>>]
/
[>>]
buttons to select the
required radio station.
4. Confirm the selection by pressing the
[SELECT] button.
The radio then connects to this radio
station.
5. The selected station is then played.
Note: Please remember that not all radio stations transmit around the clock
or are permanently online.
If the On Demand menu option appears in the display, i.e. you have the
opportunity of listening to programmes already broadcast, refer to Section
“On Demand Programmes”.
Storing and Assigning a Radio Station to a Preset
Button
It is possible to assign radio stations to Preset buttons and select them by
pressing the respective Preset button assigned, [P1] to [P5].
Assigning radio stations to Preset buttons
While listening to a radio station, press and
hold the required Preset button, [Pre1] to
[Pre5].
# = the number of the Preset button.
The radio station is stored and assigned to the corresponding Preset
button.
Selecting a stored radio station
1. Press the relevant Preset button [Pre1] to [Pre5].
The radio station assigned to the Preset button pressed is selected.
Note: Do not keep the button pressed too long. If you press and hold the
button too long, the station assigned to that button is overwritten by the one
currently being played (refer to “Assigning radio stations to Preset buttons).
Sport
Classic
< Rock >
< Stations > Assigned to
Preset #

Radio Stations
OPERATING
INSTRUCTIONS
www.olympia-vertrieb.de
12Page
On Demand Programmes
Some radio stations offer services. Certain radio stations, for example,
enable you to select and hear programmes which have already been
broadcast. After selecting a radio station, the radio does not start playing
the broadcast immediately.
1. A menu appears.
2. Press the
[>>]
/
[>>]
buttons to select the
required source.
3. Confirm the selection by pressing the
[SELECT] button.
If you select the Live (direct transmission) menu option, the radio plays the
programme currently being broadcast.
If you select the On Demand menu option, the On Demand Streams
available appear in a list.
The actual procedure to use the feature is dependent on the radio station
selected. The procedure is, however, basically the same:
SPress the
[>>]
/
[>>]
buttons to make a selection.
SConfirm the selection by pressing the [SELECT] button.
SIf necessary, make other selections in a submenu.
SConfirm the selection by pressing the [SELECT] button.
SStart fast forward/rewind by pressing the [Pre1] and
[Pre3] buttons.
Queries on New Radio Stations
If you want to listen to a particular radio station which is not currently
available online, you can send a query via the Reciva internet page
(http://www.reciva.com). Where technically possible, the required radio
station will be included in the list of available radio stations.
On Demand
< Live >

Settings
www.olympia-vertrieb.de
OPERATING
INSTRUCTIONS 13Page
Settings
Various equipment settings can be adjusted according to individual
requirements:
Volume Control
Press the [VOL −] and [VOL +] buttons to adjust the volume of recordings
played.
It is assumed that the radio receiver’s main
menu is open for selecting the various
settings.
Note: It may be necessary to press the
[BACK] button several times.
Language
1. Press the
[>>]
/
[>>]
buttons to select the
CONFIGURATION menu option.
2. Press the [SELECT] button.
3. Press the
[>>]
/
[>>]
buttons to select the
LANGUAGE menu option.
4. Confirm the selection by pressing the
[SELECT] button.
5. Press the
[>>]
/
[>>]
buttons to select the
required language.
6. Confirm the selection by pressing the
[SELECT] button.
Clock
1. Press the [SELECT] button.
2. Press the
[>>]
/
[>>]
buttons to select the
CONFIGURATION menu option.
3. Confirm the selection by pressing the
[SELECT] button.
4. Press the
[>>]
/
[>>]
buttons to select the
CLOCK menu option.
5. Confirm the selection by pressing the
[SELECT] button.
6. Press the
[>>]
/
[>>]
buttons to select the
TIME/DATE menu option.
7. Confirm the selection by pressing the
[SELECT] button.
8. Press the
[>>]
/
[>>]
buttons to select the
correct value for the hour.
9. Confirm the selection by pressing the
[SELECT] button.
10.Press the
[>>]
/
[>>]
buttons to select the
correct value for the minute.
11.Confirm the selection by pressing the
[SELECT] button.
12.Set the date according to the same
procedure.
13.The time set is displayed for a few
seconds.
Stations
Media Player
Configuration
Sleep Timer
< Language >
< English >
< Configuration >
< Configuration >
< Clock >
< Time/Date >
12:04
< Set Time >
01 Jan 2007
< Set Date >
Time and Date
set

Media Player
OPERATING
INSTRUCTIONS
www.olympia-vertrieb.de
14Page
Media Player
If a PC is connected to the same network as the radio receiver, it is
possible for the radio to access all the playlists (M3U) and audio files (AAC,
AIFF, MP3, RM, WAV, WMA) stored on it.
The radio equipment is compatible with Windows 2000, Windows XP and
Windows Vista.
Configuring the PC
In order for the equipment to be able to access and share audio files on the
PC, they must be located in a folder which can be shared.
Note: If you use the data sharing feature provided by Windows, the folder
containing the relevant files must not be in the My Documents or My Music
folders. These folders cannot be used to share files. The storage location is
irrelevant when sharing files via a UPnP server.
1. Ensure that the PC is connected to the same network as the radio
equipment.
2. Use Windows Explorer to navigate to the folder containing the audio
files to be shared.
3. Click with the right−hand mouse button on the folder.
4. Click the left−hand mouse button on PROPERTIES and then on the
SHARING tab.
5. Activate the Share this folder on the network and Allow network users to
change my files checkboxes.
6. Copy the files you want to play from the radio equipment to the shared
folder. We suggest assigning an unambiguous name, such as Shared
Music.
Searching for Shared PCs
1. Switch the receiver on and wait until the
STATIONS menu option appears.
Note: It may be necessary to press the
[BACK] button several times.
2. Press the
[>>]
/
[>>]
buttons to select the
MEDIA PLAYER menu option.
3. Press the [SELECT] button until the
WINDOWS SHARES menu option
appears.
4. Confirm the selection by pressing the
[SELECT] button.
5. Press the
[>>]
/
[>>]
buttons to select the
FIND PCs menu option.
6. Confirm the selection by pressing the
[SELECT] button.
7. After the equipment has completed the
scan routine, a list of PCs available is
displayed.
8. Press the
[>>]
/
[>>]
buttons to select the
required PC.
Sleep Timer
< Stations >
Media Player
Sleep Timer
Stations
< Media Player >
< Windows Shares >
< Find PCs >
//PC_Olympia

Media Player
www.olympia-vertrieb.de
OPERATING
INSTRUCTIONS 15Page
9. Confirm the selection by pressing the
[SELECT] button. The equipment then
scans for shared folders.
10.After the equipment has completed the
scan routine, a list of folders available is
displayed.
11.Press the
[>>]
/
[>>]
buttons to select the
required folder.
12.Confirm the selection by pressing the
[SELECT] button. The equipment then
scans for files. Progress is indicated in the
bottom section of the display.
Note: The scan can take a few minutes if
there are a lot of files in the folder.
13.When the scanning routine has been
completed, you can sort the files. Press
the
[>>]
/
[>>]
buttons to select the required
sorting process.
Note: During the scanning routine, a file with the name reciva_media_cache
is stored in the folder containing the audio files. This file serves to accelerate
future scans.
Playing a Single Track
1. Press the
[>>]
/
[>>]
buttons to select the BY
ARTIST menu option.
2. Confirm the selection by pressing the
[SELECT] button.
3. Press the
[>>]
/
[>>]
buttons to select the
required artist.
4. Confirm the selection by pressing the
[SELECT] button.
5. Press the
[>>]
/
[>>]
buttons to select the
required album.
6. Confirm the selection by pressing the
[SELECT] button.
7. Press the
[>>]
/
[>>]
buttons to select the
required track.
8. Confirm the selection by pressing the
[SELECT] button.
9. The track is played.
< Example Music >
By Album
< By Artist >
By Album
< By Artist >
Add to
Queue

Media Player
OPERATING
INSTRUCTIONS
www.olympia-vertrieb.de
16Page
Playing a Whole Album
1. Press the
[>>]
/
[>>]
buttons to select the BY
ARTIST menu option.
2. Confirm the selection by pressing the
[SELECT] button.
3. Press the
[>>]
/
[>>]
buttons to select the
required artist.
4. Confirm the selection by pressing the
[SELECT] button.
5. Press the
[>>]
/
[>>]
buttons to select the
required album.
6. Confirm the selection by pressing the
[SELECT] button.
7. Start playing by pressing the [SELECT]
button.
8. The album is played.
Playback Functions
Press the [Pre1] button to select the previous track from the play list.
Press the [Pre2] button to interrupt playback.
Press the [Pre2] button again to resume playing the track.
Press the [Pre3] button to select the next track in the play list.
Press the [Pre5] button to stop playback.
Navigation in the current list
1. Press the [BROWSE] button to display the
name of the track currently playing.
2. Press the
[>>]
/
[>>]
buttons to scroll through
the list.
3. Press the [SELECT] button to select the
track displayed.
By Album
< By Artist >
Track Added
to Queue
< Song 01 >
< Song 13 >
Table of contents
Other Olympia Radio manuals