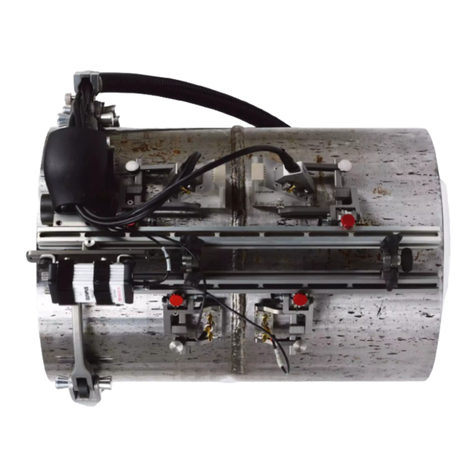
Olympus HSMT-Compact User manual

DMTA017-01EN — Rev. F
August 2016
HSMT-Compact
Manual Weld Scanner
User’s Manual
This instruction manual contains essential information on how to use this Olympus product safely and effectively.
Before using this product, thoroughly review this instruction manual. Use the product as instructed.
Keep this instruction manual in a safe, accessible location.

Olympus Scientific Solutions Americas, 48 Woerd Avenue, Waltham, MA 02453, USA
Copyright © 2007, 2012, 2013, 2014, 2016 by Olympus. All rights reserved. No part of this
publication may be reproduced, translated, or distributed without the express written
permission of Olympus.
This document was prepared with particular attention to usage to ensure the accuracy of the
information contained therein, and corresponds to the version of the product manufactured
prior to the date appearing on the title page. There could, however, be some differences
between the manual and the product if the product was modified thereafter.
The information contained in this document is subject to change without notice.
Part number: DMTA017-01EN
Rev. F
August 2016
Printed in Canada
All brands are trademarks or registered trademarks of their respective owners and third
party entities.

DMTA017-01EN, Rev. F, August 2016
Table of Contents
iii
Table of Contents
List of Abbreviations ........................................................................................ v
Labels and Symbols ........................................................................................... 1
Important Information — Please Read Before Use ..................................... 3
Intended Use .......................................................................................................................... 3
Instruction Manual ................................................................................................................ 3
Equipment Compatibility ..................................................................................................... 4
Presence of Visual Interferences or Phantom Spots ......................................................... 5
Repair and Modification ....................................................................................................... 5
Safety Symbols ....................................................................................................................... 5
Safety Signal Words ............................................................................................................... 6
Note Signal Words ................................................................................................................. 7
Safety ....................................................................................................................................... 7
Warnings ................................................................................................................................. 8
Equipment Disposal .............................................................................................................. 8
CE (European Community) ................................................................................................. 8
WEEE Directive ...................................................................................................................... 9
Warranty Information ........................................................................................................... 9
Technical Support ................................................................................................................ 10
Introduction ...................................................................................................... 11
1. Overview ..................................................................................................... 13
2. Scanner Assembly and Setup .................................................................. 19
2.1 Changing the Frame Configuration ....................................................................... 19
2.2 Attaching the Umbilical Cable ................................................................................ 23
2.3 Setting Up the Scanner ............................................................................................. 25

DMTA017-01EN, Rev. F, August 2016
Table of Contents
iv
3. Operating the Scanner .............................................................................. 27
4. Maintenance ................................................................................................ 29
4.1 Replacing Wheels ...................................................................................................... 29
4.2 Replacing a Conventional Ultrasonic Probe ......................................................... 30
4.3 Replacing a Phased Array Probe ............................................................................ 33
4.4 Unit Cleaning ............................................................................................................. 35
5. Specifications .............................................................................................. 37
6. Accessories and Spare Parts ..................................................................... 41
6.1 Umbilical Cables ....................................................................................................... 41
6.2 Yokes ........................................................................................................................... 42
6.3 Couplant-Feed Units ................................................................................................ 43
6.4 Connector Reference ................................................................................................. 44
6.5 Spare Parts .................................................................................................................. 44
List of Figures ................................................................................................... 49
List of Tables ..................................................................................................... 51
Index ................................................................................................................... 53

DMTA017-01EN, Rev. F, August 2016
List of Abbreviations
vi

DMTA017-01EN, Rev. F, August 2016
Labels and Symbols
1
Labels and Symbols
Product information and safety-related labels (with symbols) are attached to the
HSMT-Compact scanner at the locations shown in Figure i-1 on page 1 and Figure i-2
on page 2. Label details are provided in Table 1 on page 2. If any or all of the labels or
symbols are missing or illegible, please contact Olympus.
Figure i‑1 Identification label location
Model number
Serial number

DMTA017-01EN, Rev. F, August 2016
Labels and Symbols
2
Figure i‑2 Rating label location
Table 1 Rating label content
Content
S/N The serial number is an eight (8) digit number
The CE marking is a declaration that this product conforms to
all the applicable directives of the European Community. See
the Declaration of Conformity for details. Contact your Olympus
representative for more information.
The regulatory compliance mark (RCM) label indicates that
the product complies with all applicable standards, and has
been registered with the Australian Communications and
Media Authority (ACMA) for placement on the Australian
market.
The WEEE symbol indicates that the product must not be
disposed of as unsorted municipal waste, but should be
collected separately.
The direct current symbol.
Rating label (see
Table 1 on page 2)

DMTA017-01EN, Rev. F, August 2016
Important Information — Please Read Before Use
3
Important Information — Please Read Before Use
Intended Use
The HSMT-Compact scanner is designed to perform nondestructive inspections on
industrial and commercial materials.
Do not use the HSMT-Compact scanner for any purpose other than its intended use. It
must never be used to inspect or examine human or animal body parts.
Instruction Manual
This instruction manual contains essential information on how to use this Olympus
product safely and effectively. Before using this product, thoroughly review this
instruction manual. Use the product as instructed.
Keep this instruction manual in a safe, accessible location.
WARNING

DMTA017-01EN, Rev. F, August 2016
Important Information — Please Read Before Use
4
Some of the details of components and/or software images in this manual may differ
from your instrument’s components or software display. However, the principles
remain the same.
Equipment Compatibility
The HSMT-Compact scanner is compatible with the Olympus ancillary equipment
listed in Table 2 on page 4.
Always use equipment and accessories that meet Olympus specifications. Using
incompatible equipment could cause equipment malfunction and/or damage, or
human injury.
Table 2 Ancillary equipment
Equipment Description
OmniScan PA and FOCUS Several types of phased array instrument
model can be used (may require one of the
encoder cable adaptors listed below).
Phased array probe and wedge Several models used. See Table 7 on page 42
for optional holder models required according
to wedge models.
P/N: U8775201 Scanner interface adaptor to connect scanner
encoder cables with DE15 connector to
OmniScan MX2, SX or FOCUS PX with LEMO
connector scanner interface.
P/N: U8780329 Scanner interface adaptor to connect scanner
encoder cables with LEMO connector to
OmniScan MX with DE15 connector scanner
interface.
IMPORTANT
CAUTION

DMTA017-01EN, Rev. F, August 2016
Important Information — Please Read Before Use
5
Presence of Visual Interferences or Phantom Spots
In a situation of physical proximity to powerful electromagnetic radiators, visual
interferences or phantom spots may be present. These interferences are temporary
and their persistence is not permanent in comparison with physical features of the
inspected part.
Repair and Modification
The HSMT-Compact scanner does not contain any user-serviceable parts. Opening
the instrument might void the warranty.
In order to prevent human injury and/or equipment damage, do not disassemble,
modify, or attempt to repair the instrument.
Safety Symbols
The following safety symbols might appear on the instrument and in the instruction
manual:
P/N: U8769010 0.3 m long adaptor LEMO female to Bendix
male linking LEMO encoder cable to Focus LT
P/N: U8767107 0.3 m long adaptor DE15 female to Bendix
male linking DE15 encoder cable to Focus LT
Table 2 Ancillary equipment (continued)
Equipment Description
CAUTION

DMTA017-01EN, Rev. F, August 2016
Important Information — Please Read Before Use
6
General warning symbol
This symbol is used to alert the user to potential hazards. All safety messages that
follow this symbol shall be obeyed to avoid possible harm or material damage.
Shock hazard caution symbol
This symbol is used to alert the user to potential electric shock hazards. All safety
messages that follow this symbol shall be obeyed to avoid possible harm.
Magnetic field warning symbol
This symbol is used to alert the user to potentially strong magnetic fields. All
safety messages that follow this symbol shall be obeyed to avoid possible harm.
Safety Signal Words
The following safety symbols might appear in the documentation of the instrument:
The DANGER signal word indicates an imminently hazardous situation. It calls
attention to a procedure, practice, or the like that if not correctly performed or
adhered to will result in death or serious personal injury. Do not proceed beyond a
DANGER signal word until the indicated conditions are fully understood and met.
The WARNING signal word indicates a potentially hazardous situation. It calls
attention to a procedure, practice, or the like that if not correctly performed or
adhered to could result in death or serious personal injury. Do not proceed beyond a
WARNING signal word until the indicated conditions are fully understood and met.
DANGER
WARNING

DMTA017-01EN, Rev. F, August 2016
Important Information — Please Read Before Use
7
The CAUTION signal word indicates a potentially hazardous situation. It calls
attention to a procedure, practice, or the like that if not correctly performed or
adhered to may result in minor or moderate personal injury, material damage,
particularly to the product, destruction of part or all of the product, or loss of data. Do
not proceed beyond a CAUTION signal word until the indicated conditions are fully
understood and met.
Note Signal Words
The following safety symbols could appear in the documentation of the instrument:
The IMPORTANT signal word calls attention to a note that provides important
information, or information essential to the completion of a task.
The NOTE signal word calls attention to an operating procedure, practice, or the like,
which requires special attention. A note also denotes related parenthetical
information that is useful, but not imperative.
The TIP signal word calls attention to a type of note that helps you apply the
techniques and procedures described in the manual to your specific needs, or
provides hints on how to effectively use the capabilities of the product.
Safety
Before turning on the instrument, verify that the correct safety precautions have been
taken (see the following warnings). In addition, note the external markings on the
instrument, which are described under “Safety Symbols” on page 5.
CAUTION
IMPORTANT
NOTE
TIP

DMTA017-01EN, Rev. F, August 2016
Important Information — Please Read Before Use
8
Warnings
General Warnings
• Carefully read the instructions contained in this instruction manual prior to
turning on the instrument.
• Keep this instruction manual in a safe place for further reference.
• Follow the installation and operation procedures.
• It is imperative to respect the safety warnings on the instrument and in this
instruction manual.
• If the equipment is used in a manner not specified by the manufacturer, the
protection provided by the equipment could be impaired.
• Do not install substitute parts or perform any unauthorized modification to the
instrument.
• Service instructions, when applicable, are for trained service personnel. To avoid
the risk of electric shock, do not perform any work on the instrument unless
qualified to do so. For any problem or question regarding this instrument, contact
Olympus or an authorized Olympus representative.
• Do not allow metallic or foreign objects to enter the device through connectors or
any other openings. Otherwise, a malfunction or electric shock may result.
Equipment Disposal
Before disposing of the HSMT-Compact scanner, check your local laws, rules, and
regulations, and follow them accordingly.
CE (European Community)
This device complies with the requirements of both directive
2014/30/EU concerning electromagnetic compatibility and directive
2014/35/EC concerning low voltage. The CE marking indicates
compliance with the above directives.
WARNING

DMTA017-01EN, Rev. F, August 2016
Important Information — Please Read Before Use
9
WEEE Directive
Warranty Information
Olympus guarantees your Olympus product to be free from defects in materials and
workmanship for a specific period, and in accordance with conditions specified in the
Olympus Scientific Solutions Americas Inc. Terms and Conditions available at
http://www.olympus-ims.com/en/terms/.
The Olympus warranty only covers equipment that has been used in a proper
manner, as described in this instruction manual, and that has not been subjected to
excessive abuse, attempted unauthorized repair, or modification.
Inspect materials thoroughly on receipt for evidence of external or internal damage
that might have occurred during shipment. Immediately notify the carrier making the
delivery of any damage, because the carrier is normally liable for damage during
shipment. Retain packing materials, waybills, and other shipping documentation
needed in order to file a damage claim. After notifying the carrier, contact Olympus
for assistance with the damage claim and equipment replacement, if necessary.
This instruction manual explains the proper operation of your Olympus product. The
information contained herein is intended solely as a teaching aid, and shall not be
used in any particular application without independent testing and/or verification by
the operator or the supervisor. Such independent verification of procedures becomes
increasingly important as the criticality of the application increases. For this reason,
Olympus makes no warranty, expressed or implied, that the techniques, examples, or
procedures described herein are consistent with industry standards, nor that they
meet the requirements of any particular application.
Olympus reserves the right to modify any product without incurring the
responsibility for modifying previously manufactured products.
In accordance with European Directive 2012/19/EU on Waste Electrical
and Electronic Equipment (WEEE), this symbol indicates that the
product must not be disposed of as unsorted municipal waste, but
should be collected separately. Refer to your local Olympus distributor
for return and/or collection systems available in your country.

DMTA017-01EN, Rev. F, August 2016
Important Information — Please Read Before Use
10
Technical Support
Olympus is firmly committed to providing the highest level of customer service and
product support. If you experience any difficulties when using our product, or if it
fails to operate as described in the documentation, first consult the user’s manual, and
then, if you are still in need of assistance, contact our After-Sales Service. To locate the
nearest service center, visit the Service Centers page at: http://www.olympus-
ims.com.

DMTA017-01EN, Rev. F, August 2016
Introduction
11
Introduction
This manual provides instructions for assembling, installing, and operating the
HSMT-Compact scanner. The HSMT-Compact scanner is a versatile pipe and plate
scanner that can be used to inspect pipes of 4 in. schedule or greater (with minimum
outside diameters of 114 mm [or 4.5 in.]), as well as flat surfaces.
To help users understand the HSMT-Compact scanner’s operation and configuration,
this manual provides the following subject matter:
• The scanner’s main components
• Assembly and setup
• Scanner operation
•Maintenance
• Technical specifications, including system connectors
• Accessories and spare parts, with exploded view diagram and descriptions

DMTA017-01EN, Rev. F, August 2016
Introduction
12

DMTA017-01EN, Rev. F, August 2016
Overview
13
1. Overview
This chapter provides an overview of the main HSMT-Compact scanner components.
The contents of a standard case are shown in Figure 1-1 on page 13.
Figure 1‑1 Case contents
The main HSMT-Compact scanner components are the frame (with four wheels and
two handles), the probe holders, the water-couplant distribution system, and the
encoder (see Figure 1-2 on page 14).

DMTA017-01EN, Rev. F, August 2016
Chapter 1
14
Figure 1‑2 The HSMT‑Compact scanner
Frame
The frame provides a base for up to four conventional ultrasonic probes or
phased array ultrasonic probes. It is supported at both ends by subassemblies that
hold the wheels and handles used to move the unit across the surface being
inspected. If necessary, the handles can be removed to reduce the height of the
scanner.
Magnetic wheels
The magnetic wheels help hold the unit against a ferromagnetic inspection
surface. The wheels are covered with a plastic layer for smooth motion during
inspection (see Figure 1-2 on page 14).
Water manifold
Handle for moving the
scanner (2)
Magnetic wheels
Safety
attachment ring
or umbilical
bracket
Encoder Frame
Water feed
Probe holder (2)
Table of contents
Other Olympus Scanner manuals

Olympus
Olympus HST-X04 User manual

Olympus
Olympus GLIDER User manual

Olympus
Olympus SteerROVER User manual

Olympus
Olympus COBRA User manual

Olympus
Olympus HSMT-Flex User manual

Olympus
Olympus FlexoFORM User manual

Olympus
Olympus HST-Lite User manual

Olympus
Olympus HST-X04 User manual

Olympus
Olympus ChainSCANNER User manual
Popular Scanner manuals by other brands

Socket
Socket Cordless Ring Scanner Series 9 user guide

Epson
Epson Expression 800 Setup guide

Xerox
Xerox XDM2525D-WU - DocuMate 252 Quick install guide

Canon
Canon 3923B002 Brochure & specs

Panasonic
Panasonic KV-S6040W - Document Scanner installation manual

Microtek
Microtek ArtixScanDI 4020 Plus Start here