Omnilux MINI User manual

User Guide
Blemish Eraser

2 3
OMNILUX™ MINI BLEMISH ERASER
It is mandatory that users of this device read and
comprehend all information in this User Guide prior
to use of the Omnilux™ Mini Blemish Eraser device.
You must follow all the instructions in the User Guide.
Please contact us if you have any comments about the Blemish
Eraser device or this User Guide or if you experience any side
effects that are not mentioned in this User Guide or are more
severe than those described in the User Guide.
www.omniluxled.com
GlobalMed Technologies Co. KD&A PTY LTD
163 Camino Dorado Suite B 288 Flinders Street
Napa, CA 94558 Adelaide SA 5000
Tel: +1-707-224-0200 RP: Certainty IP Ltd
www.omniluxled.com Dublin, D18 CV48
+353 1582 9003
The information in this document is proprietary to
iSMART Developments Ltd, and supplied on the
understanding that it shall be kept condential to
recipients and that it shall not be reproduced and/or
used for commercial purposes without the written
consent of iSMART Developments Ltd.

2 3
USER GUIDE
It is mandatory that users of this device read and
comprehend all information in this User Guide prior
to use of the Omnilux™ Mini Blemish Eraser device.
You must follow all the instructions in the User Guide.
Please contact us if you have any comments about the Blemish
Eraser device or this User Guide or if you experience any side
effects that are not mentioned in this User Guide or are more
severe than those described in the User Guide.
www.omniluxled.com
GlobalMed Technologies Co. KD&A PTY LTD
163 Camino Dorado Suite B 288 Flinders Street
Napa, CA 94558 Adelaide SA 5000
Tel: +1-707-224-0200 RP: Certainty IP Ltd
www.omniluxled.com Dublin, D18 CV48
+353 1582 9003
The information in this document is proprietary to
iSMART Developments Ltd, and supplied on the
understanding that it shall be kept condential to
recipients and that it shall not be reproduced and/or
used for commercial purposes without the written
consent of iSMART Developments Ltd.
Contents
Who should use the Blemish Eraser device..................... 4
Device Description....................................................5
Intended Use...........................................................7
Contraindications, Warnings and Precautions...................7
Contraindications...........................................7
Warnings ..................................................9
General Safety ............................................11
Precautions ...............................................11
Risks and Benets ....................................................12
Potential Risks.............................................12
Potential Benets ..........................................13
First Time Setup ......................................................13
Unpacking and charging the Blemish Eraser device..............13
Charging the Blemish Eraser device ..........................13
Charging Status of the Blemish Eraser device..................14
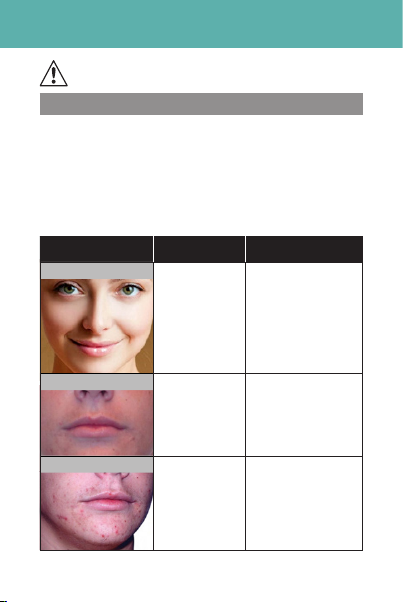
Sensitization test .....................................................15
Using the Blemish Eraser device ..................................16
Treatment Recommendations................................16
Carrying out a treatment ....................................16
How to use the Hydrocolloid Patches............................18
Care and Maintenance . . . . . . . . . . . . . . . . . . . . . . . . . . . . . . . . . . . . . . . . . . . . . . 21
Cleaning the Blemish Eraser Device..............................21
Disposal/Recycling...................................................22
Troubleshooting ......................................................22
Labeling ................................................................24
Technical specication ..............................................24
Explanation of symbols .............................................25
Warranty................................................................27
Standard Warranty .........................................27
Warranty exceptions .......................................27
What to do if your product is faulty ...........................27

4 5
OMNILUX™ MINI BLEMISH ERASER
Before using the Blemish Eraser device you must
carry out a sensitization test and wait 6 hours.
Who should use the Blemish Eraser device
Thank you for choosing the
Blemish Eraser
device.
The
Blemish Eraser device
is suitable for persons ≥14 years of
age who are suffering from mild to moderate acne vulgaris.
The typical appearance of acne is a mixture of the following:
a greasy skin, red pimples or spots, yellow pus-lled spots
and scars.
Use this chart to determine whether
the Blemish Eraser
device
is suitable for you
.
Acne type Description Suitable for the
Blemish Eraser device
Clear skin
No pimples or
spots or yellow
pus-lled spots.
No whiteheads
or blackheads
NO
the Blemish
Eraser device
is NOT
indicated for clear skin.
The Blemish Eraser
device
should NOT
be used to prevent
pimples or spots
forming
Mild acne
A few pimples
or spots, a few
pus-lled spots,
some whiteheads
or blackheads
YES Mild acne is
suitable for treatment
with
the Blemish
Eraser device
Moderate acne
Some pimples
or spots, some
pus-lled spots,
only a few small
nodules. Many
whiteheads or
blackheads
YES Moderate acne is
suitable for treatment
with
the Blemish
Eraser device

4 5
USER GUIDE
Acne type Description Suitable for the
Blemish Eraser device
Severe acne
Many pimples
or spots, many
pus-lled spots.
Some nodules.
Many whiteheads
or blackheads
NO
the Blemish
Eraser device
is NOT indicated for
severe acne.
Please consult your
doctor for a more
appropriate treatment
Whiteheads or
Blackheads –
Comedonal acne
Many whiteheads
or blackheads. No
pimples or spots.
No pus-lled
spots
NO
the Blemish
Eraser device
is NOT
indicated for whiteheads
or blackheads.
Please consult your
doctor for a more
appropriate treatment
If you have purchased the
Blemish Eraser device
and nd
that it is NOT suitable for you, please contact your supplier
to return the device within 30 days with proof of purchase.
Device Description
The Blemish Eraser device is a battery operated; cordless
wearable Light emitting diode (LED) device intended to
emit light in the blue (415nm) and red (630nm) regions of
the light spectrum for the treatment of mild to moderate
acne vulgaris.
The Blemish Eraser device system consists of the following
key components.
1. 1 x Silicone LED Patch
2. 1 x Magnetic 2 pin, 4mm to USB A Charging Cable
3. 14 x Individually Wrapped Hydrocolloid Patches including
1 Sensitization Test Patch
4. 1 x User Guide

6 7
OMNILUX™ MINI BLEMISH ERASER
The Blemish Eraser device is a silicone exible patch
containing LEDs. The LEDs generate the light.
The LEDs produce blue (415nm ± 10nm) and red (630nm
± 10nm) light in the visible spectrum. The device works
through a non-thermal mechanism called endogenous
photodynamic therapy.
The LEDs are driven by an integrated 3.7V, 37mAh Lithium
Polymer battery.
The battery is charged via a magnetic 2 pin, 4mm to
USB A connector that plugs into a standard 5v USB A
power adaptor. The device cannot be operated while
in charging mode. The charging status of the device is
indicated by a single indicator LED on the rear of the
Blemish Eraser device and the treatment LEDs.
In charging mode.
i. Solid green – battery is fully charged.
ii. Solid orange – battery charging.
The Blemish Eraser device contains a simple ON/OFF
button ( ) that switches the LEDs ON/OFF. The treatment
time is 10 minutes. The device automatically turns OFF
after the 10-minute treatment cycle. The user may stop the
treatment program during the 10 minutes by pressing the
ON/OFF button.
The LED device is worn on the face and held in place by
an adhesive hydrocolloid patch. The adhesive hydrocolloid
patch is impregnated on both sides with an elastomer and
hydrogenated petroleum resin that acts as an adhesive.
The hydrocolloid patch contains the following ingredients:
CMC Carboxymethyl cellulose (Cellulose Gum), Styrene/
Isoprene Copolymer, Hydrogenated Rosin, Homopolymer,
Parafnum Liquidum (Mineral oil), PET, Niacinamide,
Camellia Sinensis Leaf Extract (Green Tea), Sodium

6 7
USER GUIDE
Hydroxide, Sodium Hyaluronate, Salicylic Acid and
Pentaerythritol Tetrakis.
You are supplied with a set of 14 adhesive hydrocolloid
patches for treatment, one of which must be used to
carry out a Photosensitivity patch test before starting your
treatment course.
The equipment is not used to make measurements of any
sort, or to draw any conclusions regarding the indication to
treat. The equipment does not require checks on the light
output as the LEDs do not dim with age to any practical
extent.
Intended Use
The
Blemish Eraser device
is an over-the-counter device
intended to emit energy in the red and blue region of
the light spectrum, specically indicated to treat mild to
moderate acne vulgaris of the face.
The Blemish Eraser device
is intended to be used in the
home by people ≥ 14 years of age.
Contraindications, Warnings and Precautions
Contraindications
• DO NOT
reuse the hydrocolloid patches between treatment
sessions. The hydrocolloid patches are for single use only.
• DO NOT share the Blemish Eraser device device with any other
person.
The
Blemish Eraser
device is for single person use only.
• DO NOT use the Blemish Eraser device to treat any other
conditions apart from those listed in the intended use. The
Blemish Eraser device has not been tested for any other
conditions than those listed, and the risk is unknown.

8 9
OMNILUX™ MINI BLEMISH ERASER
• DO NOT use the Blemish Eraser device if you are pregnant,
planning on becoming pregnant or breastfeeding. The Blemish
Eraser device has NOT been tested on pregnant or breast-
feeding women and therefore the risk to the foetus, neonate or
pregnant women is unknown.
• DO NOT use the Blemish Eraser device if you are a child
under 14 years of age or on children under 14 years of
age. The safety of the device for children younger than 14
years of age has NOT been tested and the risk is unknown
• DO NOT use the Blemish Eraser device on open cuts,
wounds, oozing acne pustules and broken skin.
• DO NOT use the Blemish Eraser device if you have an
allergy to Silicone or Polyethylene terephthalate. The
treatment surfaces of the Blemish Eraser device contain
medical grade Silicone and Polyethylene terephthalate.
• DO NOT use the Blemish Eraser device if you have an
allergy to Hydrocolloid bandages or any of the ingredients
in the hydrocolloid patches outlined above. The LED
device xes to you face using an adhesive hydrocolloid
patch.
• DO NOT use the Blemish Eraser device if you suffer from
light induced headaches.
• DO NOT use the Blemish Eraser device if you suffer from
any genetic conditions of the eyes. If you are unsure about
any related eye condition and using the Blemish Eraser
device contact a health care professional
• DO NOT use device if you suffer from lupus
erythematosus, photosensitive eczema, or albinism.
If you use the Blemish Eraser device to treat lupus
erythematosus, photosensitive eczema, or albinism you
may cause a severe skin reaction.

8 9
USER GUIDE
• DO NOT use device if you suffer from any photosensitive
disorder (sensitization to light). If you use the Blemish
Eraser device and you suffer from a photosensitive
disorder, you may cause a severe skin reaction.
• DO NOT use device if you are taking any medication that
can cause photosensitivity. If you use the Blemish Eraser
device and you are taking any medication that can cause
photosensitivity you may cause a severe skin reaction
• For a full list of drugs that can cause photosensitivity,
please visit: www.omniluxled.com
Photosensitivity is a common side effect of various
medications. These can include certain antibiotics,
chemotherapy drugs, and diuretics. If you are unsure
about any medication, you may be taking consult your
healthcare provider.
Other substances not listed above can also
cause photosensitivity.
• Common examples of these substances are:
St John’s Wort, coal tar, deodorants, antibacterial soaps,
articial sweeteners, naphthalene (mothballs), petroleum
products, brightening agents found in laundry detergent,
and cadmium sulphide (a chemical injected into the skin
during tattooing).
Warnings
• Before using the Blemish Eraser device you must carry out
a sensitization test. Please read the section
“Sensitization test” on how to carry out the test.

10 11
OMNILUX™ MINI BLEMISH ERASER
• DO NOT over ex the Blemish Eraser device. Although it
is exible, it is not designed to withstand excess bending
or folding.
• Keep the Blemish Eraser device away from Sharp Objects.
• DO NOT use the Blemish Eraser device in any way that
is not exactly as specied in this User Guide. Use of the
Blemish Eraser device other than exactly as specied
in this User Guide has not been tested and the risk is
unknown.
• DO NOT use the Blemish Eraser device in an environment
that is NOT specied by the manufacturer, as this may
cause damage to the device or harm to the user.
• TURN OFF and REMOVE the Blemish Eraser device
immediately if it feels hot or your skin feels uncomfortably
warm. DO NOT continue treatments and contact
customer services.
• STOP using the Blemish Eraser device during a treatment
if you experience headaches or changes in vision. DO
NOT continue treatments and contact customer services.
• DO NOT use the Blemish Eraser device without rst
removing creams, lotions, or make-up BEFORE treatment.
Some ingredients in these products may cause light
sensitization or may reduce the effect of the treatment.
If you use the Blemish Eraser device without removing
these products, you may cause a skin reaction, or may
reduce the effect of the treatment.
• Only use the adhesive hydrocolloid patches
recommended. Other adhesive patches are available but
have not been tested with the device and may block light
penetration and reduce the effects of the treatment.
• DO NOT use the hydrocolloid after its expiry date.

10 11
USER GUIDE
• NEVER use the Blemish Eraser device near water or where
water can be spilt onto the equipment. DO NOT use the
Blemish Eraser device if you think it has come into contact
with water.
• Keep the Blemish Eraser device away from HOT surfaces
or direct sunlight.
• DO NOT attempt to modify the Blemish Eraser device
in any way. Modifying the Blemish Eraser device will void
your warranty. Modifying the Blemish Eraser device could
cause an electric shock when the system is used again.
The system contains no serviceable parts.
• DO NOT use the Blemish Eraser device if the device,
packaging, or cable are damaged in any way.
• DO NOT use the Blemish Eraser device any longer if it
shows any signs of damage to the material through wear
and tear.
• DO NOT leave the Blemish Eraser device unattended
when it is switched on. Accidental mishandling of the
device could lead to the risk of re or burns.
General Safety
The Blemish Eraser device is an electrical device, which
under certain circumstances could present an electrical
shock hazard to the user. Please read this User Guide
thoroughly and follow directions stated in the manual to
assure maximum safety during operation.
The Blemish Eraser device may only be charged with the
charging cable that is supplied with the device. Use of other
charging cables may not be safe and could lead to electric
shock.

12 13
OMNILUX™ MINI BLEMISH ERASER
Precautions
• DO NOT stare directly at the LED light source.
• DO NOT use the Blemish Eraser device without a
hydrocolloid.
• The Blemish Eraser device cannot be used in
charging mode.
• Unplug The 2-pin charging cable from the USB charging
port when not in use.
• Before each use, with the device switched off, clean
the Blemish Eraser device. All surfaces of the Blemish
Eraser device may be cleaned by following the cleaning
instructions.
• DO NOT use any other cleansing products other than
those stated in the cleaning instructions. Use of other
cleansing products may damage the Blemish Eraser
device.
• Store the Blemish Eraser device at room temperature in
dry conditions, away from direct sunlight.
• Don’t use the Blemish Eraser device in Direct Sunlight.
• Take care when using the Blemish Eraser device
around young children. Electrical cables can present a
strangulation hazard.
• Take care when removing the patch and hydrocolloid, as
there is a risk of damaging the top layer of the skin if it is
removed too vigorously.
• DO NOT charge the Blemish Eraser device if the USB
socket or wall adapter you are using has poor connections
or becomes hot. Make sure you plug the device into a

12 13
USER GUIDE
high quality, CE certied USB charging socket or adapter
to avoid the risk of re and burns.
• DO NOT subject the Blemish Eraser device to heavy
shocks to avoid risk of damage to the device, if you
damage the device, do not use it any longer.
Risks and Benets
Potential Risks
This list although not exhaustive, lists what are considered to
be among the mostly likely adverse effects that could occur
with use of the device.
Immediately after treatment skin may appear red. Skin
should return to normal within 1-2 hours.
Some users have reported pigmentation, skin aking or
peeling, associated pruritis and dryness with prolonged and
repeated use on the same area. This is transient and fades
within a few days.
Temporary headaches may occur immediately following the
light treatment.
Although this device emits levels of visible blue and red
light that are considered to be safe for the skin, if you have
adverse reactions after using the device that do not resolve,
you should stop using the device immediately.
If you experience a side effect that is not described above
or is of greater severity than described above, please STOP
using the device immediately and contact a healthcare
professional and iSMART Developments Ltd or your provider
and your representative Competent Authority if you deem
it applicable.

14 15
OMNILUX™ MINI BLEMISH ERASER
Potential Benets
People who have undergone a course of 4 weekly
treatments for 6 weeks using the Blemish Eraser device
report a reduction in mild to moderate acne vulgaris.
First Time Setup
Unpacking and charging The Blemish Eraser
device
Unpack the Blemish Eraser device and check off the parts
described in Device description.
Visually inspect the parts and connections. Return the device
to your supplier if you think the device or connecting parts
or components are damaged or have been previously used.
DO NOT use the Blemish Eraser device if you notice device
or connecting parts or components are damaged.
Charging the Blemish Eraser device
Before use, fully charge the device.
The Blemish Eraser device uses an integrated lithium-ion
polymer battery. When the LED device is connected to
the power supply do not attempt to use the device as
the LEDs will not illuminate.
1. To charge the Blemish Eraser device battery connect the
2-pin connection cable to the port on the upper side of
the LED device.
2. Insert the USB A connector into a suitable USB power
supply or laptop port.
3. The indicator LED will illuminate Orange to show that the
device is charging. The device is fully charged when the
indicator LED is solid green.

14 15
USER GUIDE
4. When fully charged the battery will deliver 3-4 treatments
before recharging. The lifetime of the Lithium battery can
be maximized by allowing it to fully charge and then fully
discharge during regular use.
5. Always ensure the LED device is fully charged before
commencing a treatment session.
6. Unplug the 2-pin charging cable from the USB A charging
port when not in use.
Charging Status of the Blemish Eraser device
The Blemish Eraser device uses a single display LED on the
rear of the LED device and treatment LEDs to indicate the
status of charging.
Solid Green – Battery is fully charged.
Solid Orange – Battery is charging (Charging Mode).
Low Battery Mode – Identied by Treatment LEDs
Flashing – There is not enough battery charge to complete a
treatment cycle please recharge your device.
Sensitization test
Before carrying out your rst treatment you must
carry out a sensitization test to see if you are
sensitive to light or the adhesive hydrocolloid patch.
Follow the step-by-step guide below.
DO NOT attach the Blemish Eraser device to your
face, the sensitization test should be carried out on
your arm.
1. Ensure the Blemish Eraser device is fully charged.

16 17
OMNILUX™ MINI BLEMISH ERASER
2. Remove one of the adhesive hydrocolloid patches from
its packaging.
3. See the “How to use the Hydrocolloids” section for a
step-to-step guide to using the hydrocolloids.
4. Unpeel the device side of the backing paper off the
adhesive hydrocolloid patch.
5. Place the sticky side of the adhesive hydrocolloid patch
onto the LED side (white) of the Blemish Eraser device.
Ensure the adhesive hydrocolloid patch aligns with the
shape of the Blemish Eraser device.
6. Press down across the entire surface of the adhesive
hydrocolloid patch.
7. Peel the face side of the backing paper from the
adhesive hydrocolloid patch.
8. Attach the Blemish Eraser device to the inside of your
left or right forearm and push down gently.
9. Switch ON the Blemish Eraser device and allow it to run
for a full treatment (10 minutes)
10. At any time if your skin feels HOT or uncomfortable
STOP using the device immediately.
11. After the treatment, carefully remove the
Blemish Eraser
device and adhesive hydrocolloid patch from the
treatment area. Discard the test adhesive hydrocolloid
patch in the general waste.
12. Wait at least 6 hours. If your skin on your inner arm is red
or itchy, then the treatment is unsuitable for you. Return
the device to the retailer within (30) days of purchase.

16 17
USER GUIDE
Using the Blemish Eraser device
Regarding electromagnetic compatibility (EMC) and
electromagnetic elds (EMF), in and around the home
environment the Blemish Eraser device should be
kept away
from radio frequency (RF) equipment to
avoid interference.
Treatment Recommendations:
For the treatment of mild to moderate acne vulgaris the
best results are seen by treating for 4 days a week for 6
weeks.
Maintenance treatments should be carried out as
required, according to lifestyle and skin condition.
Carrying out a treatment
DO NOT over ex the Blemish Eraser device. Although
it is exible, it is not designed to withstand excess
bending or folding.
DO NOT use the Blemish Eraser device without a
Hydrocolloid.
1. Ensure the Blemish Eraser device is fully charged
before commencing a treatment session.
2. Cleanse or exfoliate the skin to remove any traces
of skincare.
3. Use a new hydrocolloid every treatment session.
4. See the “How to use the Hydrocolloids” section for
a step-to-step guide to using the hydrocolloids.
5. Unpeel the device side of the backing paper off an
adhesive hydrocolloid patch.
6. Place the sticky side of the adhesive hydrocolloid
patch onto LED side (white) of the Blemish Eraser
device. Ensure the adhesive hydrocolloid patch

18 19
OMNILUX™ MINI BLEMISH ERASER
aligns with the shape of the Blemish Eraser device.
7. Press down across the entire surface of the adhesive
hydrocolloid patch.
8. Peel the face side of the backing paper from the
adhesive strip.
9. Using a mirror position the Blemish Eraser device
over the treatment area.
10. Switch ON the Blemish Eraser device. The device will
automatically switch OFF after 10 minutes. You may
stop the treatment at any time by pressing the
ON/OFF button.
11. After the treatment, carefully remove the Blemish
Eraser device and adhesive hydrocolloid patch from
the treatment area.
12. Remove the adhesive hydrocolloid patch from
the Blemish Eraser device and discard in general
household waste.
13. Clean the Blemish Eraser device by following the
instructions in “Cleaning the Blemish Eraser
device”. Ensure that the device is NOT being
charged when cleaning.
14. You may treat more than one treatment area in a
treatment session.
DO NOT repeat a treatment on the same treatment area
in the same treatment session

18 19
USER GUIDE
1Step
Peel the device side of the
hydrocolloid patch. � 2Step
Attach it to the LED
device. � 3Step
Once secured to the device, peel the
face side of the hydrocolloid patch. �
2Step
Attach it to the
LED device. �
1Step
Peel the device side of the
hydrocolloid patch. �
4
Step
SKIN
LED
Press firmly on the face
in the desired treatment
area. �
4
Step
Press firmly on the
face in the desired
treatment area. �
SKIN
LED
3Step
Once secured to the device, peel the
face side of the hydrocolloid patch. �
How to use the Hydrocolloid Patches
SIDE ONE - TO FACE SIDE ONE - TO DEVICE
FACE SIDE DEVICE SIDE
Step-to-step diagram for using
the Hydrocolloids

20 21
OMNILUX™ MINI BLEMISH ERASER
1Step
Peel the device side of the
hydrocolloid patch. � 2Step
Attach it to the LED
device. � 3Step
Once secured to the device, peel the
face side of the hydrocolloid patch. �
2Step
Attach it to the
LED device. �
1Step
Peel the device side of the
hydrocolloid patch. �
4
Step
SKIN
LED
Press firmly on the face
in the desired treatment
area. �
4
Step
Press firmly on the
face in the desired
treatment area. �
SKIN
LED
3Step
Once secured to the device, peel the
face side of the hydrocolloid patch. �
1Step
Peel the device side of the
hydrocolloid patch. � 2Step
Attach it to the LED
device. � 3Step
Once secured to the device, peel the
face side of the hydrocolloid patch. �
2Step
Attach it to the
LED device. �
1Step
Peel the device side of the
hydrocolloid patch. �
4
Step
SKIN
LED
Press firmly on the face
in the desired treatment
area. �
4
Step
Press firmly on the
face in the desired
treatment area. �
SKIN
LED
3Step
Once secured to the device, peel the
face side of the hydrocolloid patch. �
Other manuals for MINI
2
This manual suits for next models
1
Table of contents
Other Omnilux Personal Care Product manuals

Omnilux
Omnilux Contour Neck & Decollete User manual

Omnilux
Omnilux CONTOUR User manual

Omnilux
Omnilux CLEAR TN2112 User manual

Omnilux
Omnilux Clear-U User manual

Omnilux
Omnilux CLEAR User manual

Omnilux
Omnilux New-U User manual

Omnilux
Omnilux MINI User manual

Omnilux
Omnilux MINI User manual

Omnilux
Omnilux CLEAR User manual

Omnilux
Omnilux Men User manual