Page 3
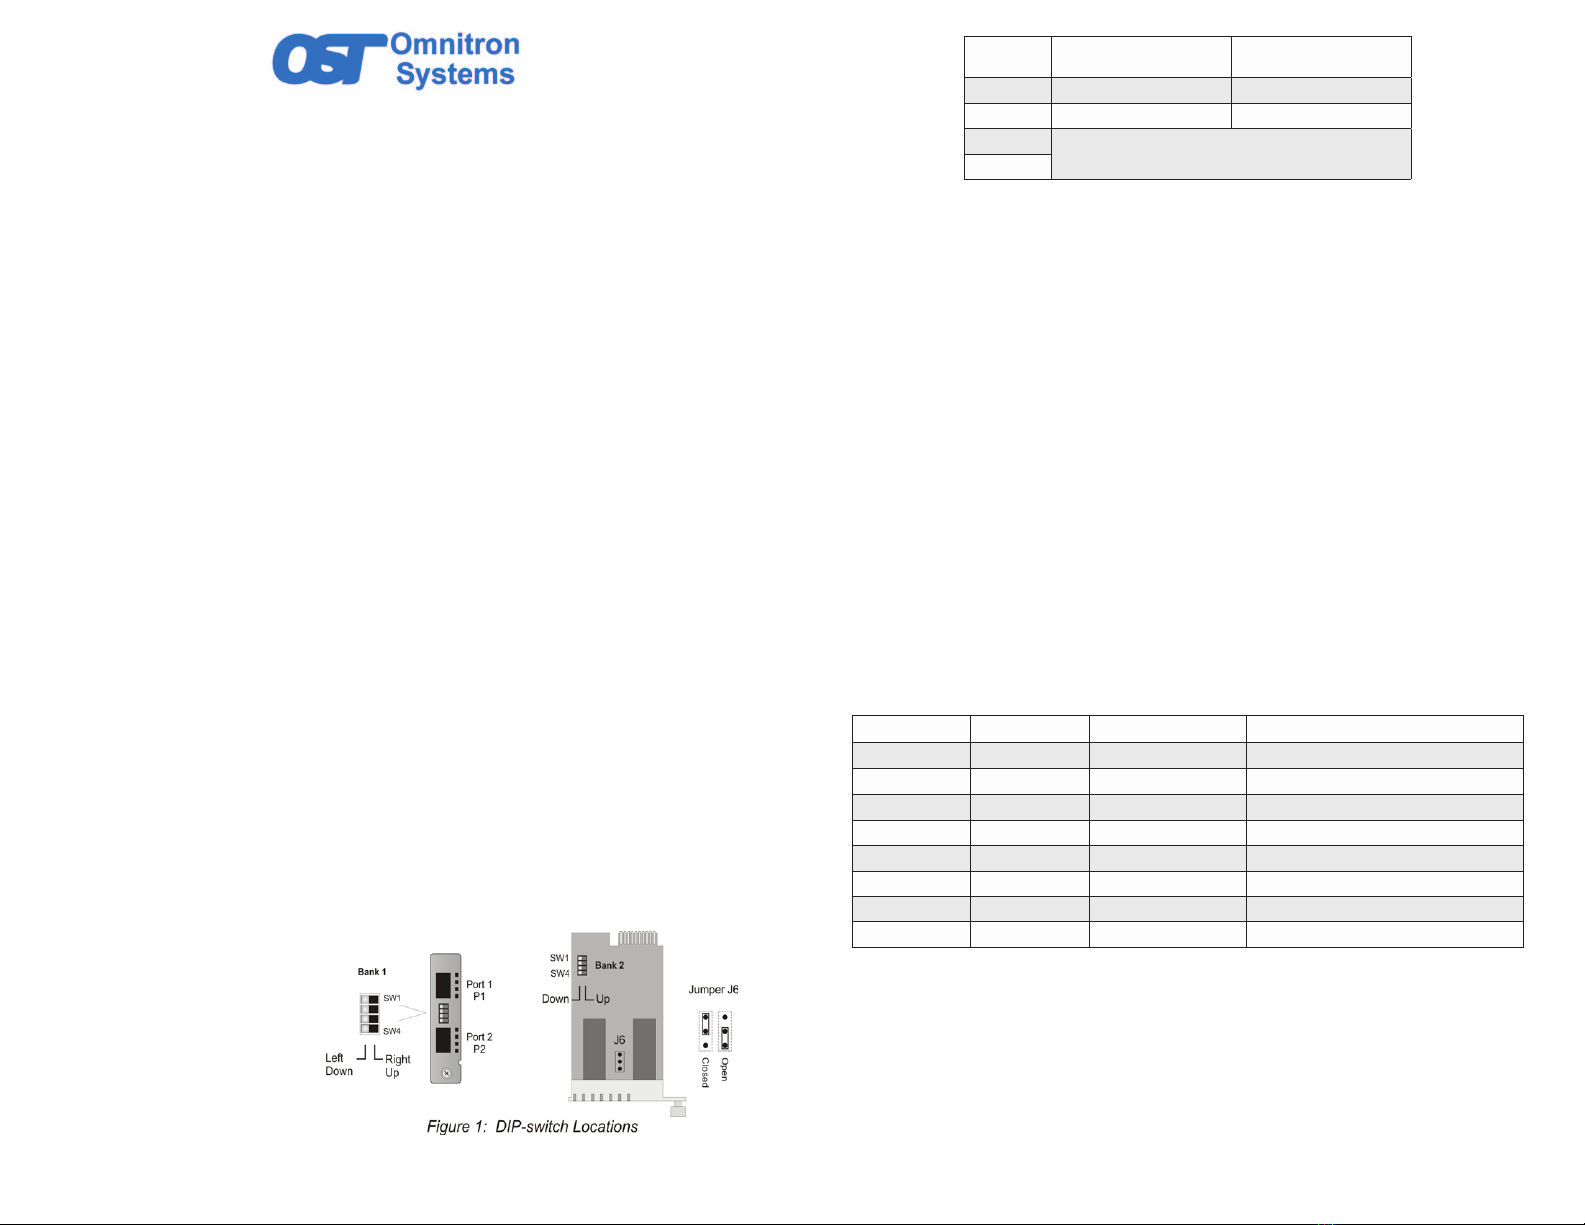
SW1 SW2 SW3 SW4 Function
DOWN DOWN DOWN DOWN Link Segment (default)
UP DOWN DOWN DOWN Asymmetrical Link Propagate P1 to P2
DOWN UP DOWN DOWN Asymmetrical Link Propagate P2 to P1
UP UP DOWN DOWN Dual Asymmetrical Link Propagate
DOWN DOWN UP DOWN Remote Fault Detect for P1 and P2
UP DOWN UP DOWN RFD + Asymmetrical LP P1 to P2
DOWN UP UP DOWN RFD + Asymmetrical LP P2 to P1
UP UP UP DOWN RFD + Dual Asymmetrical LP
All combinations except UP, UP, UP UP Symmetrical Fault Detect (SFD)*
UP UP UP UP Self Diagnostic Circuit Test
Figure 4: DIP-switch BANK 2 Link Mode and Self Test Congurations
* Symmetrical Fault Detect requires bookend conguration of two iConverter XG+ modules
connected via Port 1. For detailed information on the operation of the different Link Modes, download
the application note “iConverter Link Modes” available on Omnitron’s web page:
http://www.omnitron-systems.com/downloads_iconverter.php
SELF DIAGNOSTIC CIRCUIT TEST (SFP+ models only)
When two XG+ modules are connected via Port 1 (Port 1 to Port 1), a self diagnostic circuit test is
supported. The XG+ initiating the circuit test (all DIP-switches to UP) will generate and send a test
pattern out Port 1 to the other XG+. The receiving XG+ will detect a good test pattern and return
the test pattern back to the initiating XG+.
A successful test will produce a green blinking (5Hz) P1 LB LED on the initiating XG+ and a green
blinking (1Hz) P1 LB LED on the receiving XG+. If the initiating XG+ does not receive a valid
response, the P1 LB LED will be blinking amber (5Hz). When the self diagnostic circuit test is
initiated, the trafc received on Port 2 of both XG+ converters will be discarded.
If loopback has been initiated, self diagnostic circuit test DIP-switch will be ignored. If self diagnostic
circuit test has been initiated, loopback DIP-switches will be ignored.
2) INSTALL MODULE IN CHASSIS AND CONNECT CABLES
The XG+ module must be installed using the following chassis congurations/guidelines:
19-Module High Airow Chassis 8201-x (AC) or 8207-x (DC). Each 120W High Airow power supply
can support up to 6 iConverter modules installed in the chassis, and three of the six modules can be
XG+. The XG+ modules must be installed directly in front of the installed High Airow power supply
and the slot on the right side of the installed XG+ module must be empty. All empty slots must have
a blank panel installed. The other iConverter modules can be installed anywhere in the chassis.
A maximum of nine XG+ modules can be installed in a 19-Module High Airow Chassis. All empty
slots must have a blank panel installed.
5-Module High Airow Chassis 8221-x (AC) or 8227-x (DC). An XG+ module can be installed in
all slots. All empty slots must have a blank panel installed.
2-Module High Airow Chassis 8232-1 (AC) or 8238-1 (DC). Only one XG+ can be installed in the
chassis. The other slot can have another iConverter module installed (NMM2, 10/100M2, etc). If
the slot is empty, it must have a blank panel installed.
1-Module Chassis is not supported with the XG+ (recommend using a standalone model).
Refer to the iConverter XG, XG+ and XGT+ Chassis Installation Guidelines for Airow and Cooling
Application Note 002-A0006 for more detailed information.
The iConverter XG+ can be used in a managed conguration by installing a Management Module
(such as an iConverter NMM2 or 10/100M2) that provides monitoring, conguration and trap
notication in the same chassis.
a. Carefully slide the XG+ module into an open slot in the chassis. Align the module with the
installation guides and ensure that the module is rmly seated against the backplane. Secure
the module by fastening the front panel thumbscrew (push in and turn clockwise to tighten) to
the chassis front. Verify the “Pwr” LED is ON (indicating the chassis is powered).
b. Insert the appropriate XFP or SFP+ transceivers into the corresponding port receptacle on
the XG+.
NOTE: The release latch of the transceiver must be in the closed position before insertion.
c. When using copper CX4 XFP, connect the cable between the converter and external device
using the recommended copper CX4 cable.
d. Connect an appropriate multimode or single-mode ber cable to the ber transceiver ports
on the XG+. It is important to ensure that the transmit (Tx) is attached to the receive side of
the device at the other end and the receive (Rx) is attached to the transmit side.
3) VERIFY OPERATION
Once the module has been installed and congured per steps 1 and 2, verify the module is operational
by viewing the LED indicators.
Legend OFF State Color ON/Blinking State
Pwr Off – No power Green Green – Power On
P1/P2
Lk
Off – No Transceiver detected
or no ber link Green
Green Solid – Fiber link
Green Blinking (1/2Hz) – When SFD is enabled,
receiving remote ber fault signal from link partner
P1/P2
Stat
Off – Transceiver does not
support digital diagnostic or
no transceiver installed
Green Green Solid – Transceiver supports digital
diagnostic and no DDMI Alarm Detected
Amber Amber Solid – Transceiver supports digital
diagnostic and DDMI alarm detected
P1/P2
LB
Off – Port loopback mode not
enabled or congured
Green
Green Solid – Port set to Loopback mode and port
in loopback
P1 LB Only
Green Blinking (1 Hz) - Port responding to Circuit
Test activation with valid Circuit Test response
Green Blinking (5 Hz) - Port initiating Circuit Test
and receiving valid Circuit Test response
Amber
Amber Solid – Port set to loopback mode, but XFP
does not support loopback
P1 LB Only
Amber Blinking (5 Hz) - Port initiating Circuit Test
and not receiving valid Circuit Test response
P1 Lk,
P1 Stat,
P2 Lk,
P2 Stat
-Amber
Simultaneous Amber Blinking (1Hz) – Ports disabled
due to installed XFP drawing more current than
allowed
Figure 5: LED Indicators
NOTE: The module does not generate data, it only passes the data it receives from the
connected equipment. So both transceivers must be installed and connected in order for
the module to pass data trafc. P1/P2 Lk LED indicates an optical connection has been
established. It does not indicate the presence of data trafc .
040-8599N-002C 8/15
Omnitron Systems Technology * 38 Tesla * Irvine, CA 92618
949.250.6510 tel * 949.250.6514 fax * www.omnitron-systems.com
©2015 Omnitron Systems Technology, Inc. iConverter is a registered trademark of Omnitron Systems Technology, Inc.
Trademarks are owned by their respective companies. Specications subject to change without notice. All rights reserved.