Onbon OVP-M2D User manual

OVP-M2D USER MANUAL
Version:V1.2 Release time:2019.8.23

Directory
Directory.................................................................................................................................................................1
Statement...............................................................................................................................................................1
Instruction..............................................................................................................................................................1
Safety notification....................................................................................................................................... 1
About software.............................................................................................................................................2
Functions................................................................................................................................................................2
Description.................................................................................................................................................... 2
Features.......................................................................................................................................................... 3
Panel........................................................................................................................................................................ 3
Front panel.................................................................................................................................................... 3
Back panel......................................................................................................................................................4
Basic steps............................................................................................................................................................. 5
Menu....................................................................................................................................................................... 6
Menu button operation.............................................................................................................................6
The initial state of the main interface....................................................................................................6
Main menu.................................................................................................................................................... 7
Output setup.................................................................................................................................................9
Crop menu...................................................................................................................................................11
Option...........................................................................................................................................................12
USER MODE SAVE AND SWITCH.................................................................................................................. 16

www.onbonbx.com
Intelligent guiding.............................................................................................................................................17
FAQ........................................................................................................................................................................ 19
Parameters...........................................................................................................................................................20

1
Statement
Any companies or privates cannot copy, transcribe or translate
part or whole content of this file without our written permission. And
cannot use it on any business or benefit filed with any forms.
The specifications and information which are mentioned on the
file is for reference only, if there’s update, we will not inform you. This
file is only for guidance, and all information will not be for any
promises.
Instruction
Safety notification
There are high voltages in this product. Non-professional maintenance personnel
are not allowed to open the case or repair the device by themselves to avoid danger.The
input voltage range of this product's AC power supply is 100 ~ 240V, 50/60Hz, please use
the correct power supply.
This product is grounded through the power cord. In order to avoid current impact,
please insert the power cord into the grounded socket before connecting the product
input or output port. Protective grounding of the grounding conductor in the power
cord is essential for safe operation.Before performing any hardware operations, please
turn off the power of the LED video processor and discharge static electricity on your

www.onbonbx.com
2
body by touching a grounded surface.When you want to connect or disconnect any
signal cable or control cable, please make sure that all power cables have been
unplugged in advance.
Please use it in a clean, dry and ventilated environment. Do not put this product in
high temperature and humidity environments.This product is an electronic product,
please keep away from fire, water and flammable and explosive dangerous goods.If you
find unusual conditions such as strange noises, smoke or odors, you should immediately
unplug the power cord and contact your dealer.
About software
The software installed on this product may not be changed, decompiled,
disassembled, decrypted or reverse engineered. The above acts are illegal.
Functions
Description
OVP-M2D video processor is a video processing equipment developed and
produced by onbon for LED large-screen display, performance and rental, conference
room, studio and other markets.This product adopts HD image processing technology,
specially designed for the small spacing LED display screen. For the large HD resolution
LED screen, point-to-point input and output can be realized. Therefore, it can effectively
eliminate the jagged edge phenomenon caused by the enlargement of the image and
reduce the out-of-focus fuzzy sense of the enlarged image.At the same time because of
the U disk playback function, especially suitable for exhibition occasions.

www.onbonbx.com
3
Features
Maximum resolution is 2.55 million pixels, the horizontal maximum
3840 pixels, vertical maximum 2000 pixels;
With 5 channels HD digital and analog input interface;
Support 2 channel digital input port DVI\HDMI custom input resolution
settings;
Support hot backup of input signal source;
8 user modes can be stored for users to quickly call;
With "intelligent navigation" setting function, convenient for users to
quickly set;
Support local USB2.0 media playback;
The device can be controlled through the panel keys, USB interface or
WIFI.
Panel
Front panel
○
1
○
2
○
3
○
4
○
5
○
6
○
7

www.onbonbx.com
4
Interface
1
Power switch
2
2.8”Full color LCD(320×240)
3
Operation area ,LCD display status
INPUT area
[DVI] ~ [USB] 8 buttons,8 nos of input port button,can switch window
: if BLACK and the LED indication light is on ,then will output black screen.
4
FUNCTION area
[BRIGHT]:brightness adjustment
[FREEZE]:image freeze
[LOAD]:load user mode menu
[SAVE]:fast load the user mode to save menu
[AUTO] :VGA input image auto correction
[PART]:Switch between local display and full screen display。。
5
USB PLAY area
USB display area,including display,pause,up,down
6
MENU area
Including one rotation button ,one[OK],one [GUIDE]and one [ ]
7
USB interface
USB display insert interface
Back panel

www.onbonbx.com
5
Power
voltage
100-240V 100-240V~50/60Hz
Video input port
DVI
Computer digital signal input port
HDMI
digital HD signal input port
EXT
digital HD signal extension port
VGA
Computer analog signal input port
CV
PAL\NTSC Compound video signal input port
Audio input output port
HDMI audio
HDMI video input port built-in
AUDIO-IN
outside audio input port
AUDIO-OUT
Analog audio output port for the selected input signal source audio.
Control port
COM
USB control port
WIFI
WIFI(optional)
Basic steps
Click [OK] to enter the main menu interface, and then follow the steps below to set the
controller:
The first step: Set LED screen parameters (width, height, network port width and height
and start) according to the size of the LED screen;
Step 2: Select the corresponding signal source according to the signal source required
by the user;
Step 3: If necessary, make appropriate adjustments to the "display window";
Video output port
DVI1 - DVI2
DVI output port,connect the LED sending card via DVI connection cable.

www.onbonbx.com
6
Step 4: Select "Mode Save" or press the [SAVE] key to enter the "Mode Save" menu to
save the current display mode for next recall
Note: For detailed instructions on the above four steps, please refer to the next chapter
"Introduction to Main Menu".
Menu
Menu button operation
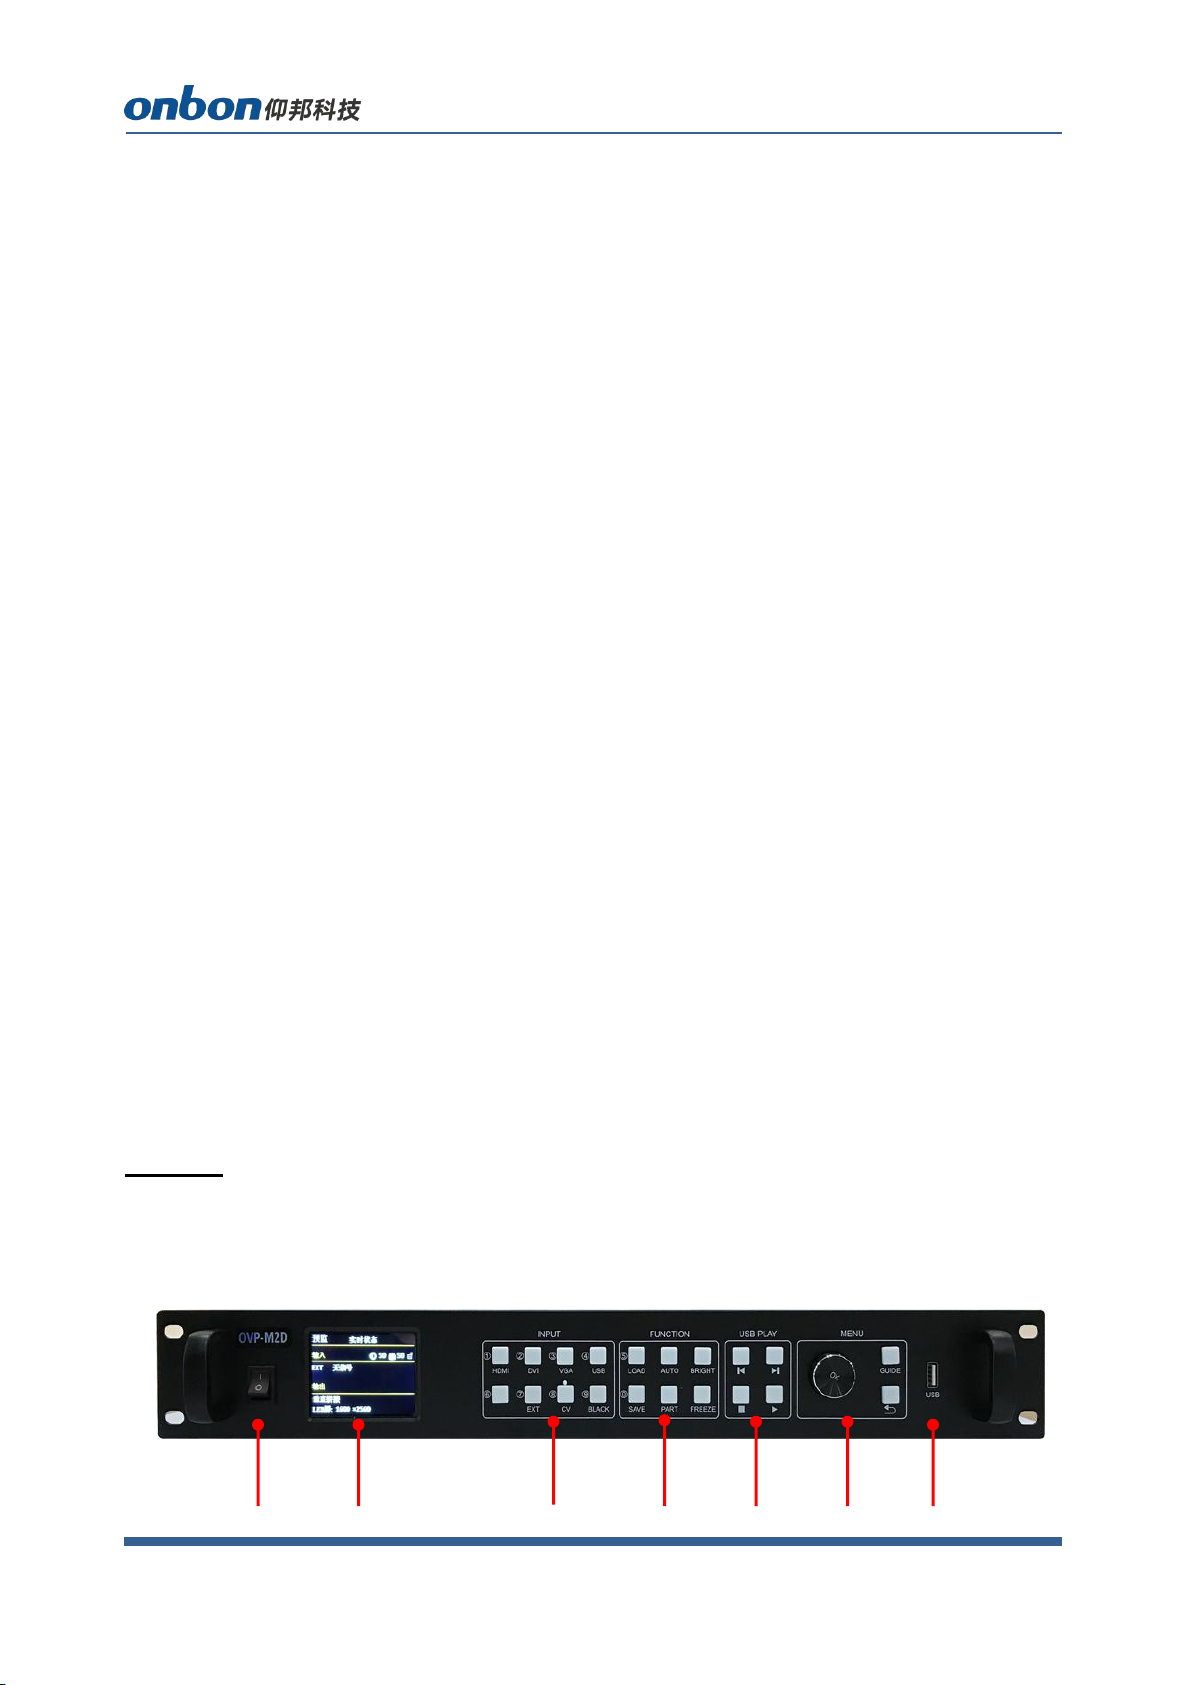
The key operation area related to the menu is the MENU area, including a knob, a
confirmation key [OK], a return key [] and a [GUIDE] key.
In the initial state of the system, short press [OK] to enter the main menu setting
interface. When the return key is pressed, the menu system will return to the previous menu
in order until it returns to the initial state
.In the browsing state, turn [Knob] counterclockwise to move the cursor upward or left;
turn [Knob] clockwise to move the cursor downward or right. When the cursor is moved to
the item to be adjusted, press the [OK] key to enter the corresponding setting sub-menu. At
this time, turn the [knob] counterclockwise to decrease the current parameter value; turn the
[knob] clockwise to Increase the current parameter value. If the adjustment is completed,
short press [OK] to write the data and save it. To return to the previous menu, use the return
key; until you return to the initial state. Press【GUIDE】key to quickly switch out the "smart
navigation" setting interface.
Note: The [knob] cannot be turned too fast, otherwise the value adjustment will change
very little and should be rotated at a constant speed.
The initial state of the main interface
During the system start up, the LCD screen will display the startup interface. After the
startup is complete, the current machine status will be displayed on the screen. The initial
menu of the system startup is shown in the following figure:

www.onbonbx.com
7
There are 3 areas:
Input: It shows selection info of input source, including input signal source format which
is detected by system;
Output: Shows real LED screen size which is set by users;
Top right corner: Shows present contrast, brightness values and button lock status
Main menu
This equipment adopts 2.8”LCD screen (320*240), and adopts font 24*24 which can display
10 rows. There are 6 parts on menu. If you are not in menu status, please click【OK】,it will
show:

www.onbonbx.com
8
Main menu and branch menu:
Main menu
The second and third menu
Output setup
Size of LED screen (total width and total height)
LAN port output setting (LAN port LED1-LED2): horizontal width, vertical
height, horizontal start, vertical start.
Adjust display window(horizontal width, vertical height, horizontal start,
vertical start)
Image
Brightness,contrast,saturation,sharpness,color temperature and dynamic
contrast.
Crop
Switch, crop width, crop height, crop horizontal start, crop vertical start
Save mode
Mode 1-Mode 8
Load mode
Mode 1-Mode 8

www.onbonbx.com
9
Option
Input EDID (horizontal width,vertical width,refresh rate) Input hot spare
(close, backup for input source) VGA setting (adjust automatically,horizontal
start,vertical start) Planned tax(tax 1, tax 2...) Other setting(switch stunt,
voice setting) Testing photo(close, photo 1 to photo 8) Button lock(open,
close) Factory reset(ADC calibration,languages,factory reset,firmware
version)
Output setup
1. LED size
Click【OK】as to enter into main menu, then choose “LED setting”, as below:
After finish settings of LED size, system will be in reset status, users need to wait for a
while here.
Note: Size range
LED screen width <= 3840
LED screen height <= 2000
LED refreshment:60 or 50

www.onbonbx.com
10
Note: When the refresh rate of the LED screen is selected to 50, the number of loading
points of the LED screen can be appropriately increased.
2. Display window
In the non-menu state, click the [OK] button to enter the main menu, led setting
Horizontal width: the adjustment range is 120 ~ the maximum number of points
can be set in the horizontal direction.
Vertical height: the adjustment range is 68 ~ the maximum number of points can be
set in the vertical direction.
Horizontal start: The minimum value is 0, and the maximum value is the maximum
number of horizontal points minus the horizontal width.
Vertical start: The minimum value is 0, and the maximum value is the maximum
number of vertical points minus the vertical height.
Note:
(1) The start bit and size of the picture in the display window can be
fine-tuned to better match the LED screen display;
(2) The default screen size is the size of the LED screen. After the LED
screen parameters are set, the general screen size will be determined
accordingly.
3. Image quality
Click【OK】as to enter into main menu--”IMAGE QUALITY”, as below:

www.onbonbx.com
11
Brightness: adjust range 0-100, default is 50.
Contrast: adjust range 0-100, default is 50.
Saturation: adjust range 0-100, default is 50.
Sharpness: adjust range 0-10, default is 5.
Dynamic contrast: adjust range 0-4, default is 1. 0 means closed, it’s invalid for inputting
VGA signal source.
Color temperature: “warm”, “natural”, “cold”, “custom”.
Customized color temperature: adjusting range in RED 0-100 adjusting range in BLUE
0-100 adjusting range in GREEN 0-100
Note:You can also adjust brightness by “BRIGHT”button on board
Crop menu
Click【OK】as to enter into main menu--”CROP”, as below:
Open or close CROP function, default is close.

www.onbonbx.com
12
Minimum is 128, maximum is “width of input signal”.
Minimum is 128, maximum is “height of input signal”.
Minimum is 0, maximum is “width of input signal”- “height of input signal”.
Minimum is 0, maximum is “height of input signal”- “width of input signal”.
Note: (1)Crop is for input source, so crop width and height cannot bigger than the
resolution of present cropped signal source.
(2)Users can select different input source by input source button on boar
Option
Click【OK】as to enter into main menu--”OPTION”, as below:
1. Input EDID
It offers EDID editing function of DVI/HDMI input signal source, means, the
recommended resolution of input signal source. In WIN7 system, when the “input EDID
(recommended)” is modified which is read by PC, the output resolution of PC will be
modified too;But for WIN10 system, output resolution of PC won’t be changed, users need
to operate manually.
By “INPUT EDID”, users can get good resolution effect in the range of 4K*2K. As below:

www.onbonbx.com
13
Width:adjust range 640-1920
Height:adjust range 480-2500
Refresh rate:adjust range 60 or 30
Note:
(1)The real adjust range is limited by port type and input bandwidth, for this equipment, it
can reach to the highest input EDID, cause input source HDMI adopts HDMI 1.4. So, it can
reach:1920*1080@60Hz.
(2)In 1920*1080@60Hz, input refresh rate should be 30Hz.
2.Input hot spare
Select “input hot spare”in “OPTION”, users can choose different backup signal
source. So, if some of image input signal is lost, system can switch to backup signal source
Immediately
3. VGA setting
Select “VGA SETTING”,as below:

www.onbonbx.com
14
VGA X:adjust range 0-300。
VGA Y:adjust range 0-300。
Note:
(1)Adjust range of VGA X and VGA Y is decided by system.
(2)When there’s excursion of VGA input signal in display, users can click “Auto adjust”
as to display correctly. And if“Auto adjust”is invalid, users can adjust“VGA horizontal start”
and “VGA vertical start” manually.
(3)If the screen of GA input signal source is a little darker, users can adjust by “VGA ADC”
or “DV ADC”
4.PLANNED TASK
PLANNED TASK Choose “PLANNED TASK” in “OPTION”

www.onbonbx.com
15
Note:
(1)Users must do calibration for the clock in system, then, you can use PLANNED TASK
function, calibration will be done by PC software.
(2)Users can set many tasks, use different user mode in different time (users need to save
user modes first), task setting will be done by PC software.
(3)When users opened the function of PLANNED task and it’s valid, you can open or close
at any time by LCD menu.
5.Other setting
Switch stunt:”switch seamless” and “fade over”
Voice setting:Including switch button and volume setting.
6. Testing photo
There are 8 testing photos, photo 1-photo 8, default is “close”.
7. Button lock
Default is “close”, when “button lock” is in open status, all the buttons will be
useless except 【OK】.

www.onbonbx.com
16
8. Factory setup
Choose “FACTORY SETUP” in “OPTION”, as below:
ADC correct:Usually, “VGA\CV correct” was done before selling in our factory.
Language: ”Chinese”and “English”, default is Chinese.
Factory reset:Reset to default value.
Firmware version:Check present hardware version, factory date.
USER MODE SAVE AND SWITCH
Mode save
Press “SAVE” on board, as below:
Select the save mode you want, then, click【OK】.
Note:
(1)If the circle is solid, means the present mode data is already there; If the circle is hollow,
means the present mode data is not there.

www.onbonbx.com
17
(2)Maximum 8 user modes, it saves image size, position,status and brightness, contrast.
(3)If users changed splicing mode, the saved user modes will be deleted.
User mode switch
Press “LOAD” on board, as below:
Note:
(1)Can be switch only if you saved before.
(2)If you already save, you can use it by pressing 1-8 numbers.
Intelligent guiding
It’s for the users who use it at the first time. And set for LED screen by 3 steps. It’s very
simple, convenient and useful. Press “【GUIDE】”, as below::
Table of contents
Other Onbon Media Converter manuals
Popular Media Converter manuals by other brands

HDFury
HDFury 4K Linker user manual

Lenz
Lenz Digital plus Gold Maxi Silent-Back EMF DCC manual

Ocean Matrix
Ocean Matrix OMX-HDMI-HDB1X8 Operation manual

IMC Networks
IMC Networks iMcV-DS3 Operation manual

Atlona
Atlona AT-HD500 user manual

Snell & Wilcox
Snell & Wilcox HD2300 Installation & operator's manual