manuals.online logo
Brands
  1. Home
  2. •
  3. Brands
  4. •
  5. Opticon
  6. •
  7. Other
  8. •
  9. Opticon EduMic User manual

Opticon EduMic User manual

Other Opticon Other manuals

Opticon EduMic User manual

Opticon

Opticon EduMic User manual

Opticon OPL-9815 User manual

Opticon

Opticon OPL-9815 User manual

Opticon OPN2002 User manual

Opticon

Opticon OPN2002 User manual

Popular Other manuals by other brands

Kessil A360W owner's manual

Kessil

Kessil A360W owner's manual

TEFAL ULTRA COMPACT MIXER manual

TEFAL

TEFAL ULTRA COMPACT MIXER manual

Martin Audio WS18X - SCHEMATICS manual

Martin Audio

Martin Audio WS18X - SCHEMATICS manual

Hendrickson AR2 series Service instructions

Hendrickson

Hendrickson AR2 series Service instructions

GO Industries 38017 installation instructions

GO Industries

GO Industries 38017 installation instructions

Cissell 30LBCMAN2 manual

Cissell

Cissell 30LBCMAN2 manual

RIDGID K-60SP manual

RIDGID

RIDGID K-60SP manual

Gage Bilt GB751SH-5 Original instructions

Gage Bilt

Gage Bilt GB751SH-5 Original instructions

OVE SIERRA 60 installation manual

OVE

OVE SIERRA 60 installation manual

ReelCraft 7800 OLB21 operating instructions

ReelCraft

ReelCraft 7800 OLB21 operating instructions

Body Armor 4x4 ECO-SERIES user manual

Body Armor 4x4

Body Armor 4x4 ECO-SERIES user manual

ROBLIN DROP Dimensions

ROBLIN

ROBLIN DROP Dimensions

EMG EMG-ACB BARREL Installation information

EMG

EMG EMG-ACB BARREL Installation information

MiniSolar MT-150 Assembling Guide

MiniSolar

MiniSolar MT-150 Assembling Guide

Parkside PSZ 250 B2 Operation and safety notes

Parkside

Parkside PSZ 250 B2 Operation and safety notes

ABB REM 610 Technical reference manual

ABB

ABB REM 610 Technical reference manual

Tyent ACE-13 user manual

Tyent

Tyent ACE-13 user manual

Parkside 55992 translation of original operation manual

Parkside

Parkside 55992 translation of original operation manual

manuals.online logo
manuals.online logoBrands
  • About & Mission
  • Contact us
  • Privacy Policy
  • Terms and Conditions

Copyright 2025 Manuals.Online. All Rights Reserved.

How to use EduMic
User guide for teachers
EduMic sends your voice directly to your students’ hearing aids.
Button
ON, OFF, mute,
telecoil and
clear pairings
Rotating clip
Attaches to the
lanyard or clothes
Microphone
Micro USB
charging
LED
Status
indicator
LED
Power
indicator
3.5 mm jack
input
FM Connector for
Universal Receiver
1To mute EduMic, briefly press the
button.
2To unmute, briefly press the button
again.
1Turn EduMic ON by pressing the
button for 2 seconds until both
indicators turn WHITE. Then, release
the button.
2Wait for 10 seconds until the status
indicator turns GREEN.
3EduMic is now ON.
Turn OFF
Press the button for 2 seconds until the
status indicator turns OFF.
Turn ON
How to turn EduMic ON/mute
Mute/unmute
EduMic is ON EduMic is muted
1Attach EduMic to the lanyard.
2Hang the lanyard around your neck
and adjust the distance to your
mouth.
The distance from your mouth to the microphone on EduMic
should be a maximum of 7-8 inches.
Use of the lanyard
For the comfort of the student
! Be aware that when touching EduMic,
noise is sent to the hearing aids. Mute
EduMic while you are handling it.
!EduMic should not be worn close to
pieces of jewelry or other hard
objects.
Max 7-8
inches
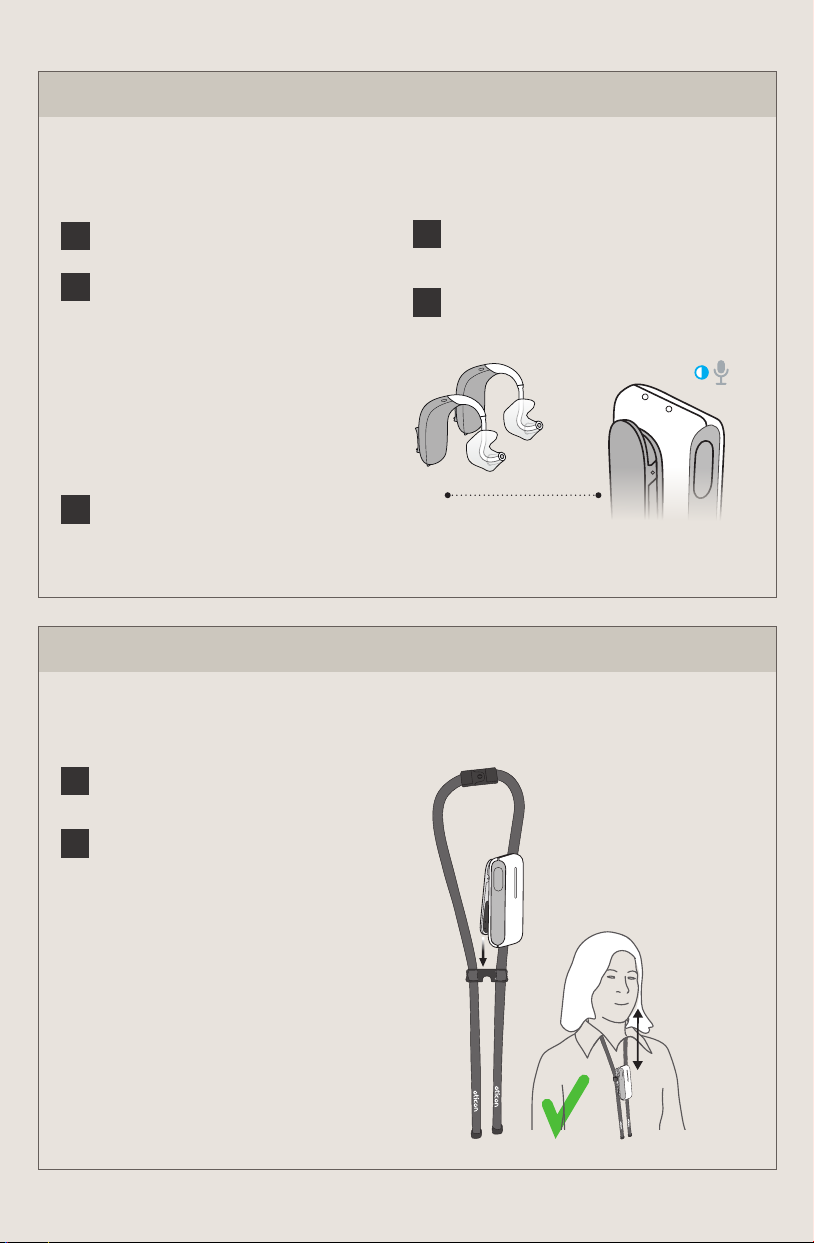
4When the status indicator turns GREEN,
EduMic is paired with the hearing aids.
5Confirm the student can hear your voice
in both hearing aids through EduMic.
1Ensure EduMic is ON.
2Turn hearing aids OFF and then ON
again. For non-rechargeable hearing
aids, this is done by opening and
closing the battery drawer. For
rechargeable hearing aids, this is
done by first pressing the lower part
of the push button for 3 seconds
(OFF) followed by pressing the lower
part of the button for 2 seconds (ON).
3Place the hearing aids within 7-8
inches of EduMic. The status indicator
flashes BLUE during pairing.
Max 7-8
inches
EduMic and the hearing aids need to be paired before use.
You only need to pair the hearing aids once.
Getting started: Pairing the hearing aids
1To mute the connection, press the
button briefly. The status indicator
flashes YELLOW.
2To unmute, press the button again
briefly.
1Plug in the 3.5 mm jack cable to send
sound to the students’ hearing aids
from external sound sources like
sound field systems, smartboards or
PC/tablets, etc.
2When the cable is connected, the
status indicator turns YELLOW, and
the EduMic microphone is disabled
(OFF). Unplug the cable from EduMic
to use the microphone.
Use the jack cable
Audio connections
EduMic is connected
with cable or FM
receiver
Connection is muted
Mute/unmute connection
1Plug in the FM receiver (not included)
to send sound to the students’
hearing aids from classroom
microphone systems like Oticon
Amigo. Ensure the EduMic is placed
within 9.5 feet from the hearing aids.
Use of FM connection
LED indicator overview
Power indicator
Charging time for full charging is 2.5 hours.
A quick 30 minute charge during a break
provides approx. 2.5 hours of use.
When the power indicator flashes RED, there
is approx. 2 hours of battery life remaining.
Status indicator
A steady light indicates you are sending
sound. A flashing light indicates that
EduMic is muted.
White Start-up
Flashing blue Pairing in progress
Green ON/microphone mode
Flashing green Mute in microphone
mode
Yellow Jack/FM mode
Flashing yellow Mute in jack/FM mode
Red Pairings cleared
Magenta Telecoil mode
Flashing magenta Mute in telecoil mode
White Start-up
Green Fully charged
Flashing yellow Charging
Flashing red Battery low
www.oticon.com
18511 15555-9916/12.19