Opticum sloth classic User manual

OPTICUM
USER MANUAL

2
Table of contents
Safety………………………….….……………………………...………………………………4
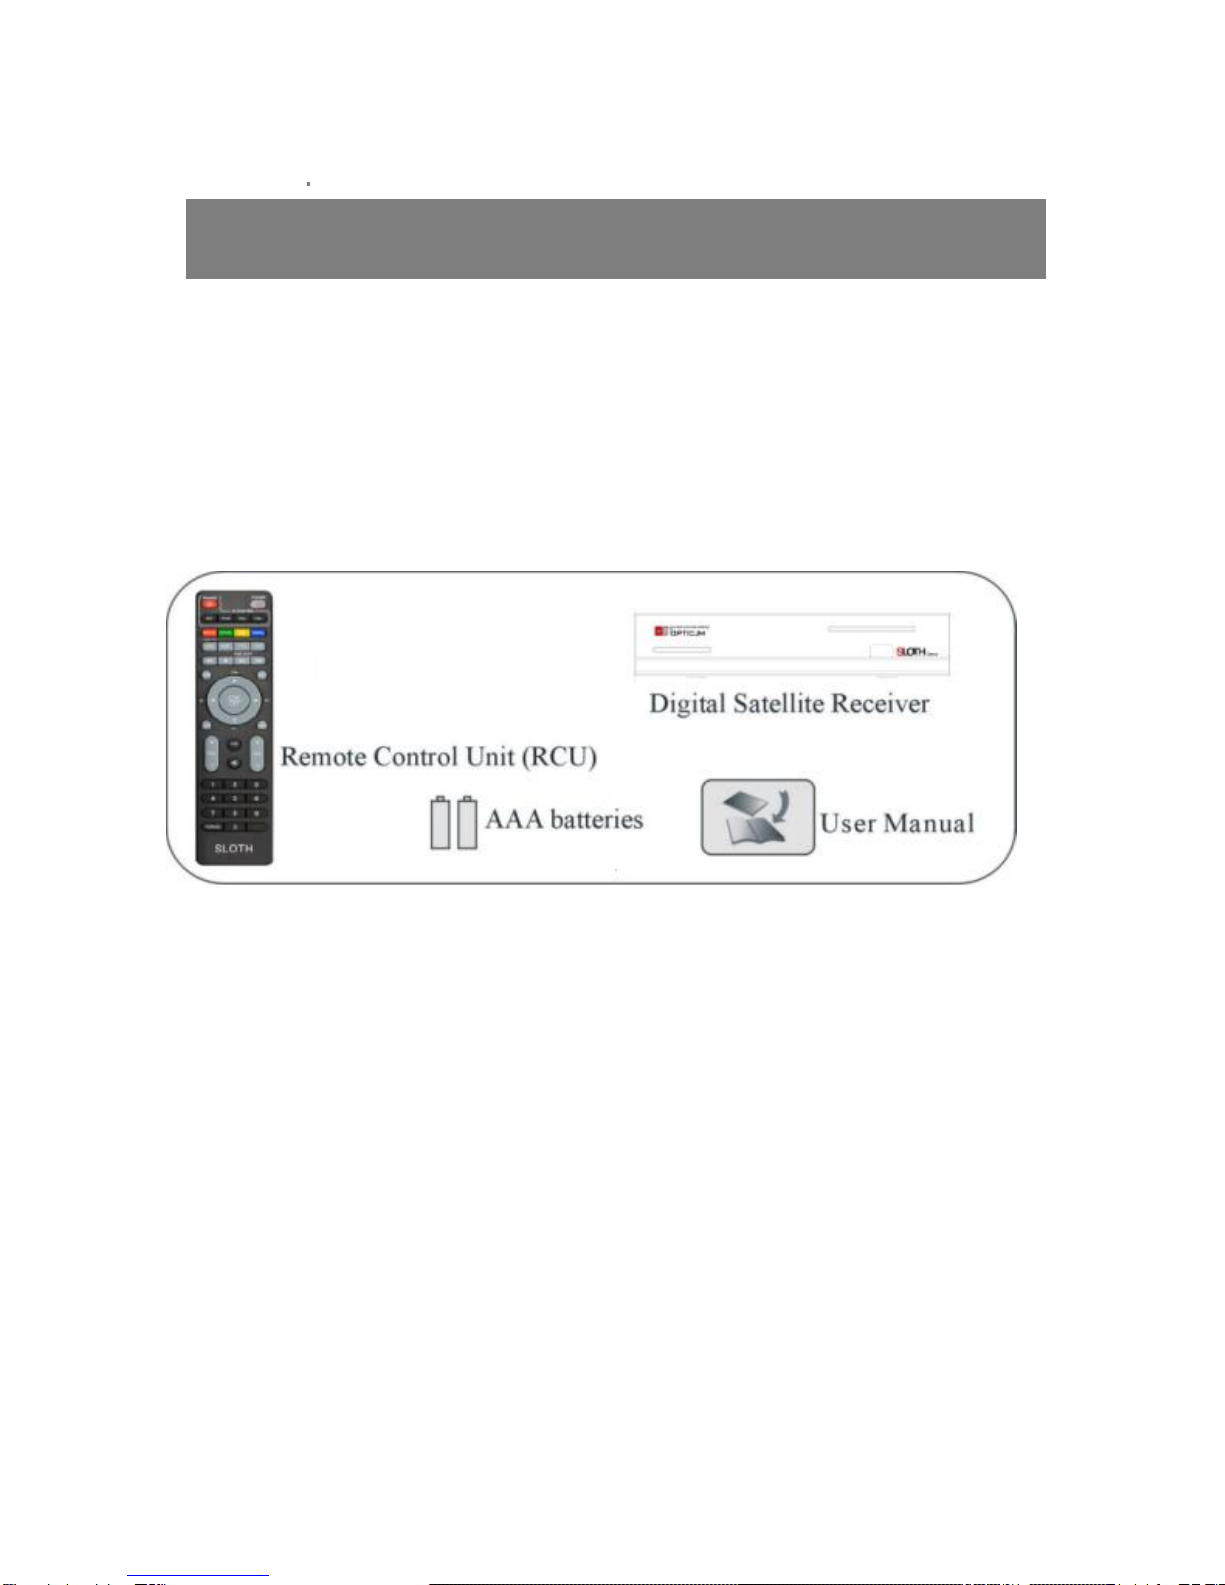
General Introduction …………………………….….……………………………...…………6
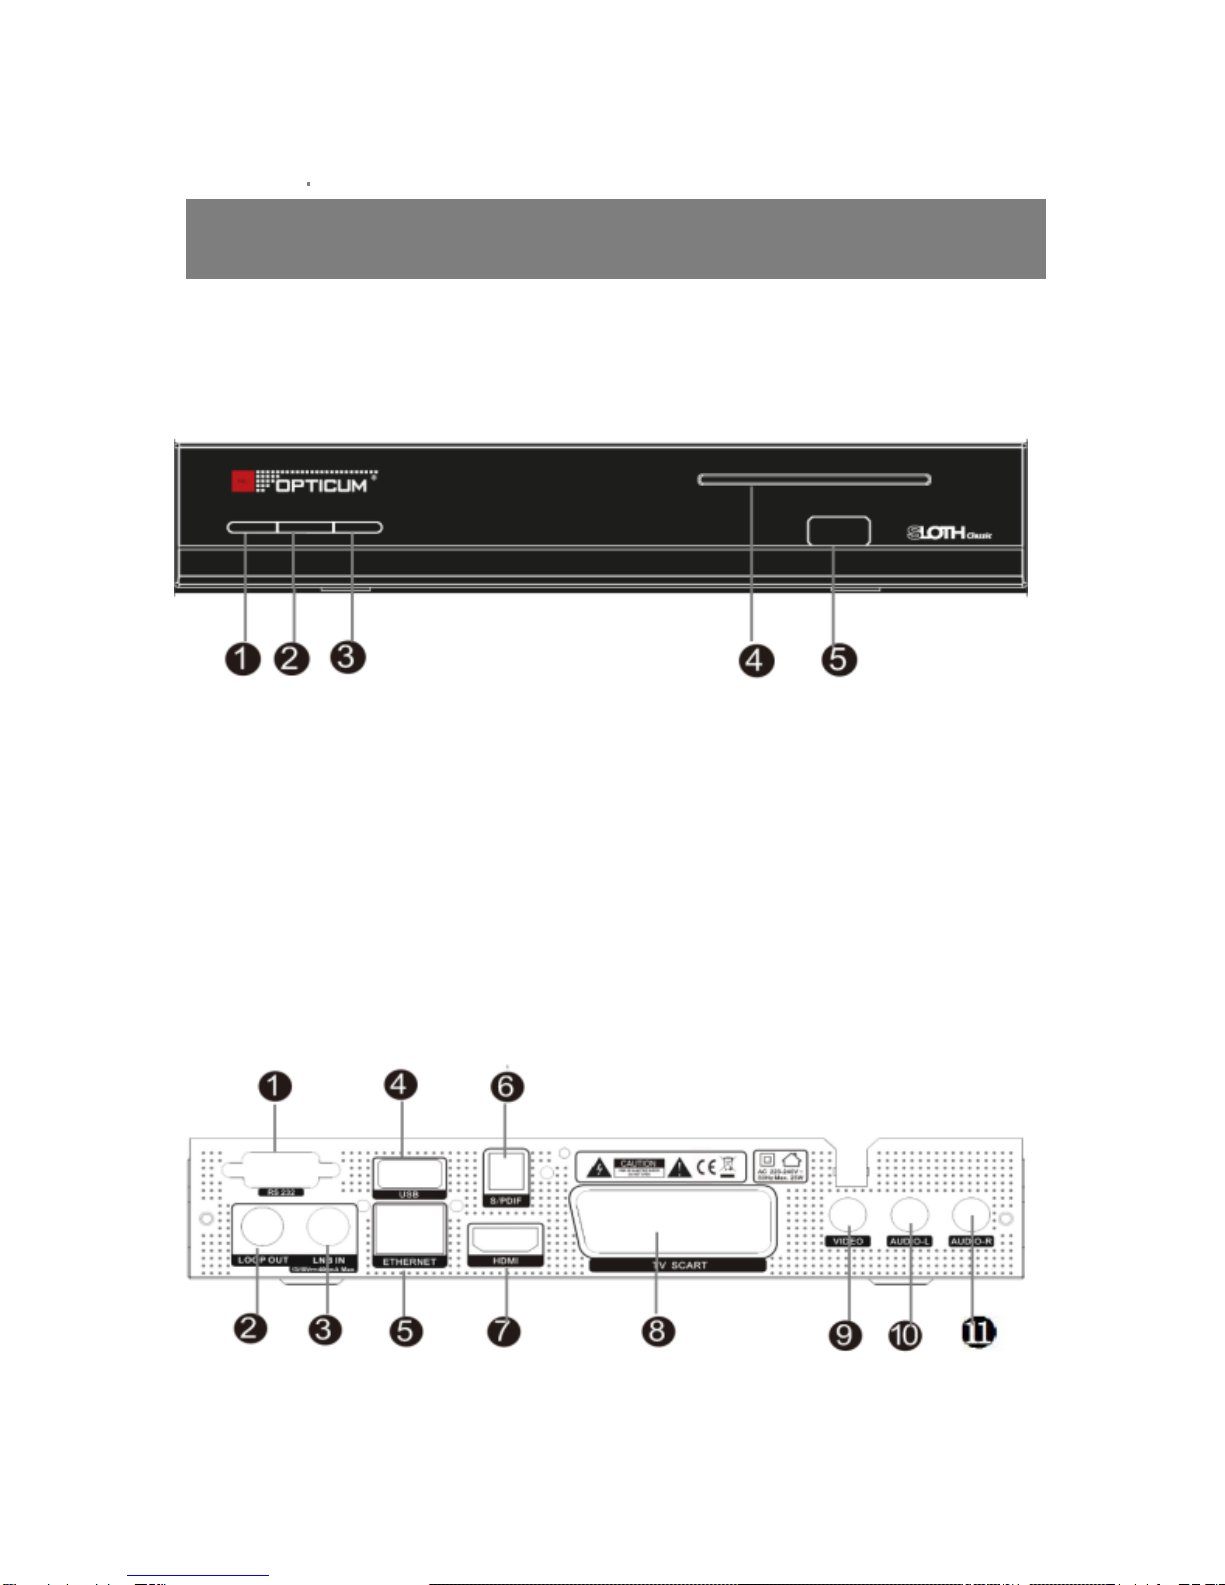
Front Panel / Rear Panel……………………………………………….…………………....8
Remote Control Unit ………………………………………………………………….……. 9
S.T.B Connection …………………………………………………………..………..11
1. Installation…………………………………………………………………………… .13
1.1 LNB Setting ……………..…....................................………………….…...13
1.2 Satellite List……….………….......................................…………………13
1.3 Search Channels……………..…………................................………………….14
1.4 Motor settings……………..…………................................………………….14
1.5 Blind search/Fast Scan……………..…………................................………………….14
2 Channels management………….……..................................………………..15
2.1 Channels Manager……………………................................…….………15
2.2 Favorites channels manager……………..……………....................................………15
2.3 Start Channel…… …… …… … … …… ……… …… … … …… …… … .…… … 16
3. System…………………….…………………………………………….…………..16
3.1 Parent control…………………………….……………………………… ..……16
3.2 Timers……………………………………….………………………………….16
3.3 Date/time settings …………………………………......................................17
3.4 Factory Default …………………………………………………… … … … .17
3.5 G-Remote ……………………………………….......................…………..17
3.6 CA … … … …… … … ……… … … …… …… …… ....................… … …… ….18
4. Multimedia…………………………........................……………............……………..18
5. USB…………………………........................……………............……………..18
6. Games…………………………........................……………............……………..18

3
Table of contents
7. Extra services…………………………........................……………............……………..18
7.1 Network MediaPortal…………….......................……………............…………….. ....…19
7.2 N32 Games …………………….......................……………............…………….. ....…19
7.3 DLNA…………………………….......................……………............…………….. ....…19
7.4 Google Maps.…..................……………............…………………………….. .....….…19
7.5 Gmail…...….….…................……………............…………………………….. .....….…19
7.6 WEB server..….…................……………............…………………………….. .....….…19
Trouble shooting.….…................……………............…………………………….. .....….…20
Specification…………………………………………………………………………………….21
Declaration of conformity………………………………………………………………………23

4
Safety Instructions
This STB has been manufactured to satisfy the international safety standards.
Please read the following safety precautions carefully.
MAIN SUPPLY
AC 220-240V~50Hz, work consumption: 10w, Max Consumption: 25w
OVERLOADING
Do not overload a wall outlet, extension cord or adapter as this may result in fire
or electric shock.
Ensure that the power source (socket) is easily accessible.
LIQUIDS
This STB shall not be exposed to dripping or splashing and that no objects filled
with liquids, such as vases, shall be placed on the STB.
CLEANING
Disconnect the STB from the main supply before cleaning. Do not use any kind
of solvents to clean the STB; only use a soft-dry cloth.
VENTILATION
The slots on top of the STB must be left uncovered to allow proper airflow to the
unit.
Ensure a minimum distance of 5cm around the apparatus for sufficient
ventilation.
Ensure that the ventilation is not impeded by covering the ventilation
Openings with items such as newspapers, table-cloths, curtains, etc.
Do not stand the STB on soft furnishings or carpets.
Do not expose the STB to direct sunlight or do not place it near a heater.

5
Safety Instructions
Do not stack electronic equipments on top of the STB.
Do not place naked flame sources, such as lighted candles on the apparatus.
ATTACHMENTS
Do not use any unrecommended attachments as these may cause hazard or
damage to the STB.
CONNECTION TO THE SATELLITE DISH LNB
Disconnect the STB from the main supply before connecting or disconnecting
the cable from the satellite dish.
FAILURE TO DO SO CAN DAMAGE THE LNB.
CONNECTION TO THE TV
Disconnect the STB from the main supply before connecting or disconnecting
the cable from TV.
FAILURE TO DO SO CAN DAMAGE THE TV.
EARTHING
The LNB cable MUST BE EARTHED to the system earth for the satellite dish.
LOCATION
Place the STB indoor in order not to expose to lightening, rain or Sunlight.
Use the apparatus only in moderate climates (not in tropical climates).
Battery handling
Batteries may contain toxic agents that are hazardous to the environment.
Therefore, dispose of the batteries immediately according to the prevailing
statutory regulations. Never throw the batteries in normal household waste

6
General Introduction
INTRODUCTION
This manual will help you learn basic functions such as installation, selecting
channels and many other functions of the STB. All functions can be operated by
the remote control. You can easily install it by selecting” Installation” function and
upgrade its software through communication cable.
The remote control is designed for easy access to all the functions at once and
for comfortable grab for your hand. It is programmed to control all functions and to
easily watch TV and Radio programs via the STB.
1. WARNING:To reduce the risk of fire or electric shock, do not expose this
apparatus to rain or moisture. The apparatus shall not be exposed to dripping or
splashing and that objects filled with liquids, such as vases, shall not be placed on
apparatus.
2. WARNING: The battery (battery or batteries or battery pack) shall not be
exposed to excessive heat such as sunshine, fire or the like.
3. WARNING: The mains plug is used as disconnect device, the disconnect
device shall remain readily operable.

7
General Introduction
UNPACKING
Unpack the unit and check to make sure that all of the following items are included
in the packaging.
1 x Remote Control Unit (RCU) 1 x User Manual
1 x Digital Satellite Receiver 2 x AAA Battery
We hope you enjoy using your digital satellite receiver!

8
Front Panel/ Rear Panel
Front Panel
1.▲:Page up on menu.
2. Power: Switch between operation and standby modes.
3.▼:Page down on menu 4.CA:CA slot 5.USB:One USB Host Port
Rear Panel

9
1. RS232: Connect to the computer using a serial line.
2. LOOP OUT: Connect another receiver.
3. LNB IN: Connect the satellite antenna cable.
4. USB: One USB Host Port 5. ETHERNET: Connect to internet
6. S/PDIF: Digital Audio output (COAXIAL).
7. HDMI: Connect to the TV using an HDMI cable
8. TV SCART: Connect to the TV using a Scart cable.
9. VIDEO: Connect to the TV using an AV cable for Video
10. AUDIO-L: Connect to the TV using an AV cable for left audio
11. AUDIO-R: Connect to the TV using an AV cable for right audio
Remote Control Unit
1. POWER: Switches TV between Operation and Standby modes
TV CONTROL
2. POWER: Switches Receiver between Operation and Standby
modes.
3. SET: set TV function
4. TV/AV: Switch between TV and AV
5. VOL-/VOL+: Change TV volume in viewing mode.
6. MEDIA: To Multi-Media menu.
7. HDMI: change video Resolution
8. USB: Enter into USB interface
9. PORTAL: Enter into internet interface
10. AUDIO: Display the audio list
11. SUBT: Display the subtitle language list.

10
12. TEXT: To show Teletext
13. FIND: Quickly find channels which you want.
14.:To fast rewind a movie or music track
15. ■: Stop recording and playing.
16. ►I I: Next
17.:To fast forward in a movie or music track
18. MENU: To display the main menu, or return to a previous menu
19. EXIT: Press to exit the current menu
20. CH+/CH-▼:Changes program.
21. V-◄/V+►:Change volume in viewing mode.
22. EPG: To show the TV and radio program guide
23. INFO: Display the program in formation bos on the screen
24. PAGE+/-: Page up/down on menu.
25. FAV: To display the favorites list in viewing mode and to select a favorite
26.: To turns sound on or off.
27. RECALL: Press to jump to previous channel watched
28. SAT: To display SAT list
29:0-9: To choose a channel directly, or to enter numeric information in a menu.
30:TV/RADIO: Switches between TV and Radio Modes
31. REC: Press to start recording TV program

11
Connection with Other Device
The following diagram shows you the connections among receiver, TV, LNB and
other equipment, please read this first if you are not sure about the connection,
and it will guide you to the correct connection.
1. Connecting to TV
1. Connecting to TV & VCR
2. Connecting the Antenna
You can connect one fixed dish LNB directly to the LNB IN, or connect at least two
dishes LNB by DiSEqC Switch.

12
2. Connecting to Dish LNB
3. Connecting to Dish LNB

13
Installation
Plug in the STB. Then press the “power” button on the remote control or the
“Standby” button on the STB Front Panel. The Main Menu will display various
functions of the STB or you can select with direction buttons on the remote control.
1 Installation
Your STB can be easily installed by using
“Installation” Menu.
Plug in the STB, and power on, to get start the
STB, please go to installation menu by pressing
“Menu” button on the remote control
1.1 LNB Setting
Selecting your installed Satellite, and press
direction buttons to set all the other figures such
as LNB type; Frequency; 22 KHz; DiSEqC control;
LNB Power and so on, then to save the settings.
1.2 Satellite List
Add satellite
Press the red button to add the new satellite to
this STB.
Edit Satellite
Press the green button. You can view the satellite
information and edit the satellite
Delete satellite
Press the yellow button to delete the satellite from this STB forever.

14
Installation
1.3 Search Channels
In this Menu, You can search channels
through Frequency, When choose the
Frequency, and then press” blue” button to
start search.
1.4 Motor Settings
To set up the auto satellite dishes (DiSEqC
1.2 system) and generate the position
system.
1.5 Blind Search
Enter this menu; choose satellite, LNB type,
And LNB Frequency, then press”OK”button
to start blind scan.
1.6 Fast Scan
You can search channels fast by different
provider’s base on fixed satellite and transponders.

15
Channels management
2. Channels management
You can easily access to any TV and Radio programs by the variable functions
available from this STB, and enjoy your digital entertainment TV fun.
2.1 Channels Manager
Delete Channel
Press ok button to select the channel you wish to
delete, and then press Yellow red to delete the
selected channel from STB.
Lock Channel
Enter here, press green button you can lock the
current channels.
Move Channel
Press ok button to select the channel you wish to move, then press Green button
to pop-up Move-To menu and input channel numbers you wish to move, and press
OK button again to insert.
Rename Channel
Press blue button, then you can use the color buttons to rename, modify.
2.2 Favorites channel
The functions of Set Favorite enhance the
flexibility of operating huge amount of TV and
Radio Channels in your STB. Personalize it with
your own way of interests can increase the joy of

16
Digital Entertainment.
Channels management
Set TV Favorite
There are total 15 groups of Favorite Sorting;
Press 1-15 number buttons to select Favorite group to mark the channel to related
Favorite (1-15) group, up/down buttons to change channels.
Set Radio Favorite
Operation procedure is same as Set TV
Favorite.
2.3 Start Channel
Enter this menu, you can setup channel which
you want to play, No matter what you play
before shut up, when you open will play what
you have set.
3. System (Parent control, language&menu
settings, Timers and Factory defaults)
Basic setting of the STB and USB functions.
3.1 Parent Control
To prevent the unauthorized accessing of your
STB, you can set the child lock password to
your receiver (Default password: 0000)
3.2 Timers
Delete all

17
Press red button, to delete all timers.
System
Delete
Press green button to delete the timer you select.
Edit
Press yellow button to edit timer.
3.3 Date/time settings
You can choose auto Date Time Mode to setting date time automatic and manual,
also can select Time Zone to choose zone
automatic and manual.
3.4 Factory Default
Set default the factory settings, by choosing
“Restore all” or “Restore settings”, etc, and
press “OK” button to proceed.
Restore all: Set default software settings and
channels to be factory settings.
Restore settings: Set default only software settings to be factory settings.
3.5 G-Remote
3.5.1 Set on STB
Main menu->System->Network Control(Apple/Android)->WEB remote: choose
“On”->Password: Input one to six character, can use digit,letter,symbol in any
combination.
3.5.2 Need install one APK (Download from internet)in mobile:Sunplus STB
Remote,make sure the wifi of mobile is connect to internet, after the success if
installation, open the application, it can automatically check all the STB in the LAN

18
network, According to IP address you can find your STB,click it ,input the
password(which set in STB),into Remote function, can enter into long-distance
remote screen.
Note: Software orAPK need install in client can download from online.
3.6 CA
Main menu->System->Conditional Access, If you have insert one CA card into
receiver, you will find its information in this menu, such as:Version,CA settings,
Card Info and so on.
4. MultiMedia
Enter MultiMedia, then you will find a lot of
Multi Medias in it, such as: Movie, Music,
photo, Ebook, Files manager, TV Records
and Games.
5 USB
Enter USB interface, then you will find PVR settings, Setting: save/Restore, FTP
Manager, UART RS232 upgrade menu, SSIPTV &VOD active.
5.1 USB Upgrade
Choose path to new software file, which is saved in USB disk device, select and
press “OK”to proceed
To set factory default should be the first thing to do after updating.
5.2 USB Remove
In full screen,and have USB connect to receiver ,please press three times for the
"Stop" key, then will POPUP the "Disconnect U-disk" for USB Safety Remove.
6. Games
This receiver contains five highly enjoyable
games, which you can get the joy while

19
relaxing (Box Man,Teris,Hit Rat,Go Bang and Sudoku.).
7. Extra services
7.1 Network MediaPortal
Main menu->Extra services->Network MediaPortal, this menu is some internet
applications. Such as :YouTube,Super serial, Super Mv,Super Movie, Super Radio
and so on.
7.2 N32 Games
Main menu->Extra services->N32 Games, this menu provide an interface to
download games from internet.
7.3 DLNA
7.3.1 Connect to internet,enter Menu: Main Menu→Extra Services→DLNA→
DMP→choose which serviio servicer you want to access(Note this serviio servicer
need connect to internet too),after open file, then you can visit the shared
Multi-Media.
7.3.2 Serviio servicer
PC or mobile need install serviio servicer control board, then can set the sharing
file, then via Champ share function, can visit these shared Multi-Media files.
7.4 Google Maps
In this menu, select left toolbar menu to change different cities and map mode,
move the highlight to the “Begin”option and press [OK] button start to view the
map.
7.5 Gmail
Connect to internet,enter Menu: Main Menu→Extra Services→Gmail, input user
name and password, After login, you can use your Gmail.
7.6WEB Server
First, please make sure the receiver and PC are in the same network. Then
connect receiver to network. Copy the
WebRemote file (decompressing files) to
U disk root directory, and connect U disk to
receiver. Then go to set, Main
Menu→System→IP settings→WEB server,
choose WEB server(HTTP、UDP、
Off),input all kinds parameters. For
example: choose WEB server to HTTP,
you can find the HTTP port: 09890, Login

20
Name: root and Login Password: root.
Check the IP Address of this receiver, Main Menu→System→System
Information→IP Address(192.168.1.121).In the PC using a browser to open web
Server,enter the address in the address bar, such as: http://192.168.1.121:9890/
(http://IPAddress: WEB server http Port/)
In the User name and password input parameters you set in the STB.Click on the
Log in into the interface.
Trouble shooting
Before contacting your local service center, please read the tips below carefully. If
the problem persists after completing the following procedure, please contact your
local product distributor or service center for further instructions.
1. No message displayed on the front display. (The product will not switch on.)
• Check the main power cable and make sure it is plugged into a suitable power
outlet.
• Check that the mains supply is switched on.
• Connect the power cable to a different power outlet.
• Check that the power switch is on at the rear of the product. (where applicable)
2. No picture
• Make sure that the product is powered on and in operation mode. (Press the
STANDBY button)
• Make sure that the AV/HDMI/YUV cable is firmly connected to the TV.
• Make sure that the antenna cable is properly connected to the product.
• Be sure to activate channel search.
• Check the brightness level of the TV.
• Check if the channel is currently on air. Contact the broadcaster to ensure that
the channel is running.
3. Poor picture/sound quality
• Make sure there is no mobile phone or microwave oven near the product.
• [Satellite] Check that your dish alignment is correct.
Table of contents
Other Opticum Receiver manuals

Opticum
Opticum DVB-S User manual

Opticum
Opticum HD 9600 User manual

Opticum
Opticum HD X406p User manual

Opticum
Opticum HD X403P User manual

Opticum
Opticum AX LION NS User manual

Opticum
Opticum X80 HDMI User manual

Opticum
Opticum XS65 User manual

Opticum
Opticum ACTUS MINI User manual

Opticum
Opticum HD AX 150 User manual

Opticum
Opticum HD S60 User manual