OPUS aeroPOUCH 4 Instrukcja obsługi / User guide
4. INSTALLATION
•Plug the power cable.
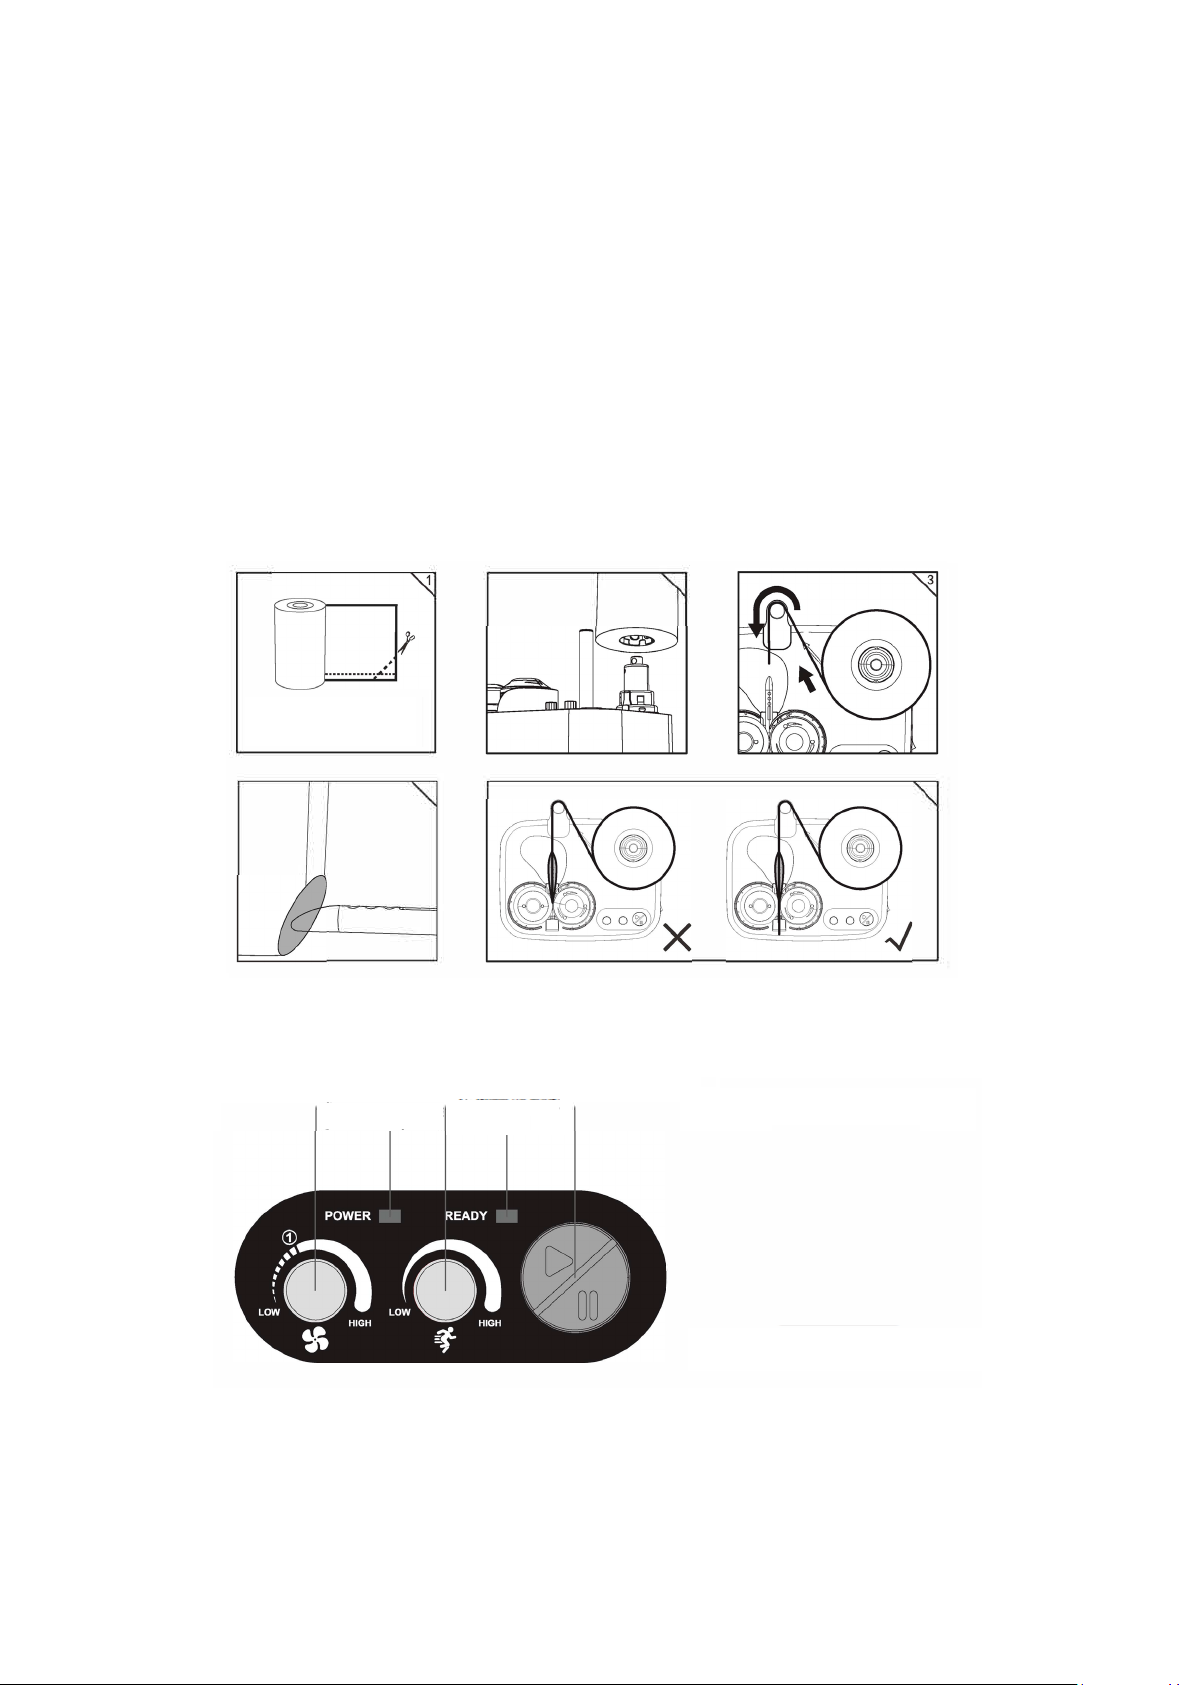
•Before you install the roll of foil cut the lower corner off with a pair of Sharp scissors.
See Dig.1 below.
•Put the roll foil on the feeder capstan, there are grooves inside the tube of the rolls of
foil that line up with the capstan carefully. See Dig 2 and 3 below.
•SEE the direction in which the foil must be placed on the tension bar guide - see Dig 3
below.
•Now feed the foil over the nozzle SEE Dig 4 and then up to the sealing rollers,
see Dig 5.
•Make sure that the foil is exactly between the sealing roller and the heated sealing roller
so that after pressing the start button, smooth welding starts Dig. 5.
5. OPERATIONS
•Before turning on the device read about the various functions of the control panel.
•Plug the device into the power socket.
•Switch on, the power light comes on and the ready light blinks. Now the sealing roller
begins to heat up. When the sealing roller is at the set temperature, the ready light
stops blinking. The device is now ready for use.
Temperature setting switch
Air pressure control knob Speed control knob Start and pause button
Power indicator Ready to work indicator
• ®
Air Cushion Machine
Instruction manual
G
(2001400mm
w w
Please read carefully before use.
Approximately
3cm (1-1/2") cut o corner.
4
2
5
• ®
Air Cushion Machine
Instruction manual
G
(2001400mm
w w
Please read carefully before use.
Approximately
3cm (1-1/2") cut o corner.
4
2
5
• ®
Air Cushion Machine
Instruction manual
G
(2001400mm
w w
Please read carefully before use.
Approximately
3cm (1-1/2") cut o corner.
4
2
5
OPUS aeroPOUCH 4 Instrukcja obsługi / User guide
4. INSTALLATION
•Plug the power cable.
•Before you install the roll of foil cut the lower corner off with a pair of Sharp scissors.
See Dig.1 below.
•Put the roll foil on the feeder capstan, there are grooves inside the tube of the rolls of
foil that line up with the capstan carefully. See Dig 2 and 3 below.
•SEE the direction in which the foil must be placed on the tension bar guide - see Dig 3
below.
•Now feed the foil over the nozzle SEE Dig 4 and then up to the sealing rollers,
see Dig 5.
•Make sure that the foil is exactly between the sealing roller and the heated sealing roller
so that after pressing the start button, smooth welding starts Dig. 5.
5. OPERATIONS
•Before turning on the device read about the various functions of the control panel.
•Plug the device into the power socket.
•Switch on, the power light comes on and the ready light blinks. Now the sealing roller
begins to heat up. When the sealing roller is at the set temperature, the ready light
stops blinking. The device is now ready for use.
Temperature setting switch
Air pressure control knob Speed control knob Start and pause button
Power indicator Ready to work indicator
OPUS aeroPOUCH 4 Instrukcja obsługi / User guide
OPUS
aeroPOUCH 4
PL Instrukcja obsługi
OPUS aeroPOUCH 4 Instrukcja obsługi / User guide
4. INSTALLATION
•Plug the power cable.
•Before you install the roll of foil cut the lower corner off with a pair of Sharp scissors.
See Dig.1 below.
•Put the roll foil on the feeder capstan, there are grooves inside the tube of the rolls of
foil that line up with the capstan carefully. See Dig 2 and 3 below.
•SEE the direction in which the foil must be placed on the tension bar guide - see Dig 3
below.
•Now feed the foil over the nozzle SEE Dig 4 and then up to the sealing rollers,
see Dig 5.
•Make sure that the foil is exactly between the sealing roller and the heated sealing roller
so that after pressing the start button, smooth welding starts Dig. 5.
5. OPERATIONS
•Before turning on the device read about the various functions of the control panel.
•Plug the device into the power socket.
•Switch on, the power light comes on and the ready light blinks. Now the sealing roller
begins to heat up. When the sealing roller is at the set temperature, the ready light
stops blinking. The device is now ready for use.
Temperature setting switch
Air pressure control knob Speed control knob Start and pause button
Power indicator Ready to work indicator