OPW PetroVend M1700-SUN-FSC3000 Manual

Part Number: M1700-SUN, Rev. 1
Issue Date: tbd - DRAFT
Supersedes: 6/12/2020
M1700-SUN - FSC3000™
SUNCOR FSC3000
Installation, Operation and Maintenance

NOTE: Before you use this guide, make sure you have the latest revision. Check the revision
level of this document against the most current revision found at
http://www.opwglobal.com/opw-fms/tech-support/manuals-how-to-videos. Download the
latest revision if necessary.
OPW Fuel Management Systems is a part of Dover Fueling Solutions.
Copyright Information
Copyright © 2019 Delaware Capital Formation, Inc. All Rights Reserved. DOVER, the DOVER logo are
registered trademarks of Delaware Capital Formation, Inc., a wholly-owned subsidiary of Dover Corporation.
Contact OPW Fuel Management Systems
Visit us at http://www.opwglobal.com/opw-fms, or contact us at:
Call 1-877-OPW-TECH (877-679-8324)
For calls outside US and Canada, call +1-708-485-4200
Monday through Friday, 7 a.m. to 6 p.m., US CST
For technician registration, see
http://www.opwglobal.com/opw-fms/tech-support/technician-registration
For in-depth training via OPW University, see
http://www.opwglobal.com/opw-fms/tech-support/training-certification
Doc. No.: M1700-SUN Rev.: 1
Page 2 of 57

Table of Contents
Section 1 FSC3000 - SUNCOR 7
Section 1 System Equipment 8
1.1 FSC3000 8
1.2 Commercial Outdoor Payment Terminal (C/OPT) 10
1.2.1 Technical Specifications 10
1.3 Pump Control Terminal (PCT) 11
1.4 Connections 12
Section 3 Command Line Instructions 14
3.1 Single Command Instructions 14
Section 4 System Access 17
4.1 Open/Close 17
4.2 Hello/Bye 17
Section 5 System Time and Date 18
5.1 Time Commands 18
5.2 Daylight Savings Time 18
5.3 Time Change Commands 18
5.4 Date Commands 18
5.5 System ON/OFF Commands 19
5.6 Light ON/OFF Time Commands 19
Section 6 System Devices 20
6.1 FIT (C/OPT) Commands 20
6.1.1 Show Current FIT (C/OPT) Status 20
6.1.2 Configure FIT (C/OPT) 20
6.1.3 Install FIT 21
Doc. No.: M1700-SUN Rev.: 1
Page 3 of 57

6.1.4 Remove FIT 21
6.2 PCT (PCM) Commands 21
6.2.1 Configure PCT 22
6.2.2 Install PCT 22
6.2.3 Remove PCT 22
6.3 PCT Position Commands 22
6.3.1 Configure PCT Position 22
6.4 Show Pump # 24
Section 7 Customer Messages 25
7.1 Receipts 25
7.1.1 About Receipts 25
7.1.2 Receipt Header 25
7.1.3 Receipt Trailer 25
7.2 Sample Receipt 25
7.3 Display Formatting Commands 26
7.3.1 Character Display Commands 30
7.3.2 Graphic Display Overview 30
7.3.3 Graphics Display Command Syntax 31
7.3.4 Graphics Display Picture Selection 31
7.3.5 Graphics Display Text Position 31
7.3.6 Graphics Display Font Selection 31
7.3.7 Time of Day in a Graphics Display 32
7.3.8 Inverting the Graphics Screen 32
7.3.9 Clearing the Graphics Screen 32
7.3.10 Cleaning the Screen 32
Doc. No.: M1700-SUN Rev.: 1
Page 4 of 57

7.3.11 Graphics Display Prompts, Type Styles and Position Codes 33
7.3.12 Graphic Display Examples 35
7.4 Keyboard Commands 35
7.5 Local Message Commands 35
7.5.1 Format Local Messages 35
7.5.2 Show Local Messages 36
Section 8 System Parameters 37
8.1 System 37
8.2 Site ID 37
8.3 Fuel Types 38
8.4 Fueling Units 39
8.5 Passwords 39
8.6 Language 40
8.7 Echo 40
8.8 Version 40
8.9 Host 40
8.10 GST (General Sales Tax) 42
Section 9 Transaction Data 43
9.1 Show or Print Summary by Transaction, Date, Time, Card, or Vehicle 43
9.2 Set Transaction 43
Section 10 System Totals 45
10.1 Showing or Printing Total Transactions by Date, Time, Card, or Vehicle 45
10.2 Showing or Printing Summary of Total Transactions by Date, Time, Card, or
Vehicle 45
10.3 Midnight Totals 45
10.4 Day Totals 45
Doc. No.: M1700-SUN Rev.: 1
Page 5 of 57

Section 11 Journal Printer 47
11.1 Lock Printer 47
11.2 Unlock Printer 47
Section 12 Network Commands 48
12.1 Host Commands 48
12.1.1 Set Host 48
12.1.2 Show Host 48
12.1.3 Set/Show IP 48
12.1.4 ISO Commands 49
12.1.5 Show ISO 49
12.1.6 Set ISO 50
12.2 Debugging Commands 51
12.2.1 Show/Print/Set Debug 51
12.2.2 Test Circuit 51
12.2.3 Monitor Host 51
12.3 Local Message Commands 51
12.3.1 Format Local Message 51
12.3.2 Show Local Message 51
Appendix A - Memory Management 52
Appendix B - USB Memory Key Operation 54
Warranty 56
Doc. No.: M1700-SUN Rev.: 1
Page 6 of 57

Section 1 FSC3000 - SUNCOR
lThe FSC3000 can control up to 12 C/OPTs (up to 32 fueling positions in mechanical pumps)
lOn-site or remote access
lAutomatic daily pump totals
lOn-demand Pump, Product and Shift Totals
lProgrammable customer messages and receipts
lProgrammable Open/Close system times
lUser configurable Login Timeout
Doc. No.: M1700-SUN Rev.: 1
Page 7 of 57

Section 1 System Equipment
1.1 FSC3000
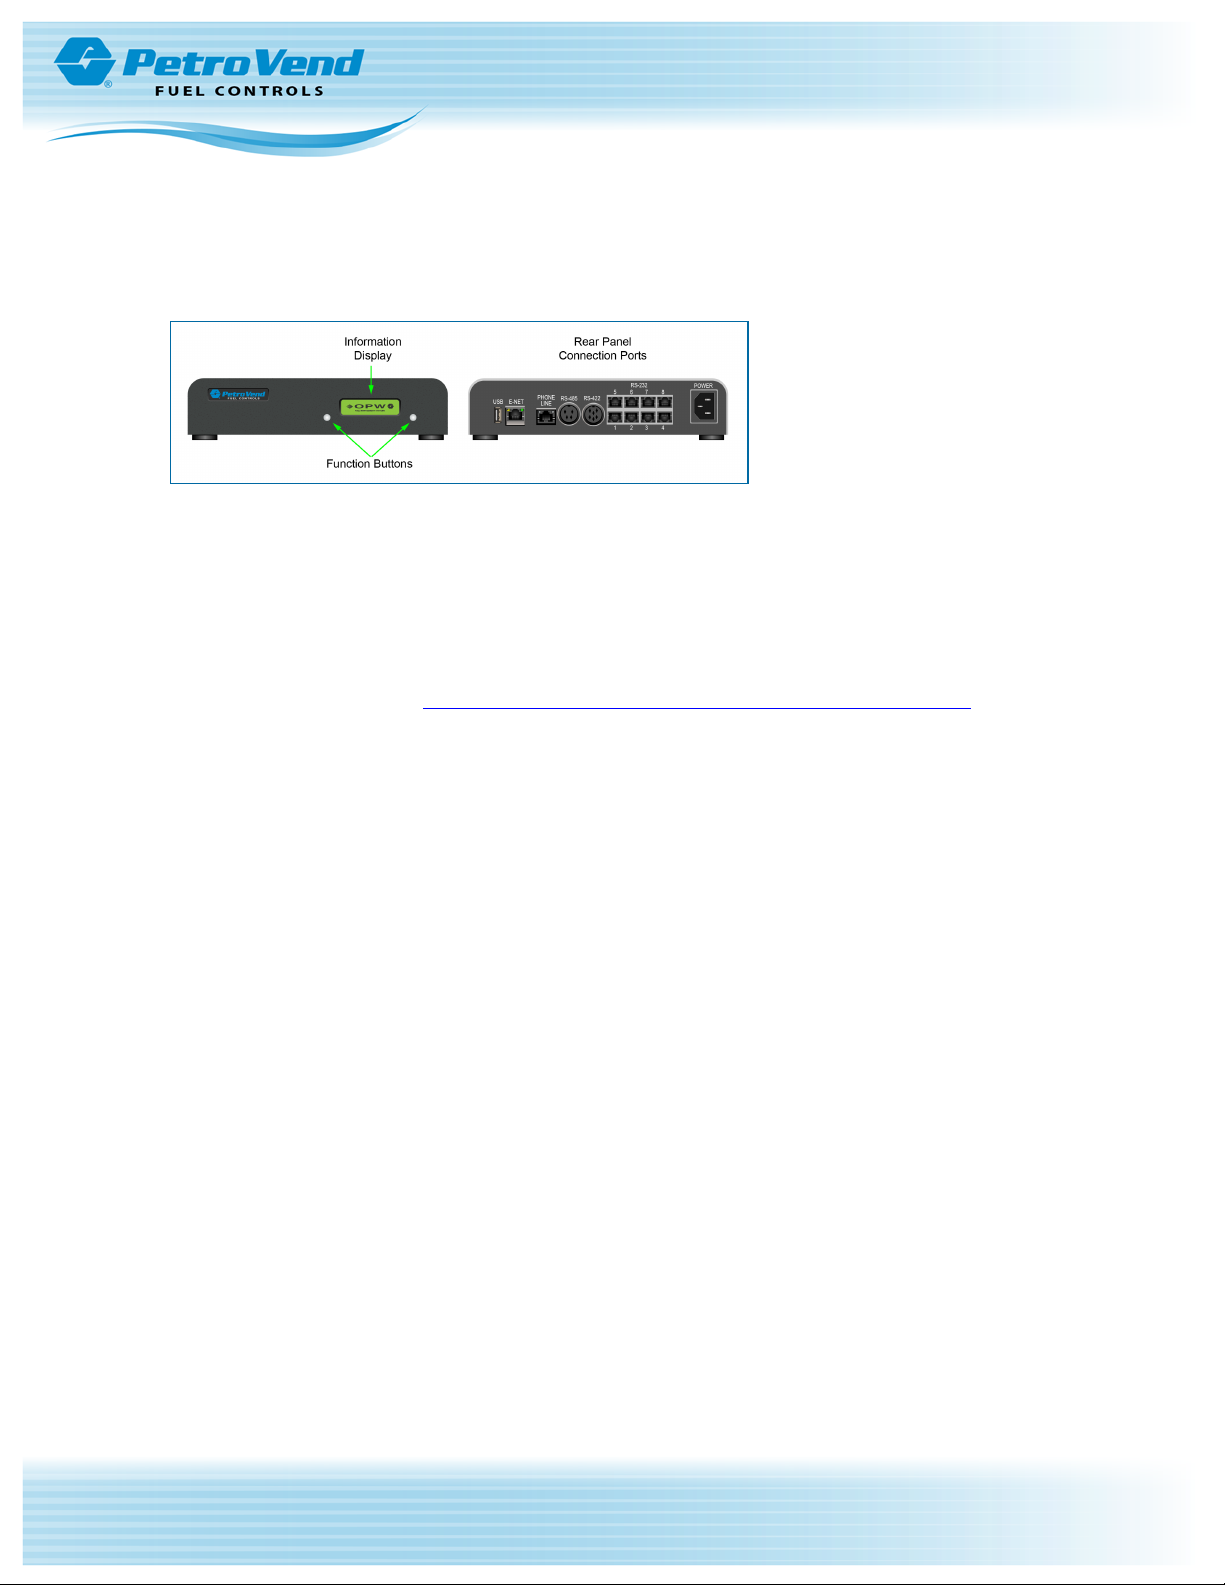
The FSC contains the software shown in the remaining instructions in this manual. This small, tabletop unit
processes data supplied over Petro-Net from the PCTs, and OPTs. The FSC contains all card information
and system configuration data.
The FSC manages the operations of the OPTs, the terminal or computer, the journal printer, and an optional
modem.
The FSC must be installed indoors, and connected to one of the OPTs using twisted pair wiring and rigid
steel conduit.
Install the FSC as described in M1700 FSC300 Installation, Operation and Maintenance Manual. The
M1700 manual also contains an illustration of the FSC board and descriptions of its status LEDs and
switches.
Before you can program the system, the FSC must be connected to a computer compatible with ASCII
communications.
The FSC uses an optional internal modem or TCP/IP socket connection for remote operation. This gives you
complete control from a remote terminal or computer over standard telephone lines or the Internet.
The FSC has a built-in battery to protect its data in case of an interruption or loss of AC power. The battery
can be disconnected when a total clearing of data is required.
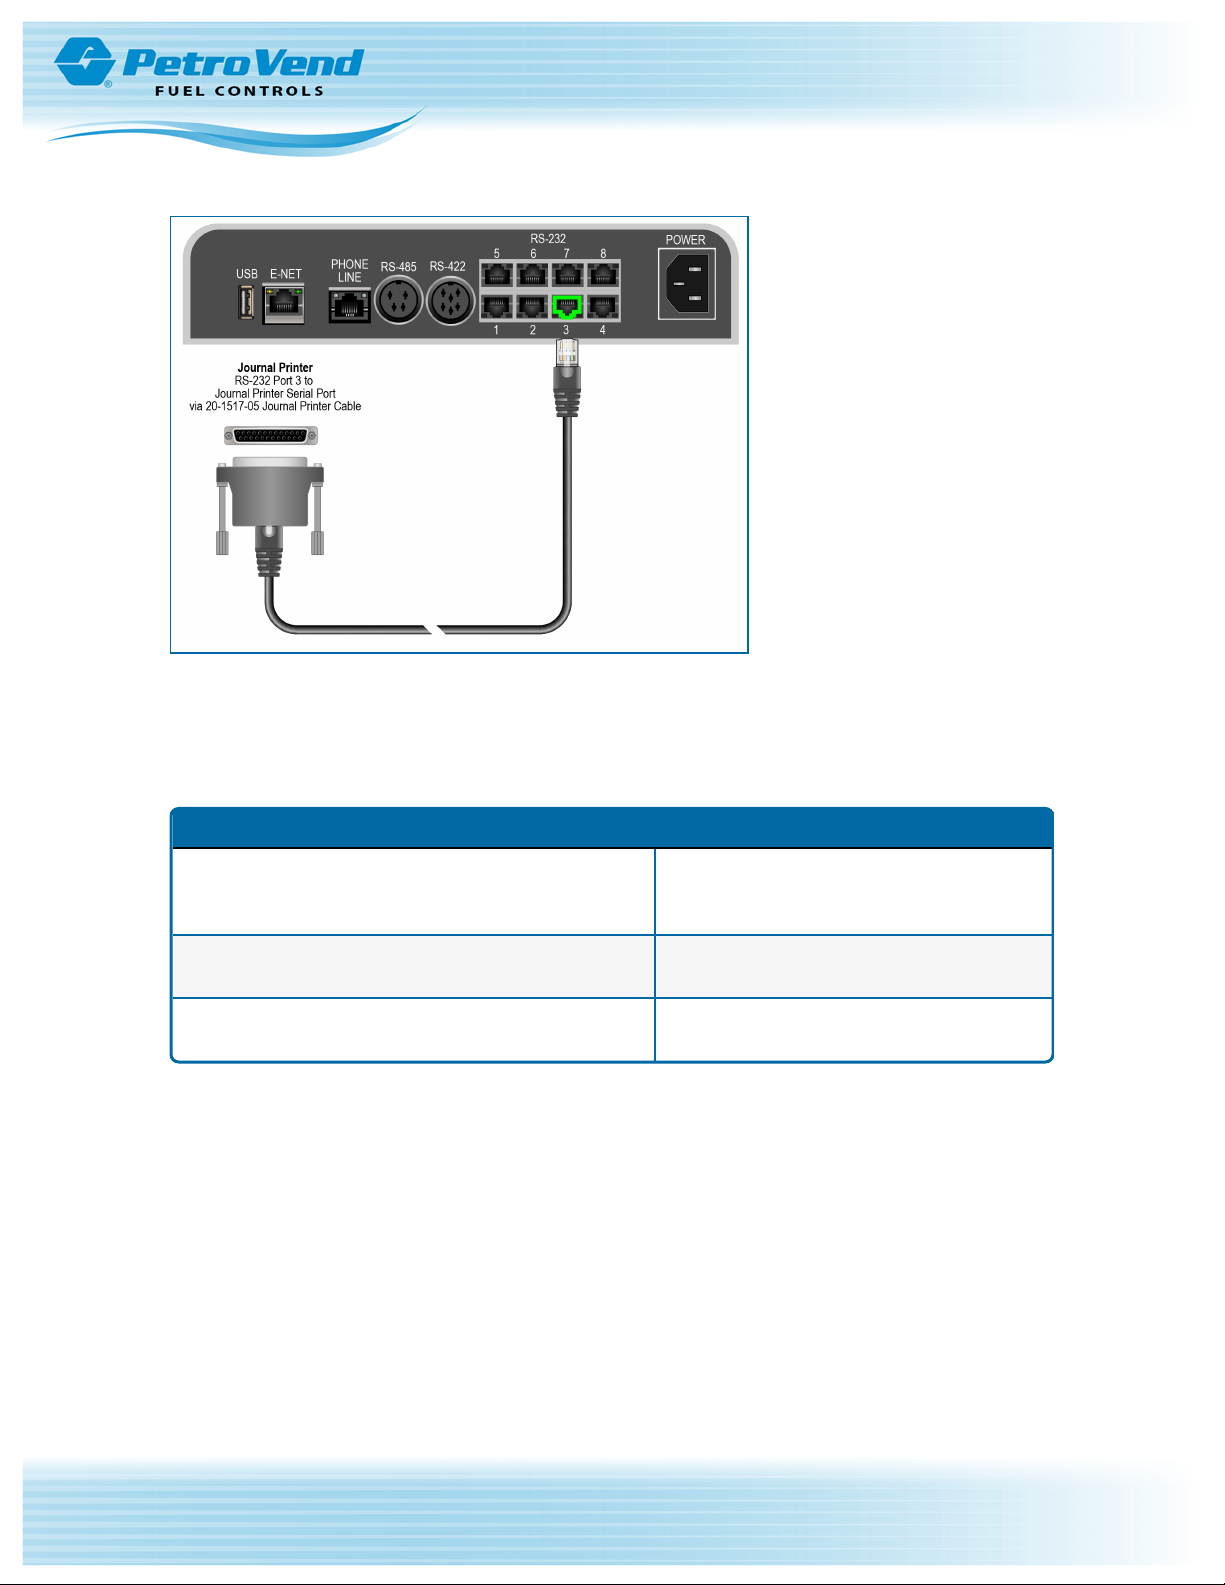
Journal Printer Connection
Connect the (optional) Journal Printer as shown below. See the Connections section for more information on
connection changeovers from System2 to FSC3000.
Doc. No.: M1700-SUN Rev.: 1
Page 8 of 57

Port 3: This is the connection port to an optional Journal Printer (OPW-FMS part number 20-7073).
Transactions can be printed in real-time to this printer. Connect an RJ45 to DB25 M (OPW-FMS part number
20-1517-05) cable; RJ-45 connector into port 3 of the FSC and the DB25 M connector to the Journal Printer
serial port.
FSC3000 Specifications
Power Requirements
85-240 VAC, 50/60 Hz; 25 watts maximum
(See C/OPT specifications for terminal
installation)
Operating Temperature Range 32° F - 122° F (0° C – 50° C) (See C/OPT spe-
cifications for terminal installation)
Enclosure Dimensions (H x W x D) 2.25” x 10” x 8.25” (5.7 cm x 25.4 cm x 21
cm)
Doc. No.: M1700-SUN Rev.: 1
Page 9 of 57

1.2 Commercial Outdoor Payment Terminal (C/OPT)
The Commercial/outdoor Payment Terminal (Figure 3) a Petro Vend fueling terminal. The C/OPT works with
your Petro Vend Fuel Site Controller (FSC) and Pump Control Terminal (PCT).
Refer to the C/OPT section of the M1700 FSC300 Installation, Operation and Maintenance Manual for full
installation and operation instructions.
With optional Universal Pump Control (UPC) software, the FSC can authorize fueling transactions through a
pump control console (such as used in a self service station). For pumps controlled by a UPC, refer to the
UPC section of the M1700 FSC300 Installation, Operation and Maintenance Manual.
1.2.1 Technical Specifications
C/OPT Specifications
Power Requirements 120/240 VAC; 50/60 Hz; 250 watts max.
Operating Temperature Range -40°F - 122°F (-40°C - 50°C)
Enclosure Dimensions (H x W x D) 15" x 18.5" x 11" (38 cm x 47 cm x 28 cm)
Graphics Display (5” Monochrome)
Doc. No.: M1700-SUN Rev.: 1
Page 10 of 57

1.3 Pump Control Terminal (PCT)
Pump Control Terminal (PCT)
The PCT gathers the data from the pumps and formats it for the FSC. The PCT can be mounted (Figure 4) in
one of the following ways:
lBuilt into the C/OPT as a PC board (behind the C/OPT PC board).
lIn the C/OPT on the back wall of the box.
lAs a “remote PCT," in a separate indoor cabinet.
Refer to the PCT section of the M1700 FSC300 Installation, Operation and Maintenance Manual for more
information about Pump Control Terminals.
Doc. No.: M1700-SUN Rev.: 1
Page 11 of 57

1.4 Connections
Do the steps that follow to changeover your connections from a System2 Fuel Site Controller to an FSC3000
Fuel Site Controller.
IMPORTANT: It is recommended to upload all transactions from the System2 Fuel Site
Controller before you reconfigure these connections.
NOTE: Connections that are shown as dashed lines in the illustration above are
disconnected from a System2 component and re-connected or replaced by an FSC3000
component.
1. As a precaution, turn off all electrical power to the system before you continue with the next steps.
2. Disconnect the Petro-Net connection from the System2 and connect it to the RS-485 port in the
FSC3000 (shown by a blue Petro-Net cable in the illustration [OPW-FMS part number 20-1443]).
3. Disconnect the Ethernet cable from the Ethernet port of your Sena LS100 and connect it to the Ethernet
port of the FSC3000 (shown by a red Ethernet cable in the illustration above). The other end can
remain connected to your router.
Doc. No.: M1700-SUN Rev.: 1
Page 12 of 57

4. Disconnect the Journal Printer (optional) cable at the printer connection. You can keep the other end
connected to the System2.
5. Use a 20-1517-05 (OPW-FMS part number - RJ45 to DB25 M) cable (shown by a green cable in the
illustration above) to connect your Journal Printer (optional) to the #3 RS-232 port of the FSC3000 as
shown in the illustration..
TIP: As a backup, you can keep the remaining cables of your System2 configuration
connected.
Serial connection between System2 and Sena LS100.
Serial connection between System2 and Precidia Ether232.
Ethernet connection between Precidia Ether232 and your router.
If it becomes necessary to re-connect your System2 components you can simply reverse the
connections in the steps above back to their original positions.
Doc. No.: M1700-SUN Rev.: 1
Page 13 of 57

Section 3 Command Line Instructions
Your system powers up in “command line” mode. This means you must issue commands at the “>” prompt.
To enter privileged mode, type HELLO at the ">" prompt, then enter the privileged password.
The most used commands are:
SHOW: Displays information from an FSC3000 data base on the screen of your terminal or PC. This
command does not require privileged status.
PRINT: Sends data to your external journal printer to make a hard copy. Most (but not all) information
can be printed, including all setup data (cards, fuel types, prices, etc.) and all transaction information
(time, date, amount, price, cost, etc.). This command does not require privileged status.
SET (FORMAT and CONFIGURE work similarly): These commands are used to enter or change the
setup data. These commands are privileged. Note that after a FORMAT or CONFIGURE command is
used, one of the DOWNLOAD commands must be entered.
Other common commands include:
INSTALL/REMOVE: These commands activate and deactivate a device (such as a PCT). Privileged
commands.
CLEAR: There are several CLEAR commands, which erase transactions from the system data base.
Privileged command.
3.1 Single Command Instructions
SYSTEM ACCESS
lOPEN
lCLOSE
lCALL
lHELLO
lBYE
SYSTEM TIME COMMANDS
lTIME
lTIME CHANGE
lDATE
lSYSTEM ON TIME
lLIGHT ON TIME
SYSTEM DEVICE COMMANDS (Show/Print/Install/Remove/Configure/ Download)
lFIT # (C/OPT number)
lPCT #
lPCT #/POSITION #
lPUMP #
Doc. No.: M1700-SUN Rev.: 1
Page 14 of 57

CUSTOMER MESSAGE COMMANDS (Show/Print/Format)
lRECEIPT BODY
lRECEIPT HEADER
lRECEIPT TRAILER
lRECEIPT BONUS POINTS
lDISPLAY (#...)
lKEYBOARD (#...)
lDATE
lLOCAL MESSAGES
lFORMAT NATIONAL
SYSTEM PARAMETERS COMMANDS (Show/Print/Set)
lSYSTEM
lSITE ID
lFUELTYPE (#...)
lFUELING UNITS
lPASSWORD
lLANGUAGE
lMENU
lECHO
lBONUS POINTS
lRAM
lVERSIONS
lHOST
lIP
TRANSACTION DATA COMMANDS (Show/Print/Set/Clear*)
lTRANS
lTRANS DATE #... SEQUENCE #...
* Transactions cannot be CLEARED selectively. They can only be cleared all at once.
SYSTEM TOTALS (Show/Print/Set/Clear)
lTRANS DATE TIME CARD ACCOUNT VEHICLE
lTRANS DATE TIME CARD ACCOUNT VEHICLE SUMMARY
lMIDNIGHT
lDAY
lSHIFT
Doc. No.: M1700-SUN Rev.: 1
Page 15 of 57

lPUMP #... TOTALS
lPCT #... TOTALS
lFUELTYPE (#...) TOTALS
lTANK (#...)
JOURNAL PRINTER (Show/Print/Set/Lock/Unlock)
lJOURNAL PRINTER
lPRINTER
NETWORK COMMANDS (Show/Print/Set/Format)
lHOST
lISO
lDEBUG
lFORMAT MESSAGES
lIP
lFORMAT NATIONAL
Doc. No.: M1700-SUN Rev.: 1
Page 16 of 57

Section 4 System Access
4.1 Open/Close
The OPEN and CLOSE commands give immediate access to pumps. Both commands are privileged,
requiring the main password. When a CLOSE command is issued, all activities in progress (pumping,
printing a receipt, etc.) complete normally, but no new activities are allowed to begin.
4.2 Hello/Bye
HELLO is used to access the privileged mode. You'll be prompted for the system password (see
"Passwords" on page39). The factory-set password is HELLO).
BYE exits the privileged mode.
You MUST enter the main password to enter Privileged mode. To return to Normal mode from the command
line $> prompt, type BYE.
Doc. No.: M1700-SUN Rev.: 1
Page 17 of 57

Section 5 System Time and Date
5.1 Time Commands
The SHOW TIME or SET TIME command displays or sets the current time of day. The SET TIME
command changes time as follows:
1. SET TIME (ENTER)
2. TIME (ENTER)
3. Enter the time in the format HH:MM AM or PM. For example, 12:57 PM. If PM is not specified, AM is
assumed. Alternatively, you can enter as 24 hour (military) time, with or without the colon (HH:MM or
HHMM).
4. Push (ENTER) to complete the entry; this sets seconds to zero. The new time and current (or default)
date are displayed.
Push (ENTER) to leave the current time unchanged.
5.2 Daylight Savings Time
The SET TIME CHANGE command sets dates on which the internal clock moves ahead or back by one hour,
to adjust for the change between daylight savings time and “standard” time.
The change occurs at 2:00 AM on the date specified.
5.3 Time Change Commands
The SHOW TIME CHANGE command displays change dates in the system. The SET TIME CHANGE
command changes the dates as follows:
1. After issuing the command you are prompted:
ENTER DATE WHEN TIME IS MOVED BACK 1 HOUR:
2. Enter the “move-back” date in the format MMM DD YYYY (the year must be four digits). Press (ENTER).
The following prompt appears:
ENTER DATE WHEN TIME IS MOVED AHEAD 1 HOUR:
3. Enter the “move ahead” date in the same way.
The word CHANGE can be abbreviated CH in these and other line commands.
5.4 Date Commands
The SHOW DATE or SET DATE command displays or sets the current date within the system's memory.
After issuing the command you are prompted to enter a date: ENTER DATE (MMM DD, YYYY):
1. Enter the date in the indicated format (for example, type FEB 11, 2000 for February 11th, 2000.
2. Push (ENTER) to complete the entry; the new date is now displayed.
Push (ENTER) with no entry to leave the current date unchanged.
Doc. No.: M1700-SUN Rev.: 1
Page 18 of 57

5.5 System ON/OFF Commands
The SHOW SYS TIME and SET SYS TIME commands display or set the time the system goes ON and
OFF, and the time during which “transactions in progress” are allowed (the “receipts only” time).
The SET SYS TIME command lets you set the following four options (time for the first three is entered in the
same format as for System Time - hh:mm).
SYSTEM ON TIME - specifies when SYSTEM2 goes active. When the system is on, it displays messages,
and accepts card insertions or keypad entries.
SYSTEM OFF TIME - specifies when the system goes inactive. No new transactions are allowed to begin,
but any in progress are allowed to finish.
RECEIPTS ONLY TIME - specifies when the system allows no new transactions to begin, but does allow
“just completed” customers to get their receipts. This time would typically precede the `SYSTEM OFF TIME'
by several minutes.
EXAMPLE: A gas station that dispenses fuel from 9:00 AM until 7:00 PM would have the
`SYSTEM ON TIME' set to 9:00 AM, the `SYSTEM OFF TIME' set to 7:10 PM and the `RECEIPTS
ONLY TIME' set to 7:00 PM.
TIME ADJUST - this feature allows a software adjustment to the internal time clock. In the event of a
noticeable time drift, a number of seconds can be added to or subtracted from each day, until a proper
hardware adjustment can be made.
5.6 Light ON/OFF Time Commands
The SET LIGHT command lets you set the SYSTEM2 to turn the “pocket” lights in the standard C/OPT ON
and OFF at designated times.
After selecting this option, the following prompts appear:
ENTER LIGHT ON TIME:
ENTER LIGHT OFF TIME:
Enter time in the same format as for SYSTEM ON TIME.
Doc. No.: M1700-SUN Rev.: 1
Page 19 of 57

Section 6 System Devices
6.1 FIT (C/OPT) Commands
"FIT" is equivalent to "C/OPT" in the screen prompts.
The SHOW, PRINT, INSTALL, REMOVE and CONFIGURE FIT # commands let you view, configure,
install or remove FITs, and determine if the receipt printer will issue receipts, whether the keyboard is
enabled or disabled, which PCTs to shut off when the emergency stop button is pressed, and reset the card
reader error counter.
6.1.1 Show Current FIT (C/OPT) Status
Issue a SHOW FIT command with a FIT (C/OPT) number to see how that terminal is set up:
FIT INSTALLED
FIT INFO:
GRAPHICS PUSH_PULL v 11.01E
NO RECEIPTS
KEYBOARD ACCESS - ENABLED
PCTs TO SHUT OFF ON E-STOP: 1,2,3,4
CARD READER ERROR COUNTERS:
READER 1: 0 READER 2: 0
-- ACCESS TO ALL PUMPS
ALPHA ENTRIES ALLOWED FROM THIS FIT
Entries vary depending on current FIT (C/OPT) settings.
6.1.2 Configure FIT (C/OPT)
The CONFIGURE FIT command changes these settings. The following prompts appear one by one after
using CONFIGURE FIT #:
NOTE: "#" is the number of the FIT (C/OPT) configured in the steps that follow. The number
can be in a range from 1 to 12.
lISSUE RECEIPTS (Y/N)? - Enter Y to have the optional receipt printer issue a receipt (N is
default). If you enter (Y) to the ISSUE RECEIPTS? prompt, two additional prompts appear...
nENTER LIMIT TO RECEIVE RECEIPT IN DAYS (0..99) - this is the number of
days after a transaction that a customer can receive a receipt. Default is NO LIMIT.
nCLEAR RECEIPT COUNTER (Y/N)? - The receipt counter keeps a running total of all
receipts issued to date. It can be used to keep track of the receipt paper and to indicate
when the paper is running low.
lKEYBOARD OPTIONS (Y/N)? - Default is N. Enter (Y) to display:
Doc. No.: M1700-SUN Rev.: 1
Page 20 of 57
This manual suits for next models
1
Table of contents
Other OPW Industrial Equipment manuals
Popular Industrial Equipment manuals by other brands

KAKA Industrial
KAKA Industrial MB-36 operating manual

Thermo Scientific
Thermo Scientific HyPerforma S.U.B. TK quick start guide

Schmalz
Schmalz SSP operating manual

Kooltronic
Kooltronic KPHE32 Series Operator's manual

Reliable
Reliable H Deluge Riser Instructions for installation, operation care and maintenance

LEGRAND
LEGRAND LEXIC 073 03 quick start guide