Orange Electronic M207 User manual

Orange Electronic Co., Ltd. | 04-2560-2766 | www.orange-electronic.com
1/13
M207 User Manual
To ensure correct operation and service,read
the following instructions before operating the
Motorcycle TPMS accessory.

Orange Electronic Co., Ltd. | 04-2560-2766 | www.orange-electronic.com
2/13
TPMS
Tire Pressure Monitoring Systems (TPMS) improves safety while driving. Once installed in your
vehicle, the system will automatically monitor your tires in real-time for pressure and temperature.
When any tire’s pressure and/or temperature appear abnormal, the system will, in real-time,
transmit signals to active an alarm and show a digital figure to warn the driver of a problem. The
system aids safety, can extend the tire life and help reduce fuel consumption.
NOTICE
FCC Notice
This device complies with Part 15 of the FCC Rules. Operation is subject to the following
two conditions: (1) this device may not cause harmful interference, and (2) this device must
accept any interference received, including interference that may cause undesired operation.
This equipment has been tested and found to comply with the limits for a Class B digital
device, pursuant to Part 15 of the FCC Rules. These limits are designed to provide
reasonable protection against harmful interference in a residential installation. This
equipment generates uses and can radiate radio frequency energy and, if not installed and
used in accordance with the instructions, may cause harmful interference to radio
communications. However, there is no guarantee that interference will not occur in a
particular installation.
If this equipment does cause harmful interference to radio or television reception, which can
be determined by turning the equipment off and on, the user is encouraged to try to correct
the interference by one or more of the factoring measures.
●
Reorient or relocate the receiving antenna.
●
Increase the separation between the equipment and receiver.
●
Connect the equipment into an outlet on a circuit different from that to which the
receiver is connected
Caution: Any changes or modifications in construction of this device which are not expressly
approved by the party responsible for compliance could void the user’s authority to operate
the equipment.
To comply with the FCC RF exposure compliance requirements, this device and its antenna
must not be co-located or operating to conjunction with any other antenna or transmitter.
System Scope of Use and Warnings
Tire Pressure Monitoring System, TPMS
This system is a sensing device designed to measure and display tire operation and / or
activate an alert to the driver when pressure and temperature irregularities are detected. It is the
responsibility of the driver to react promptly and with discretion to alerts. Abnormal tire inflation
pressure should be corrected at the earliest opportunity.
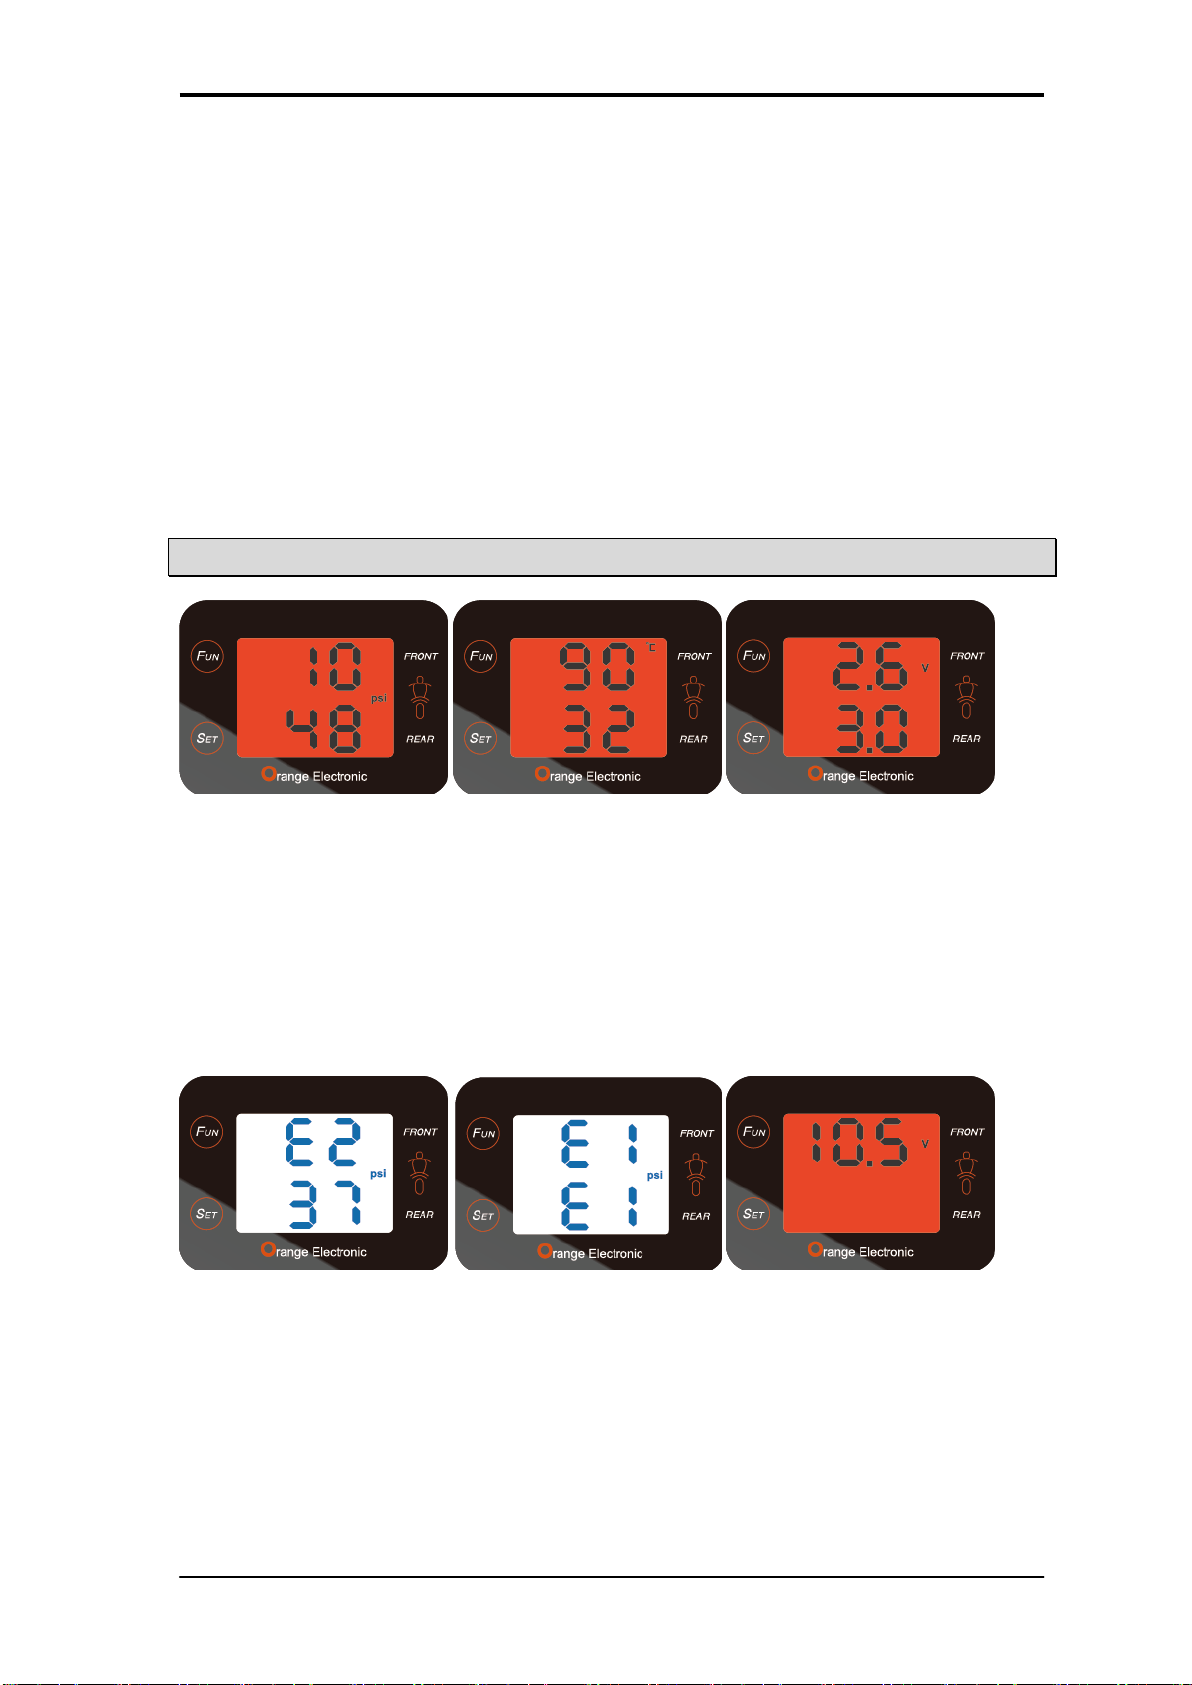
Caution: The system is wireless RF product; therefore, it may not receive signal due to
interference environment or incorrect operating or installation. When the system continually
cannot receive signal from one of the tire sensor more than 10 minutes since the system be
switched on, the system will show “E2”. In this case, it may cause by a RF interference
environment and driver needs to drive the vehicle to other place. If the display still cannot
receive any correct signal from tire sensor, then, driver needs to find a nearby qualified tire
maintain service for checking and maintain. It may cause by a tire sensor damaged or
battery power consumption is low (the battery consumption will be lower than under normal
using condition due to sensors need to send warning signal continually to driver) . If the
system continually cannot receive signal from any sensors more than 10 minutes, the
system might damaged and will show “E1”. Driver needs to drive to other place (there might
be a interference nearby) or send the system to agent for repair.
System Installation and Usage
Proper use of the TPMS requires that a qualified tire service technician has properly installed
the
TPMS sensors. The system is intended for use on 2-wheel motorcycles. The pressure
monitoring range is 74 Psi (Gauge), below instruction is Gauge value mentioned.

Orange Electronic Co., Ltd. | 04-2560-2766 | www.orange-electronic.com
3/13
Suggestion: Please check valve stem every year to be sure the valve stem is not leaking air.
Reacting to Alerts
When an alert or warning is received, reduce vehicle’s speed and proceed to a safe
location to stop where the tire can be inspected and /or serviced.
The low-pressure alert indicates that the air pressure has dropped to a selected minimum
and a high-temperature alert indicates that the temperature of the tire content has
surpassed the threshold value set.
Use of Chemicals
Temporary resealing or re-inflation products containing internal sealants or propellants in any
tire assembly may adversely affect the operation of the sensor/transmitter.
SPECIFICATION
M207 RECEIVER SPECIFICATION
Operating voltage
9V-16V (DC)
Operating Current
< 150mA
Operating Temperature
-20oC to 80oC / -4oF to 176oF
Storage Temperature
-20oC to 80oC / -4oF to 176oF
Tire pressure/temperature reading unit
psi, bar, kPa / oF, oC
Dimension of display
L:6cm x W:4.4cm x H:2cm
M207 SENSOR SPECIFICATION
Operating Temperature
-30oC to 110oC / -22oF to 230oF
Storage Temperature
-40oC to 125oC / -40oF to 257oF
Operating humidity
Maximum 95%
Operating Frequency
433.92 MHz ±50kHz
Pressure Monitoring Range
0 ~ 74psi / 0 ~ 508kPa / 0 ~ 5.1bar
Pressure Reading Accuracy
±1psi / ±10kPa / ±0.1bar (as normal pressure)
Temperature Monitoring Range
-30oC to 110oC / -22oF to 230oF
Temperature Reading Accuracy
±4 oC in normal environmental conditions
Transmission Power
Maximum 75.1 dBuV/m
Battery
3V
Note:
1. Due to different rims’ spec, this product does not fit for all rims.
2. Torque wrench is 40~45kgf-cm (4~4.5Nm ; 35.4~39.8 inlb).

Orange Electronic Co., Ltd. | 04-2560-2766 | www.orange-electronic.com
4/13
ACCESSORIES
NO.
Item
Qty
A
Display unit
1
B
Ⅰ、Sensor
Ⅱ、Valve stem
Ⅲ、Grommet
Ⅳ、Nut
Ⅴ、Screw
2
C
Velcro for Display
2
D
Ties for power cord
3
E
Clip
2
F
Orange display bracket
1
M207
Ⅰ
Ⅱ
Ⅲ
Ⅳ
Ⅴ

Orange Electronic Co., Ltd. | 04-2560-2766 | www.orange-electronic.com
5/13
SYSTEM INSTALLATION
The Orange Electronic Motorcycle TPMS Kit requires both the display unit and tire sensors to be
installed. It is recommended to install the display unit before the two sensors.
DISPLAY UNIT INSTALLATION
Step
Process
1
Red Wire - positive (ACC)
Black Wire - negative
On the motorcycle's fuse box, connect red wire to positive electrical ACC
connection and connect black wire to negative connection.
Optional: Use clips (Accessory E) and ties (Accessory D) to help connect and fix
electrical wires to the fuse box.
Do not cut the wires more than 30cm due to the antenna(white wire) is inside the
wires.
2
Attach velcro to the back of the display unit and place monitor at an appropriate
position in front of driver.
SENSOR INSTALLATION
Step
Process
photo
1
Only a professional tire dealer or mechanic should install
the TPMS sensor
2
Remove each tire and release the air pressure.
Take off the air valves from the wheel of the tire.
(Note: Need to change the valve to a TPMS valve)
3
Match the number to each TPMS sensor with the correct
wheel position on the motorcycle before installing.
(IMPORTANT)
F-1: Front tire
R-2: Rear tire
4
Take off the valve cap and nut.
Set up the new TPMS sensor valve in the wheel.
After valve stem is through the rim, load nut.
Use a wrench to secure the valve and tighten nut to
40~45kgf-cm (4~4.5Nm ; 35.4~39.8 inlb).
5
Inflate the tires to the manufacturer's recommended
inflation level.
Balance the tires to manufacturer's specifications:
A lead tire weight may need to be added for balancing.

Orange Electronic Co., Ltd. | 04-2560-2766 | www.orange-electronic.com
6/13
SENSOR INSTALLATION NOTICE
SAFE
1. Valve stem aims vertically to sensor.
2. Use a torque wrench and make sure to tighten the hexagonal nut to 4.5~5Nm.
3. Make sure sensor doesn’t touch the rim.
NOT SAFE
1. The sensor touches the rim
2. The grommet is visible from the rim.
3. Tighten the hexagonal nut less than 4.5Nm.
SYSTEM OPERATION

Orange Electronic Co., Ltd. | 04-2560-2766 | www.orange-electronic.com
7/13
Once accessory power is applied, the system will scan both tire sensors and display tire
pressure and temperature in real time within 3 minutes.
(Fig.1) (Fig.2)
Use the “Fun”(function) button to
cycle between display modes:
Mode 1: Cycle between tire pressure
and temperature.
Mode 2: Tire pressure (Fig.1)
Mode 3: Tire temperature (Fig.2)
Mode 4: Battery (Fig.3)
Under any mode, if stay up to 30 seconds without,(Fig.3)
the display will record the mode automatically.
Next time when restarting the display, it will be
on the same mode.
Press “Fun”button for more than 3 seconds,
the display will show sensor’s battery voltage for
few seconds, the display will go back to the
previous mode.
ADJUSTING OPERATING UNITS
1. Press the "Set" button and release after 3 seconds when screen goes blank.
2. Press the "Set" button to choose psi, kPa or bar.
Fun
Set

Orange Electronic Co., Ltd. | 04-2560-2766 | www.orange-electronic.com
8/13
3. Once your preferred pressure unit is displayed, press and hold "Set" button for 3 seconds
until the temperature unit is displayed.
4. Press the "Set" button to choose Fahrenheit (F) or Celsius (C)
5. Once your preferred temperature unit is displayed, press and hold "Set" button for 3 seconds
to set your preferred warning levels.
ADJUSTING WARNING LEVELS
Use the following steps to adjust the preset high/low pressure and high temperature warning
levels for the individual front and rear tire.
The unit has been pre-loaded with alert thresholds, the details as below.
LOW/HIGH PRESSURE WARNING LEVELS:
Present warning level
Front High warning level:45psi Rear High warning level:50psi
Low warning level:27psi Low warning level:30psi
To modify the high and low pressure warning levels for the front and rear tires, use the
following steps:
1. Press and hold the "Set" button for 1 second to enter warning level modification.
2. The display unit will enter warning level modification for the FRONT tire first.
3. The display will show "Lo" with flashing numbers.
4. Use the "Fun" button to change the front tire's low pressure warning level by +1psi within the
ranges of 17-50psi. After reaching desired low warning level, select front low pressure by
pressing the "Set" button.
5. The display will show "Hi" with flashing numbers.
6. Use the "Fun" button to change the front tire's high pressure warning level by +1psi within the
ranges of 22-70psi. After reaching desired high warning level, select front high pressure
warning by pressing the "Set" button.
Notice: After adjust the low pressure warning level, the lowest warning level of high pressure
warning will +5 psi based on adjusted low pressure warning level.
7. The display unit will enter warning level modification for the REAR fire second.
8. The display will show "Set" with flashing numbers.
9. Use the "Fun" button to change the rear tire's low pressure warning level by +1psi within the
ranges of 17-50psi. After reaching desired low warning level, select rear low pressure by
pressing the "Set" button.
10. The display will show "Hi" with flashing numbers.
11. Use the "Fun" button to change the rear tire's high pressure warning level by +1psi within the
ranges of 22-70psi. After reaching desired high warning level, select rear high pressure
warning by pressing the "Set" button.
12. After selecting the high and low warning levels for the front and rear fires, the display will
automatically enter the set-up for high temperature warning level.
HIGH TEMPERATURE WARNING LEVEL:

Orange Electronic Co., Ltd. | 04-2560-2766 | www.orange-electronic.com
9/13
Preset warning level: 80°C /176 °F
Preset warning range: 60~100°C =140~212 °F
1. The display unit will show "Hi" and flashing numbers.
2. Press the "Fun" button to modify flashing numbers to desired high temperature warning level.
3. Press the "Set" button once desired warning level has been reached to set warning level.
4. System will return to normal display mode, showing tire pressure and temperature.
SYSTEM ALARM
When the Motorcycle TPMS
unit detects abnormal tire
pressure, the display unit
will keep showing tire
pressure in red until the
abnormal pressure has been
corrected
When the Motorcycle TPMS
unit detects abnormal tire
temperature, the display unit
will keep showing tire
temperature in red until the
abnormal temperature has
been corrected.
When the Motorcycle TPMS
unit detects low battery
voltage under 2.6V of the
tire sensors, the display unit
will keep showing sensor
battery voltage in red until
the sensor is replaced.
The warning can be lifted by
pressing “Set”.
When the display cannot
receive data from one of the
sensors for about 10
minutes, the display will
show “E2”.
If the display cannot receive
data from any of the sensors
for more than 10 minutes,
the display will show two
“E1”.
When the motorcycle battery
voltage below 11V, in mode
3, the display will show in
red number, but if switch to
other mode, there will be a
flickering low-voltage sign to
remind the user.
※It is driver's responsibility to act with caution and discretion in response to a warning from
the display unit. Tire pressure and temperature issues should be corrected as safely and
early as possible.

Orange Electronic Co., Ltd. | 04-2560-2766 | www.orange-electronic.com
10/13
SENSOR REPLACEMENT
If a new sensor is replaced or if tires are rotated, the sensors need to be relearned by the display
unit in order to display the correct information.
Step
1
Install a new Orange sensor according to directions (page 5).
2
Press the "Set" and "Fun" keys simultaneously for around 5 seconds. The screen
will flash white and red text. Once a '1' is shown, release the buttons. This
indicates that sensor replacement mode has been entered.
3
Press the 'Fun' key to switch between tire to be replaced. (1 = front, 2 = rear)
4
When select 1 (front tire), deflate the tire until the display shows 2, it means the
display has recognized the front tire sensor.
When display shows 2 (rear tire), deflate the tire until the display goes back to
monitoring screen, it means the display has recognized the rear tire sensor.
5
Inflate tire back to manufacturer's recommended inflation level.
6
When the display unit recognizes the proper inflation level, it will return to normal
display mode and monitor tire pressure and temperature in real-time.
APPENDIX 1
Glossary
kPa
Pressure reading in Kilo Pascal
psi
Pressure reading in pound per square inch
bar
Pressure reading in bar
°C
Temperature reading in degrees Celsius
°F
Temperature reading in degrees Fahrenheit
Inflating Pressure
environment
Recommended inflation pressure of a tire at ambient temperature
of 25˚C / 77 ˚F by vehicle manufacturers.
Low Pressure Alert
Visual and audible warning will be activated when the tire’s
pressure is below the preset level.
High Pressure Alert
Visual and audible warning will be activated when the tire’s
pressure is higher than the present level.
High Temperature Alert
Visual and audible warning will be activated when the tire’s
temperature is higher than the present level.
Display / Receiver
The electronic module mounted inside the vehicle that alerts the
driver of any tire irregularities.
Sensor / Transmitter
The electronic module mounted on the wheels that measure the
air pressure and temperature of the tire.
APPENDIX 2

Orange Electronic Co., Ltd. | 04-2560-2766 | www.orange-electronic.com
11/13
kPa , psi, bar Conversion Table
kPa
psi
bar
kPa
psi
bar
kPa
psi
bar
10
1
0.1
210
30
2.1
410
59
4.1
20
3
0.2
220
32
2.2
420
61
4.2
30
4
0.3
230
33
2.3
430
62
4.3
40
6
0.4
240
35
2.4
440
64
4.4
50
7
0.5
250
36
2.5
450
65
4.5
60
9
0.6
260
38
2.6
460
67
4.6
70
10
0.7
270
39
2.7
470
68
4.7
80
12
0.8
280
41
2.8
480
70
4.8
90
13
0.9
290
42
2.9
490
71
4.9
100
15
1
300
44
3.0
500
73
5
110
16
1.1
310
45
3.1
510
74
5.1
120
17
1.2
320
46
3.2
520
75
5.2
130
19
1.3
330
48
3.3
530
77
5.3
140
20
1.4
340
49
3.4
540
78
5.4
150
22
1.5
350
51
3.5
550
80
5.5
160
23
1.6
360
52
3.6
560
81
5.6
170
25
1.7
370
54
3.7
570
83
5.7
180
26
1.8
380
55
3.8
580
84
5.8
190
28
1.9
390
57
3.9
590
86
5.9
200
29
2
400
58
4.0
600
87
6
WARRANTY POLICY
Orange Electronic products are guaranteed from material defects for 365 days after the date of
purchase. If the product fails under normal circumstances within the 1st year, Orange Electronic
will repair or replace the product. Product will not be replaced or repaired if damaged from misuse
or incorrect application. To obtain repair or replacement of the product under warranty, contact
Orange Electronic or distributor. Proof of purchase and date of purchase are required to validate
the warranty claim.
Orange Electronic is not liable for any director or consequential loss or property damage arising
from the use of the product
ATTENTION
Warning!!!
Only can replace new sensor by TP–checker TPMS replacement sensor (sensor
can be purchased from agents).
°C / °F Conversion Table
°C
°F
°C
°F
°C
°F
-40
-40
20
68
80
176
-30
-22
30
86
90
194
-20
-4
40
104
100
212
-10
14
50
122
110
230
0
32
60
140
120
248
10
50
70
158
125
257

Orange Electronic Co., Ltd. | 04-2560-2766 | www.orange-electronic.com
12/13
Cannot use other brands’ TPMS sensors for replacement parts. Using other brands
will cause failure reception and invalid warranty.
Any questions pertaining to warranty information or other questions not answered in
the preceding pages can be answered by the place of purchase or by Orange
Electronic service phone line or e-mail address:
E-mail:sales@orange-electronic.com
TROUBLESHOOTING GUIDE
A. The receiver shows no sign or any information after its power is turned on
1.The power cord connector is not well connected with the receiver
Solution: Remove the power cord and plug it into the outlet again until it is connected
completely.
2. The digits shown on the display panel become incomplete, or the light indicators become
abnormal.
Solution:Send the defected receiver display back to agent for repair and reconfigure its ID
follow “SENSOR REPLACEMENT” setting.
3. The fuse is blown in display
Solution:Send the defected receiver display back to agent for repair and reconfigure its ID by
following “SENSOR REPLACEMENT” setting
B. The button has no response
1. The inner circuits of the receiver failed
Solution:Send the defected receiver display back to agent for repair and reconfigure its ID
follow “SENSOR REPLACEMENT” setting
C. The receiver cannot receive signal from one tire after the power is turned on the
numeric values representing the locations of those tires displayed on the screen become
“E2”.
1. There is interference from other electronic device in the vehicle.
Solution:Remove other electronic device in the vehicle to determine if TPMS is interfered by
those removed devices.
2. The ID of the tire does not set up correctly
Solution:Reconfigure the ID of the tire by following “SENSOR REPLACEMENT” setting for
single tire.
3. The sensor of the tire failed.
Solution:Reconfigure the ID by following by following “SENSOR REPLACEMENT” setting for
single tire and then send the defected sensor back to manufacturer for repair.
D. The receiver cannot receive signal from any tire after the power is turned on the
numeric values representing the locations of those tires displayed on the screen become
“E1”.
1. There is interference from other electronic device in the vehicle.
Solution:Remove other electronic device in the vehicle to determine if TPMS is interfered by
those removed devices.
2. The ID of the tire does not set up correctly
Solution:Reconfigure the ID of the tire by following “SENSOR REPLACEMENT” setting for
single tire.
3. The inner circuits of the display panel failed.

Orange Electronic Co., Ltd. | 04-2560-2766 | www.orange-electronic.com
13/13
Solution:Send the defected receiver display back to agent for repair and reconfigure its ID by
following “SENSOR REPLACEMENT” setting
E. The pressure (or temperature) values show the wrong tire locations
1. The IDs of the two tires are not configures correctly
Solution:Reconfigure the IDs of the tires by following “SENSOR REPLACEMENT” setting.
2. After rotating the tires, it cannot reconfigure the IDs from sensors.
Solution:Reconfigure the IDs of the tires by follow “SENSOR REPLACEMENT” setting.
Table of contents
Popular Power Tools manuals by other brands

Worx Professional
Worx Professional WU462 Original instructions

Skil
Skil 3440 Original instructions

Shop fox
Shop fox Shop Fox W1671 instruction manual

Meister
Meister MET36ME Translation of the original instructions

Pattfield Ergo Tools
Pattfield Ergo Tools PE-AGS 3,6 Li Original operating instructions

Metabo
Metabo KHA 36 LTX Original instructions