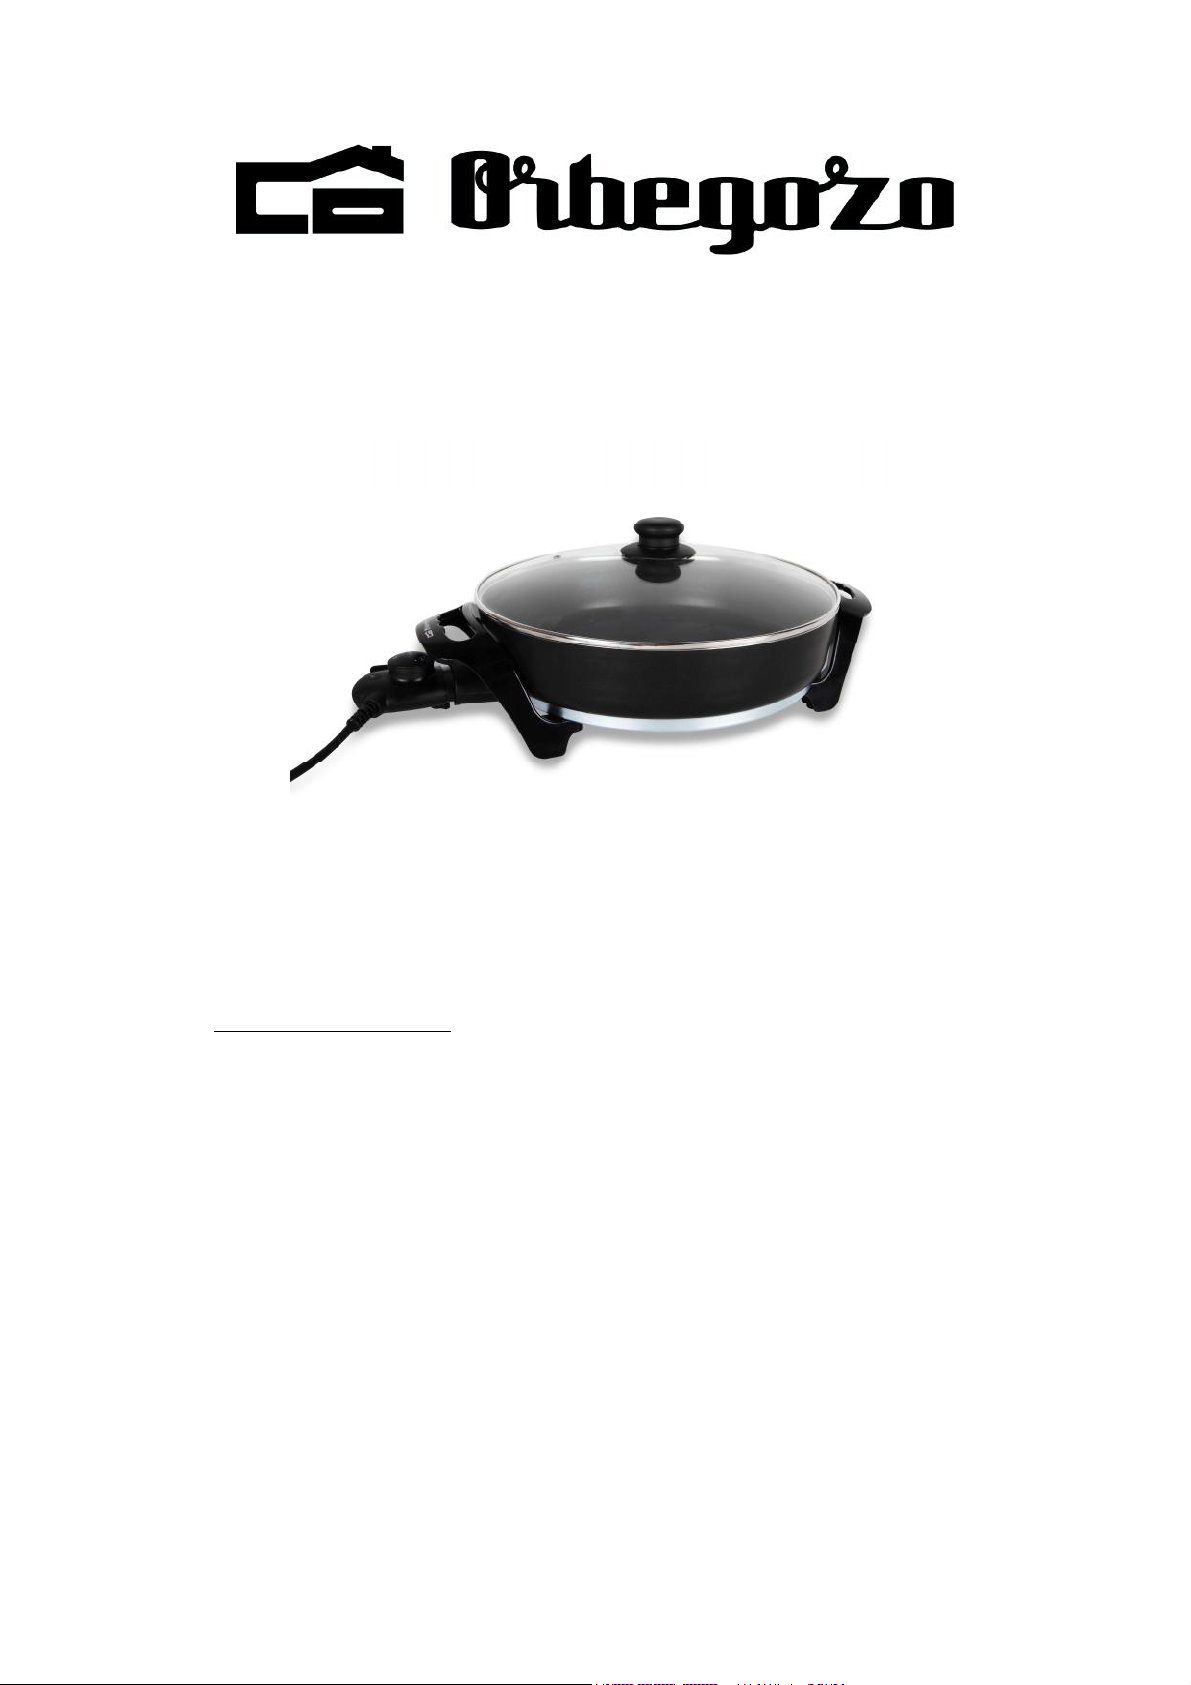
Orbegozo OL 4035 User manual

OLLA MULTIFUNCIÓN – MANUAL DE INSTRUCCIONES
MULTIUSE ELECTRIC HOT PLATE- INSTRUCTION MANUAL
SAUTEUSE ELÉCTRIQUE MULTIUSAGES- MANUEL D’INSTRUCTIONS
PANELA ELÉCTRICA MULTIUSOS- MANUAL DE INSTRUÇÕES
OL 4035
Sonifer, S.A.
Avenida de Santiago, 86
30007 Murcia España
Made in PRC
Lea atentamente este manual antes de utilizareste aparato y
guárdelo para futuras consultas.Sólo asípodrá obtener los mejores
resultados y la máxima seguridad de uso.
Read this manual carefully before running this appliance and save
it for referencein orderto obtain the bestresults and ensure
safe use.
Veuillez lire attentivement ce manuel avant d’utiliser cet appareil
et conservez-le pour toute consultation future. C’est la seule
façon d’obtenir les meilleurs résultats et une sécurité optimale
d’utilisation.
Leia este manual cuidadosamente antes de utilizar este aparelho e
guarde-o para consulta futura. Só assim, poderá obter os melhores
resultados e a máxima segurança na utilização.

OL4035
2

OL4035
3
ESPAÑOL
MEDIDAS DE SEGURIDAD
El uso de aparatoseléctricos nos obliga aobservar medidas de seguridad
tanto para el producto adquirido, como para el usuario.
BÁSICAS:
1. Este aparato no está destinado a
aquellas personas (incluidos niños)
cuyas capacidades físicas,
sensoriales omentales estén de
alguna manera reducidas ono cuenten
con la suficiente experiencia ocon
el conocimiento necesario del
producto, amenos que estén
supervisadas por una persona
competente durante la utilización del
mismo.
2. Se deberásupervisar alosniños
para asegurarse de que no juegan con
este aparato.
3. Mantenga el aparato ysu cable
fuera del alcance de los niños
menores de 8 años.
4. PRECAUCIÓN: Para laseguridad de
sus niños no deje material de
embalaje (bolsas de plástico, cartón,
polietileno etc.) a su alcance.
5. Si el cable de alimentación está
dañado, debe ser sustituido por el
fabricante, el servicio técnico o
cualquier otro profesional
cualificado.

OL4035
4
6. No desconecte nunca tirando del
cable.
7. No lo ponga en funcionamiento si
el cable oel enchufeestán dañados o
si observa que el aparato no funciona
correctamente.
8. No manipule el aparato con las
manos mojadas.
9. No sumergir el aparato en agua o
cualquier otro líquido.
10. Antes de su limpieza observe que
el aparato está desconectado.
11. El aparato debe instalarse de
acuerdo con la reglamentación
nacional para instalaciones
eléctricas.
12. Este aparato es sólo para uso
doméstico.
13. En caso de necesitar una copia del
manual de instrucciones, puede
solicitarla por correo electrónico a
14. ADVERTENCIA: En caso de mala
utilización, existe riesgo de
posibles heridas.
IMPORTANTES
•ATENCIÓN. Este símbolo indica:
Superficie caliente. PRECAUCIÓN:
Las superficie puede permanecer

OL4035
5
caliente durante odespués de su
uso.
•El aparato no está destinado aser
puesto en funcionamiento por medio de
un temporizador externo oun sistema
separado de control remoto.
•Lea todaslas observaciones y
recomendaciones cuidadosamente.
•No toquelas superficies calientes.
USE LAS ASAS laterales olos pies del
aparato, ya que estos, sí son
resistentes al calor.
•Para evitar una descarga eléctrica,
asegúrese de que tanto el termostato,
como el cable yel aparato, estén
absolutamente secos.
•Pasos para el encendido del aparato:
oPRIMERO: Coloque el termostato
firmemente yhastael topeen el
Enchufe previsto en el cuerpo del
aparato, dejando el indicador de
temperatura en “0”.
oSEGUNDO: Coloque la clavija del
cable eléctrico en el enchufe de
la red.

OL4035
6
•No lo ponga en funcionamiento si el
cable oelenchufe están dañados osi
observa que el aparato no funciona
correctamente.
•No use productos ocomponentes
diferentes a los originales.
•Mantenga el cable lejos de
superficies calientes.
•No opere el aparto cerca de la
encimera de gas ode un radiador
eléctrico. Mantenga la mínima
distancia entre la plancha de asar y
la superficie o pared de 15cm.
•Tome todaslas debidas precauciones
al separar el termostato de la
cacerola.
•Este aparato debeusarsesólo
siguiendo rigurosamente las
instrucciones mencionadas
anteriormente.
•Este aparato sólo deberá ser
utilizado con la toma móvil
apropiada.
•El aparato no está destinado aser
puesto en funcionamiento por medio de

OL4035
7
un temporizador externo oun sistema
separado de control remoto.
INSTRUCCIONES DE USO
Regulador Automático de Temperatura:
El termostato está integrado en el cable eléctrico, el cual podermos
separar del aparato. La regulación de éste es de 0°C a240°C con un
selector del 0al10, permitiendo elegir la temperatura ideal para cada
comida, garantizando un óptimo resultado de gran calidad yaltísimas
propiedades nutritivas de los productos.
Según el tipo de comida a prerarar, se selecciona la temperatura.
Una vez alcanzada la temperatura deseada, la luz del termostato se apaga
automáticamente, así como se enciende nuevamente cuando ésta desciende.
Utilización correcta:
-Antes de cada uso,limpie cuidadosamente la planchayla tapa del
aparato.
-Después de cada uso, lubricar lasuperficie de lacacerola con
aceite o mantequilla.
Para el encendido:
1. Colocar el indicador de temperaturaen posición “0”ycolocar la
clavija del regulador de temperatura FIRMEMENTE YAFONDO en el
enchufe.
Nota importante: Si el regulador de temperatura no está correctamente
enchufado, puede producirse un calentamiento anormal, lo que puede
ocasionar daños enel aparato eincluso accidentes. Por lo tanto,
asegúrese de que elregulador de temperatura esté firmemente enchufado
hasta el fondo.
2. Colocar la clavija en el enchufe de la red eléctrica.
La lámpara de control se enciende una vez enchufado el cable de red.
3. La escala de temperatura tiene diez fases, seleccionables según el
tipo de comida.
4. ¿Cómo empezar a cocinar?
a. Una vez conectadoel cable, espereunos 5minutos.La lámpara
de control se encenderá y podrá comenzar a cocinar.
Si la lámpara de control se apaga, nose alarme, no está rota,
recuerde que tieneuna función automática yse apagará al
alcanzar la temperatura deseada.
Si durante el primer uso, aparecieran unos olores anormales,
no se preocupe. No es nocivo para la salud. El calentamiento
de la resina protectora que viene de fábrica, suele aportar
estos olores, pero a los pocos minutos desaparecen.
No tocar la base del aparato. Mueva ymanipule la caceróla
sólo por las asas y pies resistentes al calor.

OL4035
8
b. Con OLLA MULTIFUNCIÓN ORBEGOZO ya puede empezar adisfrutar de
sabrosas comidas,cocinadas con muy poca grasa para una
alimentación sana y para optimizar su bienestar.
c. La tapa decristalPIREX debeusarseen todaocasión,pues no
sólo es resistente al calor, sino que también distribuye el
calor por la parte superior, además de dejar los alimentos
crujientes.
La tapa de cristal permite comprobar el progreso de la cocción
de la comida, sin olores ni salpicaduras.
La tapa tiene una válvula para el escape del agua evaporada, no
permitiendo que la comida se cueza con líquidos no deseados,
sino que quede más tierna y jugosa.
d. Cuando esté la comida en su punto, ponga el regulador de
temperatura nuevamente en “0”. Si desea mantener la comida
caliente, baje hasta la posición “2”.
e. Antes de servir, ponga el reguladorde temperatura nuevamente
en “0”.
f. Desconecte el enchufe yel termostato de la cacerola. A
continuación puede servir la comida en la mesa en el mismo
recipiente.
Atención: Primero sacar la clavijadel enchufe en la red. En segundo
lugar, sacar con precaución el termostato (el otro extremo del cable) del
enchufe integrado en la base delaparato. Cuando se enfríe, pasar un
trapo seco y limpio por dentro del enchufe.
CUIDADOS Y MANTENIMIENTO DE LA SUPERFICIE ANTIADHERENTE
La superficie dela cacerola esde primera calidad, es material
antiadherente, donde no se pega absolutamente nada.
Por ese mismo motivo hay que tomar las siguientes medidas preventivas:
-No use palas ocucharones metálicos. Le recomendamos utensilios de
madera o plástico.
-Si tiene que cortar carne, embutidos opescado, le recomendamos que
extraiga los alimentos de la cacerola y los corte sobre una tabla.
-Asegúrese de que niel cable eléctrico ni el termostato, rocen ose
apoyen sobre la superficie del aparato.
-No use utensiliosfuertes de nylonometálicos para limpiar la
superficie d ela cacerola.
-La cacerola deberálimpiarse despuésde cada uso.Le recomendamos el
uso de papel de cocina.
-Para una comida más sana ygenuina,se aconseja no utilizar aceite
directamente sobre la superficie antiadherente, sino más bien,
adobar previamente las carnes, verduras ypescados con distintas
especias, mantequilla, aceite, vino, mostaza, etc.
-Los productos congelados podrán cocinarsereduciendo las temperaturas
un 50% según la tabla adjunta, yaumentando su tiempo de
preparación.
INSTRUCCIONES DE LIMPIEZA

OL4035
9
Plancha antiadherente en estado caliente:
Después de cada uso, limpie la plancha con un paño decocina húmedo oun
poco de papel. Si quedan residuos sobre la superficie, ponga un poco de
agua en la planchaycalientela nuevamente para quitar estos restos de
comida. Ayúdese, si es necesario, de una espátula de goma o madera.
No utilice detergentesfuertes ni abrasivos como cepillos oesponjas de
nylon o metálicas.
Nunca introduzca laplancha enel agua, ni lalave conagua mientraseste
caliente.
Plancha antiadherente en estado frío:
Limpiela con una esponjasuave yun poco de detergente no abrasivo. Evite
que penetre agua en el interior.
Tapa de cristal PIREX:
Limpie la tapa conuna esponja ydetergente suaves. No cambie bruscamente
la temperatura de la tapa (de caliente afrío). No ponga la tapa bajo el
chorro de agua fría mientras está caliente. No utilice toallitas
impregnadas con productos químicos u otros detergentes fuertes.
Termostato regulador de temperatura:
Limpie el termostato con toallitas suaves de papel. No limppie el hueco
del enchufe del termostato con trapos opapel húmedos.Este siempre debe
mantenerse seco.
Una vez limpio el aparato, séquelo completamentecon un paño de cocina.
Finalmenteunte finamente la superficie antiadherente con un poco de
aceite o mantequilla.
TABLA DE TIEMPOS PARA COCINAR CON EL PIZZA PAN ORBEGOZO
ALIMENTOS
TIEMPO DE
COCCIÓN SELECTOR TEMPERATURA
Empanada-Croissant 1 min. por lado 2, 4 80°C
Huevo frito 2 min. 2, 4, 6 150°C
Crepes 1–
2min. por
lado 2, 4, 6,
8 160°C
Tortilla francesa 2 min. por lado 2, 4, 6,
8, 10 160°C
Queso fresco 1 min. por lado 2, 4, 6 150°C
Tostadas 1 min. por lado 2, 4, 6 150°C
Sándwiches 2 min. por lado 2, 4, 6,
8 170°C
Calabacines,
berenjenas,
tomates, setas,…
2 min. por lado 2, 4, 6 150°C
Patata, calabaza,
zanahorias en
corte,…
3 min. por lado 2, 4, 6 150°C
Salchichas 2-3
min. por
lado 2, 4, 6 150°C
Entrecot de
ternera 2-3
min. por
lado 2, 4, 6,
8 180°C
Filete de ternera
o cerdo 3 min. por lado 2, 4, 6,
8 180°C
Costillas de
3 min. por lado 2, 4, 6,
170°C

OL4035
10
cordero 8
Chuletas de cerdo 3 min. por lado 2, 4, 6,
8 170°C
Conejo troceado 3-4
min. por
lado 2, 4, 6,
8 160°C
Brochetas de
pescado 2 min. por lado 2, 4, 6 160°C
Atún, salmón, pez
espada, caballa, … 2-3
min. por
lado 2, 4, 6,
8 160°C
Sepias,
calamares,… 2-3
min. por
lado 2, 4, 6,
8 180°C
Crustáceos 2-
3min. por
lado
2, 4, 6,
8 180°C
Pizzas 7-10 min.
2, 4, 6,
8, 10 240°C
Paellas 35-45 min.
2, 4, 6,
8, 10 160-240°C
Eliminación del electrodoméstico viejo.
En base alaNorma europea 2002/96/CE de Residuos deaparatos
Eléctricos yElectrónicos (RAEE), loselectrodomésticos viejos no
pueden ser arrojados en los contenedores municipales habituales;
tienen que ser recogidos selectivamente para optimizar la recuperación
yreciclado de loscomponentes ymateriales que los constituyen, y
reducir el impactoen la saludhumana yel medioambiente.El símbolo
del cubo de basuratachado se marcasobre todos los productos para
recordar al consumidor la obligación desepararlos para larecogida
selectiva. El consumidor debe contactar con la autoridad local ocon el vendedor
para informarse en relación ala correcta eliminación de su electrodoméstico
viejo.
DECLARACIÓN DE CONFORMIDAD: Este dispositivo cumple con los requisitos de la
Directiva de Baja Tensión 2006/95/CE ylos requisitos de la directiva de
Compatibilidad Electromagnética 2004/108/CE.

OL4035
11
ENGLISH
SAFETY PRECAUTIONS
When using electrical devices itis necessary to observe safety
precautions both, for the product purchased and for the user.
Basic precautions
1. This appliance is not intended for
use by persons (including children)
with reduced physical, sensory or
mental capabilities, or lack of
experience and knowledge, unless they
have been given supervision or
instruction concerning use of the
appliances by aperson responsible
for their safety.
2. Children should be supervised to
ensure that they donot playwith the
appliance.
3. Keep the appliance and the cable
cord out of the reach of children
less than 8 years old.
4. WARNING: In order to ensure your
children‘s safety, please keep all
packaging (plastic bags, boxes,
polystyrene etc.) out of their reach.
5. If the supply cord is damaged it
must be repaired by the Authorized
Service Agent.

OL4035
12
6. Never pull on the cord when
unplugging.
7. Do not use the unit with adamaged
cord or plug, or if it is not working
properly.
8. Do not handle the appliance with
wet hands.
9. Never immerse the appliance in
water or any other liquid.
10. Make sure the appliance has been
unplugged before cleaning.
11. This appliance must be installed
following the national regulations
for electrical installations.
12. This appliance is for household
use only.
13. In case that you need acopy of
the instruction manual, you can ask
for it writing an email to
14. ADVERTENCIA: En caso de mala
utilización, existe riesgo de
posibles heridas.
Important precautions
•ATTENTION: This symbol show: Hot

OL4035
13
surface. CAUTION: The surface can
remain hot during or after use.
•Do not operate the device connected
to an external timer or aseparate
remote control system.
•Read carefully all the remarks and
recommendations.
•Do not touch any hot surfaces. USE
THE SIDE HANDLES of the device’s feet
as these are heat resistant.
•To prevent electric shocks, make sure
that the thermostat, the power cord
and the device are totally dry.
•Steps for turning on the device:
oFIRST: Insert the thermostat
firmly as far as itwill gointo
the socket in the device’s body,
leaving the temperature indicator
set to “0”.
oSECOND: insert the power cord plug
into the mains socket.
•When plugging andunplugging the
device´s power cord and thermostat
never pull on the cord but on the
plug or thermostat.

OL4035
14
•Make sure that theplug and power
cord are in good condition in order
to guarantee satisfactory operation.
•Do not use products or components
that are different from the original
ones.
•Keep the power cord away from hot
surfaces.
•Do not operate the device ….. of
electric radiators. Keep aminimum
distance of 15cm between the hotplate
and the surface of wall.
•Take allnecessaryprecautions when
removing the hotplate from the frying
pan.
•This device should only be used
strictly in compliance with the above
mentioned instructions.
•If the power cord isdamaged, it must
be replaced by the manufacturer or
its authorized technical service or
by aqualified technician in order to
prevent hazards.
•This device should only be used with
the power cord supplied.

OL4035
15
•Do not operate the device connected
to an external timer or aseparate
remote control system.
INSTRUCTIONS FOR USE
Automatic temperature regulator
The thermostat is integrated with the power cord andcan be separated
from the device. The thermostat can be adjusted from 0° to 240° using a
selector from 0to10. This allowsyou to choosetheideal temperature
for each meal, guaranteeing optimal results whilepreserving all the
food’s nutritional properties.
Correct use:
-Carefully clean the device’s hotplate and lid each time before use.
-Grease the hotplate with oil or butter each time after use.
Turning on:
1. Set the temperature indicator to “0” and insert the temperature
regulator’s plug FIRMLY into the socket AS FAR AS IT WILL GO.
Important note: If the temperature regulator is not correctly
inserted, it may cause abnormal heating, which may damage the device
and even cause accidents. Therefore,make sure thatthe temperature
regulator is firmly inserted as far as it will go.
2. Insert the plug inthe main socket.The indicator light turns on
when the power cord is connected to the mains.
3. The temperature scale has ten phases, which are selectable depending
on the type of meal.
4. How do I start cooking?
a. Wait for about 5minutes after plugging in the power cord. The
indicator lamp will light and you can start cooking.
If the indicator lamp should go out,do not be alarmed.It is not
broken. Remember that it operates automatically and will turn off
when the desired temperature is reached.
If you should noteabnormal smells when using for the first time,
do not worry. Thisis not harmful foryour health. Theprotective
resin, applied inthe factory, normally gives off these smells
when heated. They will disappear after a few minutes.
Do not touch thedevice’s base. Use only the heat-resistant
handles and feet when moving and handling the frying pan.
b. With Multicooker ORBEGOZO, you canstart to enjoytasty meals
cooked helping you follow a healthy diet for increased wellbeing.
c. The glass lid should always be usedwhen cooking: it isnot only
heat-resistant butalso maintains and distributes theheat along
the top, keeping the food crispy.

OL4035
16
d. When the food is ready, set the temperature regulator to “0”. If
you wish to keep the food hot, lower the regulator to position
“2”.
e. Before serving, reset the temperature regulator to “0”.
f. Pull out the plug and thermostat from the frying pan. You can now
serve the food at the table straight from the frying pan.
Caution: First remove the plug fromthe mains socket. Next, carefully
take out the thermostat (of the other end of thepower cord) from the
socket in the device’s base. When it has cooled, wipe with aclean, dry
cloth inside the socket.
CARE AND MAINTENANCE OF THE NON-STICK SURFACE
The frying pan’s surface has atop-quality non-stick coating on which
absolutely nothing will stick. To preserve its properties, the following
precautions must be taken.
-Do not use metal spatulas. We recommend you use wooden or plastic
utensils.
-If you have to cuthot or cold meat,or fish, we recommend you take
the food out of the frying pan and cut it on a board.
-Make sure that neither the power cordnor the thermostat rest on or
rub against the frying pan.
-Do not use nylon or metal brushes to clean the frying pan.
-The multicooker should be cleaned each time after use.Wait until it
has cooked to asuitable temperatureand use aclean,dry cloth. We
recommend you use paper kitchen towels.
-For healthier, more natural food, we recommend you do not use oil
directly on the non-stick pan but rather that you marinade the meat,
vegetables and fish beforehand with spices, butter, oil, lemon,
wine, mustard, soy sauce…
-Frozen products can be cooked reducing the temperatures 50%, as
shown in the table below, and increasing the cooking times.
CLEANING INSTRUCTIONS
We recommend the following practices and suggestions for proper cleaning:
Non-stick hotplate, hot:
Clean the hotplate each time after use with adamp cloth or apaper
towel. If any remains of food should be left on thesurface, place a
little water on the plate and reheat to delude these remains. If
necessary, use a wooden or rubber spatula to loosen them.
Do not use aggressive or abrasive detergents, or nylon or metal brushes
or pads.
Never immerse the hotplate in water or wash with water while it is hot.
Non-stick hotplate, cold:

OL4035
17
Clean with asoftsponge and alittle gentle detergent. Avoid entry of
water inside the device.
Pirex glass lid:
Clean the lid using asoft spongeand gentle detergents. Avoid abrupt
temperature changes of the lid (from hot to cold). Do not place the lid
under cold runningwater while itishot. Do notuseclothes impregnated
with chemicals strong detergents.
Temperature regulator thermostat:
Clean the thermostat with soft papertowels. Do not clean the thermostat
socket with damp cloths or paper. It must be kept dry at all times.
When the device has been cleaned, dry it thoroughly with akitchen towel.
Finally, grease the non-stick surface of the frying panwith alittle oil
or butter.
TABLE OF COOKING TIMES WITH PIZZA PAN ORBEGOZO
FOOD COOKING TIME SELECTOR TEMPERATURE
Croissant 1 min. side 2, 4 80°C
Fried egg 2 min. 2, 4, 6 150°C
Crepes 1–
2min.
side
2, 4, 6,
8 160°C
Omelette 2 min. side
2, 4, 6,
8, 10 160°C
Fresh Cheese 1 min. side 2, 4, 6 150°C
Toasted bread 1 min. side 2, 4, 6 150°C
Sandwiches 2 min. side
2, 4, 6,
8 170°C
Zucchini,
eggplant,
tomatoes,
mushrooms, ...
2 min. side 2, 4, 6 150°C
Potato, pumpkin,
carrots in court,
...
3 min. side 2, 4, 6 150°C
Sausagges 2-3 min. side 2, 4, 6 150°C
Beef sirloin 2-3 min. side
2, 4, 6,
8 180°C
Beef or pork
filet 3 min. side
2, 4, 6,
8 180°C
Lamb chops 3 min. side
2, 4, 6,
8 170°C
Pork chops 3 min. side
2, 4, 6,
8 170°C
Chopped rabbit 3-4 min. side
2, 4, 6,
8 160°C
Fish kebabs 2 min. side 2, 4, 6 160°C
Tuna, salmon,
swordfish,
mackerel, ...
2-3 min. side
2, 4, 6,
8 160°C
Cuttlefish, skids 2-3 min. side
2, 4, 6,
8 180°C
Crustaceans 2-3 min. side
2, 4, 6,
180°C

OL4035
18
8
Pizzas 7-10 min.
2, 4, 6,
8, 10 240°C
Paellas 35-45 min. 2, 4,
6,
8, 10 160-240°C
Disposal of old electrical appliances.
The European directive 2002/96/EC on Waste Electrical and Electronic
Equipment (WEEE), requires that old household electrical appliances
must not be disposed of in the normal unsorted municipal waste stream.
Old appliances must be collected separately in order to optimize the
recovery and recycling of the materials they contain, and reduce the
impact on human health and the environment. The crossed out “wheeled
bin” symbol on the product reminds you of your obligation, that when
you dispose of theappliance, it must be separatelycollected.
Consumers should contact their local authority or retailer for information
concerning the correct disposal of their old appliance.
DECLARATION OF CONFORMITY: This devicecomplies with therequirements of theLow
Voltage Directive 2006/95/EC and the requirements of the EMC directive
2004/108/EC.

OL4035
19
FRANÇAIS
MESURES DE SECURITÉ
1. Cet appareil n'est pas destiné aux
personnes (enfants inclus) ayant des
capacités physiques, sensorielles ou
mentales réduites ou un manque
d'expérience et deconnaissance du
produit, àmoins qu'elles ne soient
mises sous la garde d'une personne
pouvant les surveiller.
2. Les enfants doiventêtre surveillés
afin de s'assurer qu'ils ne jouent pas
avec cet appareil.
3. Gardez l’appareil et le câble àla
portée des enfants de moins de 8 ans.
4. ATTENTION: Par mesure desécurité
vis-à-vis des enfants, ne laissez pas
les emballages (sac en plastique,
carton, polystyrène) a leur portée.
5. Si le cordon d’alimentation est
endommagé, adressez-vous àunservice
technique agréé.
6. Ne débranchez jamais en tirant du
cordon.
7. Ne jamais le fairefonctionner si le
cordon ou la fiche sont ao mes ou si

OL4035
20
vous remarquez que l´appareil ne
fonctionne pas correctement.
8. Ne pas manipuler l´appareil, les
mains mouillées.
9. Ne jamais placer l´appareil près dans
l´eau ou autre liquide.
10. Avant de nettoyer l´appareil,
vérifiez s´il est bien débranché.
11. L´appareil doit être installé
suivant les normes nationaux pour les
installations électriques.
12. Cet appareil est seulement apte
pour une utilisation domestique.
13. Dans le cas où vous avez besoin
d'une copie du manuel d'instructions,
vous pouvez demander par écriture d'un
14. AVERTISSEMENT: En cas de mauvaise
utilisation de l'appareil, il yaun
risque de blessure.
MESURES DE SECURITÉ IMPORTANTES
•Ce symbole indique: ATTENTION:
La surface peut rester chaud
pendant ou après
l'utilisation.
Table of contents
Languages:
Other Orbegozo Cooktop manuals
Popular Cooktop manuals by other brands

KitchenAid
KitchenAid KECC568MBB00 parts list

Heartland Appliances
Heartland Appliances 300 Installation and operation guide

Fisher & Paykel
Fisher & Paykel PROFESSIONAL CDV3-365H user guide

Samsung
Samsung NA64H3010AS user manual

Gaggenau
Gaggenau VG491211CA use and care manual

Jenn-Air
Jenn-Air 30" (76.2 cm) Cooktop installation instructions

Lincat
Lincat Lynx 400LBR User and installation instructions

Frigidaire
Frigidaire FED355A Specifications

Blanco
Blanco BIC64F instruction manual

Electrolux
Electrolux E30EC65ESS - 30 Inch Smoothtop Electric... installation instructions

AEG
AEG CGA 60 WOK Operation manual

Manitowoc
Manitowoc Garland GI-SH/DU/BA 7000 Installation, operation and maintenance manual