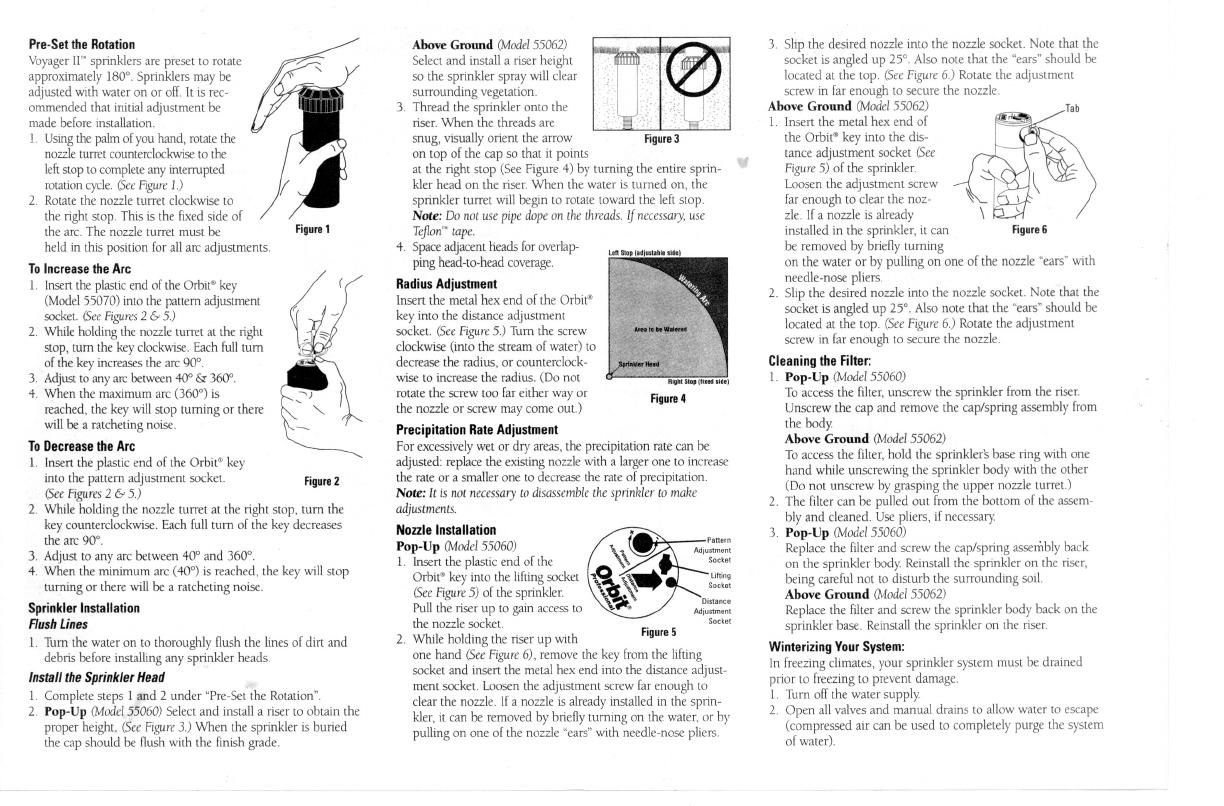
manuals.online logo
Brands
  1. Home
  2. •
  3. Brands
  4. •
  5. Orbit
  6. •
  7. Irrigation System
  8. •
  9. Orbit Voyager II 55072 User manual

Orbit Voyager II 55072 User manual

Radius
psi

ft.

GPM
Precip.
in./hr.
n

•
30
28'
.5
.06 .07
40
29'
.6
.07
.08
50
29'
.7
.08
.09
60
30'
.8
.09
.10
30
29'
.7
.08 .09
40
30'
.8
.09
.10
50
30'
.9
.10
.11
60
31'
1.0
.10
.12
30
30'
.9
.10
.11
40
31'
1.0
.10
.12
50
31'
1.2
.12
.14
60
32'
1.3
.12
.14
30 32'
1.2
.11
.13
40
33'
1.4 .12
.14
50
34'
1.6
.13 .15
60
34'
1.8
.15
17
30
34'
1.6
.13
.15
40
36'
1.8
.13
.15
50
38'
2.0
.13
.15
60
38' 2.2
.15
.17
30
36'
2.0
.15
.17
40
38'
2.4
.16
.18
50 40'
2.7
.16 .19
60 40'
2.9
.17
.20
Radius
psi

ft.

GPM
Precip.
in./hr.
n

A
30 36'
2.6
.19
.22
40
40'
3.0
.18
.21
50
42'
3.4
.19
.21
60 42'
3.7
.20
.23
30
37'
3.2
.22
.26
40
40'
3.7
.22
.26
50
43'
4.2 .22
.25
60
44'
4.6
.23
.26
30
38'
4.2
.28
.32
40 43'
4.9
.26
.29
50
46'
5.5
.25
.29
60 47'
6.0
.26 .30
40
45'
6.0
.29 .33
50
48'
6.8
.28 .33
60
49'
7.6
.30
.35
70
51'
8.2
.30 .35
40
46'
8.0
.36
.42
50
48'
8.9
.37
.43
60
50'
9.8
.38
.44
70
51'
10.5
.39
.45
40 46'
11.4
.52 .60
50
48'
12.2
.51
.59
60 50'
13.2
.51
.59
70 52'
14.4
.51
.59
Nozzle
I
E
2
3
4
6
Data represent test results in zero wind. Adjust for local conditions. Radius can be
reduced by up to 30% with nozzle retaining screw. (This may alter the uniformity of
the spray pattern.)
n
Denotes square spacing.
♦
Denotes equilateral triangular spacing.
Your Voyager II
-
Pop-Up Sprinkler comes with a pre-installed, Standard #7 nozzle,
Nozzle
8
9
STANDARD NOZZLES LOW ANGLE NOZZLES
Radius
Precip.
in,/hr.
psi

ft.

GPM
n
•
30 22'
1.4
.28
.32
40
24'
1.7
.28
.33
50
26'
1.8
.26 .30
60
28'
2.0
.25
.28
30
25'
1.6
.25
.28
40
27'
1.9
.25
.29
50
28'
2.1
.26
.30
60
30'
2.3
.25
.28
30
27'
2.1
.28 .32
40
30'
2.5
.27
.31
50
33'
2.8 .25 .29
60
35'
3.0 .24
.27
30
29'
2.8
.32
.37
40
32'
3.1
.29
.34
50
35'
3.5
.28
.32
60
37'
3.8
27
.31
30
31'
3.4
.34
.39
40
34'
3.9
.32 .37
50
37'
4.4
.31
.36
60
38'
4.7 .31
.36
30
33'
4.3
.38
.44
40
37
5.0
.35
.41
50
40'
5.6
.34
.39
60
42'
6.1
.33
.38
40
38'
6.5 .43 .50
50
40'
7.3
.44
.51
60 42'
8.0
.44

.50
70 44'
8.6
.43.
din
P
Blank nozzle plug for turning
off selected sprinklers during
repairs, maintenance, etc.
CAUTION
For outdoor use with
cold
water only
Do not spray near electrical connections.
Orbit Irrigation Products, Inc.
Technical Customer Service
1-800-488-6156
www.orbitonline.com
PN 55060-04 Per B
Voyager
ITTM
Pop-Up & Above
Ground Sprinkler
Instructions
n
Replaces or works
with most types of
impact or gear
. drive sprinkler
systems including
Hunter®, Toro®
Rainbird"
n
40°-360°
.
adjustable arc for
fast, hassle-free
adjustment, wet
or dry
n
Comes with
pre-installed,
Standard #7
nozzle.'
n
Set of 12 inter-
changeable noz-
zles included.
n
Adjustment key
included.
n
Detailed installation
instructions inside.
n
Set of 7 low-angle
nozzles available
(Model 55072,
sold separately).
Nozzle
7
9
1 0
Figure 1
Figure 2
Fig re 3
Figure 6
Pre-Set the Rotation
Voyager IF' sprinklers are preset to rotate
approximately 180°. Sprinklers may be
adjusted with water on or off. It is rec-
ommended that initial adjustment be
made before installation.
1.
Using the palm of you hand, rotate the
nozzle turret counterclockwise to the
left stop to complete any interrupted
rotation cycle.
(See
Figure 1.)
2.
Rotate the nozzle turret clockwise to
the right stop. This is the fixed side of
the arc. The nozzle turret must be
held in this position for all arc adjustments.
To Increase the Arc
1.
Insert the plastic end of the Orbit' key
(Model 55070) into the pattern adjustment
socket.
(See Figures 2 & 5.)
2.
While holding the nozzle turret at the right
stop, turn the key clockwise. Each full turn
of the key increases the arc 90°.
3.
Adjust to any arc between 40° & 360°.
4.
When the maximum arc (360°) is
reached, the key will stop turning or there
will he a ratcheting noise.
To Decrease the Arc
1.
Insert
the plastic end of the Orbitm key
into the pattern adjustment socket.
(See Figures 2 & 5.)
2.
While holding the nozzle turret at the right stop, turn the
key counterclockwise. Each full turn of the key decreases
the arc 90°.
3. Adjust to any arc between 40° and 360°.
4.
When the minimum arc (40°) is reached, the key will stop
turning or there will be a ratcheting noise.
Sprinkler Installation
Flush Lines
I. Turn the water on to thoroughly flush the lines of dirt and
debris before installing any sprinkler heads.
Install the Sprinkler Head
I.
Complete steps 1 and 2 under "Pre-Set the Rotation".
2. Pop-Up
(Model 55060)
Select and install a riser to obtain the
proper height.
(See Figure
3.) When the sprinkler is buried
the cap should he flush with the finish grade.
Above Ground
(Model 55062)
Select and install a riser height
so the sprinkler spray will clear
surrounding vegetation.
3
Thread the sprinkler onto the
riser. When the threads are
snug, visually orient the arrow
on top of the cap so that it points
at the right stop (See Figure 4) by turning the entire sprin-
kler head on the riser. When the water is turned on, the
sprinkler turret will begin to rotate toward the left stop.
Note:
Do not
use
pipe dope on the threads. If necessary, use
Teflon
-
tape.
4.
Space adjacent heads for overlap-
ping head-to-head coverage.
Radius Adjustment
Insert the metal hex end of the Orbit'
key into the distance adjustment
socket.
(See Figure
5.) Turn the screw
clockwise (into the stream of water) to
decrease the radius, or counterclock-
wise to increase the radius. (Do not
rotate the screw too far either way or
the nozzle or screw may come out.)
Precipitation Rate Adjustment
For excessively wet or dry areas, the precipitation rate can be
adjusted: replace the existing nozzle with a larger one to increase
the rate or a smaller one to decrease the rate of precipitation.
Note:
It
is
not necessary
to disassemble the
sprinkler
to make
adjustments.
Nozzle
Installation
Pop-Up
(Model 55060)
I. insert the plastic end of the
Orbit® key into the lifting socket
(See
Figure 5) of the sprinkler.
Pull the riser up to gain access to
the nozzle socket.
2. While holding the riser up with
one hand
(See Figure 6),
remove the key from the lifting
socket and insert the metal hex end into the distance adjust-
ment socket. Loosen the adjustment screw far enough to
clear the nozzle. If a nozzle is already installed in the sprin-
kler, it can he removed by briefly turning on the water, or by
pulling on one of the nozzle "ears" with needle-nose pliers.
3. Slip the desired nozzle into the nozzle socket. Note that the
socket is angled up 25°. Also note that the "ears" should be
located at the top.
(See
Figure
6.)
Rotate the adjustment
screw in far enough to secure the nozzle.
Above Ground
(Model 55062)

Tab
1.
Insert the metal hex end of
the Orbit' key into the dis-
tance adjustment socket
(See
Figure 5) of the sprinkler.
Loosen the adjustment screw
far enough to clear the noz-
zle. If a nozzle is already
installed in the sprinkler, it can
be removed by briefly turning
on the water or by pulling on one of the nozzle "ears" with
needle-nose pliers.
2.
Slip the desired nozzle into the nozzle socket. Note that the
socket is angled up 25°. Also note that the "ears" should be
located at the top.
(See
Figure 6.)
Rotate the adjustment
screw
in far enough to secure the nozzle.
Cleaning the Filter:
1.
Pop-Up
(Model 55060)
To access the filter, unscrew the sprinkler from the riser.
Unscrew the cap and remove the cap/spring assembly from
the body
Above Ground
(Model 55062)
To access the filter, hold the sprinkler's base ring with one
hand while unscrewing the sprinkler body with the other
(Do not unscrew by grasping the upper nozzle turret.)
2.
The filter can be pulled out from the bottom of the assem-
bly and cleaned. Use pliers, if necessary.
3.
Pop-Up
(Model 55060)
Replace the filter and screw the cap/spring assembly back
on the sprinkler body Reinstall the sprinkler on the riser,
being careful not to disturb the surrounding soil.
Above Ground
(Model 55062)
Replace the filter and screw the sprinkler body back on the
sprinkler base. Reinstall the sprinkler on the riser.
Winterizing Your System:
In freezing climates, your sprinkler system must be drained
prior to freezing to prevent damage.
1.
Turn off the water supply
2.
Open all valves and manual drains to allow water to escape
(compressed air can be used to completely purge the system
of water).
Pastern
Adjustment
Socket
Lifting
Socket
Distance
Adjustment
Socket
Figure 5

This manual suits for next models

3

Other Orbit Irrigation System manuals

Orbit DripMaster User manual

Orbit

Orbit DripMaster User manual

Orbit HOSE END WATERING FLOWERBED AND SHRUB KIT User manual

Orbit

Orbit HOSE END WATERING FLOWERBED AND SHRUB KIT User manual

Orbit Underground Eco-Lock Kit User manual

Orbit

Orbit Underground Eco-Lock Kit User manual

Orbit 27752 User manual

Orbit

Orbit 27752 User manual

Orbit DripMaster Vegetable Garden Soaker System User manual

Orbit

Orbit DripMaster Vegetable Garden Soaker System User manual

Orbit ST2-RF User manual

Orbit

Orbit ST2-RF User manual

Orbit 56448 User manual

Orbit

Orbit 56448 User manual

Orbit ARC SPRINKLER User manual

Orbit

Orbit ARC SPRINKLER User manual

Orbit 20050 User manual

Orbit

Orbit 20050 User manual

Orbit DripMaster User manual

Orbit

Orbit DripMaster User manual

Orbit 96012 User manual

Orbit

Orbit 96012 User manual

Orbit Voyager II Professional User manual

Orbit

Orbit Voyager II Professional User manual

Orbit Behlman INV-1200 Series Use and care manual

Orbit

Orbit Behlman INV-1200 Series Use and care manual

Orbit 57071 Guide

Orbit

Orbit 57071 Guide

Orbit 61014 User manual

Orbit

Orbit 61014 User manual

Orbit WaterMaster 57674 User manual

Orbit

Orbit WaterMaster 57674 User manual

Orbit WaterMaster Voyager User manual

Orbit

Orbit WaterMaster Voyager User manual

Orbit 58322 User manual

Orbit

Orbit 58322 User manual

Orbit Voyager User manual

Orbit

Orbit Voyager User manual

Orbit Saturn III User manual

Orbit

Orbit Saturn III User manual

Orbit Voyager II User manual

Orbit

Orbit Voyager II User manual

Orbit 55100 User manual

Orbit

Orbit 55100 User manual

Orbit YARD ENFORCER User manual

Orbit

Orbit YARD ENFORCER User manual

Popular Irrigation System manuals by other brands

Strongway 49508 owner's manual

Strongway

Strongway 49508 owner's manual

Tyco Fire Product TFR MAX instruction manual

Tyco Fire Product

Tyco Fire Product TFR MAX instruction manual

claber Aqua-Magic System user manual

claber

claber Aqua-Magic System user manual

Toro OSMAC E-SERIES Specifications

Toro

Toro OSMAC E-SERIES Specifications

Pierce CP600 Operator's manual

Pierce

Pierce CP600 Operator's manual

Tyco Fire Product Gem F916 instruction manual

Tyco Fire Product

Tyco Fire Product Gem F916 instruction manual

Reliable Pantman F1 manual

Reliable

Reliable Pantman F1 manual

Rain PROSPORT KRN02210 Setting instructions

Rain

Rain PROSPORT KRN02210 Setting instructions

Johnson Controls Tyco RFIII manual

Johnson Controls

Johnson Controls Tyco RFIII manual

Brandson Equipment 304257/20191212NB128 user manual

Brandson Equipment

Brandson Equipment 304257/20191212NB128 user manual

Tyco TY-B Series manual

Tyco

Tyco TY-B Series manual

Tyco Fire Product Gem F898 instruction manual

Tyco Fire Product

Tyco Fire Product Gem F898 instruction manual

Rain i-dial instructions

Rain

Rain i-dial instructions

Hunter SRC Plus 600i owner's manual

Hunter

Hunter SRC Plus 600i owner's manual

Autopot AQUAvalve5 Simple care guidelines

Autopot

Autopot AQUAvalve5 Simple care guidelines

hillvert HT-COSTIGAN-3600 user manual

hillvert

hillvert HT-COSTIGAN-3600 user manual

Reliable F3QR56 manual

Reliable

Reliable F3QR56 manual

SNOWJOE Aquajoe AJ-OMS18-TRB manual

SNOWJOE

SNOWJOE Aquajoe AJ-OMS18-TRB manual

manuals.online logo
manuals.online logoBrands
  • About & Mission
  • Contact us
  • Privacy Policy
  • Terms and Conditions

Copyright 2025 Manuals.Online. All Rights Reserved.