Radio & Esc setup
Transmitter Settings:
Throttle Travel Maximum / 100%
Brake Travel Maximum / 100%
Throttle Exponential Start with 0%
Throttle Neutral Trim Center / 0
Bind your receiver and transmitter first if your radio requires
you to do so.
Initial set-up of the throttle end-points of the ESC: (1 or 2)
1) : Automatically
When you follow the “Operation” to connect the electronic,
you can switch on the ESC and then start to run.
2) : Manually (When the manual function is started, the
automatic function will permanently canceled.)
a)Turn on the transmitter and hold the throttle at full
brake position.
b)Turn on ESC and listen for 2 beep.
c)After you hear the 2 beep, apply full throttle and listen for
another 2 beep.
d)Once you hear the 2 beep, release the throttle to neutral
position.
e)A beep will then sound, signifying that the ESC endpoint
have been successfully set.
If the car direction is reverse, please check the ESC +ve and -
ve are right connect to the motor, is this is right you can
change your transmitter throttle direction setup to Reverse
your car direction.
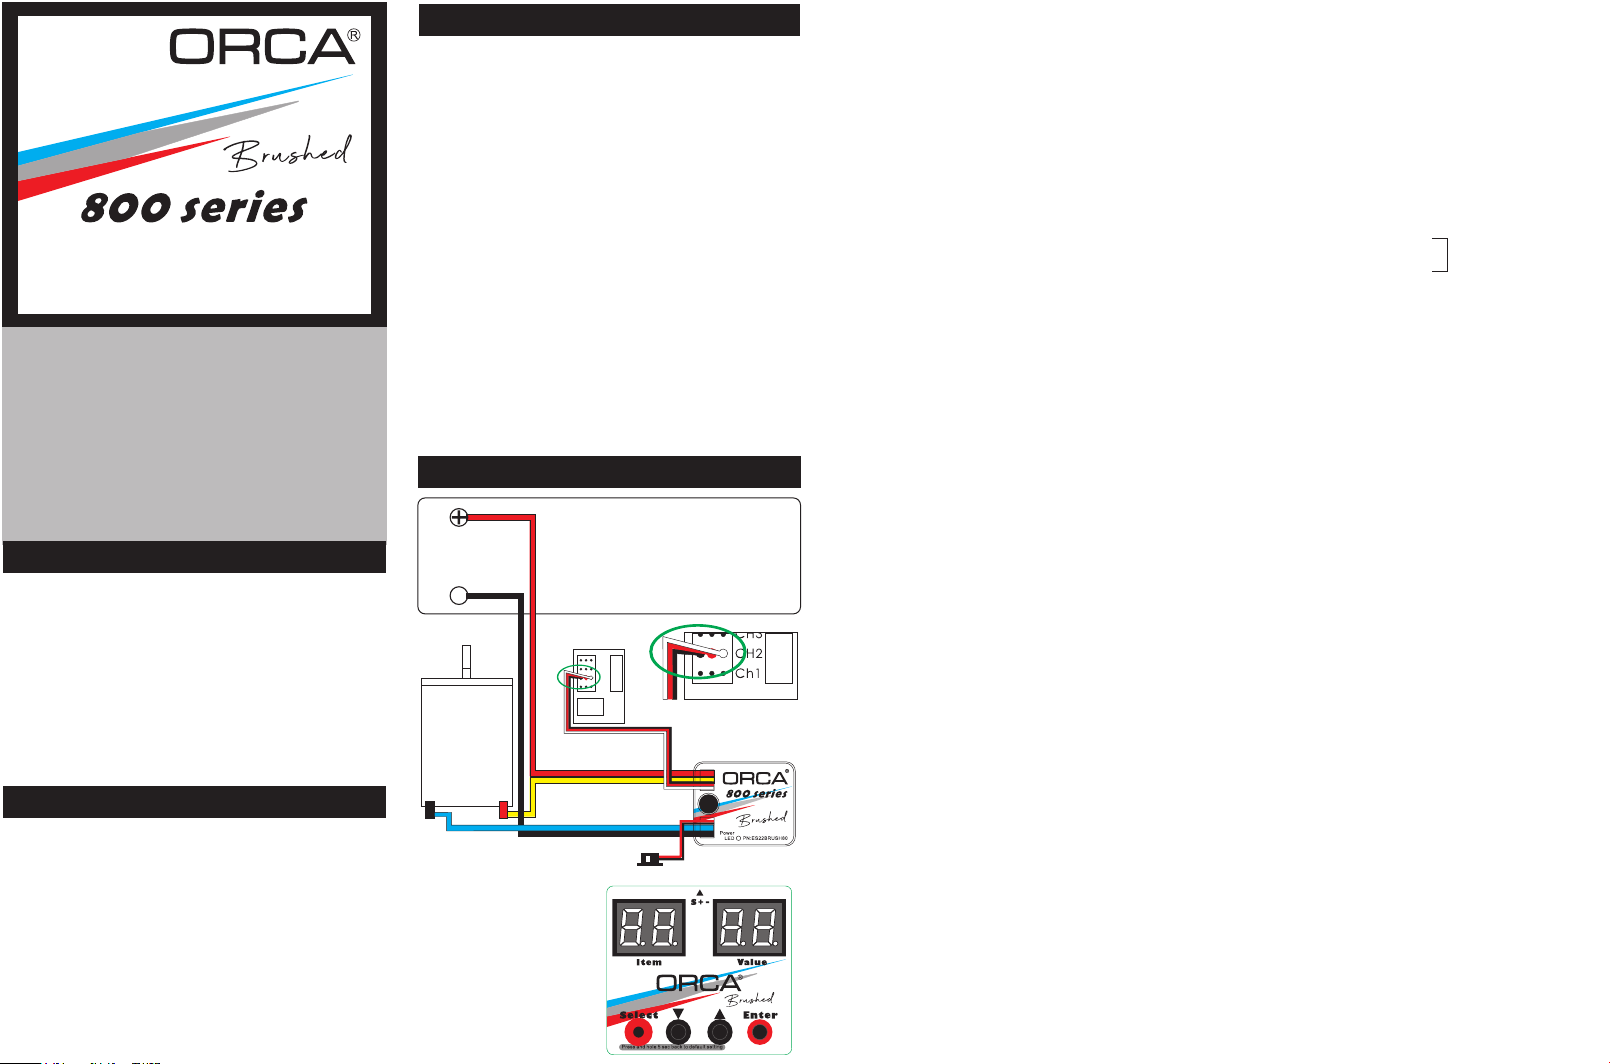
Operation
* Used ESC porvide XT60 connector to the battery,
Red to +ve and Black to -ve.
(WARNING! Reversing the battery polarity will destroy
your ESC and void the warranty.)
* Connect supplied BEC wire(200mm) to 3pin port match
the (- + s) between the CH2/throttle pin of the receiver
and ESC.
* Connect the 2 motor wire(Brushed Motor) to the motor.
The connect suggest solder direct to the motor and
match the label ESC Yellow +ve and Blue -ve. Avoid
soldering each joint for longer than 5 seconds.
(WARNING! Improper wiring may damage the ESC and
void the warranty.)
Instruction Manual
Version 1.01
Thank you for choosing ORCA Products. Welcome to
join our brushed system convenience of power RC.
By purchasing the 800 Series Electronic Speed
Control ("ESC") you have choose one of the most
advanced speed controls in RC. The 800 series ESC
allow to use brushed motor to driver. The ESC attach
the LED program card let you easy to change the
setup of ESC. Please read this manual thoroughly to
familiarize yourself with the installation, setup and
operation. By operating this product, you accept the
ORCA Warranty Terms.
Specific ation
Detailed Explanation of each Function Menu items:
1) Running Mode
Forward/Brake-------This function the car will not have reverse function, Just forward and brake.
Forward/Rev--------- This function the car will reverse immediately when the throttle brake the car.
Froward/Brk/Rev--- Set this function the first touch of throttle brake the car will have brake function, and if you
release to center position after brake and continue brake again the reverse function will
appear.
2) Battery Type
Lipo, LiFe and Nixx select.
3.) Battery Cut-Off Voltage
Lipo --- Low ------ cut off at 2.9V/cell Li-Fe — Low ------ cut off at 2.2V/cell Nixx — Low
Middle -- cut off at 3.2V/cell Middle--- cut off at 2.5V/cell Middle — cut off at 4.0V/ total
High ----- cut off at 3.4V/cell High ------ cut off at 2.8V/cell High
Disable - No cut off protect Disable - No cut off protect Disable - No cut off protect
4) Punch
Allows you to change the punch of the ESC (Level 1 to Level 5). Level 1 has the most miniature punch and Level
5 has the highest punch. Adjust punch level to maximize acceleration speed with minimum wheel spin.
5) PWM(Driver Freq)
Allows you to change the forward drive frequency of the ESC (“1K to 24K From six-step)
* The 1K setup will give you good punch at the low end.
* The 24K setup will result in strong mid to top end.
* Experiment to find out what suits your driving style best.
6)Throttle Compress
Basically the effective range of throttle is 0%~100%, when the T.Compress set in 10%, the throttle effective range
will change to 0% ~ 90%, it can let the throttle respond more sensitive, specially suitable for most brush motor
when you want to make it more strong and sensitive in the bottom power.
7) Initial start force
Usually the throttle force starts from 1% to 100%; it can let you get the best linear control feeling. This function
let you choose the throttle start point at 3%, 6%, 9%, 12%, 15%, or 18% to get the throttle feeling more
aggressive.
8) Max Forward Force
Control the maximum output power of ESC, it can control the maximum speed and increase the handling of the
car, specially in Crawl racing. Lower speed more control.
9) Max Reverse Force
Control the Maximum Reverse power when you Reverse the car.
10) Max Brake Force
Control the maximum brake power, it can control the brake feeling more smooth or more aggressive.
11) Brake Punch
When you set Punch 6, the brake time will follow your throttle brake simple and direct, if you used Punch 1-5 the
brake feeling have something ABS, get more smooth.
12) Drag Brake
Set the automatic brake force applied when the throttle returns to neutral position (8 steps from 0% to 100%):
* 60%, 80% and 100% Drag Brake recommend used in Crawl only.
13) Initial Brake Froce
Usually the brake force starts from 1% to 100%; it can let you get the best linear control feeling. This function
can let you get a more aggressive brake feeling. You can choose the brake force start point at 1%, 5%, 10%,
15%, 20%, 25%, 30% or /35% to 100%.
14) Neutral Range
Set the sensitive relay to your throttle feeling, preset in 45us.
Brushed ESC
Installation & Conne ctors
Brushed
System
WARNING!
Motor +/- polar must
match the ESC initial
Setup,otherwise the
motor rotation will
reverse.
-Black
+Red
+
6V-12.6V
-
-
(B E C ca b le )
(B EC c a bl e )
Receiver
CH 4
CH 3
CH 2
Ch 1
Bec cable
Bec cable
OFF O N
Power Switc h
Brushed System
Yes
29(L) x 34.8(W) x10.2mm(H)
20g (excluding wires)
6V-12.6V (Lipo 2~3Cells)
400A
80A
540 sized brushed motor
3A / 6V
Yes
Yes
System:
Forward/Brake/Reverse:
Dimensions:
Weight:
Voltage Input:
Peak Current:
Continuous current :
Motor Type:
B.E.C.:
Multi Protection System:
Water proof :


