Oregon Scientific BPW211 User manual

1
GB
Oregon Scientific™Wrist Blood
PressureMonitor(BPW211)
User Manual
TABLE OF CONTENTS
Introduction ....................................................................... 2
Keyfeatures ...................................................................... 2
Mainunit ........................................................................ 2
Plastic storage container ............................................... 2
LCD display symbols...................................................... 3
Safety and care instructions ............................................ 3
Safety precautions......................................................... 3
Caring for your blood pressure monitor .......................... 4
Aboutblood pressure ........................................................ 4
What is blood pressure? ................................................ 4
What are systolic pressure and diastolic pressure? ...... 4
What is mean arterial pressure (MAP)? ......................... 4
Why measure your blood pressure? .............................. 4
What is the standard blood pressure classification? ..... 5
Variation in blood pressure............................................. 5
Howdoesthe blood pressure monitor work? .................. 5
Gettingstarted .................................................................. 6
Installing and replacing the batteries ............................. 6
Setting the date, time and measurement units .............. 6
Positioning the wrist cuff ............................................... 7
Takinga blood pressure measurement ............................ 8
Recalling measurements stored in the memory .............. 9
Troubleshootingguide ..................................................... 10
Additionalresources ....................................................... 11
Specifications.................................................................. 11
Informationconcerning the CE mark ............................. 12
Bloodpressurelogbook ................................................. 12

2
GB
INTRODUCTION
Thank you for selecting the Oregon Scientific™ Wrist Blood
PressureMonitor (BPW211)as yourhealth productof choice.
This product has been designed to provide you with many
years of reliable service provided it is used correctly, and can
help you measure and track the following metrics:
·Systolic pressure
·Diastolic pressure
·Meanarterial pressure
·Pulse rate
·A historic record of up to 60 measurements
Readings taken by the BPW211 are equivalent to those
obtainedby a trained observer using the cuffand stethoscope
auscultationmethod, within the limits prescribed by “EN1060-
3Non-invasive Sphygmomanometers-Part 3: Supplementary
requirementsforelectro-mechanicalbloodpressuremeasuring
systems.” The monitor’s accuracy in measuring diastolic
pressure was tested using the fifth Korotkoff sound method.
This manual contains important safety and care information,
and provides step-by-step instructions for using the product.
Read the manual thoroughly before using the product.
KEY FEATURES
Mainunit (Figure 1)
Plastic storage container (Figure 2)
LCD display
andprotective
cover
Wrist cuff
Battery
compartment
Memory/up
button
Setbutton(time)
Onbutton
Storage
compartment

3
GB
LCD display symbols
Symbol Description Explanation
Systolicpressure
Diastolicpressure
Time Thecurrent time.
(hour: minutes)
Meanarterial Theaveragebloodpressure
pressure measured(formore information,
seepage4,“What isMean
ArterialPressure?”).
Pulse Pulserateperminute.
Memory If“MEM”shows, the displayed
measurementvalueis fromthe
memory,andnot necessarilyfrom
thelastreading.
Weakbattery Batteriesarelowandneed to be
replaced.
Inflating Unitis inflatingwithair toobtain
theneededlevelofpressure.
Deflating Wristcuff airis exhausting,or
deflating.
SAFETY AND CARE INSTRUCTIONS
Safetyprecautions
Pleaseobserve the following safety precautions when setting
up and using your blood pressure monitor.
· This device is intended for adult use only.
· This device is intended for non-invasive measuring and
monitoring of arterial blood pressure. It is not intended for
use on extremities other than the wrist or for functions
other than obtaining a blood pressure measurement.
· Do not confuse self-monitoring with self-diagnosis. This
unit allows you to monitor your blood pressure. Do not
begin or end medical treatment based solely on the
measurements of this device. Consult a physician for
treatmentadvice.
· If you are taking medication, consult your physician to
determinethemost appropriate timeto measure yourblood
pressure. Never change a prescribed medication without
consulting your physician.
· This unit is not suitable for continuous monitoring during
medicalemergencies oroperations.
· If the cuff pressure exceeds 300mmHg, the unit will
automatically deflate. Should the cuff not deflate when
pressures exceeds 300mmHg, detach the cuff from the
wrist and press the ON button to stop inflation.
· To avoid measurement errors, carefully read this manual
before using the product.
Thehighestbloodpressure
measured.
Thelowest bloodpressure
measured.

4
GB
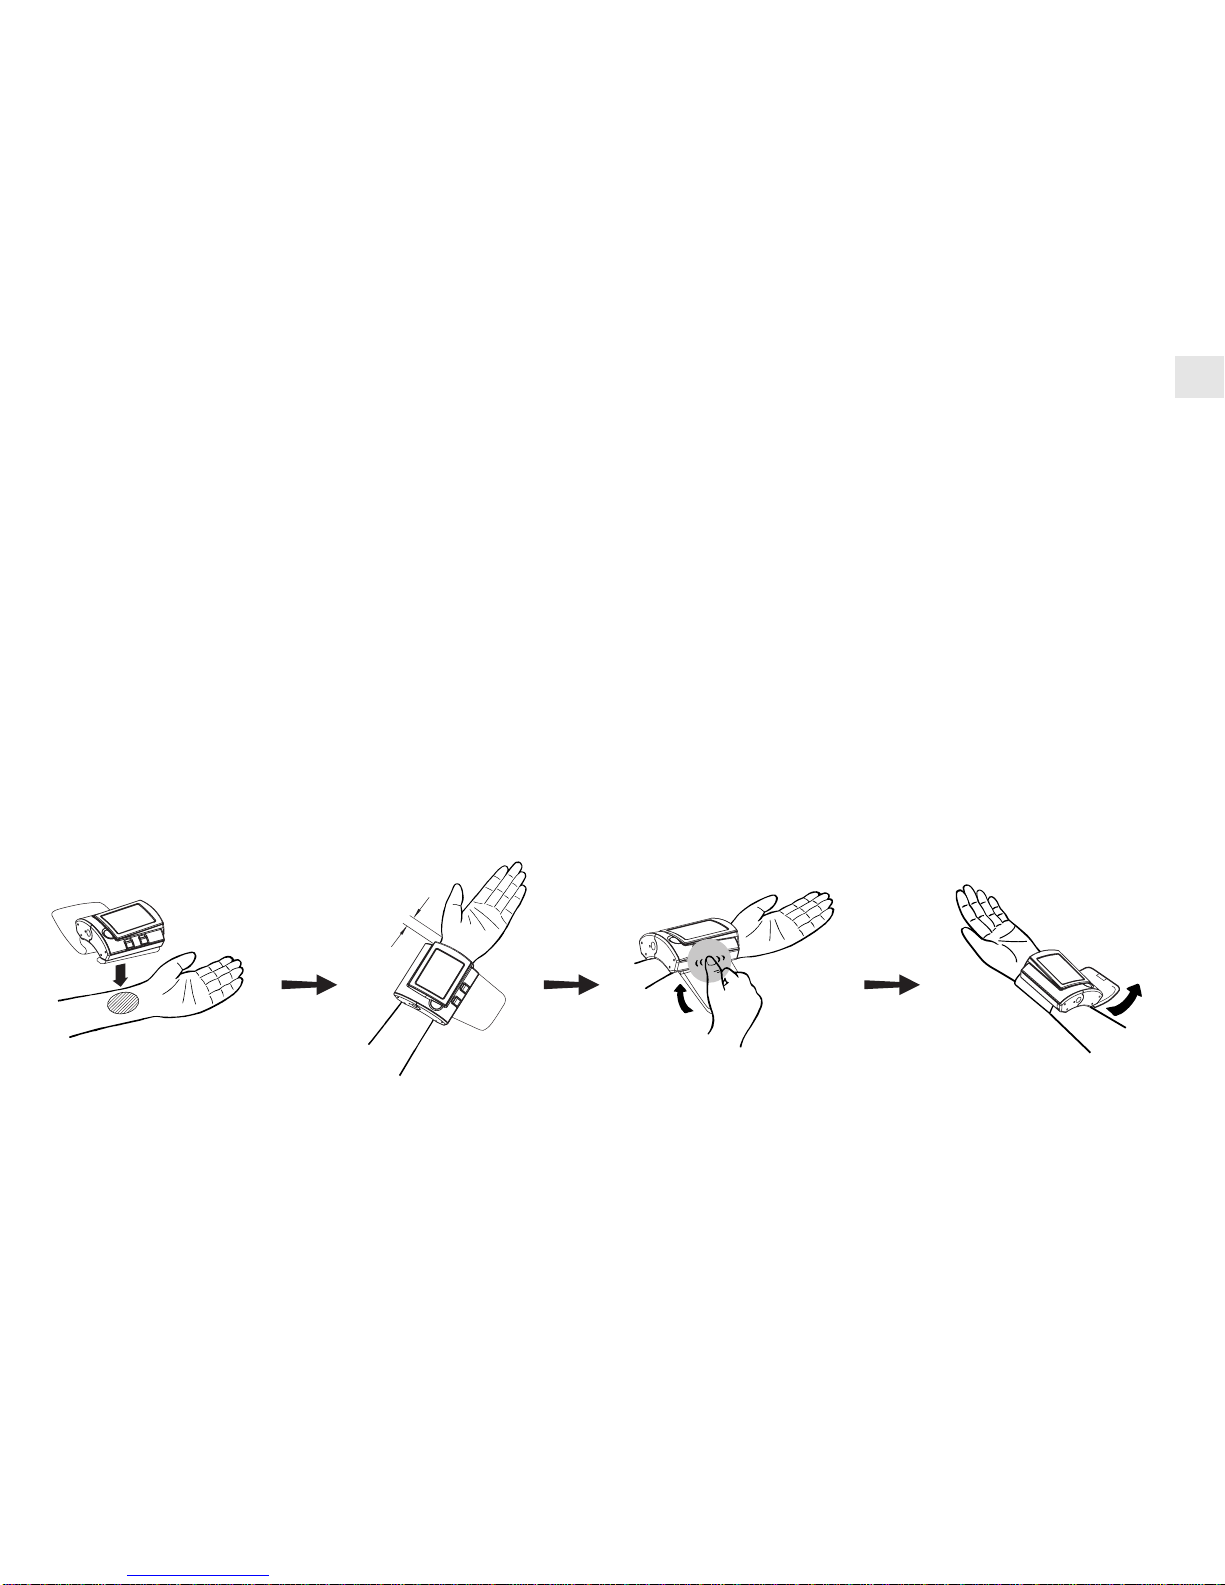
Caringfor your blood pressure monitor
To ensure you receive the maximum benefit from using this
product, please observe the following care guidelines.
· When not in use, store the main unit in the protective
plastic container that came with it.
· Donotimmerse themain unit inwater. If itcomes in contact
with water, dry it immediately with a soft lint-free cloth.
· Use a soft, slightly moistened cloth to wipe off the main
unit casing and cuff. Do not use abrasive or corrosive
cleaning agents, as these may cause damage.
· Remove the batteries whenever you are planning to store
the main unit for a long period of time.
· Whenreplacing batteries, use new batteries as specifiedin
this user manual. Do not mix new and old batteries.
· Do not place objects such as stickers on the wrist cuff or
main unit, as these may impair the measurement.
· Do not subject the main unit to excessive force, shock,
dust, temperature changes, or humidity. Such treatment
may result in malfunction, a shorter electronic life span,
damaged batteries, or distorted parts.
· Do not tamper with the internal components. Doing so will
terminate the product warranty and may cause damage.
The main unit contains no user-serviceable parts.
· If you no longer need to use this product, protect the
environment by bringing it to your dealer or designated
collection point for proper disposal.
ABOUT BLOOD PRESSURE
Whatisbloodpressure?
Blood pressure is the force generated by the blood against
the walls of arteries during cardiac contraction and relaxation
(e.g., the pumping action of the heart).
What are systolic pressure and diastolic pressure?
When ventricles contract and pump blood out of the heart,
blood pressure reaches its maximum value. This highest
pressurein the cycle is known as systolicpressure. When the
heart relaxes between heartbeats, the lowest blood pressure
is diastolic pressure.
What is mean arterial pressure (MAP)?
The mean arterial pressure (MAP) is the average pressure
that forces blood through the arteries. It is not the average of
the systolic and diastolic blood pressure; rather, MAP
corresponds to a state of balance between the compressive
and expansive forces acting on the arterial wall when there is
no distension outward or inward. MAP is an excellent way to
evaluate the stress on the walls of your blood vessels, and
canbe usedto evaluateexcessive load on the cardiovascular
system. Show your MAP history to your doctor to provide
additional information that may help him or her understand
your situation.
Whymeasureyourbloodpressure?
Blood pressure measurement can highly reflect one’s health
condition. High blood pressure is potentially linked to serious
illnesses such as stroke, heart disease and kidney failure.
Sincethereisnosymptommostofthetime,manyhypertensive

5
GB
people do not realize they are at risk until their health is
seriously threatened.
What is the standard blood pressure classification?
Thefollowingchart(Figure 3) wastakenfrom the WorldHealth
Organization(WHO),anddescribesthevariousclassifications.
Pleasenote:
· Hypotension value is for reference only.
· Bloodpressure is considered high when either thediastolic
orsystolic blood pressurevalue exceedsthe normalrange.
· Only a physician can tell you your normal blood pressure
range and the point at which you are at risk. Consult your
physiciantoobtainthesevalues.Ifthe measurements taken
withthisproductfalloutsidetherange,consultyourphysician.
Whydoes my bloodpressurefluctuate throughouttheday?
Individual blood pressure varies greatly both on a daily and a
seasonalortemperature basis.These variations maybe more
pronounced in hypertensive patients. Normally the blood
pressure rises while at work and is at its lowest during sleep.
Figure4 below illustrates the variationsover a single day with
measurement taken every five minutes. The thick line
represents sleep time. The rises in blood pressure at 4 PM (A
in the graph) and 12AM (B in the graph) correspond to an
attack of pain and sexual intercourse (Beven, Honour &
Stott, Clin. Sci. 36:329, 1969).
HOW DOESTHE BLOOD PRESSURE
MONITORWORK?
ThisproductusestheOscillometricMeasuringmethodtodetect
yourbloodpressure.Beforeevery measurement, the mainunit
establishes a “zero pressure” equivalent to the air pressure.
Thenit starts inflatingthe wristcuff to180mmHg or higheruntil
it senses that it has blocked your blood in the artery.After that,
the deflation process starts, during which time the main unit
160
A B
TimePM
BLOOD PRESSURE
(mmHg)
AM
Sleep
140
120
100
80
60
40
20
12
13
14
15
16
17
18
19
20
21
22
23
24
1
2
3
45
6
7
8
9
10
11
Figure4
Hypertension systolic over 160
(highpressure) diastolic over 95
Hypertonia systolic 140-159
(Bordervalue) diastolic 90-94
Hypotension Normal
(lowpressure) range
systolic under 90 systolic under 139
diastolic under 89
95
90
90 140 160
Systolic(mmHg)
diastolic (mmHg)
Figure3

6
GB
detects pressure oscillations generated by beat-to-beat
pulsatile, which is used to determine the systolic, mean and
diastolicpressure,andalsoyourpulserate.Anymotionduringthis
periodwillresultinanincorrectmeasurement.Afterallreadingsare
determined and displayed on LCD, the measurement is finished
and the wrist cuff automatically deflates.
EGETTING STARTED
Installing and replacing the batteries
To install the batteries:
1. Slideoff thebattery cover (Figure 5a).
2. Install the batteries by matching the
correct polarity, as shown
by Figure 5b. Always use the correct
battery type (2 Alkaline
LR03AAA-size).
3. Replace the cover (Figure 5c).
AAA
AAA
Note: Replacethe batterieswhenever theweak battery
mark( ) shows, the display is dim, or thedisplay does
not illuminate when the power is on. Replace all the
batteries at the same time – it is dangerous to mix old
and new batteries.
Contact your local waste disposal authority for
instructions on how to dispose of used batteries. Used
batteriescan beharmful tothe environment, and should
not be thrown out with household trash.
Setting the date, time, and measurement unit
Itisimportant to settheclock before usingyourblood pressure
monitor, so that a time stamp can be assigned to each record
that is stored in the memory.
To set the date, time,and measurement unit:
1. Press and hold SET for 2 seconds to enter the setting
mode.
Thesetting order is as follows: 12/24hour format, hour,
minute, month/day or day/month format, month, date,
andmeasurement unit (mmHg or kPa).
2. Press to increase a value or change the setting.
3. Press SET to accept the change and switch to the next
setting.
4. When you are finished, press ON to exit the setup
menu.
Figure5c
Figure5b
Figure5a

7
GB
Positioning the wrist cuff
It is important to properly position the wrist cuff to ensure that you receive an accurate reading.
1. Remove all accessories (watch, bracelet, etc.) from your left wrist. If your physician has diagnosed you with poor
circulation in your left arm, use your right wrist.
2. Roll or push up your sleeve to expose the skin.
3. Apply the cuff to your left wrist with your palm facing up (Figure 6a).
4. Position the edge of the cuff about 1 centimeter from the bottom of your palm (Figure 6b).
5. Fasten the wrist cuff around your wrist, leaving no extra room between the cuff and your skin. If the cuff is too loose, the
measurement will be inaccurate (Figures 6c – 6d).
1cm
Figure6a Figure6b Figure6c Figure6d

8
GB
TAKING A BLOOD PRESSURE
MEASUREMENT
You can choose to take your blood pressure while sitting or
lyingdown.
HelpfulTips for taking a measurement:
· Be sure to set the clock before taking your first
measurement,or whenever you replace thebatteries,
so that the date and time are stored in the memory
with your history. For instructions, refer to page 6.
· Itisimportanttorelaxwhentaking your blood pressure.
Try to take a 15-minute rest before you begin.
· Do not lean backward or bend your wrist inward while
taking a measurement.
· Avoid talking or moving your fingers and hand while
taking a measurement. Rapid movements or other
activities may alter your reading.
· Waitatleastone hourbeforetakingyourbloodpressure
if you have just eaten a large meal.
· Donotsmoke ordrink alcohol beforetaking your blood
pressure.
· Do not measure your blood pressure if you are under
stress.
· Wait at least 3 minutes between measurements. This
allows your blood circulation to recover.
· For a meaningful comparison, try to measure under
similar conditions. For example, take daily
measurementsatapproximately thesame time, onthe
same wrist, or as directed by a physician.
· To stop the measurement process at any time, press
the ON button.
.Themain unit automaticallyswitches off1 minuteafter
takinga measurement.
. To save the battery life, press the ON button as soon
as you are finished.

9
GB
To take a measurement:
1. Choosethe position you fromwhichyouwish to measure
– sitting or lying down.
2. Position your bodyso that your wrist isparallel withyour
heart,using the chartand illustrations below as a guide.
IF you are… THEN…
Place your elbow on a table, using the
plastic storage case or other object as a
support under your forearm.Your wrist
shouldbe parallelwith yourheart withthe
palmfacing up.
Place your arm across your chest with
the wrist parallel to your heart. Hold your
elbow with the other hand.
Sittingdown
with an
armrest
Sittingdown
with no
armrest
Measurement
Reading becomes
lower
Correct measurement
position
Measurement
Reading becomes
higher
Lyingdown Positionyour wriston a support, cushion,
or your thigh so that it is parallel with
your heart with the palm facing up.
3. Relax your hand.
4. Press the ON button.
Result: Afterafew seconds, thebloodpressure monitor
beeps and begins inflating the wrist cuff. It then slowly
deflates until there is another beep, signifying that the
measurementiscomplete.Don’tmovefromthefirstbeep
until the last to ensure a more accurate measurement.
Your systolic and diastolic pressure readings flash on
the display, followed by MAP (Mean Arterial Pressure,
see page 4) and pulse per minute readings every two
seconds. The measurement is automatically stored as
the first (1) entry in the memory; the last entry (60) is
dropped,andallthe entries inbetweenmoveup one digit
(e.g., 58 becomes 59, and so on).
RECALLING MEASUREMENTS STORED IN
THE MEMORY
Upto 60 measurementrecords can be stored in the memory.The
records are automatically stored each time you take a new
measurement.To view a history ofyourmeasurements, press .

10
GB
Note:
· The most recent record (1) is shown first. Each new
measurement is assigned to the first (1) record. All other
records are pushed back one digit (e.g., 2 becomes 3, and
so on), and the last record (60) is dropped from the list.
· Press again to see additional records.
· The date and time of measurement are shown with each
record.
· Memory records will be kept even when the batteries are
replaced.
TROUBLESHOOTING GUIDE
This section includes a list of error messages and frequently
asked questions for problems you may encounter with your
blood pressure monitor. If the product is not operating as you
think it should, check here before arranging for servicing.
No
power
Low
batteries
Display is dim
or will not
light up.
shows on
the display.
Batteries are
exhausted.
Batteries are
inserted
incorrectly.
Batteries are
low.
Replacewith new
batteries ( 6).
Insert the
batteries
correctly ( 6).
Replacewith new
batteries ( 6).
Problem Symptom Checkthis Remedy
Error
message shows on
the display.
1, 2, or 3
shows on the
display.
4 shows
on the display.
5 shows
on the display.
6 shows
on the display.
A
measurement
error
occurred.
The wrist cuff
is not secure.
Themonitor
detected
motionwhile
measuring
Pressure is
over
280mmHg
(37.3kPa)
Deflation
periodwas too
long
Relax for a
momentand then
measureagain.
Refasten the cuff
and then
measureagain
( 7).
Movementcan
affect the
measurement.
Relax for a
momentandthen
measureagain.
Relax for a
momentandthen
measureagain.
Movementcan
affect the
measurement.
Relax for a
momentandthen
measureagain.
Problem Symptom Checkthis Remedy

11
GB
ADDITIONAL RESOURCES
Visit our website (www.oregonscientific.com) to learn more
about your blood pressure monitor and other Oregon
Scientific™products such asdigital cameras, sportswatches,
hand-held organizers, alarm clocks, and weather stations.
Thewebsitealsoincludes contact informationforourcustomer
service department, in case you need to reach us.
SPECIFICATIONS
Application:
Measuringmethod Oscillometric / non-invasive
Application For adult use only
Measurementlocation Wrist section of lower arm
Memory Maximum60 records
Dimensions:
HeightxWidthxDepth ~86mm x78mm x30mm
(3.4 in x 3 in x 1.2 in)
Weight 160g (5.5 oz) with batteries
Cuffcircumference ~ 13.5 – 19.5cm (5.3 – 7.7in)
Measuringrange:
Pressure 30 - 280 mmHg (4.0 – 37.3 kPa)
Pulse 30 - 200 pulse/min
Settings
are
wrong
Nouser
memory
Date and time
are incorrect.
Measurement
unit(mmHgor
kPa) are
incorrect.
Norecords
displaywhen
is pressed.
The clock was
not set or
reset after
installingnew
batteries.
The
measurement
unit was not
set or reset
after installing
new batteries.
No
measurements
havebeen
taken.
Reset the clock
( 6).
Reset the
measurement
unit ( 6).
Take a
measurement,
then press
to access the
memory.
7 or 8
shows on the
display.
A calibration
error
occurred
Retakethe
measurement.If
theproblem
persists, contact
the retailer or our
customer
service
departmentfor
further
assistance.
Refer to the
warranty for
contact
informationand
return
instructions.
Problem Symptom Checkthis Remedy

12
GB
Accuracy:
Pressure +/- 3mmHg (+/- 0.4 kPa)
Pulse +/- 5%
Power:
Powersupply 3V DC, two (2) LR03 / AAA /
UM4-size 1.5V batteries
Powersave Auto power off after 1 minute of
non- activity
Operatingenvironment:
Operation 10°C…40°C(50°F…104°F)
Storage/Transport -20°C…60°C (-4°F…140°F)
Humidityrange 10%…83%relative humidity
INFORMATION CONCERNINGTHE CE
MARK
Thisdevice complieswith theEuropean regulations based on
theMedicalProductsCode,and bears the CEmark“CE0123”.
The device has been quality inspected according to EG
guideline93/42/EWGandtestedincompliance to the“EN1060-
1 Non-invasive sphygmomanometers – Part 1, General
requirements” and “EN1060-3 Non-invasive
sphygmomanometers – Part 3: Supplementary requirements
for electromechanical blood pressure measuring systems”.
TheCEmark further indicatesthat this bloodpressure monitor
meets the general requirements for electronic products as
regards to resistance to electromagnetic interference.
Malfunctioningmayhoweveroccurinthe proximity ofextremely
strong electromagnetic fields. In accordance with the
“Ordinance for Operators of Medical Products”, a technical
inspection must be carried out if this device is used for
industrial or commercial purposes.
BLOOD PRESSURE LOG BOOK
To create a log of your blood pressure history, complete the
personal information section at the top, then enter the details
(date,time,and measurements) foreach reading youtake.To
plot your history, use an S (systolic), D (diastolic) and M
(mean arterial pressure) to mark the points where each
measurement falls on the chart, then connect the points to
view your history over time.

13
GB
kPa mmHg
60
80
100
120
140
160
180
200
220
M
DD
M
s
s
Name: Age: Weight: (kg/lbs)
Date
Time 10 PM 10 PM
10
Oct 17
Oct
SYS
DIS
MAP
158
90
110
155
95
112
85 90
8.0
10.7
13.3
16.0
18.7
21.3
24.0
26.7
29.3
© 2003 Oregon Scientific. All rights reserved.
Table of contents
Other Oregon Scientific Blood Pressure Monitor manuals

Oregon Scientific
Oregon Scientific BPW128 User manual

Oregon Scientific
Oregon Scientific BPU321OS User manual

Oregon Scientific
Oregon Scientific BPW221 User manual

Oregon Scientific
Oregon Scientific BPW129 User manual

Oregon Scientific
Oregon Scientific BPW810N User manual

Oregon Scientific
Oregon Scientific BPW120 User manual

Oregon Scientific
Oregon Scientific BPW120 User manual

Oregon Scientific
Oregon Scientific BPW810 User manual

Oregon Scientific
Oregon Scientific BPW810N User manual

Oregon Scientific
Oregon Scientific BPW128 User manual