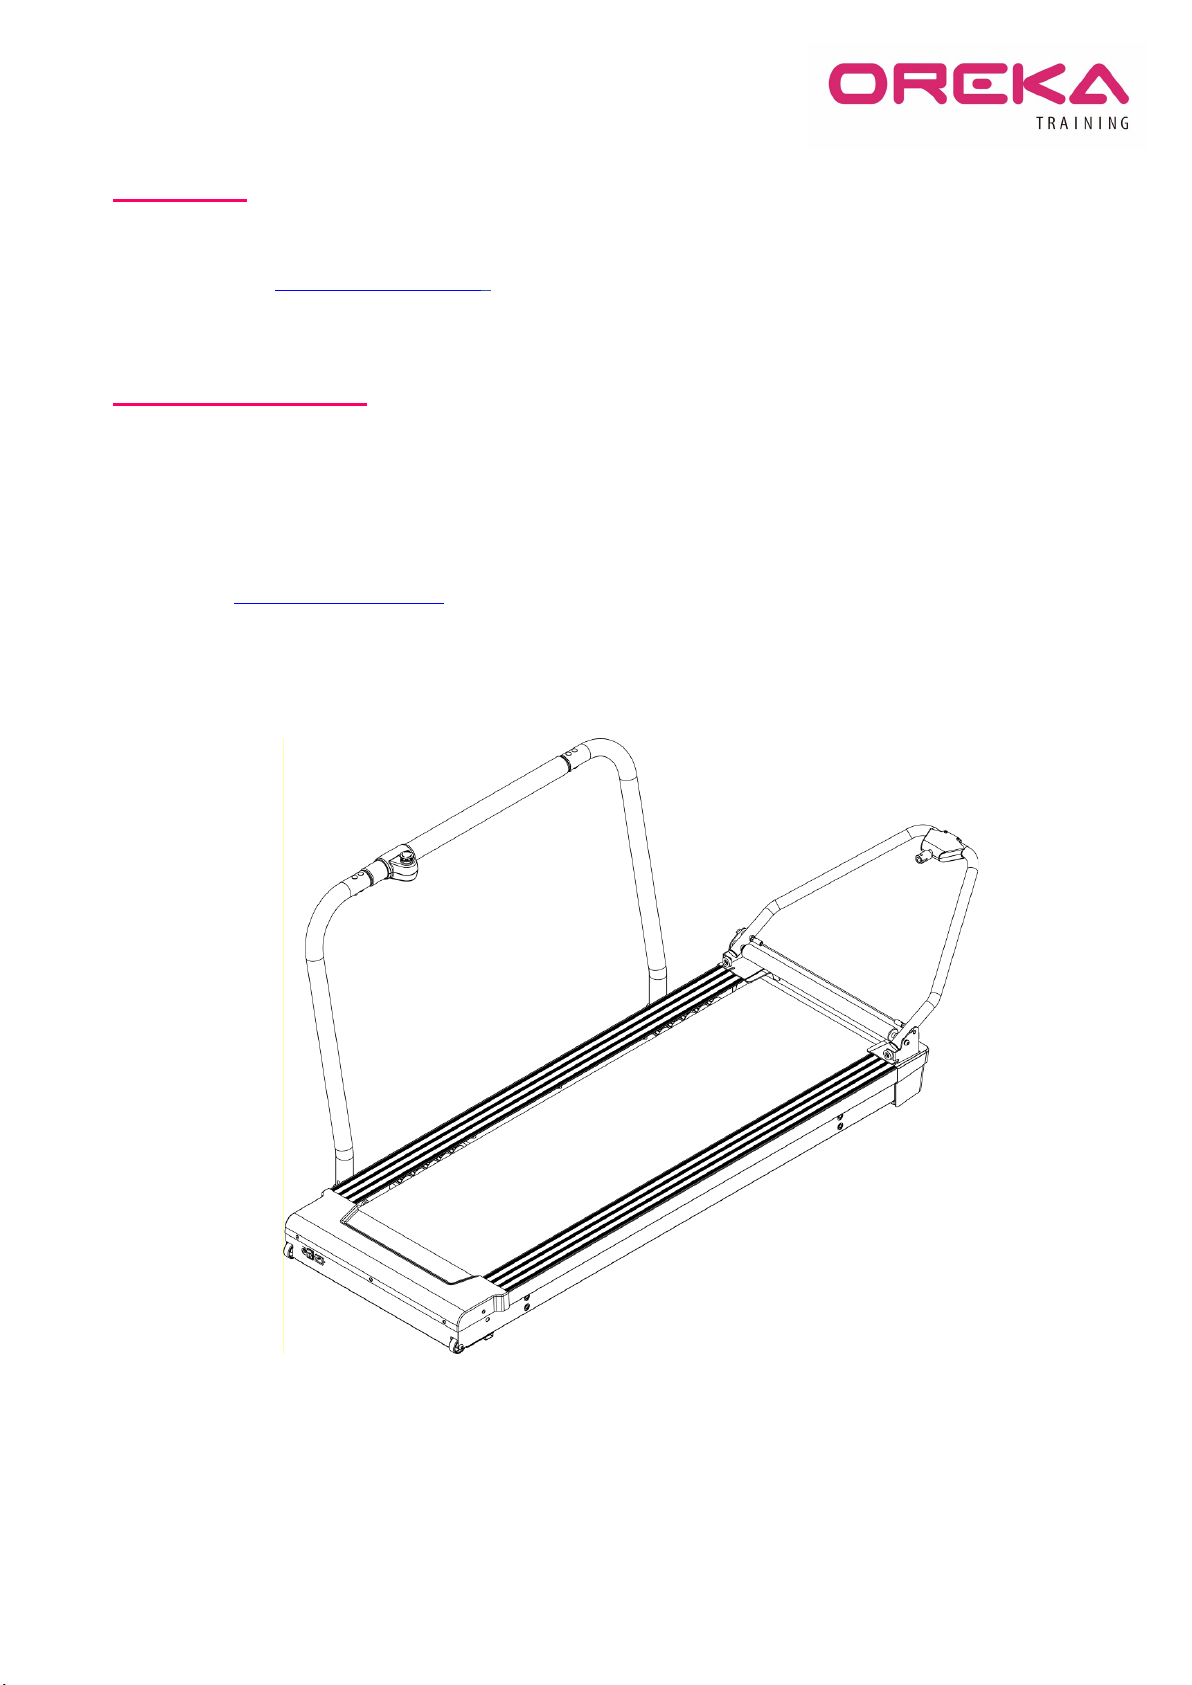
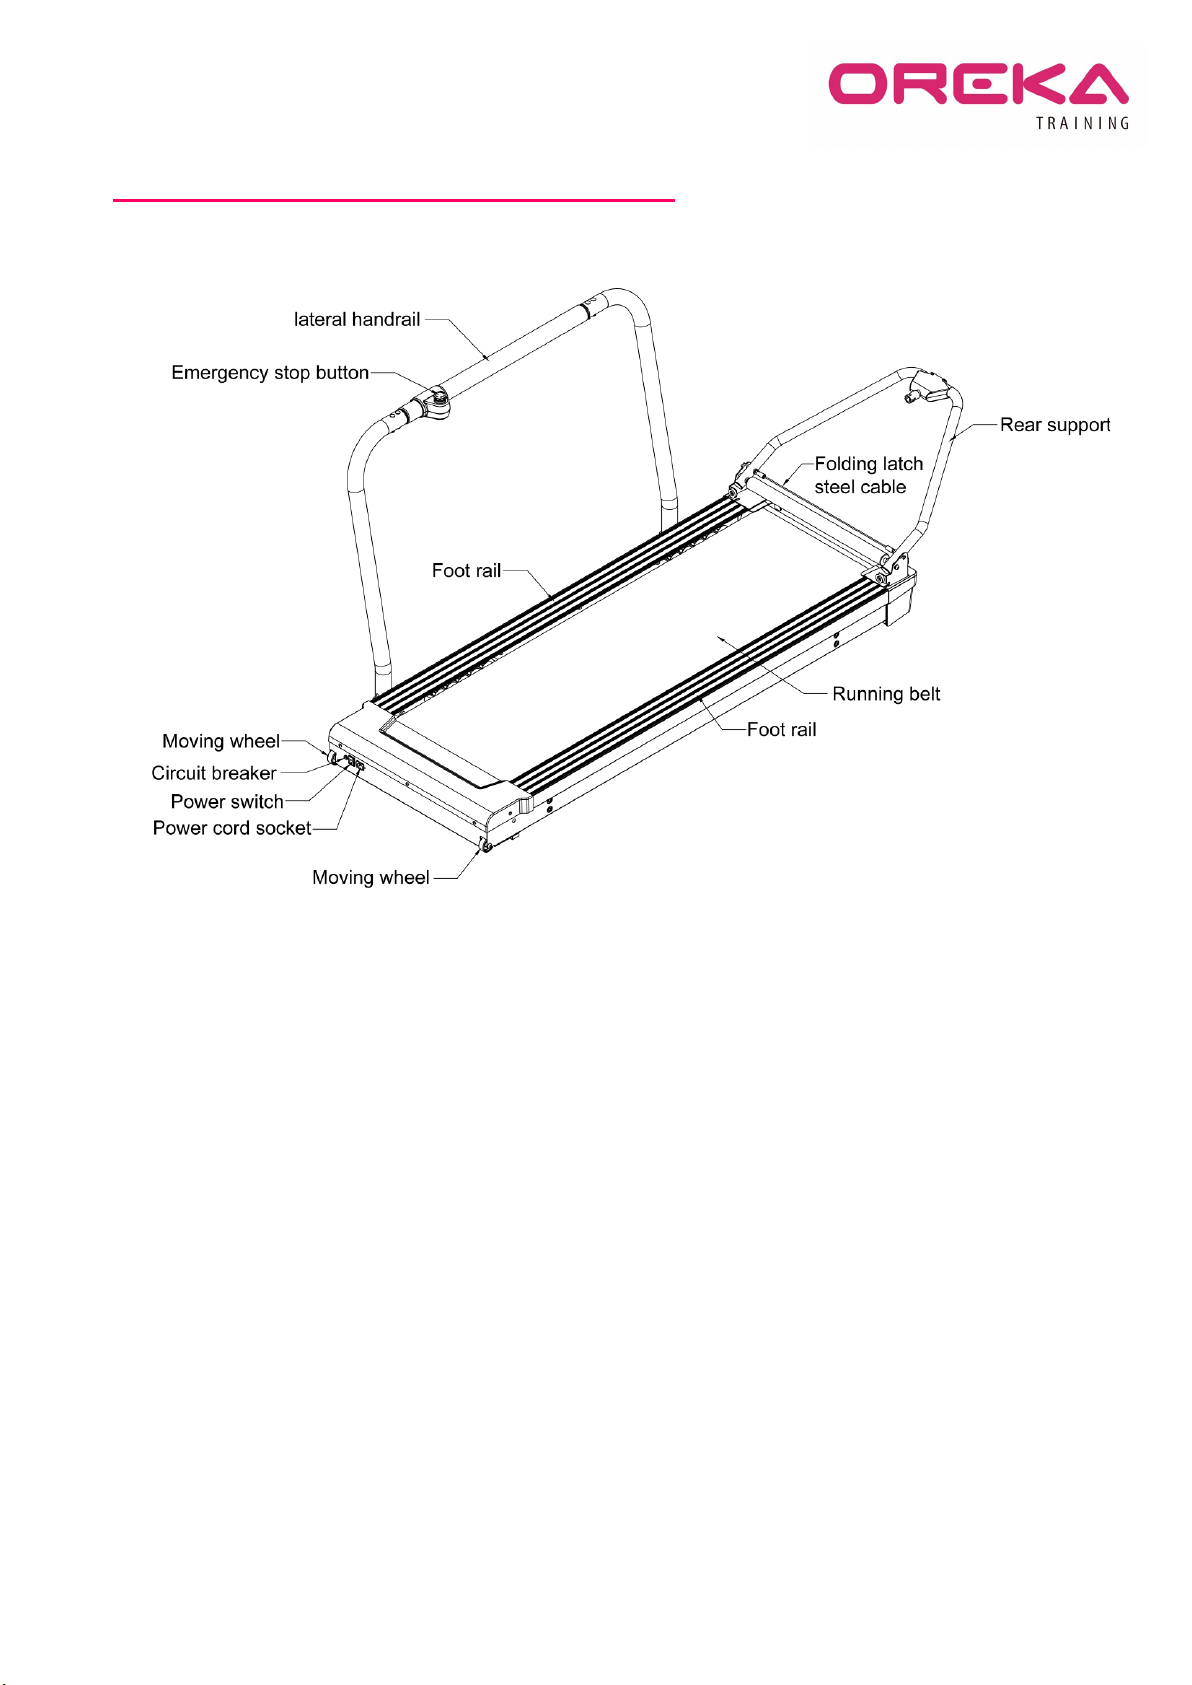
Oreka O2 User manual

OREKA TRAINING
USER MANUAL

1
CONTACT
Oreka Traning, S.L. CIF: B 75150219. Dirección: Oreka Training SL. Poligono. Egiburuberri 3, 20100 Errenteria,
Gipuzkoa. España info@orekatraning.com
OREKA TRAINING
Thank you for acquiring our product.
To be safe while using your bicycle, please make sure to carefully read the manual before using your Trainer.
In case of having any doubts after reading the manual, please visit our website or for more information you can
contact us at info@orekatraining.com
NOTE: The Company reserves the right to modify the design of the product or any features with the goal of
improving its quality.
Please keep this instruction manual after reading

2
INDEX
1. GENERAL OVERVIEW OF THE PRODUCT .......................................................................................... 3
2. NOTES ON THE TRAINERS USE ....................................................................................................... 4
3. MOUNTING INSTRUCTIONS ............................................................................................................ 9
4. PRECAUTIONS FOR THE INSTALLATION OF THE RAIL .................................................................... 15
5. PLACING THE BICYCLE ON THE TRAINER ...................................................................................... 17
6. BAND ADJUSTMENT ...................................................................................................................... 19
7. BEFORE STARTING YOUR FIRST SESSION ..................................................................................... 25
8. BKOOL.COM ................................................................................................................................. 26
9. RESPONSIBILITY EXTENSION........................................................................................................ 28
10. WARRANTY .................................................................................................................................. 29
11. TECHNICAL ASSISTANCE............................................................................................................... 29

3
1. GENERAL OVERVIEW OF THE PRODUCT
To take the Trainer out of the box, lay the box on the floor on a horizontal position and open the upper
section. Then, take the product out of the box. Do not take out the equipment while the box is on a vertical
position, this could make the components fall and cause damage to them.

4
2. NOTES ON THE TRAINERS USE
While making use of this product, please keep in mind the next rules/precautions:
1Read and follow the instructions carefully before using the product.
2The maximum weight of the user should not exceed 115KG.
3To avoid any dangerous situation while using the Trainer, make sure to be holding the handle firmly and pedal
while sitting on the bicycle seat .
4Make sure to not be carrying any object that may fall during the training session.
5The area of 1 meter around the Trainer is the safety area. This area should be empty.
6When children, elderly people or any person with a disability are near the product, make sure to keep an eye on
them to avoid danger. They should be outside of the space/room the Trainer is being used in.
7While using the trainer, the wheels of the bicycle will spin at high velocity. Under no circumstance should you or
any other person should get in contact with them. Be especially careful with kids and pets.
8This product is not recommended for people with a physical or mental disability and children.
9Once the training session is over, please put the product somewhere out of the reach of children, elderly people
or any person with a disability or pets.
10 Training incorrectly or excessively could cause damage on your health.
11 The Trainer is designed to be used in interiors and dry environments.
12 Do not use the Trainer outdoors.
13 Do not us the Trainer in interiors where there’s bug spray or any other kind of product in the air.
14 It is recommended to train on a well-ventilated room with no elevated temperatures.
15 The Trainer should be installed on stable and even floor.
16 Before every training session, be sure that the 4 legs of the Trainer are properly supported on the floor so the
Trainers it’s stable. If the Trainers is not properly supported, this could make the user fall

5
17 Make sure that the posterior lash system is properly placed, quick fastening, Oreka´s latch to the bicycle and
the rear handle are not loose. If this is not properly fixed it could make the user fall.
18 In case of emergency, press the safety button on the handlebar.
To return to the original function turn the safety button to the indicated direction, take the bicycle down and
restart the Trainer.

6
19 For your safety, when getting off the bicycle place your feet on the two lateral rails. In case of having to get off
it on the band, support yourself exclusively on zone that has board. Never support yourself on the zone of the
frontal and posterior rollers.
20 When using this product, make sure to plug it into an appropriate outlet with ground connection.
21 Clean the Trainer after every use.
22 After using this product and before cleaning it, unplug the Trainer.
23 Before unplugging the Trainer, make sure that the switch is off.

7
24 To clean the Trainer, use a cloth damped with water or non-aggressive cleaning products. Always make sure
the product is un plugged from the power.
25 Avoid the Trainer from touching any corrosive substances like salt or saline environments.
26 If any connection or electric cable of the product are damaged or the Trainer is functioning abnormally, please
contact Oreka Training to articulate your concern.
27 If water makes its way into the trainer, unplug it immediately and get in contact with Oreka Training to voice
your concern.
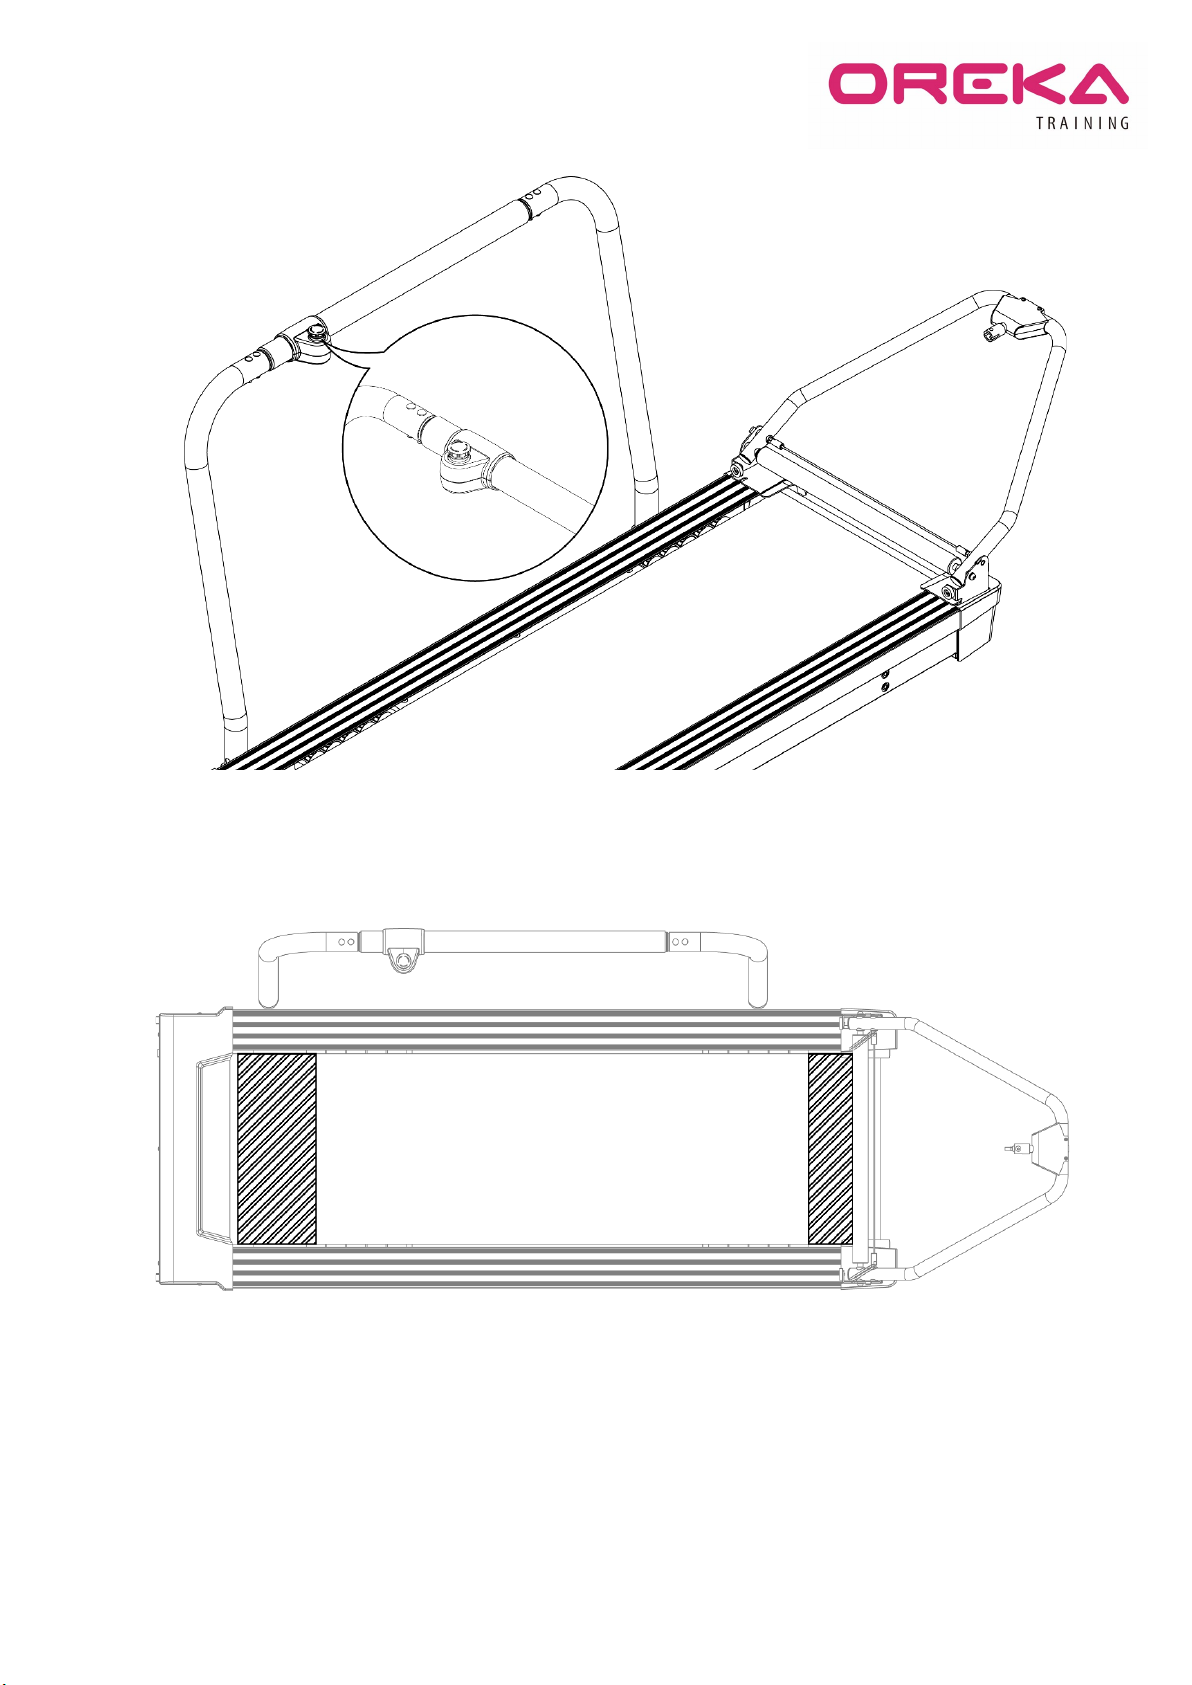
28 When moving the Trainer, do not pull form the cables.
29 Be careful while relocating the Trainer, the mobile parts and the resistance unit can be displaced and squash
fingers, hands or other parts of the body. To transport the Trainer dismount it and fold it.
30 Avoid the electric cables from touching surfaces at elevated temperatures.
31 Do not insert or include any mechanism additional to the Trainer.
32 If the electric cable is damaged, please get in touch with Oreka Training to get a replacement.
33 Connect the power transformer properly to the grid and to the roller’s socket.
34 Safety of the Trainer requires a visual inspection to check if there’s any damages before every use.
35 Do not dismount the Oreka Trainer in case of malfunction. This may produce electric shock while being
manipulated. Please get in contact with Oreka Training for your revision.
36 Do not make any holes, drill or tare any surface of the Trainer. This may cause cracks and the warranty may be
nullified.
37 Stop immediately if you experience any out of the ordinary in the performance of the Trainer. Please get in
contact with Oreka Training for revision.
38 Use original spare parts. If the current transformer is damaged it must be replaced with a spare supplied by
Oreka Training or by its after-sale services.
Bicycle Adjustments
39 Please, adjust the bicycle the same as you would on the road. Same bicycle seat height, handlebar height, distance from the
bicycle seat to the handlebar and cleat location.

8
40 The Trainer is designed to allow the users to have the same feeling riding a regular bike. Over all, in the first session its
recommended for you to pedal slowly leaning on the rails and with the simulation system disconnected. Likewise, try how
the Trainer works in different speeds. Once you are familiar with the sensations of the Trainer, turn on the Bkool simulator.

9
3. MOUNTING INSTRUCTIONS
a. Disassembled main body
b. Disassembled accessories
ELEMENT Description Qty
A Auto thread Screw Ø3x12 1
B Auto thread Screw Ø4x15 1
C Screw M6xP1.0x10 2
D Screw M8xP1.25x60 (thread lenght 25 mm) 4
E Nylon nut dry screw M8xP1.25 4
F Hexagonal Screw M10xP1.5x85 4
G Plastic plug 6P-4 2
H Hexagon wrench 5x28x75mm
( there’s a hole in
the middle) 1

10
I Open spanner 13mm 1
J Hexagon wrench 5x36x120mm 1
K Hexagon wrench 8x36x98mm 1
L Hexagon wrench 10x65x120mm 1
M Power cord 1
N Quick Release Pin 1
c. Rear support fold
i. Rear support placing
The rear support rotates upward until the bolt automatically locates the fixed hole.
ii. Fold
Pull the steel cable upward so that the bolt leave the hole and rotate the lash downward.

11
d. Rail Setup
Step 1
1The emergency button is fixed to the horizontal tube of the rail with the C screws. The connection cables enter
through the notch on the horizontal tube and should exit through one of its extremities.
2The upper and lower casings of the emergency button should be fixed with the screws A,B and C. Be careful to
not to nip the cable while screwing the casings.

12
Step 2
The emergency button cable should be inserted through the interior of the vertical tube of the rail. It should be
fastened through the inferior part. Then, the vertical tube A and B should be fixed to the horizontal tube. Finally, the
D screws are placed on the superior part and the E nuts on the inferior part (it is very important that everything is
properly fixed to avoid backlash and to assure that the assemble is properly tighten)
Step 3
The rail it’s attached to the assemble by the F screws.

13
As a first step, each screw is placed approximately 5-10mm, and after every screw is tightened individually.
Step 4
Unscrew the top lid of the mainframe to open the lid.

14
Step 5
The cable for the emergency button goes through the lateral whole on the mainframe and connected to the
connected shifter cable.
Step 6
Cover the holes with the G plug that allows the cable to go through.
Installing the plug: the cable is griped by the plug and there’s where you insert the cable to the hole. Finally, rotate
the cable 90 degrees to make it fit.
Step 7
Rotate
90°

15
Place and screw the electric components top lid.
4. PRECAUTIONS FOR THE INSTALLATION OF THE RAIL
The rail can be placed to the left or to the right of the mainframe
depending on the user’s preference. The following should be considered:
The vertical tube of the rail should point to the exterior of the mainframe.
The emergency stop button should point to the interior of the mainframe.
The emergency stop button should be placed to the front of rail.

16

17
5. PLACING THE BICYCLE ON THE TRAINER
Step 1
Place the posterior Oreka axis on the posterior axis of the bicycle and tighten with the hexagon wrench H
Side-Note: The wing of the screw should be facing upward.
Step 2
The rear lash should be placed vertically to the floor over the screws and insert them over the axis.
Wing of the screw
facing upward.

18
Step 3
The rear lash rotates downward until is parallel to the ground. Then you must make sure that the butterfly screw
has properly entered the elliptic hole of the rear latch.
Step 4
Fit the steel piece of fixed arm into the bushing, and then get the quick release pin through the hole of bushing of
rear support and the end of fixed arm.

19
※This locking pin will not release until the button on the handle is pressed which allow the balls to retract into the
pin for insertion and removal.
6. BAND ADJUSTMENT
The proper adjustment of the band is very important and please always make sure the band is well centered. The band
may get out of place due to weight, way of pedaling and the size of the rider. A slight lateral movement of the belt
will not affect the training, but in case the band moves from its place, please stop your training, and get off the
bicycle.
1- Then, get the 10mm hexagonal wrench to adjust the hexagonal screws inside plastic frame in the rear end of the
trainer.
Adjustment example: When the band moves towards the left side, tighten the left screw clockwise ¼ of a spin.
Likewise, if the band moves towards the right side, tighten the screw in the right clockwise ¼ of a spin. After
Other manuals for O2
2
Table of contents
Other Oreka Fitness Equipment manuals