Moza AirCross 3 User manual

AirCross 3 & AirCross 3 Pro
User Manual • Uživatelský manuál •
Užívateľský manuál • Használati utasítás •
Benutzerhandbuch

2
English
3 –13
Čeština
14 –24
Slovenčina
25 –35
Magyar
36 –46
Deutsch
47 –57

3
Dear customer,
Thank you for purchasing our product. Please read the following instructions carefully
before first use and keep this user manual for future reference. Pay particular attention
to the safety instructions. If you have any questions or comments about the device,
please contact the customer line.
✉www.alza.co.uk/kontakt
✆+44 (0)203 514 4411
Importer Alza.cz a.s., Jankovcova 1522/53, Holešovice, 170 00 Prague 7, www.alza.cz

4
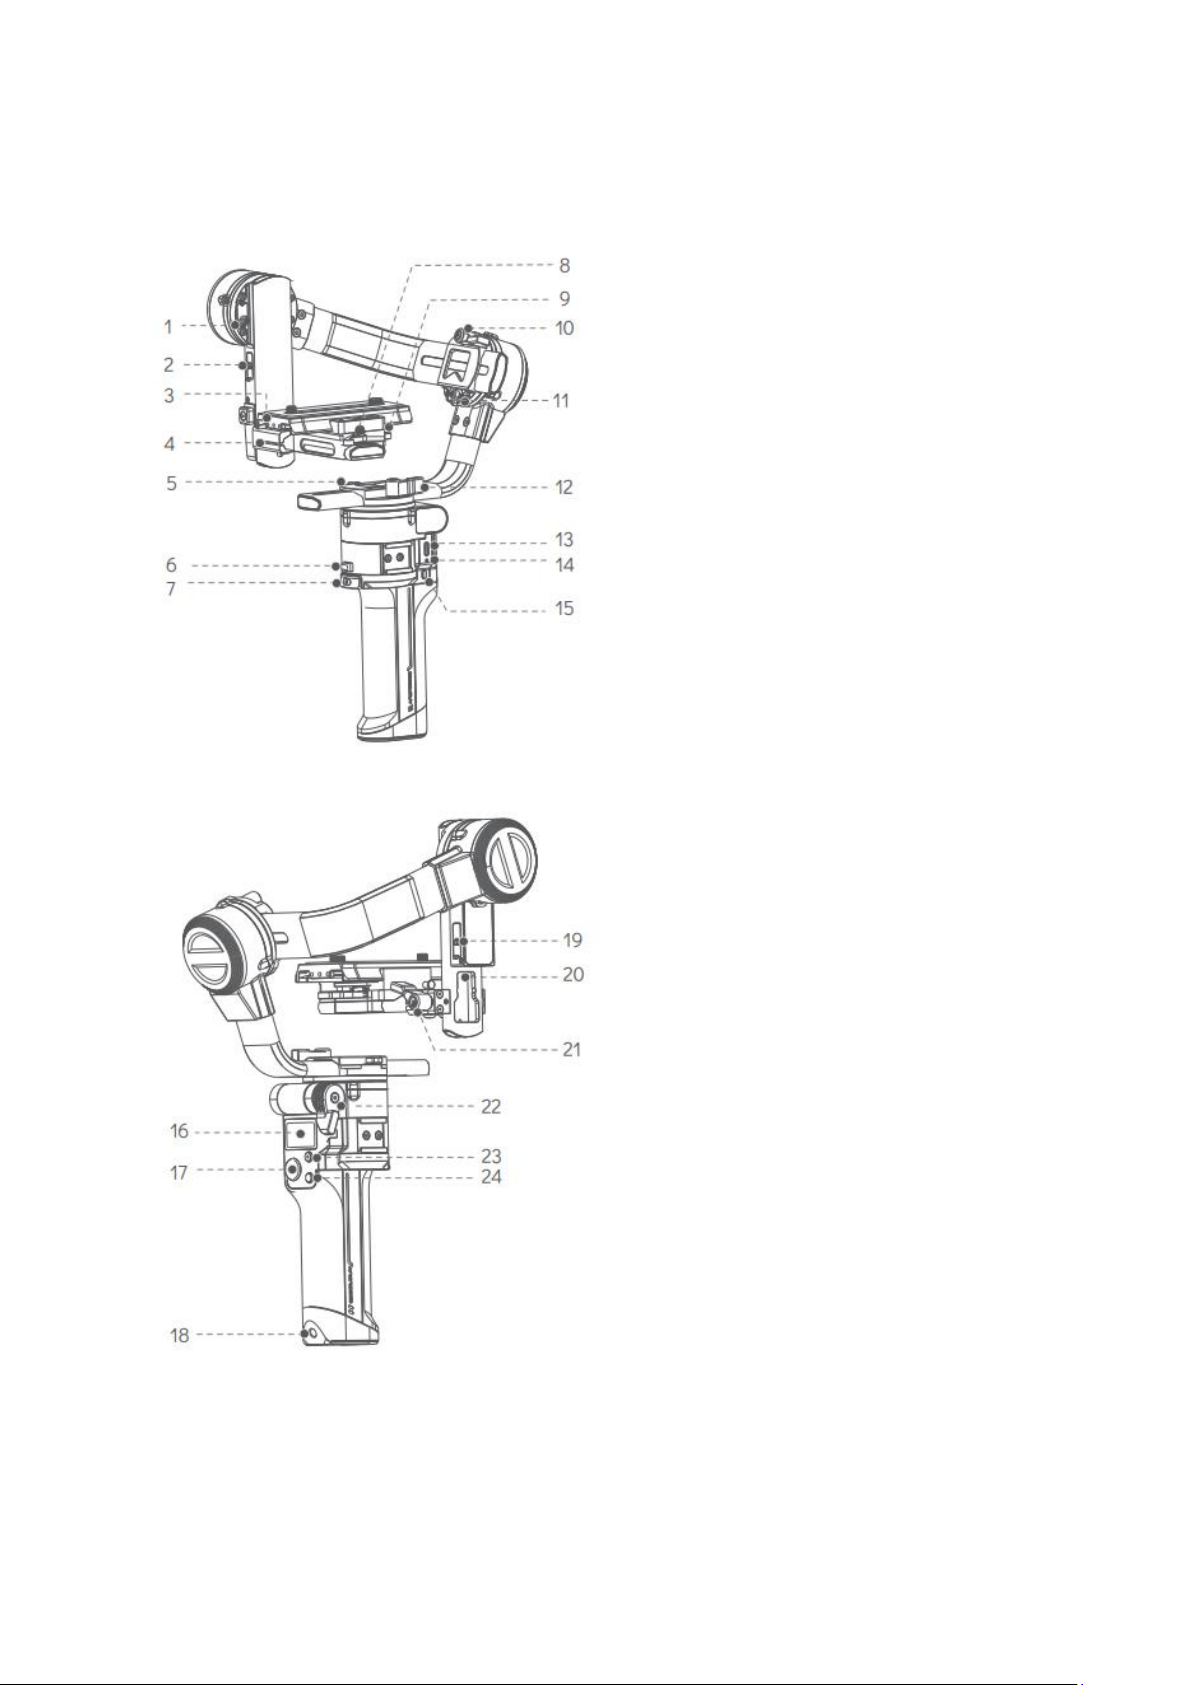
MOZA AirCross 3/Pro Overview
1. Tilt Motor Lock
2. Extension Port
3. Quick Release Plate
4. Tilt Adjustment Slider
5. Pan Motor Lock
6. Foldable Safety Lock
7. Smart Trigger
8. Quick Release Plate Knob
9. Quick Release Baseplate Knob
10. Roll Knob
11. Roll Motor Lock
12. Pan Knob
13. USB-C Charging Port
14. Battery Indicator Light
15. Power Button
16. OLED Screen
17. Joystick
18. 1/4” Extension Port
19. Camera Control Port
20. AI Extension Port
21. Tilt knob
22. Foldable Knob
23. Camera Control Button
24. Function Button

5
Preparation
Unfold the Gimbal
1. Rotate the foldable Knob.
2. Unfold the handle until it is locked.
3. Tighten the knob to prevent the handle from loosening.
Attaching the Tripod
1. Screw the mini tripod into the
screw hole at the bottom of the
handle.
2. Expand the mini tripod
Battery Charging
Please charge the battery through the USB-C charging port using a USB-C cable
(Included) and a USB adapter (Not included). It is recommended to use a USB adapter
with QC2.0 or PD protocol to complete the charging quickly. The LED light below the
charging port will switch of after the charging is completed.
USB-C Port
USB Type-C Cable

6
Unlock the Gimbal
Rotate the motor lock to the unlocked position, and then each motor can rotate freely.
NOTE: Do not rotate the motor before unlocking, otherwise the motor lock may be
damaged. If the gimbal is turned on before unlocking, the gimbal will enter sleep mode.
Mounting the Camera
Make sure to prepare the camera before mounting, confirm the battery is fully charged
and a memory card with sufficient storage space is inserted.
•Place the camera on the quick release plate wit 1/4" or 3/8” screws and keep the
camera in the center. Remove the extra screws as a spare.
•Slide the quick release plate onto the baseplate to the locked position.
•Secure the quick release plate and tighten the knob, make sure the quick release
plate is locked.
lock
unlock

7
Note:
•When installing the camera, if the right side of the camera interferes with tilt arm
caused the installation to fail, loosen the knob of the quick-release baseplate and
move it to the left until the camera can be installed successfully.
•After the camera is installed, move the quick release baseplate to the right and
make sure the camera’s right side is aligned with the tilt arm to achieve the beset
stability.
Balance Adjustment
1. Balancing the tilt axis vertical.
•Rotate the camera so that the lens is pointing upward.
•Unlock the tilt axis and loosen the knob, slightly adjust the position of the tilt
adjustment slider.
•The balancing is completed when the camera is steady while pointing upward,
lock the tilt axis.
2. Balancing the tilt axis horizontal
•Rotate the camera so that lens is pointing forward.
•Unlock the quick release plate, slightly adjust the position of the plate.
•The balancing is completed when the camera is steady while pointing forward,
lock the quick release plate.

8
3. Balancing the Roll Axis
•Unlock the Roll axis.
•Slightly adjust the roll arm left and right until it’s completely horizontal.
•Lock the roll axis.
4. Balancing the Pan Axis
•Hold the gimbal at an angle of 45° horizontally, turn the pan arm to a horizontal
angle.
•Unlock the Pan axis and slightly adjust the pan arm left and right.
•The Pan axis is balanced when the camera is steady, lock the pan axis.
Operation
Power Button
Long press: Power on or off
One click: Switch the follow speed, 5 levels from slow to fast
Double-click: Enter or exit sleep mode.

9
Joystick
Control the rotation of the gimbal
Menu:
Top Button: Option-up
Down Button: Option-down
Left Button: Return
Right Button: Confirm
Camera Control Button
Press halfway: Autofocus
One click: Start recording
Press and hold for 3 seconds: take a photo
Function Button:
One Click: Follow mode (Pan-Tilt Follow, All Lock)
Double Click: Sport Gear Mode
Triple Click: Inception Mode
Long Press: Enter/Exit Menu
Trigger Button
One Click: Start/Stop AI Follow Mode
Double Click: Re-centre
Triple Clicks: Selfie Mode
Press and Hold: All Lock
One Click and Hold: Pan-tilt Follow
Advanced Features
Please visit www.gudesn.com for the complete user manual. It will guide you:
•Language Switch
•Camera Control
•Button Customization
•Motor Output
•FPV, Sport Gear Mode, Manual Positioning
•User Configuration
•Calibration and Firmware Updated
MOZA Master App
Scan the code or search in the app store to download the MOZA Master App. MOZA
Master provides functions like Virtual Joystick Control, Motion Sensing Control,
Parameter setting, Time-Lapse, Panorama, Calibration and Firmware Updated.

10
Specification
Model
AirCross 3 / AirCross 3 Pro
Weight
1.3kg without tripod
Dimension
(W*D*H)
Unfold: 170*190*310 mm
Folded: 52*225*270 mm
Battery Type
Li-ion intelligent Battery (built-in),
24.718Wh
Battery Capacity
3400mAh
Standard Voltage
7.27V
Charging Voltage
5V/2A, 9V/2A
Working Hours
20H
Fast-charging time
1.4H
Bluetooth
2.400 GHz -24835 GHz
Environmental requirements
Working temperature: -10°C -50°C
Charging temperature: 5°C -40°C
Safety Caution
•This power is powered by a bult-in battery, please do not disassemble it, do not
put it into liquid or fire in order to avoid damage or risk of injury.
•Before powering on the gimbal, please adjust the balance follow the instructions
in this document. If the gimbal works in an unbalanced state for a long time, the
surface temperature of the motor can get hot, which will seriously shorten the
battery life.
•Do not let children touch and use this product, do not use fingers to obstruct the
motor operation to avoid finger injury.
•This product is not waterproof or dustproof, please keep the gimbal clear of dust
and water to avoid damage.

11
Warranty Conditions
A new product purchased in the Alza.cz sales network is guaranteed for 2 years. If you
need repair or other services during the warranty period, contact the product seller
directly, you must provide the original proof of purchase with the date of purchase.
The following are considered to be a conflict with the warranty conditions, for
which the claimed claim may not be recognized:
•Using the product for any purpose other than that for which the product is intended
or failing to follow the instructions for maintenance, operation, and service of the
product.
•Damage to the product by a natural disaster, the intervention of an unauthorized
person or mechanically through the fault of the buyer (e.g., during transport,
cleaning by inappropriate means, etc.).
•Natural wear and aging of consumables or components during use (such as
batteries, etc.).
•Exposure to adverse external influences, such as sunlight and other radiation or
electromagnetic fields, fluid intrusion, object intrusion, mains overvoltage,
electrostatic discharge voltage (including lightning), faulty supply or input voltage and
inappropriate polarity of this voltage, chemical processes such as used power
supplies, etc.
•If anyone has made modifications, modifications, alterations to the design or
adaptation to change or extend the functions of the product compared to the
purchased design or use of non-original components.

12
EU Declaration of Conformity
Identification data of the manufacturer's / importer's authorized representative:
Importer: Alza.cz a.s.
Registered office: Jankovcova 1522/53, Holešovice, 170 00 Prague 7
CIN: 27082440
Subject of the declaration:
Title: Stabilizer
Model / Type: AirCross 3 & AirCross 3 Pro
The above product has been tested in accordance with the standard(s) used to
demonstrate compliance with the essential requirements laid down in the
Directive(s):
Directive No. 2014/53/EU
Directive No. 2011/65/EU as amended 2015/863/EU

13
WEEE
This product must not be disposed of as normal household waste in accordance with
the EU Directive on Waste Electrical and Electronic Equipment (WEEE - 2012/19 / EU).
Instead, it shall be returned to the place of purchase or handed over to a public
collection point for the recyclable waste. By ensuring this product is disposed of
correctly, you will help prevent potential negative consequences for the environment
and human health, which could otherwise be caused by inappropriate waste handling of
this product. Contact your local authority or the nearest collection point for further
details. Improper disposal of this type of waste may result in fines in accordance with
national regulations.

14
Vážený zákazníku,
Děkujeme vám za zakoupení našeho produktu. Před prvním použitím si prosím pečlivě
přečtěte následující pokyny a uschovejte si tento návod k použití pro budoucí použití.
Zvláštní pozornost věnujte bezpečnostním pokynům. Pokud máte k přístroji jakékoli
dotazy nebo připomínky, obraťte se na zákaznickou linku.
✉www.alza.cz/kontakt
✆+420 225 340 111
Dovozce Alza.cz a.s., Jankovcova 1522/53, Holešovice, 170 00 Praha 7, www.alza.cz

15
MOZA AirCross 3/Pro Přehled
1. Zámek motoru naklápění
2. Rozšiřující port
3. Rychloupínací deska
4. Posuvník pro nastavení sklonu
5. Zámek pan motoru
6. Skládací bezpečnostní zámek
7. Chytrá spoušť
8. Knoflík rychloupínací destičky
9. Rychloupínací knoflík základní
desky
10. Otočný knoflík
11. Zámek válcového motoru
12. Otočný knoflík
13. Nabíjecí port USB-C
14. Kontrolka baterie
15. Tlačítko napájení
16. Obrazovka OLED
17. Joystick
18. 1/4" prodlužovací port
19. Port pro ovládání kamery
20. Rozšiřující port AI
21. Knoflík naklápění
22. Sklopný knoflík
23. Tlačítko ovládání fotoaparátu
24. Funkční tlačítko

16
Příprava
Rozložení gimbalu
1. Otáčejte sklopným knoflíkem.
2. Odklopte rukojeť, dokud není zajištěna.
3. Utáhněte knoflík, aby se rukojeť neuvolnila.
Připevnění stativu
1. Našroubujte mini stativ do otvoru
pro šroub ve spodní části rukojeti.
2. Rozšíření mini stativu
Nabíjení baterie
Nabíjejte baterii přes nabíjecí port USB-C pomocí kabelu USB-C (je součástí balení) a
adaptéru USB (není součástí balení). Pro rychlé dokončení nabíjení doporučujeme použít
adaptér USB s protokolem QC2.0 nebo PD. Kontrolka LED pod nabíjecím portem se po
dokončení nabíjení vypne.
Port USB-C
Kabel USB typu C

17
Odemknutí kříže gimbalu
Otočte zámek motoru do odemčené polohy ať se každý motor může volně otáčet.
POZNÁMKA: Před odblokováním motoru jím neotáčejte, jinak by mohlo dojít k
poškození zámku motoru. Pokud je gimbal před odemknutím zapnutý, přejde do režimu
spánku.
Montáž kamery
Před nasazením kameru připravte, zkontrolujte, zda je baterie plně nabitá a zda je
vložena paměťová karta s dostatečným úložným prostorem.
•Nasaďte kameru na rychloupínací destičku pomocí 1/4" nebo 3/8" šroubů a držte
ji uprostřed. Další šrouby vyjměte jako náhradní.
•Rychloupínací destičku nasaďte na základní desku do zajištěné polohy.
•Zajistěte rychloupínací destičku a utáhněte knoflík, ujistěte se, že je rychloupínací
destička zajištěna.
záme
k
odemk
nout

18
Poznámka:
•Pokud při instalaci kamery pravá strana kamery zasahuje do naklápěcího ramene
a instalace se nedaří, uvolněte knoflík rychloupínací základní desky a posuňte ji
doleva, dokud nebude možné kameru úspěšně nainstalovat.
•Po instalaci kamery posuňte rychloupínací základovou desku doprava a ujistěte
se, že je pravá strana kamery zarovnána s naklápěcím ramenem, aby bylo
dosaženo požadované stability.
Úprava vyvážení
1. Vyvážení svislé osy sklonu
•Otočte kameru tak, aby objektiv směřoval nahoru.
•Odjistěte osu náklonu a uvolněte knoflík, mírně upravte polohu posuvníku
nastavení náklonu.
•Vyvážení je dokončeno, když je kamera stabilní a zároveň směřuje vzhůru,
zamkněte osu náklonu.

19
2. Vyvážení vodorovné osy sklonu
•Otočte kameru tak, aby objektiv směřoval dopředu.
•Odjistěte rychloupínací desku a mírně upravte její polohu.
•Vyvážení je dokončeno, když je kamera stabilní a zároveň směřuje dopředu,
zajistěte rychloupínací destičku.
3. Vyvážení osy válce
•Odemkněte.
•Lehce nastavte rameno válce doleva a doprava, dokud nebude zcela vodorovné.
•Zablokování osy válce.
4. Vyvážení osy otáčení
•Držte gimbal v úhlu 45° ve vodorovné poloze a otočte rameno do vodorovného
úhlu.
•Odjistěte osu otáčení a mírně nastavte rameno otáčení doleva a doprava.
•Osa otáčení je vyvážená, když je kamera stabilní, uzamkněte osu otáčení.

20
Provoz
Tlačítko napájení
Dlouhé stisknutí: zapnete nebo vypnete napájení
Jedno stisknutí: Přepněte rychlost sledování, 5 úrovní od pomalé po
rychlou
Dvě stisknutí: Přechod do režimu spánku nebo exit
Joystick
Ovládání otáčení gimbalu
Menu
Horní tlačítko: Nahoru
Spodní tlačítko: Dolu
Levé tlačítko: Zpět
Pravé tlačítko: Potvrdit
Tlačítko ovládání fotoaparátu
Stlačte do poloviny: Auto zaostření
Jedno stisknutí: Spustit nahrávání
Stisknutí a podržení po dobu 3 sekund: pořízení fotografie
Funkční tlačítko:
Jedno stisknutí: Režim sledování (Pan-Tilt Follow, All Lock)
Dvě stisknutí: Režim Sport
Tři stisknutí: Režim otočení (Inception)
Dlouhé stisknutí: Vstup/výstup z nabídky
Tlačítko spouště
Jedno stisknutí: Start/Stop AI follow mode (sledování)
Dvě stisknutí: Srovnat do středu
Tři stisknutí: Režim selfie
Stisknutí a podržení: All Lock (zámek)
Jedno stisknutí a podržení: Pan-tilt Follow (sledování)
Pokročilé funkce
Kompletní uživatelskou příručku naleznete na adrese www.gudesn.com.
•Přepínání jazyků
•Ovládání kamery
•Přizpůsobení tlačítek
•Výstup motoru
•FPV, režim sportovního převodu, ruční nastavení polohy
•Konfigurace uživatele
•Kalibrace a aktualizace firmwaru
Other manuals for AirCross 3
1
This manual suits for next models
1
Table of contents
Languages:
Other Moza Camera Accessories manuals