Ormesa STANDY 3 Manual

USA - Cod. 22244 - 30-01-2018
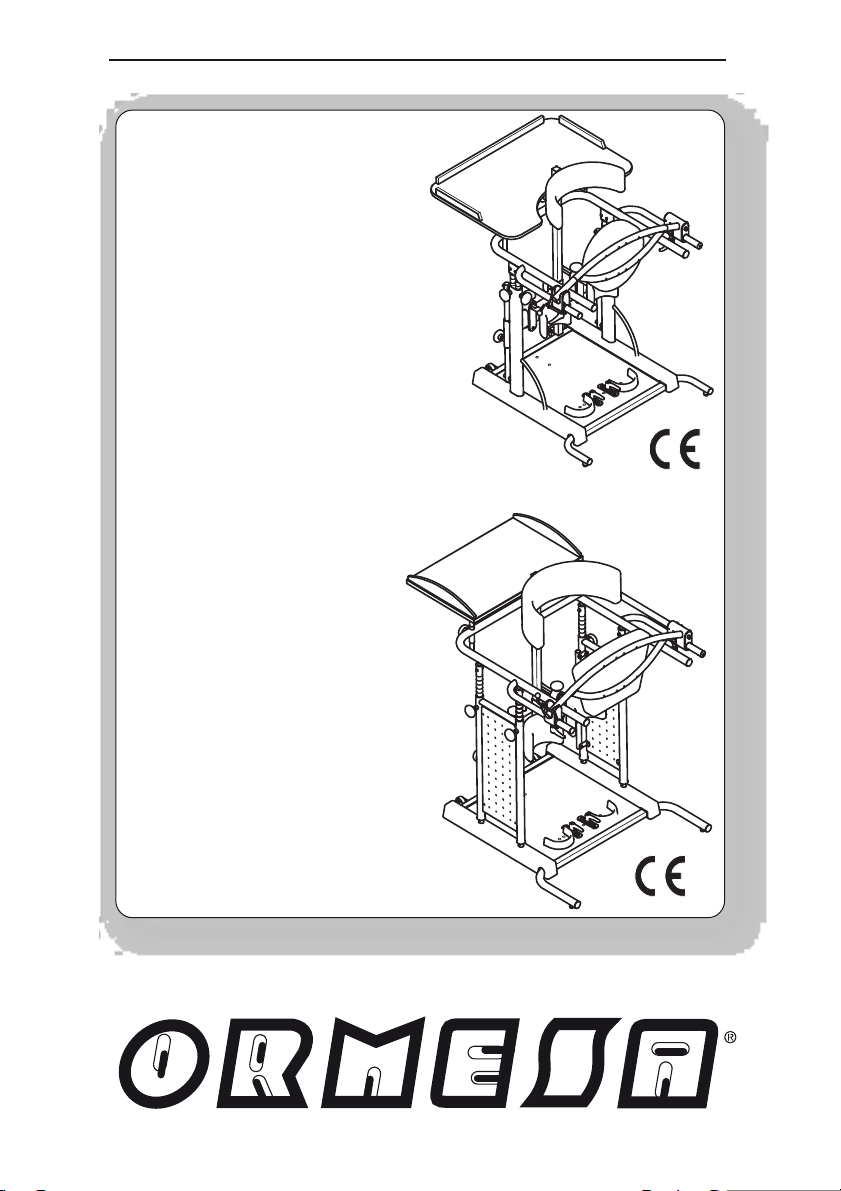
STANDY 4
STANDY 3
STANDY 4
STANDY 3
USE AND MAINTENANCE HANDBOOK
STANDING FRAME FOR
THE UPRIGHT POSITION
STANDING FRAME FOR
THE UPRIGHT POSITION

Thank you for choosing STANDY, from ORMESA s.r.l.
The STANDY combines style and ergonomics without compromising on safety.
ORMESA recommends that you read this manual very carefully to fully
understand its contents. In addition to helping you become familiar with STANDY
quickly, it also contains practical tips for making the best use of it safely and keeping it
in good working order.
Following the recommendations of this manual will help you achieve the rehabilitative
goal for which this aid was developed.
Luigi Menichini
Managing Director
1/45

2/45
TABLE OF CONTENTS
WARNINGS...................................................................................................................4
LABELS AND PLATES ................................................................................................7
CONFORMITY DECLARATION ...................................................................................7
SOME EXAMPLES OF WHAT NOT TO DO WITH STANDY........................................ 8
HOW TO MOVE STANDY..........................................................................................9
INITIAL PREPARATION.............................................................................................10
PACKING INFORMATION........................................................................................10
TECHNICAL CHARACTERISTICS STANDY 3..........................................................11
TECHNICAL CHARACTERISTICS STANDY 4..........................................................12
HOW TO USE STANDY..............................................................................................13
WHAT DOES STANDY DO.........................................................................................13
HOW STANDY WORKS.............................................................................................14
HOW TO ASSEMBLE STANDY .................................................................................16
Fitting the WORK TABLE on STANDY 3................................................................... 16
Fitting the WORK TRAY on STANDY 4....................................................................17
HOW TO ADJUST STANDY.......................................................................................18
Adjusting the height of the CHEST SUPPORT on STANDY 3................................... 19
Adjusting the height of the CHEST SUPPORT on STANDY 4.................................. 20
Adjusting the height of the HAND SUPPORT RING and BACK SUPPORT on STANDY 3...... 21
Adjusting the depth of the BACK SUPPORT on STANDY 3.................................... 23
Adjusting the height of the HAND SUPPORT RING and BACK SUPPORT on STANDY 4... 22
Adjusting the depth of the BACK SUPPORT on STANDY 4.................................... 24
Adjusting the width, height and depth of the KNEEPADS on STANDY 3 and STANDY4...25
Adjusting the HEEL STOPS on STANDY 3 and STANDY 4.................................... 28
Adjusting the height of the WORK TABLE on STANDY 3........................................ 29
Adjusting the height of the WORK TRAY on STANDY 4 ......................................... 29
Adjusting the depth of the WORK TABLE on STANDY 3 ........................................ 30
Adjusting the depth of the WORK TRAY on STANDY 4 during use ........................ 30
Opening the BACK SUPPORT on STANDY 3......................................................... 31
Opening the BACK SUPPORT on STANDY 4......................................................... 32

3/45
How to remove the HANDLE on STANDY 4.............................................................. 33
MOUNTING AND ADJUSTMENT OF ACCESSORIES............................................... 34
SIDE SUPPORT 857 on STANDY 3.......................................................................... 34
SIDE SUPPORT 857 on STANDY 4.......................................................................... 35
4–WHEEL SET 861 on STANDY 3............................................................................ 36
4-WHEEL SET 861 on STANDY 4 ............................................................................ 37
HEADREST 865 on STANDY 3................................................................................. 38
HEADREST 865 on STANDY 4................................................................................. 39
FRONT FOOT RESTRAINTS with BELTS 902 on STANDY 3.................................. 41
FRONT FOOT RESTRAINTS with BELTS 902 on STANDY 4.................................. 42
MAINTENANCE, CLEANING AND DISINFECTION.................................................... 43
CUSTOMER SERVICE AND SPARE PARTS ............................................................. 44
CONDITIONS FOR DURABILITY, REUSE AND REASSIGNMENT TOA NEW USER
..................................................................................................................................... 45

WARNINGS
-CAREFULLY READ AND UNDERSTAND THE INSTRUCTIONS IN THIS MANUAL
BEFORE USING THE DEVICE BECAUSE THEY HAVE BEEN WRITTEN WITH THE
USER'S SAFETY IN MIND and they will help the carer use the product safely and keep
it in good working order. The Use and Maintenance Manual is an integral part of the
product and must be carefully preserved for future reference.
-THE MANUAL IS INTENDED FOR TECHNICALLY QUALIFIED RETAILERS AND
FOR USERS AND THEIR ASSISTANTS; it provides instructions for using the product
correctly and must be supplemented by adequate knowledge of the rehabilitation pro-
gram for which it has been prescribed.
-The manual reflects the technical state of the product at the time it was sold.
ORMESA RESERVES THE RIGHT TO MAKE ANY CHANGES TO THE PRODUCT
OR MANUAL suggested by experience, technical considerations or regulatory devel-
opments without any obligation to update its previous production and relevant manuals.
-STANDY must be prescribed by a MEDICAL SPECIALIST who will also supervise
its use.
-ATTENZIONE!: REGOLATE lo stabilizzatore secondo LA CORRETTA POSIZIONE
per l’utilizzatore (v. § «COME REGOLARE STANDY» da pag. 18).
-ATTENZIONE!: After adjusting STANDY, make sure that all adjustable parts have
been locked, so to prevent dangerous situations (follow the instructions in sec-
tion HOW TO ADJUST STANDY from pag. 18).
-STANDY must only be used by persons whose bodily measurements and weight
conform to the specifications in the paragraph “TECHNICAL CHARACTERISTICS” on
pages 11 and 12.
-STANDY is designed for only internal use.
-ATTENTION! The product is not fireproof, so keep STANDY far from flames, ciga-
rettes or fires.
4/45

STANDY IS A MECHANICAL MEDICAL DEVICE:
Perform REGULAR MAINTENANCE and
CLEANING following the instructions shown in the
"Maintenance" chapter on page 42-43 and HAVE THE
DEVICE INSPECTED AT THE INTERVALS
INDICATED to VERIFY that it is WORKING
PROPERLY and in GOOD CONDITION, otherwise war-
ranty will fail and marking will lapse
PRODUCT REPAIRS other than the regular mainte-
nance shown on page 42-43 of the manual must be
ONLY MADE by a SPECIALIZED SERVICE
CENTER in the maintenance of mechanical aids for dis-
ables, otherwise warranty and marking will be
voided
Any CHANGES in the product and the
REPLACEMENT WITHOUT ORIGINAL PARTS
OR COMPONENTS ARE NOT AUTHORIZED.
REFER ONLY TO ORMESA, otherwise warranty and
marking will be voided
In case of DOUBT about the SAFETY of the product or
DAMAGE to parts or components, you are urged to
IMMEDIATELY DISCONTINUE USE and
CONTACT a SPECIALIZED SERVICE CENTER in
the maintenance of mechanical aids for disables, or
directly ORMESA.
5/45

GUARANTEE
ORMESA s.r.l. and INNOVATION IN MOTION WARRANT the product for 2 years
in the case of problems, contact the retailer where you purchased it. Always demand
original replacement parts or you will risk voiding the warranty.
ORMESA will not be liable for damage in the following cases:
- use by an unsuitable person;
- incorrect assembly of parts or accessories;
- unauthorized modifications or service;
- use of other than original replacement parts and parts subject to wear (seat and backrest,
wheels, etc);
- improper use (such as, transporting objects or loads larger or heavier than those shown in the
instruction handbook);
- damage caused by incorrect use and lack of regular maintenance, as shown in the instruction
handbook;
- exceptional events;
- failure to follow the instructions in this manual.
THE GUARANTEE DOES NOT COVER WEAR PARTS, WICH ARE SUBJECT TO
WEAR AND TEAR, SUCH AS THE UPHOLSTERIES AND THE WHEELS.
HOW TO STORE AND TRANSPORT THE MEDICAL DEVICE
TO AND TRANSPORT THE MEDICAL DEVICE
THE DEVICE MUST BE STORED AND PACKED using the Ormesa original
packaging materials, unless the guarantee will be voided
-Once unpacked, THE TRANSPORT OF THE DEVICE must be done by
ANCHORING ADEQUATELY it to the vehicle
-When travelling by plane, or in the car, DO NOT SUBJECT THE FOLDED
FRAME TO LOADS THAT, especially with road bumps, COULD DAMAGE ITS
STRUCTURE
THE DEVICE MUST BE PARKED / STORED IN CLOSED AND DRY PLACES
-THE OPERATING ENVIRONMENT HAS NO PARTICULAR INFLUENCE ON THE
DEVICE UNLESS IT IS USED INCORRECTLY, such as by leaving it parked for a
long time in direct sunlight or exposed to bad weather such as rain, or in
MARINE ENVIRONMENTS, where the salt air could corrode the paint and slid-
ing parts. IN THIS CASE, WE RECOMMEND CAREFULLY CLEANING AND
DRYING THE FRAME FOLLOWING THE INSTRUCTIONS SHOWN IN THE
“MAINTENANCE, CLEANING AND DISINFECTION” CHAPTER ON PAGES 42-43
AND THE WARNINGS ON PAGE 43
6/45

LABELS AND PLATES
Series number Article number
Max load
Date of
production
Warning! Read the
useand maintenance
handbook before use
Conformity with the
European safety
standards
LOT code
®
s.r.l.
Via A. Da Sangallo, 1 06034 Foligno (PG) ITALY Tel. +39 074222927 Fax +39 074222637
MODEL. PAR T N°
S N
LOT MAX. KG
!
Name of the model
CONFORMITY DECLARATION
ORMESA S.r.l. guarantees and declares , under its own exclusive responsibility, that
the following Medical Device, technical aid for rehabilitation:
STANDY 3 and STANDY 4
STANDING FRAMES FOR AN UPRIGHT POSITION
which this declaration refers to, conforms with the general requirements provided in
the Directive 93/42/EEC and subsequent amendments and additions, concerning the
medical devices, according to which this aid belongs to the I risk class and has been
designed in observance to the following standards:
CEI EN ISO 14971:2012
EN 12182:2012
EN 1041:20 13
ISO 9999:2011
CEI EN 980:2009
Medical Devices - Application of risk management
to medical
Technical aids for disabled persons - general
requirements and test methods
Information supplied by the manufacture with
medical devices
Technical aids for persons with disabilities -
Classification and terminology
Symbols for use in the labelling of medical
devices
September 13th, 2017
7/45

SOME EXAMPLES OF WHAT NOT TO DO WITH STANDY
-DO NOT USE THE PRODUCT WITH PERSONS LARGER OR SMALLER THAN
THE DIMENSIONS SHOWN ON PAGES 11and 12. STANDY must be prescribed
by a medical specialist in conformity with the laws and standards in force
-DO NOT PLACE THE STANDER ON A SLOPING SURFACE OR NEAR STAIRS
-Do not lift the stander to move it WHEN THE PERSON IS USING IT
-DO NOT REST EXCESSIVELY HOT CONTAINERS OR OBJECTS ON THE TRAY
SURFACE BECAUSE THEY COULD TIP OVER and because the wood or cover-
ing could be seriously damaged
-DO NOT ALLOW OTHER PEOPLE TO USE THE PRODUCT, NOT EVEN FOR
PLAYING
-NEVER LEAVE THE USER UNATTENDED OR NEAR OPEN FLAME OR STAIRS
-NEVER LEAVE STANDY PARKED FOR A LONG TIME IN DIRECT SUNLIGHT OR
NEAR SOURCES OF HEAT: THIS WILL AVOID OVERHEATING THE DEVICE AND
DISCOLOURING THE UPHOLSTERY
DO NOT USE THE PRODUCT WITH MISSING OR DAMAGED PARTS or the
warranty andmark will be voided DO NOT CARRY THE CHILD OVER
ROUGH STEEP SURFACES OR STAIRS
8/45

HOW TO MOVE STANDY
ATTENTION!
IT CAN TIP OVER IF TILTED MORE THAN 20°
STANDY 3
STANDY 4
fig. A
fig. a
9/45

INITIAL PREPARATION
PACKING INFORMATION
Stander A cm
(inches) Bcm
(inches) Ccm
(inches) VOLUME
m³ (inches³)WEIGHT
kg (Lbs.)
STANDY
380
(31.4) 80
(31.4) 84
(33) 0.537
(32757) 33 (72)
STANDY
485
(33.4) 80
(31.4) 93
(36.6) 0.632
(38552) 42 (92)
REMOVING STANDY FROM THE BOX
ATTENTION!
CUT WITHOUT PRESSING TOO
HARD SO AS NOT TO DAMAGE
THE CONTENTS OF THE BOX
REMOVE STANDY
FROM THE BOX
WITHOUT DRAGGING
10/45

TECHNICAL CHARACTERISTICS STANDY 3
-Available in two sizes:STANDY 3 for children and STANDY 4 for adults (page 9)
-Frame height-adjustable, painted with non-toxic polyester and epoxy-polyester powder
paints
-Ergonomic work table in plastic laminated wood, height-adjustable, removable. Semi-rigid
side protections.
-Kneepads width-, depth- and height-adjustable.
-Padded depth- adjustable back support.
-Padded height- adjustable chest support.
-Heel stops width- and depth-adjustable
-Footrest in aluminium with diamond-pattern, non-skid surface
-Wheels allow moving the aid from one room to another by tilting it, without the user (fig. A
on page 9)
Dimensions in cm
HYPHEN-SEPARATED NUMBERS INDICATE THE
MINIMUM AND MAXIMUM RANGE OF ADJUSTMENT
STANDY 3 Aid weight 28.9 kg ( 63.7 Lbs.) Max. load 90 kg (198Lbs. )
11/45

TECHNICAL CHARACTERISTICS STANDY 4
-Available in two sizes:STANDY 3 for children and STANDY 4 for adults
-Frame height-adjustable, painted with non-toxic polyester and epoxy-polyester powder
paints
-Work tray in plastic laminated wood, height-adjustable, removable
-Kneepads width-, depth- and height-adjustable covered with fireproof material
-Arm support adjustable, chromed
-Padded depth- adjustable back support.
-Padded height- adjustable chest support.
-Heel stops width- and depth-adjustable
-Footrest in aluminium with diamond-pattern, non-skid surface
-Wheels allow moving the aid from one room to another by tilting it, without the user (fig. A
on page 9)
Dimensions in cm
HYPHEN-SEPARATED NUMBERS INDICATE THE
MINIMUM AND MAXIMUM RANGE OF ADJUSTMENT
STANDY 4 Aid weight 38 kg (83.7 Lbs.) Max. load 120 kg (264 Lbs.)
12/45

HOW TO USE STANDY
STANDY IS A STANDER DESIGNED FOR ACHIEVING AND MAINTAINING AN ERECT
POSITION.
It is recommended for persons such as paraplegics, quadriplegics, spastics, dystonics, hypo-
tonics and the elderly and MUST BE PRESCRIBED BY A MEDICAL SPECIALIST WHO
HAS DETERMINED:
-that there are no dislocationsor fractures of the lower limbs
-that there is no dislocation of the hip
-that there is no bone fragility
-that the person is not convalescing from recent surgery
-that the person's dimensions and weight are not greater than the maximum
weight and/or shorter or taller than the heights indicated on page 11-12
-the degree of extension of the lower limbs
-that the intended user is capable of using the aid
THE DEVICE IS INTENDED FOR USE:
-at home
-in specialized rehabilitation centres
-in hospital gymnasiums
-in nursing homes
DO NOT LEAVE THE USER UNATTENDED OR NEAR OPEN FLAME OR STAIRS
THE AID MAY BE USED OUTDOORS ONLY IF THE SURFACE IS FLAT AND
WELL-PAVED AND PROTECTED FROM BAD WEATHER
WHAT DOES STANDY DO
STANDY HAS BEEN DESIGNED:
-to provide training in achieving an erect position
-for maintaining the upright position with the load on two feet, which would otherwise
be impossible
With STANDY the user obtains a postural adaptation that allows the body to maintain a se-
cure position, anchored and bound by the support surfaces, allowing selective explora-
tion and a dialogue with the surrounding physical/social world.
STANDY can, in fact, be used in normal life situations by children and adults, increasing
opportunities for their active involvement and, thus, real integration.
13/45

AN APPROPRIATE USE OF STANDY CAN FACILITATE:
-the prevention of deformities
-training the postural muscles
-the control and straightening of the head, facilitated by the decreased gravity-opposing
effort of the trunk thanks to the chest support, which can be removed when there is sufficient
trunk control (fig. F, f page 19-20)
-the programmed control of labyrinthine-vestibular function disturbances
-the experience of manual activities guided by vision, eased by the fact that the upper
limbs are freed from protection and support functions
IN ADDITION, AN ERECT POSITION:
-increases respiratory capacity due to increased ventilation and reduced obstructive
phenomena
-facilitates peristalsis
-facilitates circulatory functions
It is especially important to emphasize that STANDY is an aid that increases the ability to
adapt to the surrounding environment by increasing personal autonomy, i.e., the pos-
sibility of relating to oneself, others and the physical environment: the ability to “put
oneself in contact with ...”
HOW STANDY WORKS
-Bring the wheelchair close until it touches the base of the stander with its front wheels
ATTENTION
LOCK THE WHEELCHAIR WITH ITS BRAKES
-Position the lower limbs in the HEEL STOPS (see page 20)
-Make sure that the kneepads allow the knees to flex slightly: flexion can be increased or de-
creased with the person in the upright position by adjusting the kneepads or heel stops (see
pages 25-26 and 27)
ATTENTION
If the product has accessory 861, engage the brakes before making the adjustments
14/45

Be very careful to apply ADEQUATE FORCE TO THE CHEST AND PELVIC SUPPORTS:
in fact, it must be SUFFICIENT TO ENSURE A MINIMUM OF STABILITY.
-Fig. B: avoid excessive support that could cause a “feeling of constriction”
-Fig. C: a support that is too “light” could cause “fear of falling” reactions or a feel-
ing of instability
-Fig. D: in the correct position, the feet should be equidistant from the centre of the
support platform, the pelvis symmetrical and aligned with the trunk, and the trunk and
legs extended
If there is sufficient trunk control, the chest support may be lowered or removed (see p.
16).
ATTENTION: THE STANDER MUST ALLOW THE USER TO PERFORM
ACTIVITIES IN A CORRECT AND FACILITATING POSITION AND MUST NOT SERVE TO
KEEP THE PERSON STILL OR IMMOBILE
The work tray, which is also adjustable, should be set so that it allows use of the hands
with the upper limbs semi-extended.
fig. B fig. C fig. D
15/45

HOW TO ASSEMBLE STANDY
Fitting the WORK TABLE on STANDY 3
fig. e
16/45

Fitting the WORK TRAY on STANDY 4
fig. E
17/45

HOW TO ADJUST STANDY
THE STANDER IS ADJUSTED IN THREE PHASES AND MUST BE PERFORMED UNDER
THE DIRECT SUPERVISION OF THE SPECIALIST WHO PRESCRIBED IT.
1st PHASE: YOU MUST MEASURE:
1. the person's height from below the chest to the ground, which must be
used to position the chest support.
2. the distance from the kneecap to the ground, which must be used to posi-
tion the stander's kneepads
The measurements can be taken with the person standing or lying down.
2nd PHASE: INITIAL ADJUSTMENT WITHOUT THE USER
Transfer the measurements made in phase 1 to the stander
3rd PHASE: SUBSEQUENT ADJUSTMENT WITH THE USER
Check:
1. that, once closed, the backsupport is located in the centre of the but-
tocks. The height of the arm support will depend on the positioning of the rear
pelvis thrust cushion
2. the positioning of the kneepads
3. the positioning of the heel stops in width and depth
4. the position of the thoracic support
5. the position of the tray, which must be set by checking the user's height
from under the elbow to the ground (minimum height). In those cases where it
is not possible to take this measurement with the person standing, measure
the distance from bent elbow to feet with the user lying down. To operate the
handle (STANDY 4 only) the tray must be moved away.
6. the vertical alignment of the thorax and the pelvis (any lateral deviation can
be corrected with accessory 857, see pages 33 and 34)
7. the flexion of the limbs: the standing position is determined by the front-
to-back adjustment of the cback support, kneepads and heel stops
ATTENTION:
ALL ADJUSTABLE ELEMENTS MUST BE LOCKED!!!
MAKE SURE THAT ALL THE ADJUSTMENTS ARE SECURELY LOCKED IN PLACE TO
AVOID SITUATIONS OF DANGER FOR THE USER.
WARNINGS:
THE ADJUSTMENTS MUST BE CHECKED BY THE PRESCRIBER AND
REHABILITATION THERAPIST WHEN CONSIDERED APPROPRIATE TO OPTIMIZE THE
STANDING POSITION, BECAUSE ADEQUATE USE AFFECTS THE PERSON'S FLEXION
AND DECREASES HIS/HER RIGIDITY
18/45

Adjusting the height of the CHEST SUPPORT on STANDY 3
It can be removed for users with sufficient trunk control
fig. f
19/45
Other manuals for STANDY 3
1
This manual suits for next models
1
Table of contents
Other Ormesa Medical Equipment manuals
Popular Medical Equipment manuals by other brands

B. Braun
B. Braun Aesculap DSM Instructions for use/Technical description

M-TI
M-TI 830 user manual

ARJO HUNTLEIGH
ARJO HUNTLEIGH Maxi Twin Quick reference guide

BetterLiving
BetterLiving BE9002 Setup and operation

Ama Tech
Ama Tech F-91501 Instructions for use

Contec Medical Systems Co.
Contec Medical Systems Co. ECG300GT manual