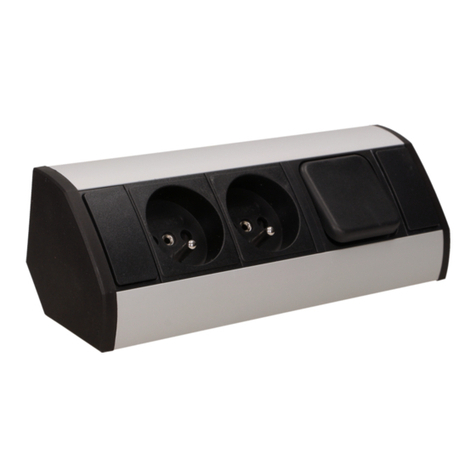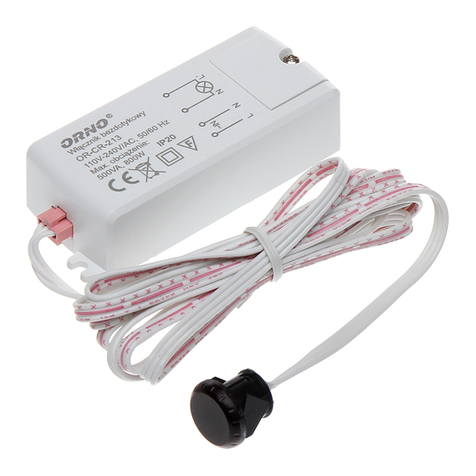
(PL) Włącznik bezdotykowy, jednobiegunowy, monostabilny
(EN) Non-contact one way switch
(DE) Berührungslos Schalter, einpolig
ORNO-LOGISTIC Sp. z o.o.
ul. Rolników 437
44-141 Gliwice POLAND
tel. (+48) 32 43 43 110
Przed rozpoczęciem korzystania z urządzenia, należy zapoznać się z niniejszą instrukcją obsługi oraz zachować ją na przyszłość. Dokonanie samodzielnych napraw i modyfikacji skutkuje utratą
gwarancji. Producent nie odpowiada za uszkodzenia mogące wyniknąć z nieprawidłowego montażu czy eksploatacji urządzenia.
Z uwagi na fakt, że dane techniczne podlegają ciągłym modyfikacjom, Producent zastrzega sobie prawo do dokonywania zmian dotyczących charakterystyki wyrobu oraz wprowadzania innych
rozwiązań konstrukcyjnych niepogarszających parametrów i walorów użytkowych produktu.
Dodatkowe informacje oraz wsparcie techniczne związane z produktem dostępne na: www.orno.pl. Orno-Logistic Sp. z o.o. nie ponosi odpowiedzialności za skutki wynikające z nieprzestrzegania
zaleceń niniejszej instrukcji. Firma Orno-Logistic Sp. z o.o. zastrzega sobie prawo do wprowadzania zmian w instrukcji - aktualna wersja do pobrania ze strony support.orno.pl. Wszelkie prawa do
tłumaczenia/interpretowania oraz prawa autorskie niniejszej instrukcji są zastrzeżone.
1. Nie używaj urządzenia niezgodnie z jego przeznaczeniem.
2. Wszelkie czynności wykonuj przy odłączonym zasilaniu.
3. Nie zanurzaj urządzenia w wodzie i innych płynach.
4. Nie obsługuj urządzenia gdy uszkodzona jest obudowa.
5. Nie otwieraj urządzenia i nie dokonuj samodzielnych napraw.
6. Urządzenie jest przeznaczone do użytku wewnętrznego.
Before using the device, read this Service Manual and keep it for future use. Any repair or modification carried out by yourselves results in loss of guarantee. The manufacturer is not responsible for
any damage that can result from improper device installation or operation.
In view of the fact that the technical data are subject to continuous modifications, the manufacturer reserves a right to make changes to the product characteristics and to introduce different
constructional solutions without deterioration of the product parameters or functional quality.
Additional information and technical support related to the product is available at: www.orno.pl. Orno-Logistic Sp. z o.o. holds no responsibility for the results of non-compliance with the provisions
of the present Manual. Orno Logistic Sp. z o.o. reserves the right to make changes to the Manual - the latest version of the Manual can be downloaded from support.orno.pl. Any
translation/interpretation rights and copyright in relation to this Manual are reserved.
1. Do not use the device against its intended use.
2. Disconnect the power supply before any activities on the product.
3. Do not immerse the device in water or other fluids.
4. Do not operate the device when its housing is damaged.
5. Do not open the device and do not repair it by yourselves.
6. The device is intended for indoor use only.
Bevor Sie das Gerät anschließen und benutzen, lesen Sie bitte diese Anleitung sorgfältig durch. Eigene Reparaturen und Modifikationen führen zum Verlust der Garantie. Der Hersteller haftet nicht
für Schäden, die durch unsachgemäße Montage oder Bedienung des Gerätes entstehen können.
Da technische Daten ständigen Modifikationen unterliegen, behält sich der Hersteller das Recht vor, Änderungen bezüglich Erzeugnischarakteristik und anderer Konstruktionsänderungen
vorzunehmen, die Parameter und Nutzwerte des Produkts nicht beeinträchtigen.
Weitere Informationen und technische Unterstützung zu diesem Produkt finden Sie unter: www.orno.pl. Orno-Logistic Sp. z o.o. haftet nicht für die Folgen der Nichtbeachtung der Anweisungen in
dieser Bedienungsanleitung. Orno-Logistic Sp. z o.o. behält sich das Recht vor, Änderungen in der Bedienungsanleitung vorzunehmen - aktuelle Version zum Herunterladen unter support.orno.pl.
Alle Rechte an Übersetzung/Dolmetschen und Urheberrechten an dieser Bedienungsanleitung sind vorbehalten.
1. Verwenden Sie das Gerät nicht unsachgemöß.
2. Alle Arbeiten dürfen nur bei abgeschalteter Stromversorgung durchgeführt werden.
3. Tauchen Sie das Gerät nicht ins Wasser oder in andere Flüssigkeiten.
4. Nutzen Sie die Anlage nicht, wenn ihre Gehäuse beschädigt ist.
5. Öffnen Sie die Einrichtung nicht und führen Sie keine selbstständigen Reparaturen aus.
6. Das Gerät ist für den Inneneinsatz bestimmt.
Każde gospodarstwo jest użytkownikiem sprzętu elektrycznego i elektronicznego, a co za tym idzie potencjalnym wytwórcą niebezpiecznego dla ludzi i środowiska odpadu, z tytułu
obecności w sprzęcie niebezpiecznych substancji, mieszanin oraz części składowych. Z drugiej strony zużyty sprzęt to cenny materiał, z którego możemy odzyskać surowce takie jak miedź,
cyna, szkło, żelazo i inne. Symbol przekreślonego kosza na śmieci umieszczany na sprzęcie, opakowaniu lub dokumentach do niego dołączonych oznacza, że produktu nie wolno wyrzucać
łącznie z innymi odpadami. Oznakowanie oznacza jednocześnie, że sprzęt został wprowadzony do obrotu po dniu 13 sierpnia 2005 r. Obowiązkiem użytkownika jest przekazanie zużytego
sprzętu do wyznaczonego punktu zbiórki w celu właściwego jego przetworzenia. Informacje o dostępnym systemie zbierania zużytego sprzętu elektrycznego można znaleźć w punkcie
informacyjnym sklepu oraz w urzędzie miasta/gminy. Odpowiednie postępowanie ze zużytym sprzętem zapobiega negatywnym konsekwencjom dla środowiska naturalnego i ludzkiego
zdrowia!
Each household is a user of electrical and electronic equipment, and hence a potential producer of hazardous waste for humans and the environment, due to the presence of hazardous
substances, mixtures and components in the equipment. On the other hand, used equipment is valuable material from which we can recover raw materials such as copper, tin, glass, iron
and others. The weee sign placed on the equipment, packaging or documents attached to it indicates the need for selective collection of waste electrical and electronic equipment. Products
so marked, under penalty of fine, cannot be thrown into ordinary garbage along with other waste. The marking means at the same time that the equipment was placed on the market after
August 13, 2005. It is the responsibility of the user to hand the used equipment to a designated collection point for proper processing. Used equipment can also be handed over to the
seller, if one buys a new product in an amount not greater than the new purchased equipment of the same type. Information on the available collection system of waste electrical equipment
can be found in the information desk of the store and in the municipal office or district office. Proper handling of used equipment prevents negative consequences for the environment and
human health!
Jeder Haushalt ist ein Anwender von Elektro- und Elektronikgeräten und damit ein potenzieller Erzeuger von Abfällen, die für Mensch und Umwelt aufgrund des Vorhandenseins von
gefährlichen Stoffen, Gemischen und Komponenten in den Geräten gefährlich sind. Andererseits sind Altgeräte ein wertvoller Rohstoff, aus dem Rohstoffe wie Kupfer, Zinn, Glas, Eisen und
andere zurückgewonnen werden können. Das Symbol der durchgestrichenen Mülltonne auf der Verpackung, dem Gerät oder den dazugehörigen Dokumenten, weist auf die Notwendigkeit
der getrennten Sammlung von Elektro- und Elektronikaltgeräten hin. Auf diese Weise gekennzeichnete Produkte dürfen unter Strafe nicht zusammen mit anderen Abfällen entsorgt werden.
Die Kennzeichnung weist gleichzeitig darauf hin, dass die Geräte nach dem 13 August 2005 in Verkehr gebracht wurden. Es liegt in der Verantwortung des Benutzers, die Altgeräte zur
ordnungsgemäßen Behandlung an eine dafür vorgesehene Sammelstelle zu bringen. Informationen über das verfügbare System zur Sammlung von Elektroaltgeräten finden Sie in der
Informationsstelle des Ladens und im Magistrat/Gemeindeamt. Ein sachgemäßer Umgang mit Altgeräten verhindert negative Folgen für die Umwelt und die menschliche Gesundheit!


