manuals.online logo
Brands
  1. Home
  2. •
  3. Brands
  4. •
  5. Orno
  6. •
  7. Switch
  8. •
  9. Orno OR-CR-218 User manual

Orno OR-CR-218 User manual

OR-CR-218
The product is a new saving-energy switch; it adopts microwave
sensor mould with high-frequency electro-magnetic wave (5.8GHz),
integrated circuit. It gathers automatism, convenience, safety,
saving-energy and practicality functions. The wide detection field is
consisting of detectors. It works by receiving human motion. When
one enters the detection field, it can start the load at once and
identify automatically day and night. Its installation is very convenient and its using is very wide.
Detection is possible through doors, panes of glass or thin walls.
SPECIFICATION:
Power Sourcing: 220-240V/AC Power Frequency: 50/60Hz HF
System: 5.8GHz CW radar, ISM band Detection Range: 360°
Ambient Light: <3-2000LUX (adjustable) Installing Height: 1.5~3.5m
Rated Load: 1200W (incandescent lamp) Transmission Power: <10mW
300W (energy-saving lamp) Time-Delay: min.:10sec±3sec
Power Consumption: approx 0.9W Max.: 12min±1min
Detection Distance: 1-8m (radius) (<24℃) adjustable Detection Motion Speed: 0.6~1.5m/s
Working temperature: -200C~+600C
FUNCTION:
Can identify day and night: It can work in the daytime and at night when it is adjusted on
the “sun” position (max). It can work in the ambient light less than 3LUX when it is
adjusted on the “moon” position (min). As for the adjustment pattern, please refer to the
testing pattern.
SENS adjustable: It can be adjusted according to using location; low sensitivity with 2m for
detection distance; High sensitivity with 16m, it fits for large room.
Time-Delay is added continually: When it receives the second induction signals after the
first induction, it will compute time once more on the basic of the first time-delay rest.
Time–Delay is adjustable. It can be set according to the consumer’s desire. The minimum
time is 10sec±3sec. The maximum is 12min±1min.
NOTE: the high-frequency output of this
sensor is <10Mw- that is just one 100th of
the transmission power of a mobile phone
or the output of a microwave oven.
INSTALLATIION: (see the diagram)
Switch off the power.
Open the transparent vinyl cover which is at the bottom of the sensor.
.Loosing the screws in the connection terminal, connecting the power and rated load to
connection terminal of sensor according to connection sketch map.
Tighten the screws; put the transparent vinyl cover into the original location
Folding the metal spring of the sensor upwards, until they are in “I” position with sensor,
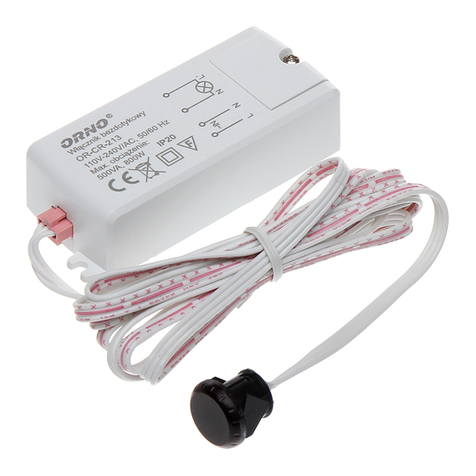
then put the sensor into the hole or installation box which is on the ceiling, the size is
similar with item. Releasing the spring, the sensor will be set in this installation position.
After finishing installing, the sensor could be connected to the power and tested.
STEP 1
STEP 2
STEP 3
CONNECTION-WIER SKETCH DIAGRAM
TEST:
Turn the SENS knob clockwise on the maximum.
Turn the TIME knob anti-clockwise on the minimum,
Turn the LUX knob clockwise on the maximum.
When you switch on the power, the light will be on
at once, and 5-30 seconds later will be off
automatically. Then if the light receives induction signal, it can work normally.
After 5-10sec of the first detection, the light could work again. If there is no induction signal,
the load should be stopped working within 5-15sec.
Note: when testing in daylight, please turn LUX knob to (SUN) position, otherwise the
sensor could not work!
NOTES
:
The unrest objects can’t be regarded as the installation basis-face.
In front of the detection window there shouldn’t be hinder or unrest objects affecting
detection.
Avoid installing it near air temperature alteration zones for example: air condition, central
heating, etc.
In order to avoid the unexpected damage of product, please add a safe device of 6A when
installing Microwave sensor, for example, fuse, safe tube etc.
SOME PROBLEM AND SOLVED WAY
The load don’t work:
a. Check the power and the load.
b. Whether the indicator light is turned on after sensing? If yes, please check load.
c. If the indicator light does not turn on after sensing, please check if the working
light corresponds to the ambient light.
d. Please check if the working voltage corresponds to the power source.
The sensitivity is poor:
a. Please check the ambient temperature.
b. Please check if the signals source is in the detection fields.
c. Please check the installation height.
The sensor can’t shut automatically the load:
a. If there are continual signals in the detection fields.
b. If the time delay is set to the longest.
c. If the power corresponds to the instruction.
d. If the air temperature changes near the sensor, air condition or central heating
etc.

Other Orno Switch manuals

Orno OR-SH-1736 User manual

Orno

Orno OR-SH-1736 User manual

Orno OR-GB-422 User manual

Orno

Orno OR-GB-422 User manual

Orno OR-SH-1734 User manual

Orno

Orno OR-SH-1734 User manual

Orno OR-GB-421 User manual

Orno

Orno OR-GB-421 User manual

Orno OR-GM-9002/B-G User manual

Orno

Orno OR-GM-9002/B-G User manual

Orno OR-CR-245 User manual

Orno

Orno OR-CR-245 User manual

Orno OR-SH-1736 User manual

Orno

Orno OR-SH-1736 User manual

Orno OR-SH-1735 User manual

Orno

Orno OR-SH-1735 User manual

Orno OR-SH-1751 User manual

Orno

Orno OR-SH-1751 User manual

Orno OR-CR-244 User manual

Orno

Orno OR-CR-244 User manual

Orno OR-CR-213 User manual

Orno

Orno OR-CR-213 User manual

Orno OR-SH-1750 User manual

Orno

Orno OR-SH-1750 User manual

Popular Switch manuals by other brands

CyberData 10845 quick reference

CyberData

CyberData 10845 quick reference

Zte ZXR10 2900E Series Configuration guide

Zte

Zte ZXR10 2900E Series Configuration guide

Omron ER Series operating instructions

Omron

Omron ER Series operating instructions

Cabletron Systems FN10 Quick setup guide

Cabletron Systems

Cabletron Systems FN10 Quick setup guide

SignaMax C-120 Series quick start guide

SignaMax

SignaMax C-120 Series quick start guide

GEM 4240 operating instructions

GEM

GEM 4240 operating instructions

Panduit PN380 user guide

Panduit

Panduit PN380 user guide

EtherWAN EX78000 Series installation guide

EtherWAN

EtherWAN EX78000 Series installation guide

Kramer VS-62HA user manual

Kramer

Kramer VS-62HA user manual

Panduit Atlona AT-UHD-SW-51 manual

Panduit

Panduit Atlona AT-UHD-SW-51 manual

Audio Authority 1820 user manual

Audio Authority

Audio Authority 1820 user manual

Versitron SF71060M installation guide

Versitron

Versitron SF71060M installation guide

Danfoss RT 260A installation guide

Danfoss

Danfoss RT 260A installation guide

OTS ET42202XM-S-PD installation manual

OTS

OTS ET42202XM-S-PD installation manual

Freedom9 freeView Pro 160P user manual

Freedom9

Freedom9 freeView Pro 160P user manual

HP StorageWorks MSA 1000 Hardware installation

HP

HP StorageWorks MSA 1000 Hardware installation

Kobold TDD Series operating instructions

Kobold

Kobold TDD Series operating instructions

TRENDnet TK-222DVK Reference sheet

TRENDnet

TRENDnet TK-222DVK Reference sheet

manuals.online logo
manuals.online logoBrands
  • About & Mission
  • Contact us
  • Privacy Policy
  • Terms and Conditions

Copyright 2025 Manuals.Online. All Rights Reserved.