Osprey POCO SERIES User manual

osprey.com
POCO SERIES
POCO PLUS POCO
Congratulations on your purchase of an Osprey Poco Child Carrier. To find your specific Poco
model look for the printed name on the back of your child carrier and follow the information
contained in this owner’s manual to safely use and operate your Poco Child Carrier.
MAXIMUM LOAD 22 KG / 48.5 LBS. (Child, gear and pack weight combined)
WARNING Do not use carrier if child cannot sit upright unassisted.
WARNING Do not use carrier with a child weighing less than
7.25kg /16 lbs. or more than 18 kg / 40 lbs. Do not
use carrier with child less than six months old.
WARNING Do not leave the child unattended in this carrier!
WARNING When the child is in the carrier, their head may be higher than
the adult’s head. Care should be taken to be aware of hazards;
e.g., door frames, low branches of trees, etc.
WARNING Always use child retention system to prevent child from falling or
sliding out of carrier which may cause serious injury.
WARNING Do not place on counter tops, tables or other elevated surfaces.
WARNING FALL OR STRANGULATION HAZARD.
READ ALL INSTRUCTIONS BEFORE USING YOUR OSPREY POCO SERIES FRAME CHILD CARRIER.
IMPORTANT! READ CAREFULLY
AND KEEP THESE INSTRUCTIONS
FOR FUTURE REFERENCE.

POCO CHILD CARRIER SERIES 2
WARNING When using the carrier the adult shall be aware of the following:
+ The Poco Series is designed for only one child to be carried by an adult.
+ Check the child carrier to assure all buckles, snaps, straps and adjustments
are secure before each use.
+ Always inspect the child carrier prior to use for damage. Never use the child
carrier with a bent frame. Never use with broken buckles anywhere on the pack.
Never use with tearing, torn or ripped seams or fabric anywhere on the pack.
+ The carrier is suitable for leisure activities, but not for sport activities; e.g.,
skiing, cycling, etc.
+ Care should be taken when putting on or removing the child carrier.
+ The adult’s balance may be adversely affected due to movement of the child and
also the adult.
+ The adult will need to take great care when bending/leaning sideways or forward.
+ Be aware that the child in the child carrier may suffer from the effects of
weather and temperature before you do. Dress the child appropriately and
occasionally check the temperature of their ears and face.
+ For sun protection deploy the sunshade and for additional protection apply
sunscreen to child.
+ The child in the child carrier can become tired. Take frequent breaks when using
your Poco child carrier.
+ Be careful to protect the child’s feet when the child carrier is on or near the floor
in order to avoid injury.
+ Do not let the child stand on the child seat within the carrier.
Make sure to register your Poco Series child carrier by mailing in the included
registration card or visiting osprey.com/pocoregistration.
The following are instructions and diagrams for:
ASSEMBLY
Step 1 Poco child carrier set-up
Step 2 Fit the adult
Step 3 Fit and secure the child
Step 4 Safely put on the Poco child carrier
Sunshade instructions
Droolpad Instructions
OVERVIEW
Suspension
Unique Features
Shared Features
POCO ACCESSORIES
PACK CARE INSTRUCTIONS
QUESTIONS

POCO CHILD CARRIER SERIES 3
1 SUNSHADE
The built-in sunshade easily stores and deploys from dedicated
zippered pocket for convenient UV protection.
2 DROOL PAD
The drool pad at the front of the cockpit is soft to the touch and
comfortably padded for the child.
3 TOY LOOPS AND SIDE MESH POCKETS
Small cord loops and open mesh pockets located in and around
the child cockpit provide child access to toy and pacifier storage.
4 DELUXE CHILD COCKPIT
Fully framed and padded cockpit surrounds the adjustable Double
Halo harness and child seat for safety. Soft contact surfaces,
anatomical fit and ventilated side panels provide comfort.
5 ADJUSTABLE STIRRUPS
For children at the top of the stated weight range requirements in this
owner’s manual the deluxe padded and adjustable stirrups offer leg
support to prevent circulation deprivation.
6 LIGHTWEIGHT FOLDING ALUMINUM FRAME
A lightweight aluminum frame fully supports loads and provides a
stable platform to set the child carrier down. The locking hinges and
rotating sidearms allow the frame to fold down for travel and storage.
The Poco Child Carrier case provides extra protection and storage
when traveling or not in use (sold separately).
7 ZIPPER STASH POCKET
Zippered slash pocket for small items with a secure key clip.
8 DUAL GRAB HANDLES
Safely pick up or set down child carrier with dual reinforced
grab handles.
9 EXTERNAL HYDRATION SLEEVE
An opening at the top of the backpanel allows for convenient hydration reservoir
storage and access for both child and adult. We recommend a 1.5L Osprey reservoir
for optimal fit and function.
10 OSPREY AIRSPEED SUSPENSION
A continuous panel of lightweight mesh extends from the top of the backpanel
to the lumbar. The seamless structure contours automatically to the body to
provide outstanding fit, excellent ventilation and unrestricted movement when
wearing the pack.
11 ADJUSTABLE TORSO
With 5"/13cm of torso adjustment, the Poco Series is quickly and easily fitted to a
variety of adult users even while on the trail.
12 LOWER ZIPPERED COMPARTMENT
The lower zippered compartment offers storage for diapers and other items. The
Poco Plus offer an extra-large lower compartment for additional storage.
Poco Plus 17L
Poco 14L
13 HIPBELT POCKETS
Hipbelt pockets offer quick and easy access to trail snacks or small items without
taking off the child carrier.
Poco Plus Zippered hipbelt pockets
Poco Open mesh hipbelt pockets
14 FIT-ON-THE-FLY HIPBELT*
The adjustable Fit-on-the-Fly hipbelt offers 5"/13cm of extension on each side for
a comfortable, ventilated custom fit and superior load support.
*Poco Plus only
15 LOWER SIDE STRETCH MESH POCKETS*
*Poco Plus only
16 LARGE FRONT PANEL COMPARTMENT*
*Poco Plus only
1
2
4
3
5
6
7
16
12
8
9
10
11
15
13
14
FEATURES

POCO CHILD CARRIER SERIES 4
The built-in sunshade, included on all Poco Child Carrier models, is easy to deploy from
its dedicated zippered pocket and offers convenient UV protection for the child.
1Unzip the sunshade pocket
marked with woven label.
2Grab the cord loop on the top of
the sunshade and pull the
sunshade out of the pocket.
3Securely grab the two red tabs
and pull them forward.
4Insert the red tabs into the sleeves
at the front of the sidearms to
secure the sunshade. Your sunshade
is now installed.
TO STORE YOUR SUNSHADE, FOLLOW THESE STEPS:
5Firmly grasp the red webbing loops with your fingers and remove the red
tabs from their sleeves taking care to ensure the sunshade does not
spring back at the child.
6Slide the sunshade down into the storage pocket and zip the storage
pocket shut.
2Push down firmly on the drool pad to release the hook and loop attachment
at the lower corners.
Reverse steps 1–2 to reinstall.
1Reach into the adult backpanel upper cavity, slide your finger through the
red webbing loop and pull down to release drool pad hook and loop tabs.
SUNSHADE
DROOL PAD
The drool pad is removable for cleaning when necessary. Use only warm water and mild detergent. Air dry in a well-ventilated area out of direct sunlight.
To remove and clean, follow these steps:

POCO CHILD CARRIER SERIES 5
1. POCO CHILD CARRIER SET-UP
1.1 Deploy the articulating footbar by
pulling the footbar back until an
audible click is heard.
1.2 If your Poco arrived in the stored
position with the child cockpit
secured flat and sidearms folded
inward, unclip the closure hooks
on each side and spread the child
cockpit open.
1.3 Rotate the sidearms out of the
child cockpit and insert into the
cuff with the red male buckle
located on both sides of the child’s
head rest. Ensure the sidearm is
fully nested inside the cuff.
1.4 Once the sidearms are resting in the
cuffs, connect the red male buckle
of the sidearms to the red female
buckle of the cuffs. Your Child Carrier
cockpit is now locked into the child
carrying position.
To store and travel with your Poco, lower the child seat all the way, reverse Steps 1.1–1.4 and store in the Poco Carry Case (sold separately).

POCO CHILD CARRIER SERIES 6
WARNING Child must not be in the carrier during the adult fit process.
HIPBELT SIZING 26"–48" / 66cm–122cm
TORSO SIZING 15"–21” / 38cm–53cm
2.1Loosen the harness, hipbelt and
load lifter straps.
2.5After fitting the hipbelt, tighten the
shoulder harness by pulling the
straps down and back.
2.6 When properly fitted the shoulder
harness yoke should rest 1-2
inches/2.5-5 centimeters below
your C7 vertebra (the bump at the
base of your neck).
2.7 Take the pack off and completely
loosen the pack’s load lifters and
harness straps.
2.8 Lift up on the torso adjustment cam
in the center of the backpanel and
slide the shoulder harness up or
down to the correct torso length.
2.2 Put the pack on and place the hipbelt
centered over the hipbones. Buckle
and tighten the hipbelt.
2.3 After tightening there should be 3-6 inches/8-15 centimeters between
both hipbelt wings. The Fit-on-the-Fly feature on the Poco Plus model
provides additional hipbelt adjustment for a custom fit.
2.4 Poco Plus Only - Separate hook and loop fabric closure between interior
hipbelt mesh and extension wing. Slide the extension wings in or out to
achieve proper fit and ensure both wings extend the same length for proper
load distribution using size arrows as a guide. Press firmly to reengage the
hook and loop.
2.9 Push the adjustment cam down to
lock the backpanel into position.
Your child carrier is now fitted to
the adult.
FIT THE HIPBELT
FIT THE BACKPANEL AND HARNESSTO ADJUST THE FIT-ON-THE-FLY HIPBELT, FOLLOW THESE STEPS:
TO ADJUST THE TORSO LENGTH, FOLLOW THESE STEPS:
2. FIT THE ADULT

POCO CHILD CARRIER SERIES 7
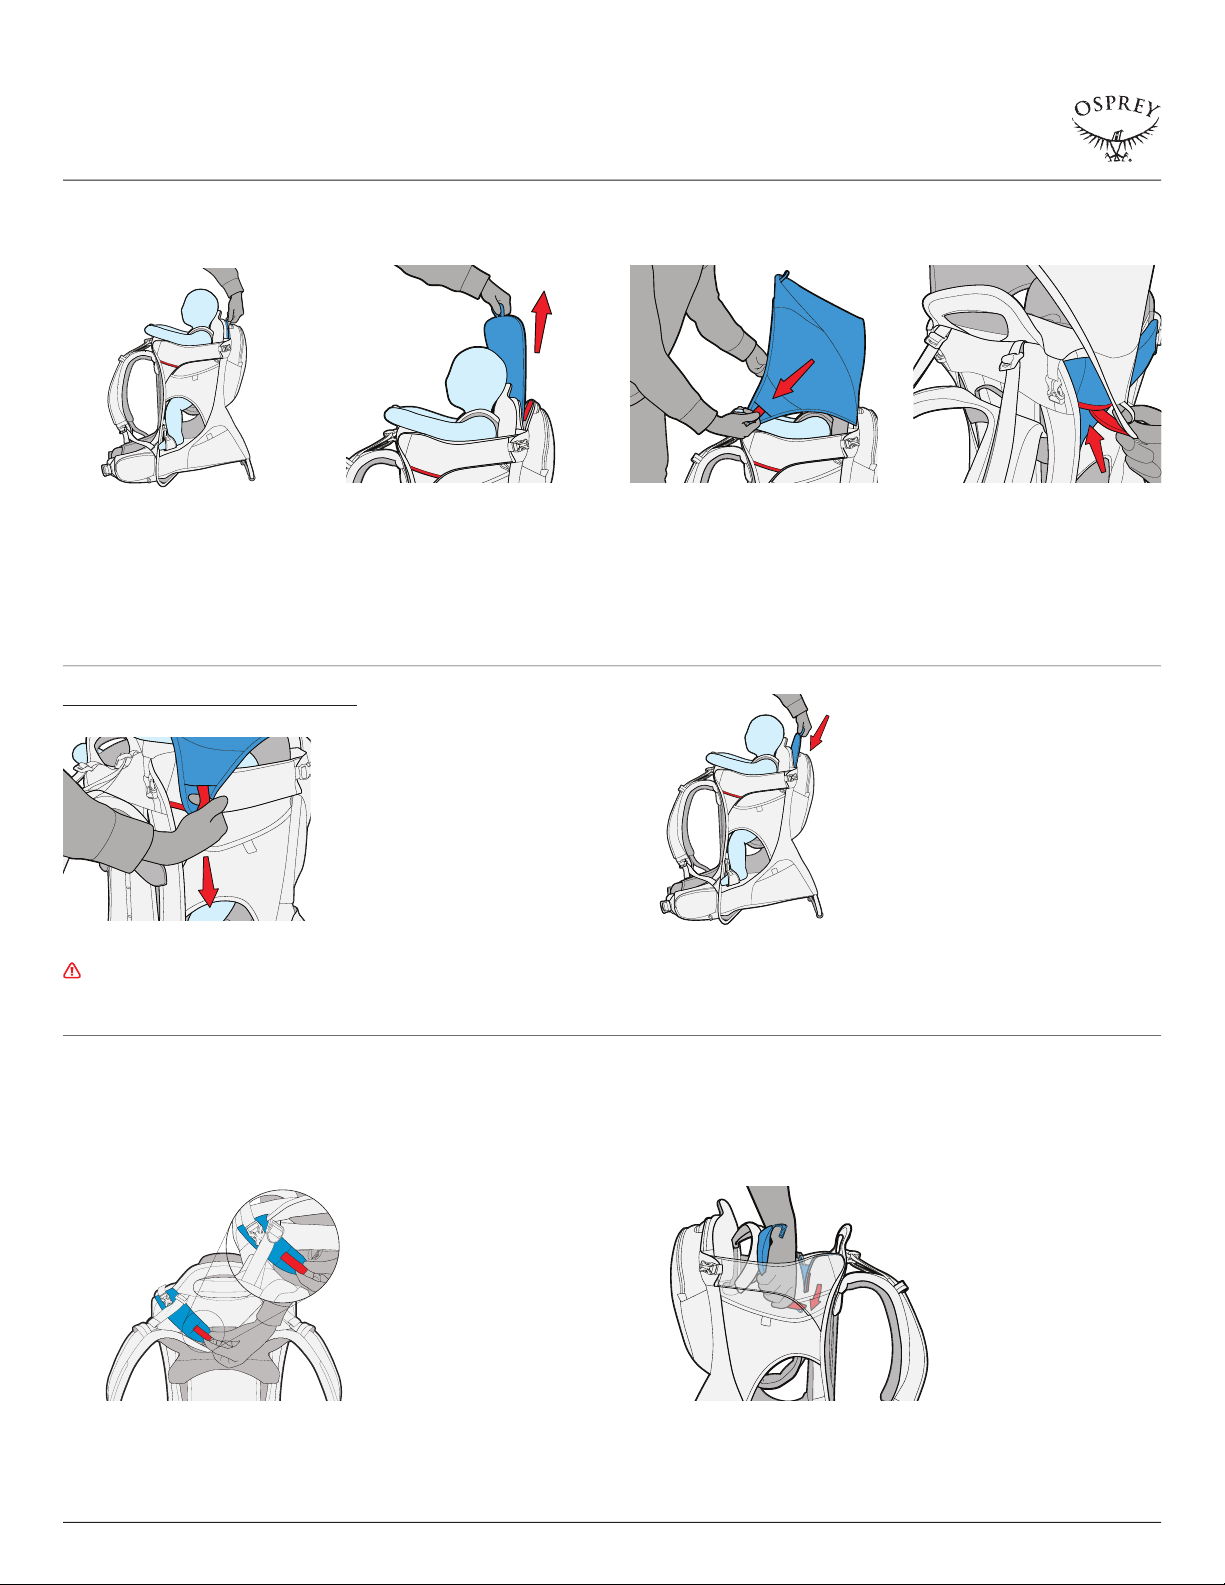
3.1 Open the DoubleHalo child harness
by releasing both red harness
buckles located below the child’s
headrest.
3.5 To move the seat down pull up
the large cam buckle located at
the base of the child’s headrest
while pushing down on the seat
to reach the desired position.
3.6 Place child into carrier guiding each
leg through the corresponding left
and right Double Halo leg loops.
Ensure proper fit by confirming the
child’s chin is level with the top of
the drool pad.
3.10 Use the stirrups for children at
the top of the stated weight range
requirements in this owner’s manual.
Place feet in stirrups and adjust
the stirrup height so the child’s
knees are slightly bent to prevent
circulation deprivation.
3.7 Unbuckle the red male buckles on
the child harness from the grey
female buckles on the top corners
of the adult backpanel. Guide the
child’s arms through the Double Halo
harness arm loops.
3.8 Buckle the right and left red
harness male buckles into the
red female buckles located
below the child’s headrest and
behind the child’s shoulders.
3.2 Connect the red male child harness
buckles to the female buckles on the
top corners of the adult’s backpanel.
This keeps the harness out of the
way to make it easier to place the
child in the carrier.
3.3 For proper fit, the child’s chin should
be level to the top of the drool pad
at the front of the cockpit. Place
the child in the carrier to check if
adjustment is needed.
3.4 To move the seat up, grab the red
handle at the back of the seat and pull
up and the seat will automatically lock
into position.
3.9 Cinch down both right and left
straps so that the harness is snug
around the child’s upper torso. The
child is now secure in the cockpit.
PREPARE THE CHILD COCKPIT ADJUST CHILD SEAT HEIGHT
SECURE THE CHILD
ADDITIONAL CHILD FITTING TIPS
3. FIT AND SECURE THE CHILD
To adjust the seat, follow these steps:
WARNING Child must not be in the
carrier while adjusting seat height.

POCO CHILD CARRIER SERIES 8
4.1 Before putting on the pack with child:
a Ensure the adult torso and hipbelt are properly fitted on the adult. (Refer to Step 2)
b Ensure the child is properly fitted and secure within the child carrier. (Refer to Step 3)
c Loosen one side of the harness — keeping the side you intend to put on your
shoulder first tight and fitted.
d Unbuckle and loosen the adult hipbelt and adult sternum strap.
4.4 Slip your free arm through the
tightened and fitted harness strap,
grab the handle in front of the
cockpit with your other hand and lift
the carrier up onto your shoulder.
4.5 While still holding the shoulder
strap, lean forward to stabilize the
child and child carrier on your back.
Let go of the handle in front of the
cockpit,slip your free arm through
the shoulder harness and slide the
child carrieronto both shoulders.
4.9 Buckle and tighten the sternum
strap. You are now ready to use
your Poco child carrier.
4.6 Buckle and tighten the hipbelt. 4.7 Tighten the shoulder harness straps.
4.2 While standing, face the adult
backpanel and use both handles at
the front and rear of the child cockpit
to lift the child carrier and place the
frame onto your slightly bent knee.
4.3 Let go of the handle behind
the child’s headrest, and spread
the hipbelt wings apart with your
free hand.
4.8 Tighten the load lifter straps.
4. SAFELY PUT ON THE CHILD CARRIER
Additional Recommendation
After safely putting on the child carrier, reach back and collapse
the footbar for greater maneuverability. Before removing the child
carrier it is critical to re-deploy the footbar, ensuring you hear an
audible click
To safely remove the child carrier, ensure the footbar is deployed
and you hear the audible click, then reverse steps 4.1–4.9.

POCO CHILD CARRIER SERIES 9
POCO PLUS
SPECS ONE SIZE
Cubic Inches 1587
Liters 26
Pounds 7.89 lbs
Kilograms 3.58 kg
Inches 29h x 16w x 19d
Inches Folded 30h x 16w x 11d
Centimeters 73h x 40w x 48d
Centimeters Folded 76h x 40w x 29d
MAX LOAD 48.5 lbs | 22 kg
(Child, gear and pack weight combined)
POCO
SPECS ONE SIZE
Cubic Inches 1220
Liters 20
Pounds 7.69 lbs
Kilograms 3.49 kg
Inches 28h x 16w x 18d
Inches Folded 29h x 16w x 11d
Centimeters 71h x 40w x 45d
Centimeters Folded 74h x 40w x 29d
MAX LOAD 48.5 lbs | 22 kg
(Child, gear and pack weight combined)
SPECS
OVERVIEW
BLUESIGN® APPROVED
MAIN FABRIC 210D NYLON DOBBY
+ Highest level of consumer safety
+ Produced with a minimum impact on people and the environment
+ Made from approved chemical products and raw materials
Textiles and accessories carrying the Bluesign® approved label meet the strict safety
and environmental requirements of the Bluesign® criteria. These articles are made
from Bluesign® approved chemical products and raw materials and are produced in a
resource conserving way with a minimum impact on people and the environment.
For more information visit www.bluesign.com

POCO CHILD CARRIER SERIES 10
Osprey recommends Nikwax® products for pack care.
For complete instructions on cleaning your pack, visit osprey.com.
STANDARD MAINTENANCE
+ After each trip, be sure to clean out your pack thoroughly.
+ Clean zippers often to prevent them from failing. Use mild soap,
warm water and a soft brush.
+ If your pack is wet, hang it to dry before storing.
+ When your Poco is not in use loosen all the straps.
+ Wash your pack if dirt, sweat, salt and stains have worked their
way into fabrics, webbing or mesh.
WASHING YOUR PACK
+ Brush out and remove gear, food, dirt or spilled items.
+ Do not wash in washing machine. Clean your pack and components
in a bathtub or large sink using a mild detergent and warm water.
+ Agitate the pack gently and scrub all compartments and pockets inside
and out with a soft brush.
+ Brush clean all zippers and rinse the interior channels and the exterior of
all buckles.
+ Drain the soapy and dirty water from the bathtub or sink and refill with
cool clean water. Rinse the pack thoroughly.
+ Hang to dry outdoors or in a well ventilated area out of direct sunlight.
POCO RAINCOVER
+ Stows into a built-in pouch
+ 4-point easy installation
+ Clear viewing windows
+ Reflective logo
HOW TO FIT RAINCOVER ON POCO CHILD CARRIER
1 Fit the raincover over the deployed Poco sunshade.
2 Thread the two raincover toggles through the cord loops on the hipbelt.
3 Wrap the two hook and loop straps around the kickstand.
4 Buckle the raincover and around the grab handle.
Contact Osprey Customer Service. Real help from real people. Scroll over the customer
service tab at osprey.com.
OSPREY CHILD SAFETY PRODUCTS, LLC
800 N Park St
Cortez, CO 81321 USA
1-866-284-7830
osprey.com
7 YEAR ALL MIGHTY GUARANTEE: POCO CHILD CARRIER AND ACCESSORIES
Osprey Child Safety Products LLC will repair any damage or defect for any reason free
of charge during the first seven years from the date of manufacture. If we are unable to
perform a functional repair on your Poco Child Carrier or Poco Accessory, we will happily
replace it.
Additional or replacement parts should only be obtained from manufacturer, importer or
organization responsible for its sales.
VISIT OSPREY.COM FOR WARRANTY AND REGISTRATION DETAILS.
Call 1-866-284-7830 or visit osprey.com for replacement parts or repair inquires.
PACK CARE QUESTIONS
POCO ACCESSORIES
Other manuals for POCO SERIES
1
This manual suits for next models
2
Other Osprey Baby Carrier manuals