manuals.online logo
Brands
  1. Home
  2. •
  3. Brands
  4. •
  5. Oticon Medical
  6. •
  7. Hearing Aid
  8. •
  9. Oticon Medical Ponto 4 Operator's manual

Oticon Medical Ponto 4 Operator's manual

Other manuals for Ponto 4

1

Other Oticon Medical Hearing Aid manuals

Oticon Medical Ponto SoundConnector User manual

Oticon Medical

Oticon Medical Ponto SoundConnector User manual

Oticon Medical Ponto Plus Operating instructions

Oticon Medical

Oticon Medical Ponto Plus Operating instructions

Oticon Medical Ponto Pro Power User manual

Oticon Medical

Oticon Medical Ponto Pro Power User manual

Oticon Medical Ponto 3 Series Operating instructions

Oticon Medical

Oticon Medical Ponto 3 Series Operating instructions

Oticon Medical Ponto 4 User manual

Oticon Medical

Oticon Medical Ponto 4 User manual

Oticon Medical Ponto Plus User manual

Oticon Medical

Oticon Medical Ponto Plus User manual

Oticon Medical Ponto User manual

Oticon Medical

Oticon Medical Ponto User manual

Oticon Medical Sentio 1 Mini User manual

Oticon Medical

Oticon Medical Sentio 1 Mini User manual

Oticon Medical Ponto Streamer User manual

Oticon Medical

Oticon Medical Ponto Streamer User manual

Oticon Medical ConnectClip User manual

Oticon Medical

Oticon Medical ConnectClip User manual

Popular Hearing Aid manuals by other brands

BTE Alta2 Pro Ti Instructions for use

BTE

BTE Alta2 Pro Ti Instructions for use

Sonic Bliss miniBTE user guide

Sonic

Sonic Bliss miniBTE user guide

Lexie B1 Replacement guide

Lexie

Lexie B1 Replacement guide

Camplicomms HC-200 user guide

Camplicomms

Camplicomms HC-200 user guide

Siemens MUSIC Pro Pro IT user guide

Siemens

Siemens MUSIC Pro Pro IT user guide

Phonak Q90 user guide

Phonak

Phonak Q90 user guide

Williams Sound SoundPlus WIR 237 Manual and user guide

Williams Sound

Williams Sound SoundPlus WIR 237 Manual and user guide

Panasonic WH-216KZ Quick tips

Panasonic

Panasonic WH-216KZ Quick tips

Siemens Life micon user guide

Siemens

Siemens Life micon user guide

Starkey Destiny Operation manual

Starkey

Starkey Destiny Operation manual

Audicus The Icon instruction manual

Audicus

Audicus The Icon instruction manual

Advanced Bionics Slim HP Standard Instructions for use

Advanced Bionics

Advanced Bionics Slim HP Standard Instructions for use

Widex DREAM440 THE DREAM SERIES User instructions

Widex

Widex DREAM440 THE DREAM SERIES User instructions

Phonak myPilot user guide

Phonak

Phonak myPilot user guide

NIKEN NK-401 instruction manual

NIKEN

NIKEN NK-401 instruction manual

ON Semiconductor Ezairo 7111 Pre Suite Getting started guide

ON Semiconductor

ON Semiconductor Ezairo 7111 Pre Suite Getting started guide

Sonetik GOHEAR user guide

Sonetik

Sonetik GOHEAR user guide

Widex FL-9 User instructions

Widex

Widex FL-9 User instructions

manuals.online logo
manuals.online logoBrands
  • About & Mission
  • Contact us
  • Privacy Policy
  • Terms and Conditions

Copyright 2025 Manuals.Online. All Rights Reserved.





0
2
9
3
4

Bone Anchored Hearing System
Quick Fitting Guide
How to programme Ponto 4
1. Insert a battery in the instrument.
2. Connect the instrument.
3. Select instrument: Click Detect and Continue.
4. Select type of hearing loss
• Conductive/mixed – if the sound processor is fitted to
a patient with conductive or mixed hearing loss
(default selected).
• SSD – if the sound processor is fitted to stimulate the
cochlear on the opposite side.
5. Select type of connection
• Abutment – if the patient is using the sound processor on
an implant and an abutment (default selected).
• Softband – if the sound processor is fitted on a soft band or
headband.
6. Click Fitting step.
In the ‘Choose setting’ dialog, select Genie Medical.
7. Connect the sound processor to the patient’s abutment. Mute
the sound processor if necessary to avoid feedback. Unmute
when the processor is attached.
8. Click Feedback Manager.
9. Click Start to measure the individual feedback limit.
If programming cable is used, please ensure that the cable
does not pull the device and evoke feedback.
10. Click BC In-situ Audiometry.
11. Conduct the BC In-situ measurement.
12. Click Fine-Tuning and evaluate the setting and, if necessary,
adjust the controls.
13. Click End Fitting step.
14. Click Save, Programme and Exit.
Ponto4 works with all Oticon connectivity devices e.g. ConnectClip
or TV Adapter with no programming needed. The devices just need
to be paired following the instructions included in the wireless
accessory. Wireless accessories can be fine-tuned in Accessories in
the End Fitting step.
Selection
Fitting
BC In situ
Audiometry
End Fitting
Feedback
Manager
Programming device
Ponto 4 sound processors can be programmed wirelessly using the NOAHlink Wireless or FittingLINK 3.0. Wired
programming is also an option using a standard programming device such as HI-Pro 2 or EXPRESSlink and a #3 cable.
206008UK / 2019.03
www.oticonmedical.com
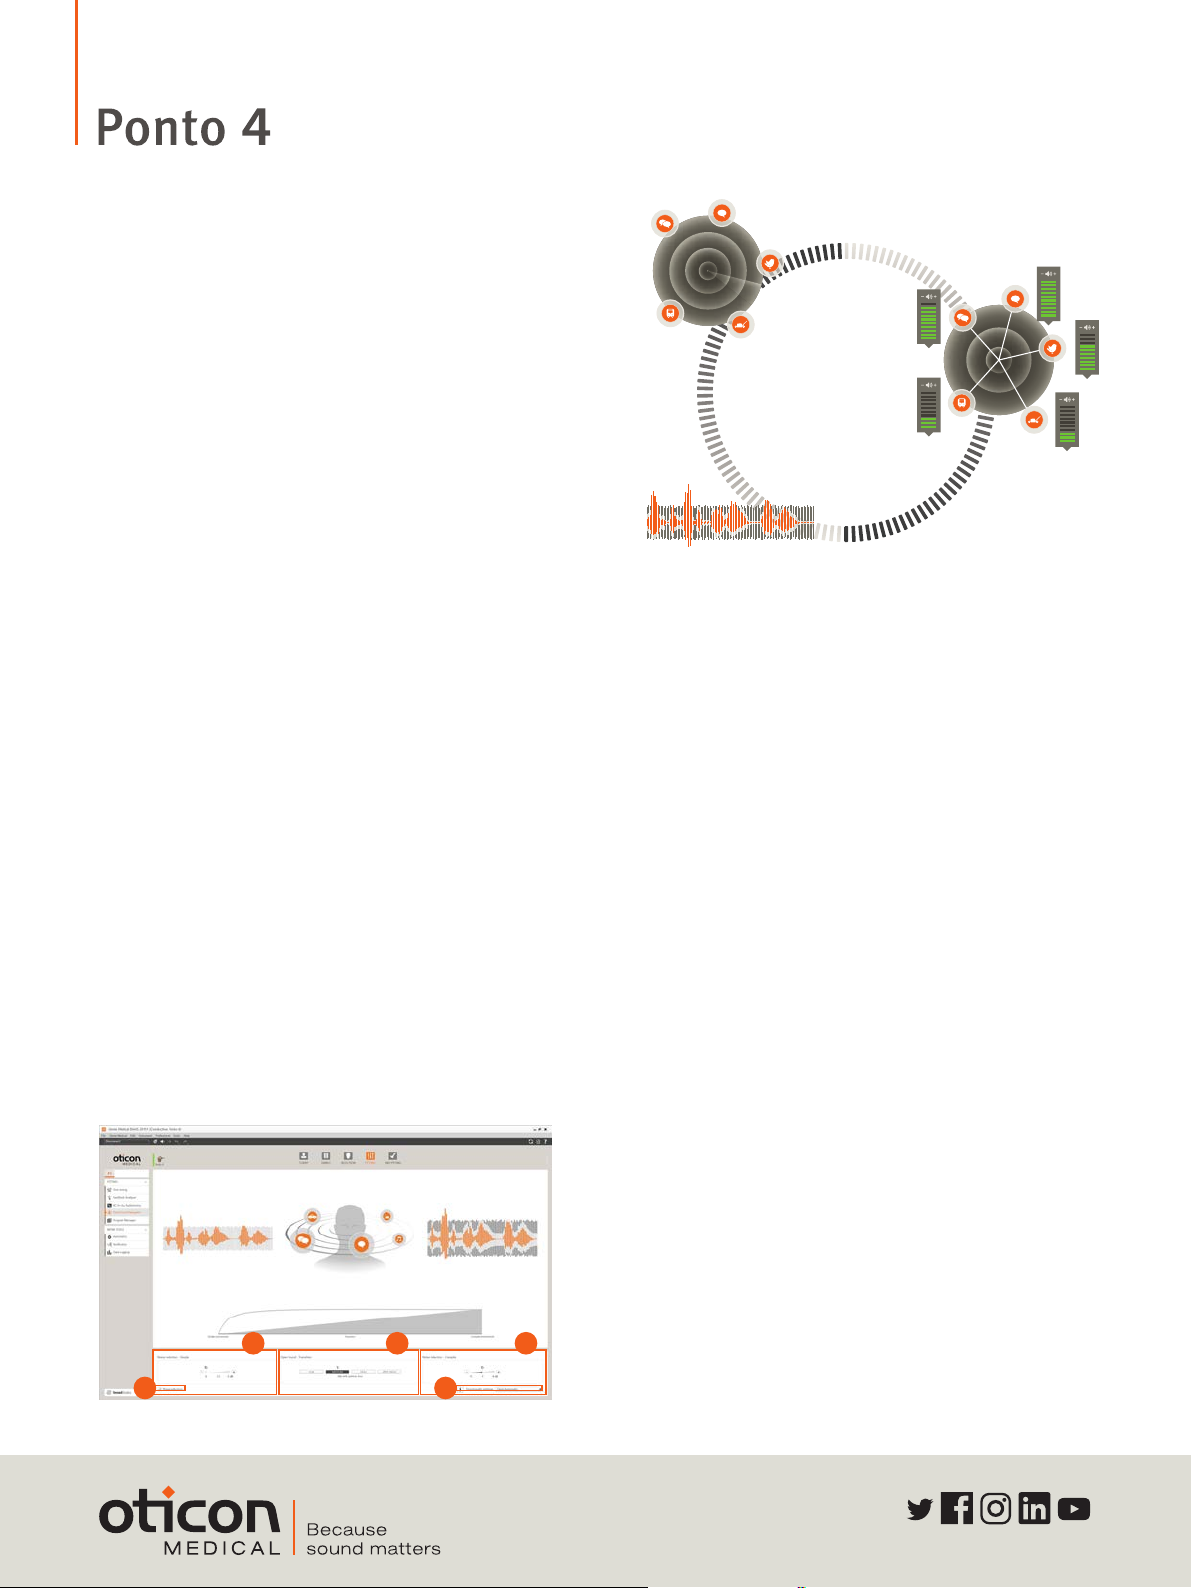
OpenSound Navigator™
OpenSound Navigator is sound processing that reduces
noise while preserving distinct speech from all directions.
This is enabled by the revolutionary Multiple Speaker Access
Technology (MSAT).
OpenSound Navigator employs an extremely fast three-step
process:
• Analyse: Scans the full 360° sound environment more
than 100 times per second to identify noise and separate
it from speech.
• Balance: Rapidly reduces the levels of loud noise coming
from specific directions, while preserving speech.
• Noise Removal: Rapidly attenuates remaining diffuse
noise, even between individual words.
Creating an open sound experience
A. OpenSound – Transition:
The control lets you choose how much help is needed in the
stage between simple and complex environments. In other
words, how early in this transition will your client want the
sound processor to help more. You can choose between a
Low, Medium, High, and Very High amount of help. As an
example, when choosing High, the sound processor will step
in more aggressively to reduce unwanted sounds, even if the
environment is not yet complex as compared to a Medium
setting.
B. Noise reduction controls:
Adjustments to noise reduction are divided into Noise
Reduction for Simple and Complex listening environments.
As default, no noise reduction is applied in Simple situations
and a medium level of reduction is applied in Complex
situations. Adjustments are made by clicking the +/- buttons.
Noise reduction choices are displayed visually in the speech
waveforms.
Analyse
Noise Removal
Balance
OpenSound Navigator transition choices are displayed visually on the
Transition bar above the control panel and in the illustration with the head
and sound sources. Here you will see the background sounds are reduced
in size as more help is applied.
A B
DC
B
C. Noise reduction on/off:
By default, noise reduction is on because it is an integral
part of the open sound experience, but it can easily be
deactivated if needed by unchecking the box on the lower
left corner.
D. Directionality setting:
In addition to the four OpenSound Transition settings
for the Open Automatics, you have two conventional
directionality settings available, Full directional and Omni
settings. Omni is recommended if the sound processor is
used on a softband on the forehead.