ESPAÑOL
ESPAÑOL
Lámpara LED (diodo emisor de luz) portátil
Lámpara LED (diodo emisor de luz) portátil
FRANÇAIS
FRANÇAIS
Lampe portative à diode électroluminescente
Lampe portative à diode électroluminescente
¡FELICITACIONES!
Este nuevo producto OttLite® que usted
acaba de adquirir representa lo mejor en
tecnología de iluminación natural.
FORMULARIO DE INSCRIPCIÓN DEL
PRODUCTO
Sírvase completar el Formulario de
Inscripción del Producto adjunto y envíelo
hoy por correo, o inscríbase en línea en:
http://warranty.OttLite.com.
1. Remueva la lámpara de su embalaje y
colóquela sobre una superficie firme.
2. Instale cuatro (4) baterías AA (no se
incluyen) como se indica en la IMAGEN
“A” y consulte la sección “INSTALACIÓN
Y RETIRO DE LAS BATERÍAS”.
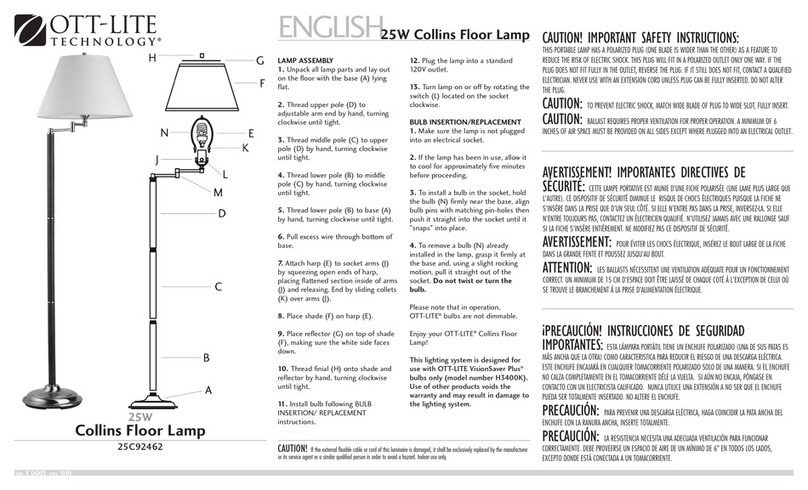
3. Para ENCENDER la lámpara, levante la
pantalla LED (A) colocando el dedo en la
hendidura (B).
4. Para APAGAR la lámpara, cierre la
pantalla LED (A).
5. Para usar corriente externa, vea la
IMAGEN “B”.
a. Enchufe una fuente “DC” de 6
voltios en el tomacorriente (F).
b. La fuente debe tener una capacidad
mínima de ½ amperio.
c. La fuente de corriente “DC” NO
recargará las baterías de la lámpara.
NOTA: NO FUERCE la pantalla LED
porque podría dañar la lámpara. La
pantalla LED usa un freno para limitar
su rotación hacia arriba.
INSTALACIÓN Y RETIRO DE LAS
BATERÍAS
Advertencia: Mantenga las baterías
fuera del alcance de los niños. Vea a un
médico inmediatamente si se ingieren.
No las instale al revés, recarge, tire al
fuego o mezcle con otros tipos de
baterías, ya que podrían explotar o
gotear, causando daños.
1. Abra completamente la pantalla
LED (A).
2. Acueste la lámpara LED portátil sobre
una superficie sólida cubierta por un paño
para proteger el acabado del producto.
3. Remueva el tornillo (C) que mantiene
cerrada la cubierta de las baterías (D).
4. Hale la cubierta (D) y retírela de la
lámpara.
5. Instale cuatro (4) baterías AA como se
indica (hay íconos de dirección dentro del
compartimiento).
6. Inserte las lengüetas de la cubierta de
la batería (E) dentro de la parte superior
del compartimiento y cierre la cubierta;
coloque el tornillo (C) que removió ante-
riormente.
7. Pruebe que las baterías estén bien
colocadas encendiendo brevemente la
lámpara.
NOTA: Reemplace las tres baterías
a la vez y no las mezcle con otras
baterías viejas. Remplace las baterías
al agotarse o si no ha utilizado la
lámpara por un periodo prolongado
de tiempo.
¡Disfrute su Lámpara LED (diodo emisor
de luz) portátil de OttLite!
¡FELICITACIONES!
Este nuevo producto OttLite® que usted
acaba de adquirir representa lo mejor en
tecnología de iluminación natural.
FORMULARIO DE INSCRIPCIÓN DEL
PRODUCTO
Sírvase completar el Formulario de
Inscripción del Producto adjunto y envíelo
hoy por correo, o inscríbase en línea en:
http://warranty.OttLite.com.
1. Remueva la lámpara de su embalaje y
colóquela sobre una superficie firme.
2. Instale cuatro (4) baterías AA (no se
incluyen) como se indica en la IMAGEN
“A” y consulte la sección “INSTALACIÓN
Y RETIRO DE LAS BATERÍAS”.
3. Para ENCENDER la lámpara, levante la
pantalla LED (A) colocando el dedo en la
hendidura (B).
4. Para APAGAR la lámpara, cierre la pan-
talla LED (A).
5. Para usar corriente externa, vea la
IMAGEN “B”.
a. Enchufe una fuente “DC” de 6
voltios en el tomacorriente (F).
b. La fuente debe tener una capacidad
mínima de ½ amperio.
c. La fuente de corriente “DC” NO
recargará las baterías de la lámpara.
NOTA: NO FUERCE la pantalla LED
porque podría dañar la lámpara. La
pantalla LED usa un freno para limitar
su rotación hacia arriba.
INSTALACIÓN Y RETIRO DE LAS
BATERÍAS
Advertencia: Mantenga las baterías
fuera del alcance de los niños. Vea a un
médico inmediatamente si se ingieren.
No las instale al revés, recarge, tire al
fuego o mezcle con otros tipos de
baterías, ya que podrían explotar o
gotear, causando daños.
1. Abra completamente la pantalla
LED (A).
2. Acueste la lámpara LED portátil sobre
una superficie sólida cubierta por un paño
para proteger el acabado del producto.
3. Remueva el tornillo (C) que mantiene
cerrada la cubierta de las baterías (D).
4. Hale la cubierta (D) y retírela de la
lámpara.
5. Instale cuatro (4) baterías AA como se
indica (hay íconos de dirección dentro del
compartimiento).
6. Inserte las lengüetas de la cubierta de
la batería (E) dentro de la parte superior
del compartimiento y cierre la cubierta;
coloque el tornillo (C) que removió ante-
riormente.
7. Pruebe que las baterías estén bien
colocadas encendiendo brevemente la
lámpara.
NOTA: Reemplace las tres baterías
a la vez y no las mezcle con otras
baterías viejas. Remplace las baterías
al agotarse o si no ha utilizado la
lámpara por un periodo prolongado
de tiempo.
¡Disfrute su Lámpara LED (diodo emisor
de luz) portátil de OttLite!
FÉLICITATIONS !
En achetant un produit OttLite®, vous avez
acheté ce qui se fait de mieux en matière
de technologie d’éclairage de lumière
naturelle.
FORMULAIRE D’ENREGISTREMENT DE
PRODUIT
Remplissez le formulaire d’enregistrement
inclus pour votre produit et retournez-le
dès aujourd’hui par la poste. Enregistrez-
vous en ligne en visitant le http://warranty.
OttLite.com.
1. Retirer le produit de son emballage et le
placer à la verticale sur une surface plane.
2. À l’aide de la FIGURE A, insérer quatre
(4) piles AA (non incluses) tel qu’indiqué
à la section INSTALLATION ET RETRAIT
DES PILES.
3. Pour mettre en position ON, ouvrir
délicatement le boîtier (A) à partir du cran
d’arrêt (B).
4. Pour mettre en position OFF, fermer le
boîtier (A).
5. On peut alimenter l’appareil à partir
d’une source extérieure, consulter la
FIGURE B.
a. Brancher la source d’alimentation
de 6 V cc dans la prise prévue à cet
effet (F).
b. La source doit présenter une
capacité minimale de ½ ampère.
c. Le courant obtenu ne chargera PAS
les piles.
NOTA : NE PAS FORCER LE BOÎTIER
au risque d’endommager la lampe.
Le dispositif comporte une butée
extérieure destinée à limiter le
mouvement vers le haut.
INSTALLATION ET RETRAIT DES PILES
Avertissement : Garder hors de la
portée des enfants. En cas d’ingestion,
consulter immédiatement un médecin.
Ne pas installer à l’envers, charger,
jeter au feu ou utiliser avec d’autres
types de piles - il existerait alors un
risque d’explosion ou de fuite pouvant
causer des brûlures.
1. Ouvrir le boîtier à sa pleine
grandeur (A).
2. Déposer la lampe portative sur une
surface ferme recouverte d’un linge afin
de protéger le fini du produit.
3. Enlever la vis (C) qui maintient fermé le
couvercle des piles (D).
4. Faire pivoter le couvercle (D) en retrait
du trou de vis, puis l’éloigner du com-
posant en le soulevant.
5. Placer quatre (4) piles AA de la façon
indiquée (l’intérieur du compartiment
présente aussi des icônes d’orientation
des piles).
6. Insérer les pattes du couvercle (E) à
la partie supérieure du composant, puis
abaisser jusqu’à sa fermeture; remettre en
place la vis (C) préalablement enlevée.
7. Allumer brièvement la lampe pour véri-
fier l’installation appropriée des piles.
Consigne : Il est important de
remplacer toutes les piles en même
temps et de ne pas mélanger de
nouvelles et d’anciennes piles.
Jeter les piles si elles sont déchargées
ou si la lampe n’a pas été utilisée
depuis longtemps.
Profitez de votre Lampe portative à diode
électroluminescente Ottlite !

