manuals.online logo
Brands
  1. Home
  2. •
  3. Brands
  4. •
  5. OttLite
  6. •
  7. Outdoor Light
  8. •
  9. OttLite CS59029 User manual

OttLite CS59029 User manual

CONGRATULATIONS!
You’ve purchased the finest in natural lighting technology with your new OttLite®product.
WARNING: To prevent electric shock, make sure the lamp is not plugged in until all
steps are complete.
PRODUCT REGISTRATION FORM
Please complete the enclosed Product Registration Form and return it today by mail, or
register online by going to: OttLite.com/warranty
NOTE: THIS UNIT IS FULLY ASSEMBLED
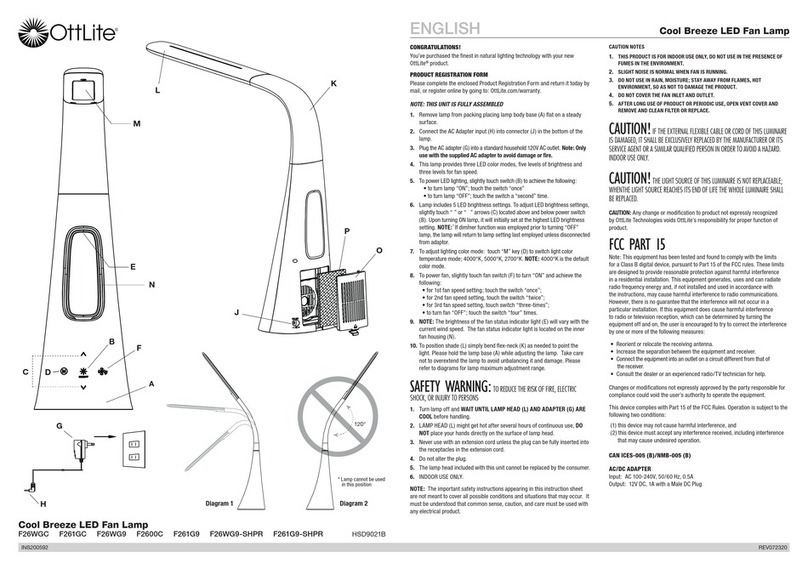
1. Remove lamp from packing, placing lamp body base (A) flat on a steady surface.
2. Connect power adapter input (F) into connector (G) in the rear-bottom of the lamp.
3. Plug the power adapter (H) into a standard household 120V AC outlet. Note: Only
use with the supplied power adapter to avoid damage or fire.
4. Turn the lamp ON/OFF by using power switch (B) located on top of base (A).
5. Touch panel (B) includes multiple “touch” keys that control the lamp’s light color
mode and brightness within each color mode. This lamp provides five levels of
brightness. See Touch Key Instructions section for operating instructions.
6. To reposition the light, hold the lamp base (A) steady and grasp either lamp body (C)
or shade (D) depending on needed adjustment.
7. Refer to diagrams 1,2,3,4 for lamp maximum adjustment range. NOTE: DO NOT
FORCE the shade or lamp body outside indicated adjustable range as excessive
adjustment may cause damage.
TOUCH KEY PANEL INSTRUCTIONS:
To power lamp and operate LED settings, slightly touch required “key” to achieve the
following:
• Turn lamp “ON/OFF”: touch “POWER” key (B) as needed.
• To adjust brightness: touch “UP” key (K) or “DOWN” key (L) as needed.
• To adjust lighting color mode: touch “M” key (M) to switch light color mode;
2700K°, 4000K°, 5000K°.
VOICE ASSISTANT COMPATABILITY:
This lamp is compatible with both Amazon Alexa and Google Home devices.
Instructions for both are provided. Follow the instructions below for pairing the lamp to
the appropriate branded device that you have – either Amazon Alexa or Google Home.
AMAZON ALEXA LAMP VOICE ACTIVATION INSTRUCTIONS:
1. Plug both the lamp and the Amazon Alexa device into an electrical outlet.
2.
Amazon Alexa Device already setup?
If you already have your Amazon Alexa device linked to the Alexa app, proceed to
step 4.
3.
Amazon Alexa Device not setup?
To operate your Amazon Alexa device, you need to download the free Alexa app
from your app store on your mobile phone or tablet. Once the app has downloaded
‘open’ the app and follow the prompts for ‘getting started’, for setting up
your account, linking to Wi-Fi, etc. Once completed your Amazon Alexa device should
be setup and ready to use.
4.
After the Amazon Alexa device is setup, you need to add a device (lamp), but before
you can do this you must first download and register the Smart Life App.
NOTE: The Lamp Voice Activation feature will only operate on a 2.4GHz wireless
network (speed of network). If the network speed is unknown, contact your wireless
network provider.
Download the free Smart Life – Smart Living app from your app store
on your mobile phone or tablet. Once the app has downloaded ‘open’ the app.
• Follow the prompts for “registering”.
• You will need to enter in your mobile phone number; a verification code will be
texted to you; also you will need to create a password to use this app. Follow the
app’s prompts to complete.
• Select the ‘Devices’ button at the bottom left of the screen.
• To add a device, select the ‘+’ symbol in the upper right hand corner of your
mobile phone or tablet screen.
• Select ‘Smart Lighting’.
• Select ‘Lighting devices’, a flashing light bulb icon will appear on your mobile
phone or tablet screen.
• Turn on the lamp.
• With the lamp on, touch and hold the “on/off” button on the actual lamp for 5
seconds to pair. The LAMP should now be RAPIDLY blinking fast, if not follow the
directions on how to make the actual lamp blink fast– see directions on your
mobile phone or tablet screen.
• If the LAMP is RAPIDLY blinking, select “confirm light blinks rapidly’ button on
your mobile phone or tablet.
• You will now need to link it to Wi-Fi -- follow the directions, enter in the Wi-Fi
password for your wireless network, select the ‘confirm’ button on your mobile
phone or tablet.
• You should now see “Device Successfully Added” on the screen. The lamp will
be listed.
• Select the edit icon and name your device/lamp.
• Select ‘done’.
5. Open the Amazon Alexa app to add the lamp you just setup in the Smart Life app.
• Go to the home page.
• Select the menu icon in the upper left handle corner.
• Select ‘ Skills & Games’.
• Select the search icon in the upper right hand corner of your mobile phone or
tablet screen.
• Type in the search bar: ‘Smart Life’.
• Select Smart Life.
• Choose ‘enable’.
• Choose ‘authorize’.
• The Smart Life app should be successfully linked.
• Select ‘done’.
• Select ‘discover devices’.
• The new device (lamp) should be listed and linked to the Alexa app.
• You can now use the voice activation feature to control the lamp.
NOTE: if at any point the lamp seems to stop following commands or malfunctions,
simply turn the lamp off, wait 5 seconds or unplug the lamp from the electrical
connection for 1 minute; plug back in and turn lamp back on. The lamp will be reset.
Verbal Command Suggestions:
“Alexa, turn on the ‘name you gave the lamp’ light.”
“Alexa, turn off the ‘name you gave the lamp’ light.”
“Alexa, dim the lights.”
“Alexa, turn the ‘name you gave the lamp’ brightness to 80%.”
“Alexa, turn the ‘name you gave the lamp’ brightness to 100%.”
If the lamp has multiple color temperatures:
“Alexa, turn the ‘name you gave the lamp’ to ‘cool’.”
“Alexa, turn the ‘name you gave the lamp’ to ‘warm’.”
GOOGLE HOME LAMP VOICE ACTIVATION INSTRUCTIONS:
1. Plug both the lamp and the Google Home device into an electrical outlet.
2.
Google Home Device already setup?
If you already have your Google Home device linked to the Google Home app,
proceed to step 4.
3.
Google Home Device not setup?
To operate your Google Home device, you need to download the free Google Home
app from your app store on your mobile phone or tablet. Once the app has
downloaded ‘open’ the app and follow the prompts for ‘getting started’, for setting up
your account, linking to Wi-Fi, etc. Once completed your Google Home device should
be setup and ready to use.
4.
After the Google Home device is setup, you need to add devices (lamp), but before
you can do this you must first download and register the Smart Life App.
NOTE: The Lamp Voice Activation feature will only operate on a 2.4GHz wireless
network (speed of network). If the network speed is unknown, contact your wireless
network provider.
Download the free Smart Life – Smart Living app from your app store
on your mobile phone or tablet. Once the app has downloaded ‘open’ the app.
• Follow the prompts for “registering”.
• You will need to enter in your mobile phone number; a verification code will be
texted to you; also you will need to create a password to use this app. Follow the
app’s prompts to complete.
ENGLISH Command LED Desk Lamp with Voice Assistant
E
Command LED Desk Lamp with Voice Assistant
CS59029 CS59029-SHPR T11FS
J
INS190501 REV050719
D
B
A
G
F
H
BK L M
Diagram 2Diagram 1
150°
90°
180°
45° 45°
Diagram 3 Diagram 4
C
• Select the ‘Devices’ button at the bottom left of the screen.
• To add a device, select the ‘+’ symbol in the upper right hand corner of your
mobile phone or tablet screen.
• Select ‘Smart Lighting’.
• Select ‘Lighting devices’, a flashing light bulb icon will appear on your mobile
phone or tablet screen.
• Turn on the lamp.
• With the lamp on, touch and hold the “on/off” button on the actual lamp for 5
seconds to pair. The LAMP should now be RAPIDLY blinking fast, if not follow the
directions on how to make the actual lamp blink fast– see directions on your
mobile phone or tablet screen.
• If theLAMP is RAPIDLY blinking, select the “confirm light blinks rapidly’ button on
your mobile phone or tablet.
• You will now need to link it to Wi-Fi -- follow the directions, enter in the Wi-Fi
password for your wireless network, select the ‘confirm’ button on your mobile
phone or tablet.
• You should now see “Device Successfully Added” on the screen. The lamp will
be listed.
• Select the edit icon and name your device/lamp.
• Select ‘done’.
5. Open the Google Home app to add the lamp you just setup in the Smart Life app.
• Go to the home page.
• Select “+ add ” on the home screen.
• Select ‘+ set up device’.
• Select ‘ have something already setup’.
• Scroll down and locate the “Smart Life” app and select the icon.
• Enter in your phone number/email address and password, select ‘link now’.
• Select “Authorize”.
• The lamp should be listed.
• Choose a home.
• Assign a room - where the lamp is located.
• Assign a nickname to the lamp, if desired.
• You can now use the voice activation feature to control the lamp.
NOTE: if at any point the lamp seems to stop following commands or malfunctions,
simply turn the lamp off, wait 5 seconds or unplug the lamp from the electrical
connection for 1 minute; plug back in and turn lamp back on. The lamp will be reset.
Verbal Command Suggestions:
“Hey Google, turn on the ‘name you gave the lamp’ light.”
“Hey Google, turn off the ‘name you gave the lamp’ light.”
“Hey Google, turn the ‘name you gave the lamp’ brightness 10%.”
“Hey Google, turn the ‘name you gave the lamp’ brightness to 80%.”
“Hey Google, turn the ‘name you gave the lamp’ brightness to 100%.”
If you have more than one lamp assigned to a room, you can turn on and off
the lamps at the same time:
“Hey Google, turn on the ‘room you assigned the lamps to i.e., family room, kitchen’
lights.”
If the lamp has multiple color temperatures:
“Hey Google, turn the ‘name you gave the lamp’ to ‘cool white’.”
“Hey Google, turn the ‘name you gave the lamp’ to ‘warm white’.”
SAFETY WARNING: TO REDUCE THE RISK OF FIRE, ELECTRIC SHOCK,
OR INJURY TO PERSONS
1. Turn lamp off and WAIT UNTIL LAMP HEAD (D) IS COOL before handling.
2. The LED panel (E) might get hot after several hours of continuous use DO NOT
place your hands directly on LED light panel.
3. Never use with an extension cord unless the plug can be fully inserted into the
receptacles in the extension cord.
4. Do not alter the plug.
5. The lamp head included with this unit cannot be replaced by the consumer.
6. INDOOR USE ONLY.
NOTE: The important safety instructions appearing in this instruction sheet are not meant
to cover all possible conditions and situations that may occur. It must be understood that
common sense, caution, and care must be used with any electrical product.
CAUTION!
DEVICE MAY BECOME WARM DURING CHARGING. THIS IS NORMAL
AND PART OF THE PROCESS. CHARGING TIMES VARY BY DEVICE.
CAUTION!
IF THE EXTERNAL FLEXIBLE CABLE OR CORD OF THIS LUMINAIRE IS
DAMAGED, IT SHALL BE EXCLUSIVELY REPLACED BY THE MANUFACTURER OR ITS SERVICE
AGENT OR A SIMILAR QUALIFIED PERSON IN ORDER TO AVOID A HAZARD. INDOOR USE
ONLY.
CAUTION!
THE LIGHT SOURCE OF THIS LUMINAIRE IS NOT REPLACEABLE; WHEN
THE LIGHT SOURCE REACHES ITS END OF LIFE THE WHOLE LUMINAIRE SHALL BE REPLACED.
FCC PART 15
Note: This equipment has been tested and found to comply with the limits for a Class B
digital device, pursuant to Part 15 of the FCC rules. These limits are designed to provide
reasonable protection against harmful interference in a residential installation. This
equipment generates, uses and can radiate radio frequency energy and, if not installed
and used in accordance with the instructions, may cause harmful interference to radio
communications. However, there is no guarantee that the interference will not occur in
a particular installation. If this equipment does cause harmful interference to radio or
television reception, which can be determined by turning the equipment off and on, the user
is encouraged to try to correct the interference by one or more of the following measures:
• Reorient or relocate the receiving antenna.
• Increase the separation between the equipment and receiver.
• Connect the equipment into an outlet on a circuit different from that to which the
receiver is connected.
• Consult the dealer or an experienced radio/TV technician for help.
Changes or modifications not expressly approved by the party responsible for compliance
could void the user’s authority to operate the equipment.
This device complies with Part 15 of the FCC Rules. Operation is subject to the following
two conditions:
(1) this device may not cause harmful interference, and
(2) this device must accept any interference received, including interference that may
cause undesired operation.
CAN ICES-005 (B)/NMB-005 (B)
CAUTION: Any change or modification to product not expressly recognized by
OttLite Technologies voids OttLite’s responsibility for proper function of product.
POWER ADAPTER SPECIFICATION:
Input: AC 100-240V, 50/60 Hz, 0.8A
Output: 15V DC, 1.4A with a Male DC Plug
THIS LAMP CONTAINS a 5V, 2,1A USB output port (J) located on the bottom rear of
lamp. USB port can charge items such as tablets, cellular phones, etc.
Amazon, Alexa and all related logos are trademarks of Amazon.com, Inc. or its affiliates.
Google Home and Google Assistant are trademarks of Google, Inc.
INS190501 REV050719

This manual suits for next models

2

Other OttLite Outdoor Light manuals

OttLite EasyView CSP57WGC User manual

OttLite

OttLite EasyView CSP57WGC User manual

OttLite X12478 User manual

OttLite

OttLite X12478 User manual

OttLite T96G5R User manual

OttLite

OttLite T96G5R User manual

OttLite DS2G5Z User manual

OttLite

OttLite DS2G5Z User manual

OttLite Hampton User manual

OttLite

OttLite Hampton User manual

OttLite VisionSaver Plus Marietta User manual

OttLite

OttLite VisionSaver Plus Marietta User manual

OttLite 571PN3 User manual

OttLite

OttLite 571PN3 User manual

OttLite 2598311P User manual

OttLite

OttLite 2598311P User manual

OttLite A12G59-FFP User manual

OttLite

OttLite A12G59-FFP User manual

OttLite Alexander Floor Lamp User manual

OttLite

OttLite Alexander Floor Lamp User manual

OttLite 8FTPN4 User manual

OttLite

OttLite 8FTPN4 User manual

OttLite SCD0500S User manual

OttLite

OttLite SCD0500S User manual

OttLite 25D54BZX User manual

OttLite

OttLite 25D54BZX User manual

OttLite L1T83G59-SHPR User manual

OttLite

OttLite L1T83G59-SHPR User manual

OttLite 25783ABR User manual

OttLite

OttLite 25783ABR User manual

OttLite V23WGT User manual

OttLite

OttLite V23WGT User manual

OttLite T57G5Z User manual

OttLite

OttLite T57G5Z User manual

OttLite CDO009 User manual

OttLite

OttLite CDO009 User manual

OttLite 20C83462 User manual

OttLite

OttLite 20C83462 User manual

OttLite F26WGC User manual

OttLite

OttLite F26WGC User manual

OttLite C75002 User manual

OttLite

OttLite C75002 User manual

OttLite CSF05WGZ-UK User manual

OttLite

OttLite CSF05WGZ-UK User manual

OttLite SCEQB00Z-CA User manual

OttLite

OttLite SCEQB00Z-CA User manual

OttLite 25883A32 User manual

OttLite

OttLite 25883A32 User manual

Popular Outdoor Light manuals by other brands

SEYNAVE Bunny manual

SEYNAVE

SEYNAVE Bunny manual

STEINEL L 260 LED installation instructions

STEINEL

STEINEL L 260 LED installation instructions

Acuity Brands Lithonia KAXW LED installation instructions

Acuity Brands

Acuity Brands Lithonia KAXW LED installation instructions

kobi Solar LED STREET 15W user manual

kobi

kobi Solar LED STREET 15W user manual

JALEXANDER JAE112 manual

JALEXANDER

JALEXANDER JAE112 manual

Hoselink L512 user manual

Hoselink

Hoselink L512 user manual

DS Produkte PFL-001A instruction manual

DS Produkte

DS Produkte PFL-001A instruction manual

ABBA CDPA66 installation guide

ABBA

ABBA CDPA66 installation guide

Access Lighting SLANT DLC 20786LED installation instructions

Access Lighting

Access Lighting SLANT DLC 20786LED installation instructions

Lumina PERLA 28 instructions

Lumina

Lumina PERLA 28 instructions

Dewenwils HNLA19A instruction manual

Dewenwils

Dewenwils HNLA19A instruction manual

XtraLight VIENTO WALLPACK quick guide

XtraLight

XtraLight VIENTO WALLPACK quick guide

IKEA VAGHOJD manual

IKEA

IKEA VAGHOJD manual

Saxby Lighting EL-40062 Instruction leaflet

Saxby Lighting

Saxby Lighting EL-40062 Instruction leaflet

luceco Mosi series Installation & operating instructions

luceco

luceco Mosi series Installation & operating instructions

Quoizel SNN9009K Assembly instruction sheet

Quoizel

Quoizel SNN9009K Assembly instruction sheet

LIGMAN ODESSA 18 installation manual

LIGMAN

LIGMAN ODESSA 18 installation manual

IKEA SOLVINDEN manual

IKEA

IKEA SOLVINDEN manual

manuals.online logo
manuals.online logoBrands
  • About & Mission
  • Contact us
  • Privacy Policy
  • Terms and Conditions

Copyright 2025 Manuals.Online. All Rights Reserved.