Otto NoizeBarrier TAC V4-10995BK User manual

NoizeBarrier®TAC
Circumaural Headset
Technical Manual and Instructions for Use

2
IMPORTANT SAFETY WARNINGS
This NoizeBarrier®TAC Headset reduces exposure to noise and loud sounds that
can damage hearing. Be sure to follow the instructions in this manual carefully.
Failure to follow these recommendations may severely reduce the amount of hearing
protection provided by the HEADSET.
• The headset must be worn at all times in noisy environments to avoid hearing
loss/injury.
• Misuse of or failure to wear hearing protection when exposed to hazardous noise
may result in hearing loss and/or injury. If you experience symptoms of hearing
injury (ringing in ears, dulled hearing, headaches), contact your supervisor or a
medical professional immediately.
• The headset must be tted, adjusted and maintained in accordance with
manufacturer’s instructions to achieve the expected attenuation and hearing
protection. Failure to do so may result in hearing loss and/or injury.
• The NoizeBarrier®TAC headset provides audio signal sound pressure level
limitation to limit the radio transmission audio signal to 82 dB effective to the ear.
• The situational awareness feature of the NoizeBarrier®TAC will continue to
function if the batteries in the headset are depleted or missing, as long as the
headset is connected to the radio using the Multi-Port Hub PTT.
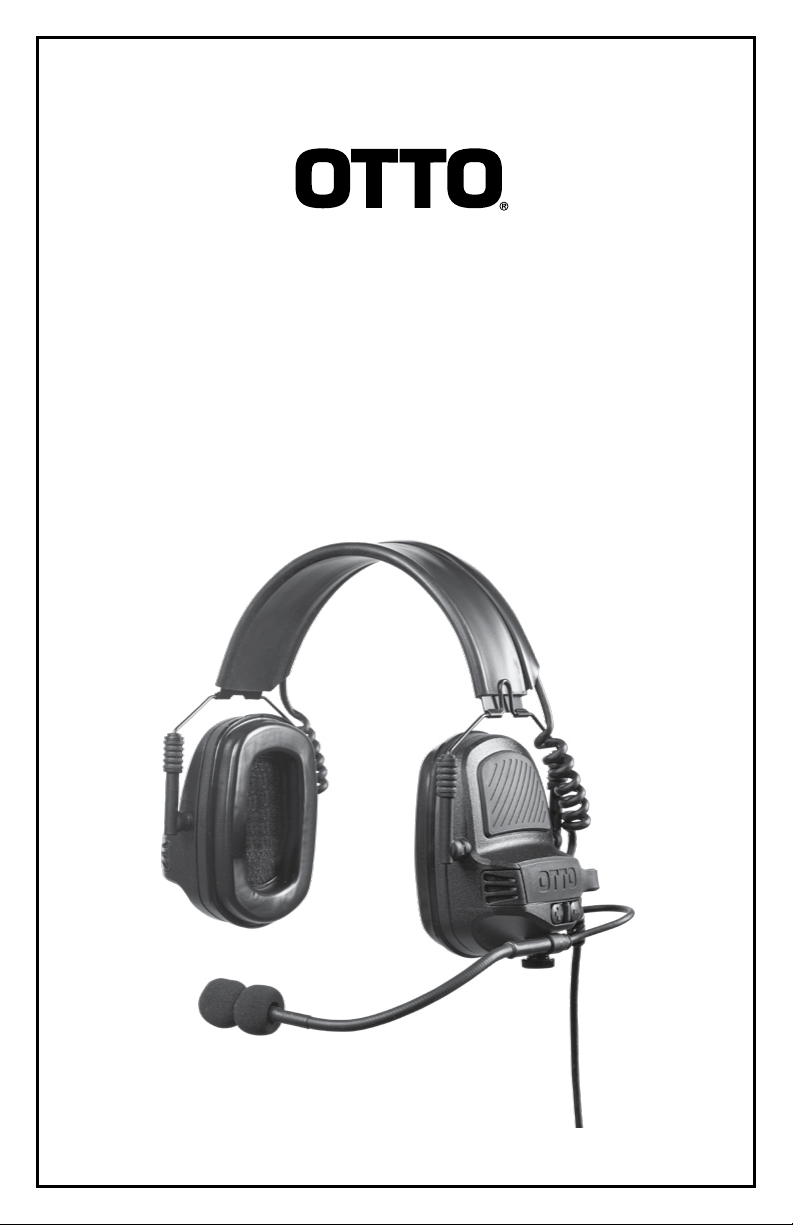
• At approximately 30 minutes of battery life remaining, the headset will present
an audible tone to the user indicating that there is low battery life. This will
repeat every 2 minutes until the batteries are depleted.Talk-through powered by
two AAA batteries.
• The thermoplastic polyurethane foam ear seals on the NoizeBarrier®TAC may
deteriorate with use and should be examined at frequent intervals for damage,
such as cracking and leakage. Replace as recommended on page 9.
• Using cloth hygiene covers over the foam ear seals may affect the acoustic
performance of the headset.
• The audibility of warning signals at a specic workplace may be impaired while
using the NoizeBarrier®TAC headset if the situational awareness functionality is
not activated.
• The NoizeBarrier®TAC headset may be adversely affected by certain chemical
substances. Further information should be sought from the manufacturer.
• This earmuff is provided with electrical audio input. The wearer should check
correct operation before use. If distortion or failure is detected, the wearer should
refer to the manufacturer's advice.
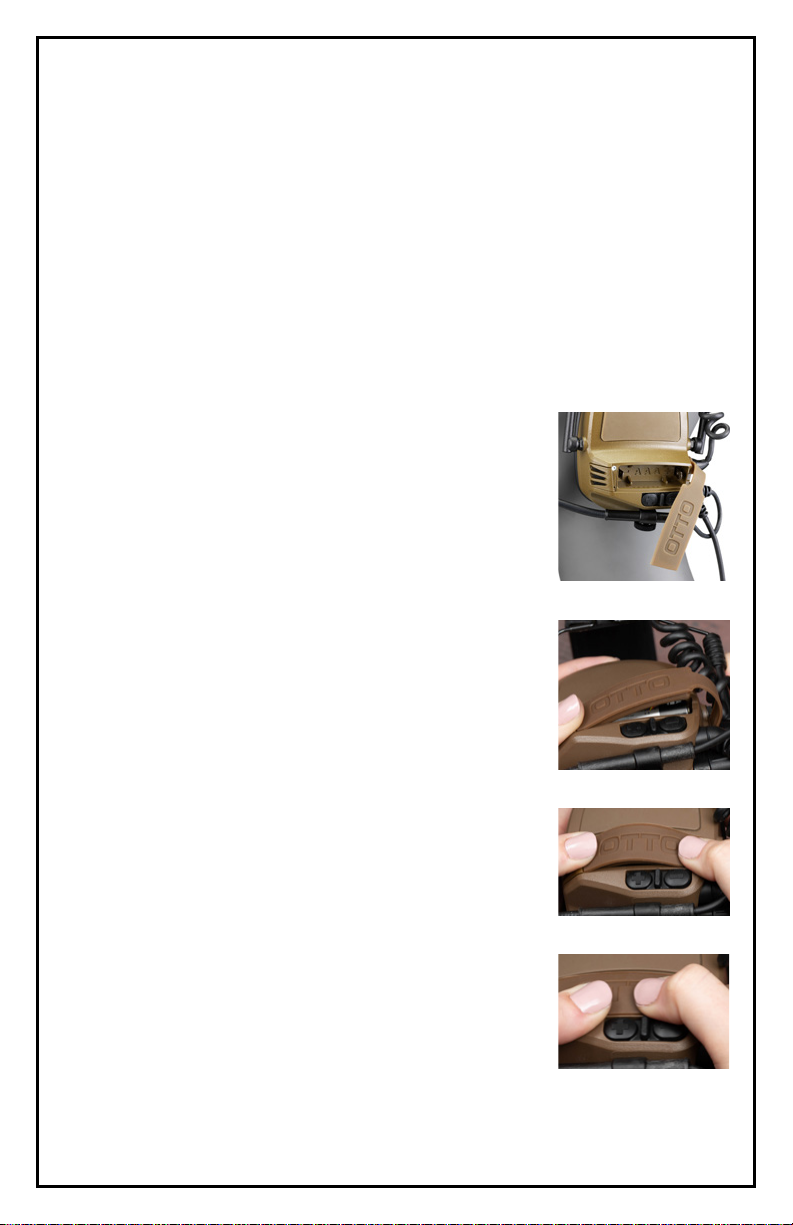
• This headset is provided with level-dependent attenuation. The wearer should
check correct operation before use. If distortion or failure is detected, the wearer
should refer to the manufacturer's advice for maintenance and replacement of
the battery. See page 6.
• Battery life may last up to 100 hours if lithium batteries are used. Headset
performance will not degrade over time as the batteries are depleted.
• Warning: the output of the electrical audio circuit of this hearing protector may
exceed the daily limit sound level.

3
NoizeBarrier®TAC Instructions for Use
Introduction
The NoizeBarrier®TAC headset provides clear radio communications, industry-leading
hearing protection and excellent situational awareness/talk-through capability for
mission-critical operations. Advanced talk-through sound suppression circuitry
enhances the ability to hear low-level sounds while protecting hearing.
The NoizeBarrier®TAC headset features left and/or right integrated audio input
downlead(s) to connect to external radio(s) or other communications device(s).
Situational awareness functions are controlled by buttons on the left ear seal and
powered by two AAA batteries that provide approximately up to 100 hours of use
if a lithium battery is used. Selectable signal separation allows dual comm users to
separate audio into left, right or both ears. An external Push-To-Talk (PTT) cable is
required to control communications functions.
Some models of the NoizeBarrier®TAC headset may also be used with the Multi-Port
Hub PTT that provides modular control of up to three communications platforms.
The Hub is compatible with major radio platforms using detachable cables, as well as
vehicular and aircraft intercoms (ICS). Situational awareness can be controlled either
via buttons on the headset or volume controls on the Hub. See page 8.
An optional helmet mount kit is available to change the headset from an over-the-head
headband conguration to a top or rear rail helmet-mounted conguration while in
the eld without the use of tools. For convenience, a spare battery for the situational
awareness functionality can be stored in each of the two rail-mount assemblies. See
pages 10 and 11.
This manual covers the following equipment:
Model Black Flat Dark Earth Olive Drab
NoizeBarrier®TAC
Headset with
Dynamic Boom
Microphone
V4-10995BK
V4-11020BK
V4-11032BK
V4-11033BK
V4-11054BK
V4-11055BK
V4-11056BK
V4-11058BK
V4-11059BK
V4-11082BK
V4-10995FD
V4-11020FD
V4-11032FD
V4-11033FD
V4-11042FD
V4-10995OD
V4-11020OD
V4-11032OD
V4-11033OD
NoizeBarrier®TAC
Headset with
Electret Boom
Microphone
V4-10995EBK
V4-11032EBK
V4-11033EBK
V4-11042EBK
V4-10995EFD
V4-11032EFD
V4-11033EFD
V4-11042EFD
V4-10995EOD
V4-11032EOD
V4-11033EOD
V4-11042EOD
NoizeBarrier®
Helmet Mount Kit -
Team Wendy®and
Ops-Core
C102359BK
C102365BK
C102359FD
C102365FD
C102359OD
C102365OD

4
Supplied Equipment
a) Headband
b) Adjustment frames
c) Audio cross-over cable
d) Comply™foam ear seals
e) Situational awareness
(talk-through) microphones
f) Battery compartment
and cover
g) Noise-canceling communications
microphone with adjustable
boom
h) Power/Volume control
i) Push-to-talk connector cable
(for models with disconnectable
cable, see page 6)
j) Boom microphone connector
NoizeBarrier®TAC Headset
(Figure 1-2)
a
b
d
e
f
g
i
j
h
c
Figure 1
Figure 2

5
Features of the NoizeBarrier®TAC Headset
• Circumaural headset compatible with major helmet systems
• Talk-through electronics for situational awareness (SA)
• Limits volume to safe level and lowers sound oor without clipping
• Passive Attenuation: 23 dB NRR
• Amplied hearing of external communications
• Volume + and - buttons on left ear cup control situational awareness circuitry
• 5-step volume control adjusts +/- 12dB
• Telescopic microphone is available in Dynamic or Electret versions, can be
mounted on the left or right side and adjusts to the optimal distance from face
• Wind noise suppression technology
• Automatic shut down after two hours of idle time
• Scalloped front ear cups reduce interference with rie stock
• Low-prole silicone headband can easily be worn under most helmet systems
• Proprietary Comply™thermoplastic polyurethane foam ear seals allow for secure
comfortable t
• Ear seals snap in for easy eld replacement
• SCBA-compatible connector for gas mask interface
• MIL-STD-810G compliant
• Immersion tested and fully sealed to IP68 standards for 1 meter/31 minutes
• USA country of origin. TAA, BAA, and Berry Amendment compliant
• Optional helmet mount interfaces with the ARC and Team Wendy®rail systems.
• Each rail mount includes a battery holder for an extra battery.
• Headset weight: 555gm (19.57 oz)
Situational Awareness Talk-Through Operation
The NoizeBarrier®TAC headset’s talk-through technology allows users to hear normal
sounds around them and maintain complete situational awareness (SA). At the same
time, sound suppression circuitry reduces dangerously loud noises over 82dB to safe
levels. The NoizeBarrier®TAC is unique in that it does not shut down situational
awareness when loud noises, including impulse noises such as gunre, are blocked.
The headset will continue to transmit sounds at a safe volume.
Talk-through SA feature is NOT required to be active to receive and transmit radio
communications. When talk-through is not activated the headset works simply as a
passive noise-reducing headset.

6
Operation
Downlead Cables
Most models of the NoizeBarrier®TAC headset have hard-wired downlead cables
ready to attach to your push-to-talk cable.
However, Models V4-10995FD and V4-11042FD have connectors for the downlead
cables to allow you to remove cables when not in use. To attach a downlead cable to
these models, simply line up the cable with the connector on the headset and push to
lock it in place. To release, pull down on the collar on the cable to easily pull the cable
away from the connector.
Install the Batteries to Power the Talk-Through Functionality
(Figure 3-6)
The NoizeBarrier®TAC headset uses battery or radio power
to operate the situational awareness/talk-through functions.
Batteries are not required for radio communication.
1. Identify the rubberized battery covers on the ear cups.
2. With nger pressure, pry off the battery cover on one
ear cup (Figure 3).
3. Install a AAA battery, aligning the ‘+’ and ‘-‘ symbols
on the battery with the markings in the battery
compartment.
4. To close the battery cover, start by inserting one end of
the cover into the battery compartment (Figure 4).
5. Slightly bend the cover and insert the other end into
the opposite end of the compartment (Figure 5).
6. Press the battery cover securely into place over the
chamber by applying pressure from the middle and
moving outward to the ends (Figure 6).
7. Repeat the operation with the other ear cup.
8. When replacing batteries, be sure headset is off
before opening battery compartment.
(See instructions on page 9).
Figure 3
Figure 4
Figure 6
Figure 5

7
Figure 8
Figure 9
Configuring the Boom Microphone (Figure 7)
The boom microphone is commonly worn on the left side but can be installed on
either the left or right ear cup. To move the mic from one side to the other:
1. Identify and pull out the two-pin plug that
attaches the boom mic to the ear cup.
2. Unscrew the knurled screw that attaches the
boom assembly to the bottom of the ear cup.
3. Remove the knurled screw from the locking
clamp and reverse it so that the clamp will
position the boom at the outboard position on
the headset.
4. Position the boom under the opposite ear cup,
and thread the screw in to the ear cup.
5. Re-orient the boom so that the mic symbol faces the user’s mouth.
6. Tighten the knurled screw until boom is secured.
7. Plug the two-pin plug into the jack at the back of the new ear cup. Note that
the rubber insert for the plug has an offset shape so that it will only insert in
one direction.
Wearing the Headset (Figure 8)
(Note: If mounting the headset to the helmet with the
optional Rail Mounting Kit, please see instructions beginning
on page 10.)
1. Identify the left and right ear seals. The Power/Volume
buttons are on the left ear cup.
2. Place the headset over the head.
3. Adjust ear cup height by pulling or pushing on the cups
until the ear seals are securely positioned over the ears.
Adjustment is accomplished by extending and contract-
ing the ear cup frames on either side of the ear cups
while holding the headband in place.
4. For effective sound protection, be sure that the ear
seals are completely sealed around the ear and obstacles
such as hair, jewelry, or clothing are out of the way.
Boom Mic Placement (Figure 9)
The boom is exible and has a length adjustment screw to ensure proper placement
for effective communications.
1. Position the boom microphone so that the
microphone is about ¼ inch from the mouth.
2. To adjust boom length, loosen the screw, position
the mic at the desired length, and re-tighten.
3. Position the mic element so that the mic symbol
on the boom faces directly toward the user’s
mouth.
Figure 7

8
Powering Up and Using the Talk-through SA Function (Figure 10)
1. Place the headset on your head.
2. Power up active talk-through by pressing and holding
either the + or – button on the left side of the headset
until a long tone sounds to indicate that talk-through
SA is active.
3. Volume + and – buttons adjust the talk-through SA
audio for ve volume levels. A tone will sound when
maximum or minimum volumes are reached.
4. To power down the unit, press and hold either the + or – button on the headset
until a different long tone sounds to indicate that talk-through SA is turned off.
Connecting to a Radio
The NoizeBarrier®TAC headset can be used for radio communications regardless of
whether active talk-through is powered. The headset may be congured to work with
single, dual or multiple radios or other communications devices.
Single Radio
1. Plug the connector on the headset cable into the Push-To-Talk (PTT) cable for
your two-way radio.
2. Attach the cable to the connector on the radio.
3. Turn on the radio.
4. Receive volume for radio communications is controlled by the volume controls
on the radio. The + and – buttons on the headset only control the volume of the
situational awareness talk-through function.
5. Use the PTT controls for radio communications.
Dual Radio
1. Follow the above steps to attach the second cable to the communications device.
2. Sound from the radio or other device connected to the left side of the headset
will be heard in the left ear, and sound from the device connected to the right
side will be heard in the right ear. Additional audio steering capabilities are
available via the mono/stereo button located on the right ear cup.
Multiple Devices
1. Plug the headset into the Multi-Port Hub PTT.
2. Refer to the Multi-Port Hub PTT Technical and Instruction Manual for operating
instructions when using the Hub.
Note: The listening volume on the headset is controlled by the volume control on the
radio or other communications device. The + and – button on the headset and on the
Hub only control the situational awareness talk-through function.
Figure 10

9
Maintenance
Low Battery/Replacing Batteries
The NoizeBarrier®TAC headset uses two AAA batteries to control situational
awareness (talk-through). Batteries are not required for radio communication.
At approximately 30 minutes of battery life remaining, the headset will present an
audible tone to the user indicating that there is low battery life. This will repeat every
2 minutes until the batteries are depleted.
Replace the batteries following the Battery Installation Instructions on page 6. Be sure
the headset is powered off before replacing the batteries.
If you purchased a NoizeBarrier®Helmet Mount Kit for either Team Wendy®or ARC
helmets and need to remove the spare battery from the compartment please see page 11.
NOTE: The situational awareness feature of the NoizeBarrier®TAC will continue to
function if the batteries in the headset are depleted or missing, as long as the headset
is connected to the radio using the Multi-Port Hub PTT.
Replacing the Ear Seals (Figures 11-15)
The ear seals are mounted in a removable frame for easy replacement.
1. Remove the ear seal by sliding
ngers under the inside of the frame
and pulling it straight out with a rm
motion.
2. The foam liner inside the ear seal will
fall out. Replace it with a new one.
3. Position a new ear seal over the ear
cup. Align the TOP of the ear seal
with the TOP label inside the ear cup.
4. Press rmly to squeeze the ear seal
into the cup until it snaps into place.
Figure 11 Figure 15Figure 14Figure 13Figure 12
Cleaning the Headset
• Use a soft cloth to remove dirt and debris from the headset.
• Use a damp soft cloth to wipe down the ear seals.
• Avoid full immersion of the NoizeBarrier®TAC headset in liquid for cleaning.
Storage
When not in use, store the headset in temperatures between -40° and +71°C.

10
Using the Headset with Optional
NoizeBarrier®Helmet Mount Kit
(Figures 16-20)
(Parts: C102359BK, C102359FD, C102359OD;
C102365BK, C102365FD, C102365OD)
The NoizeBarrier®TAC headset can easily convert from over-the-head use to mount
on helmet rails with the use of the optional helmet mounting kit. The helmet mount
kit also includes a compartment for a spare battery on each ear cup. Follow the steps
below for Team Wendy®and ARC.
1. Locate the lip on the headband. Pull the smaller section
away from the headband. Pull the cross-over cable out
from under the lip on the headband so it hangs free.
(Figure 16).
2. Holding an ear cup with one hand, with the other
hand rmly grasp the plastic adjustment frame where it
attaches to the ear cup. Pull the adjustment frame off
the pivot point on the ear cup, being careful not to pull
on the wire form portion of the adjustment frame. The
frame will unsnap from the retention ball on the ear cup
(Figure 17).
3. Repeat the operation on the frame on the other side of
the same ear cup.
4. Repeat steps 2 and 3 on the other ear cup to fully
remove the headband.
5. Position the rail mount over the ear cup and snap the
rail mount frames onto the pivot points on the ear cups
(Figure 18). NOTE: The spare battery compartment on
the rail mount frames should be positioned at the top of
the frame.
6. Attach the other rail mount to the other
ear cup.
Figure 16
Figure 18
Figure 17

11
7. Slide the ear cup into the top or rear rails by inserting
the tab on the back side of the swivel base into the
rail guide. The crossover cable is
routed along the rear and the boom
microphone faces the front of the
helmet. (Figure 19).
8. For Team Wendy®and ARC,
to remove spare battery from the
compartment, remove the helmet
mount. Holding the mount by its wire
form, sharply strike the mount into the palm of the
hand with the battery facing the palm. The battery will
eject from the holder into the user’s hand (Figure 20).
Positioning the Headset (Figures 21-23)
1. The rail system mount has two positions. The rst
position is outward (Figure 21). In this position the
ear seals sit slightly off the head for comfort. The
second position is inward to provide contact with
the head and a solid seal around the ears when in a
noisy environment.
2. To engage the ear cups against the head, press
the palms of the hands inward against the wire
form adjustment frames until they snap into
the inward position against the head
(Figure 22). This is best accomplished
by pushing against the bend in the
wire frames—pushing inward on
the ear cups WILL NOT engage the
inward detent.
3. To release the headset to the outward
position, squeeze the wire forms
together (Figure 23). This will release
the adjustment frames to swing outward.
Figure 23
Figure 22
Figure 21
Figure 19
Figure 20

12
Earmuffs
Frequency (HZ) 125 250 500 1000 2000 3150 4000 6300 8000
Mean Attenuation (dB) 18.0 18.9 25.0 30.0 32.1 37.9 37.9 36.8 34.1
Standard Deviation (dB) 2.9 1.7 1.7 2.0 2.3 2.9 3.5 3.3 4.1
NRR=23 dB; Headband Force=2.7 lbs. PER ANSI S3.19-1974
TEST REPORT ID: Q5342A, Michael and Associates, Inc.
Important: NRR is not attenuation, and the labeled NRR for most earmuffs does not represent
typical performance. While the labeled NRR is 23 dB, the typical user can expect to obtain a
higher level of attenuation across frequencies when the ear muffs are used as directed and the
device is off.
NRR (Noise Reduction Rating)

13
SNR (Single Number Rating)
Classification:
NoizeBarrier®TAC EN 352-1: 2002
Frequency (HZ) 125 250 500 1000 2000 4000 8000 SNR = 28 dB
Mean Attenuation (dB) 18.7 19.2 24.9 32.1 30.9 38.3 34.4 H= 30 dB
Standard Deviation (dB) 3.5 3.1 2.9 3.5 3.3 3.1 3.6 M= 25 dB
Assumed Protection Value (dB) 15.2 16.1 22.0 28.6 27.5 35.2 30.8 L = 19 dB
EN 352-4: 2001 +A1: 2005
Criterion levels H = 115.5 dBA M = 107.0 dBA L = 96.0 dBA
Sound pressure level of external noise for which sound pressure level under the
earmuff rst exceeds 85 dBA
EN 352-6:2002
Electrical input for which the mean + one standard deviation of A-weighted diffuse-
eld related sound = 96.0 mV pressure level is equal 82 dB
The European Union testing was conducted by Michael and Associates, Inc.
Report Q5796A, Q6030A and Q6032A.
This product is in compliance with EN 352-1: 2002, EN 352-4: 2001, EN 352-6: 2002
and 2016/425.
Notied Body responsible for EU type examination: SATRA Technology Europe, Ltd.,
Bracetown Business Park, Clonee, Co. Meath, D15 YN2P, Ireland
(Notied Body No. 2777)
Declaration of Conformity available at www.otto-comm.com

14
Troubleshooting
Problem Possible Causes Suggested Action
Headset will not power on
talk-through/situational
awareness
Depleted batteries Replace batteries
Batteries improperly
installed
Check polarity of batteries
Situational awareness
volume turned all the way
down
Press + button to increase
volume
Cannot hear or transmit
over radio
Poor connection between
headset and radio
Check all connections between
headset and radios
Radio turned off/wrong
channel
Check power, battery, and
channel on radio
Incorrect cable Check radio and PTT cable
compatibility
Poor transmission quality Boom microphone poorly
positioned
Check positioning of mic and
make sure mic symbol is facing
the mouth
Debris in microphone Remove wind sock and inspect
microphone
Boom mic connection poor Check mic plug connection at
the back of the headset
Low radio receive volume Radio volume controlled
at radio, not by headset
buttons
Check volume
settings on the radio

15
Spare Parts and Accessories
Description Part Number
Ops-Core Helmet Mounting Kit - Flat Dark Earth C102359FD
Ops-Core Helmet Mounting Kit – Olive Drab C102359OD
Ops-Core Helmet Mounting Kit – Black C102359BK
Team Wendy®Helmet Mounting Kit - Flat Dark Earth C102365FD
Team Wendy®Helmet Mounting Kit – Olive Drab C102365OD
Team Wendy®Helmet Mounting Kit - Black C102365BK
Headset bag with drawstring C760607
Soft Comply™foam snap-in ear seal, standard size C807485
Soft Comply™foam snap-in ear seal, thin size C807504
Over-The-Head headband assembly C102574
Mic Boom Assembly, dynamic C816751
Mic Boom Assembly, electret C816781
Boom windscreen and O-rings (pack of 5) C807420

16
Information on Disposal of Old Electrical and Electronic Equipment (applicable
for EU countries that have adopted separate waste collection systems).
Products with the symbol (crossed-out wheeled bin) cannot be
disposed as household waste.
Old electrical and electronic equipment should be recycled
at a facility capable of handling these items and their waste
byproducts. Contact your local authority for details in locating
a recycle facility nearest to you. Proper recycling and waste
disposal will help conserve resources while still preventing
detrimental effects on our health and the environment.
WARNING: This product can expose you to chemicals including lead, which is known
to the State of California to cause cancer and other reproductive harm. For more
information go to www.P65Warnings.ca.gov
10 West Main Street
Carpentersville, IL U.S.A. 60110
Toll Free Phone: 888-234-OTTO (6886)
Phone: 847-428-7171
Fax: 847-551-1343
www.otto-comm.com
For questions or more information, please contact:
804481 | 08/2020
Product Registration
Register to receive email alerts whenever updates or mission critical information regarding
your product becomes available. https://go.otto-comm.com/product-registration
This manual suits for next models
36
Table of contents
Other Otto Headset manuals

Otto
Otto NoizeBarrier TAC User manual

Otto
Otto NoizeBarrier Range SA User manual

Otto
Otto Hurricane II User manual

Otto
Otto ClearTrak NRX V4-11222-S User manual

Otto
Otto V4000 Series User manual

Otto
Otto NoizeBarrier Range SA User manual

Otto
Otto NoizeBarrier TAC User manual

Otto
Otto NoizeBarrier Range SA User manual