Otus D520 User manual

!
PANORAMICDRIVINGRECORDER
QUICK START GUIDE
D520
PRODUCT OVERVIEW
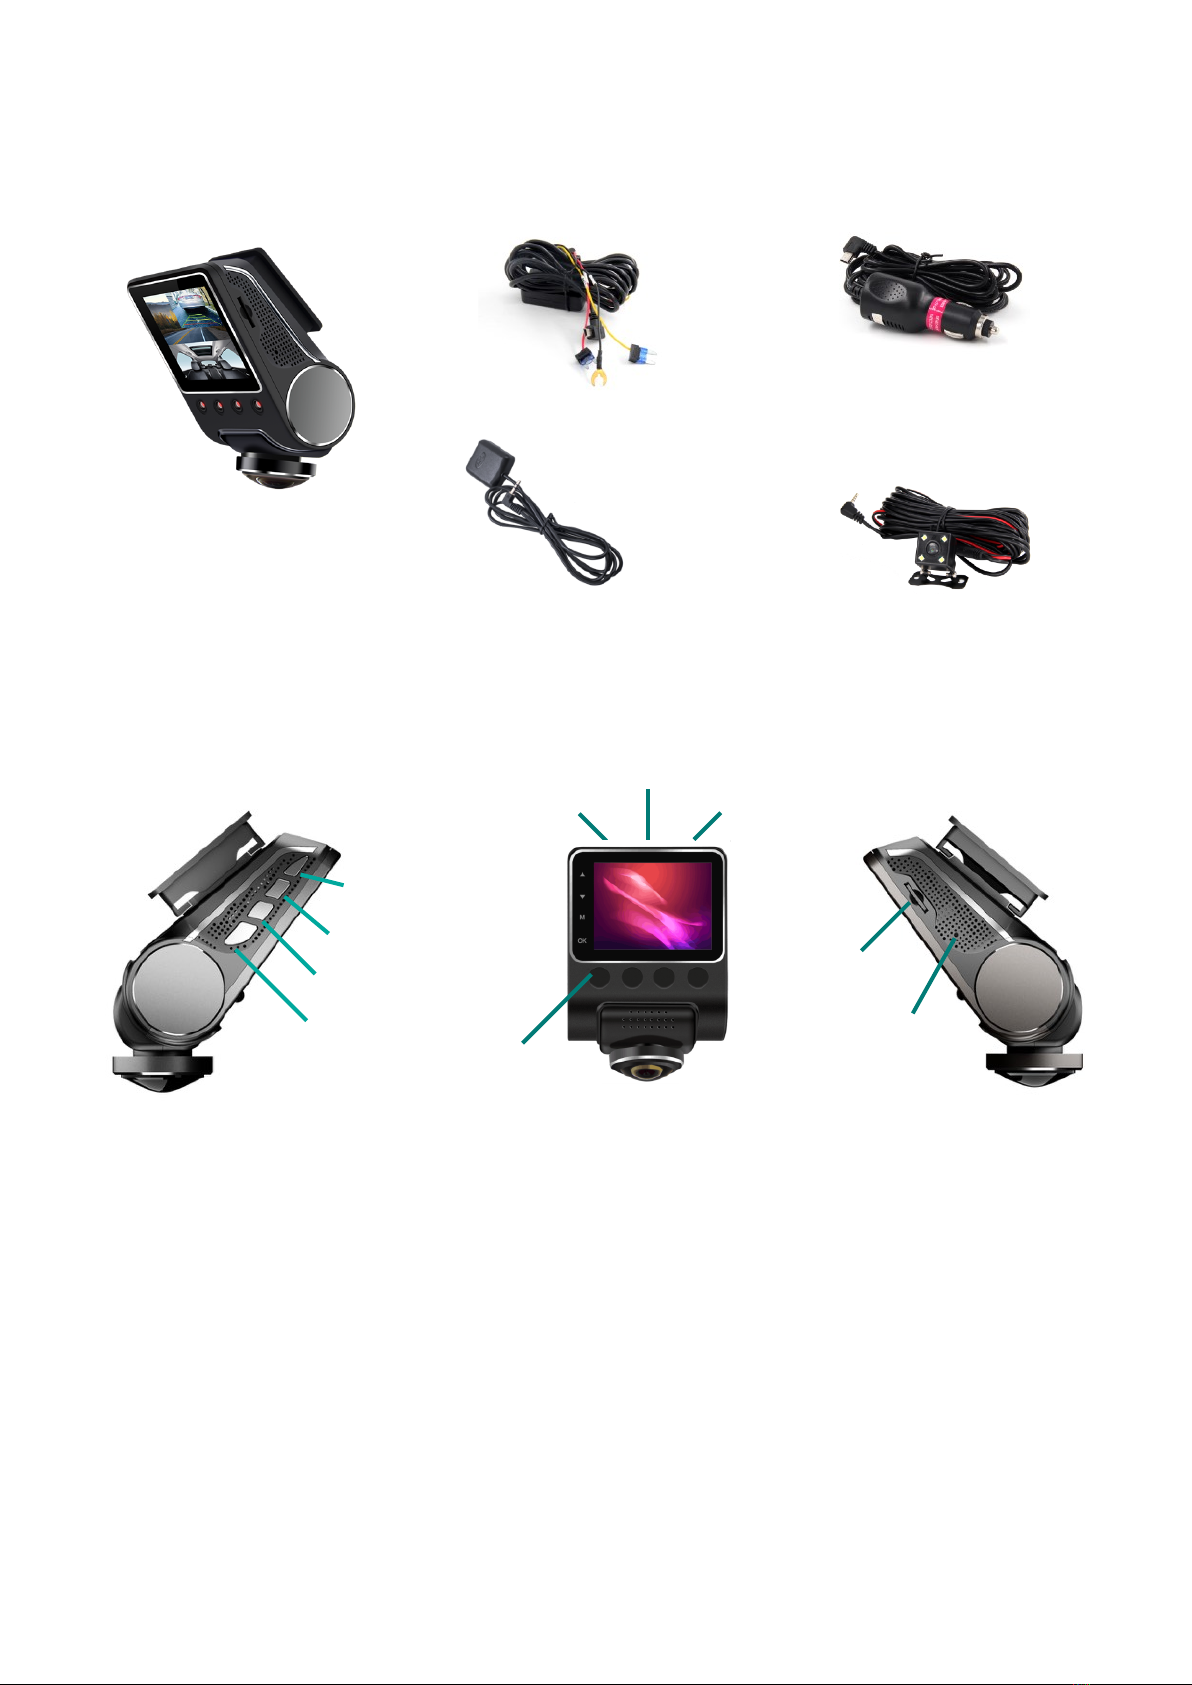
Package Contents
Product Outlook
INSTALLATION
Make sure the car is parked and follow the instructions to install the product in order to ensure the
best shooting angle and quality.!
MOUNT
Before installation, make sure the fisheye lens of the device is positioned downwards such that it
matches the factory default operation mode (2-split screen). Find the suitable installation position,
clean up the glass and peel offthe cover of red sticker on the base holder bracket. Stick the base
holder bracket to the glass slowly and FIRMLY. Slide the device into base holder from right to left !
NOTE: USE THE BRACKET TO MOUNT THE DEVICE WITH LENS DOWNWARDS SUCH THAT IT OPERATES AT 3600
DRIVING RECORDING MODE. POSITION DEVICE WITH LENS IMPROPERLY WILL MAKE DEVICE TAKE NON-SUITABLE
SHOOTING ANGLE WHILE RECORDING
ADJUST THE LENS
Adjust lens position to have a perfect viewing coverage after installation.!
micro-SD slot
reset hole
Rear CAM (D520-0X-2C)
Car Charger Power Cable
(D520-02)
D520 Panoramic Driving
Recorder
Hard Wired Kit
(D520-03)
GPS Module (D520-0X-GPS)
Power Port
GPS Port
Rear CAM (AV)
IR LED
UP/LENS MODE
POWER/OK
DOWN/MUTE/Wi-Fi
MENU/MODE/LOCK
POWER ON & START RECORDING
Insert the micro-SD card into the card slot of device. Connect power cable (the other side
connecting to cigarette lighter plug) to mini USB port of the device. The device will power on and
start recording automatically after the car engine starts. When the car is powered off, it
automatically stops recording and saves the recorded file. !
NOTE: PLEASE USE THE SD CARD WITH CLASS 10 LEVEL OR
ABOVE; CAPACITY NO LESS THAN 8GB, AND THE PRODUCT
CAN SUPPORT UP-TO 256GB
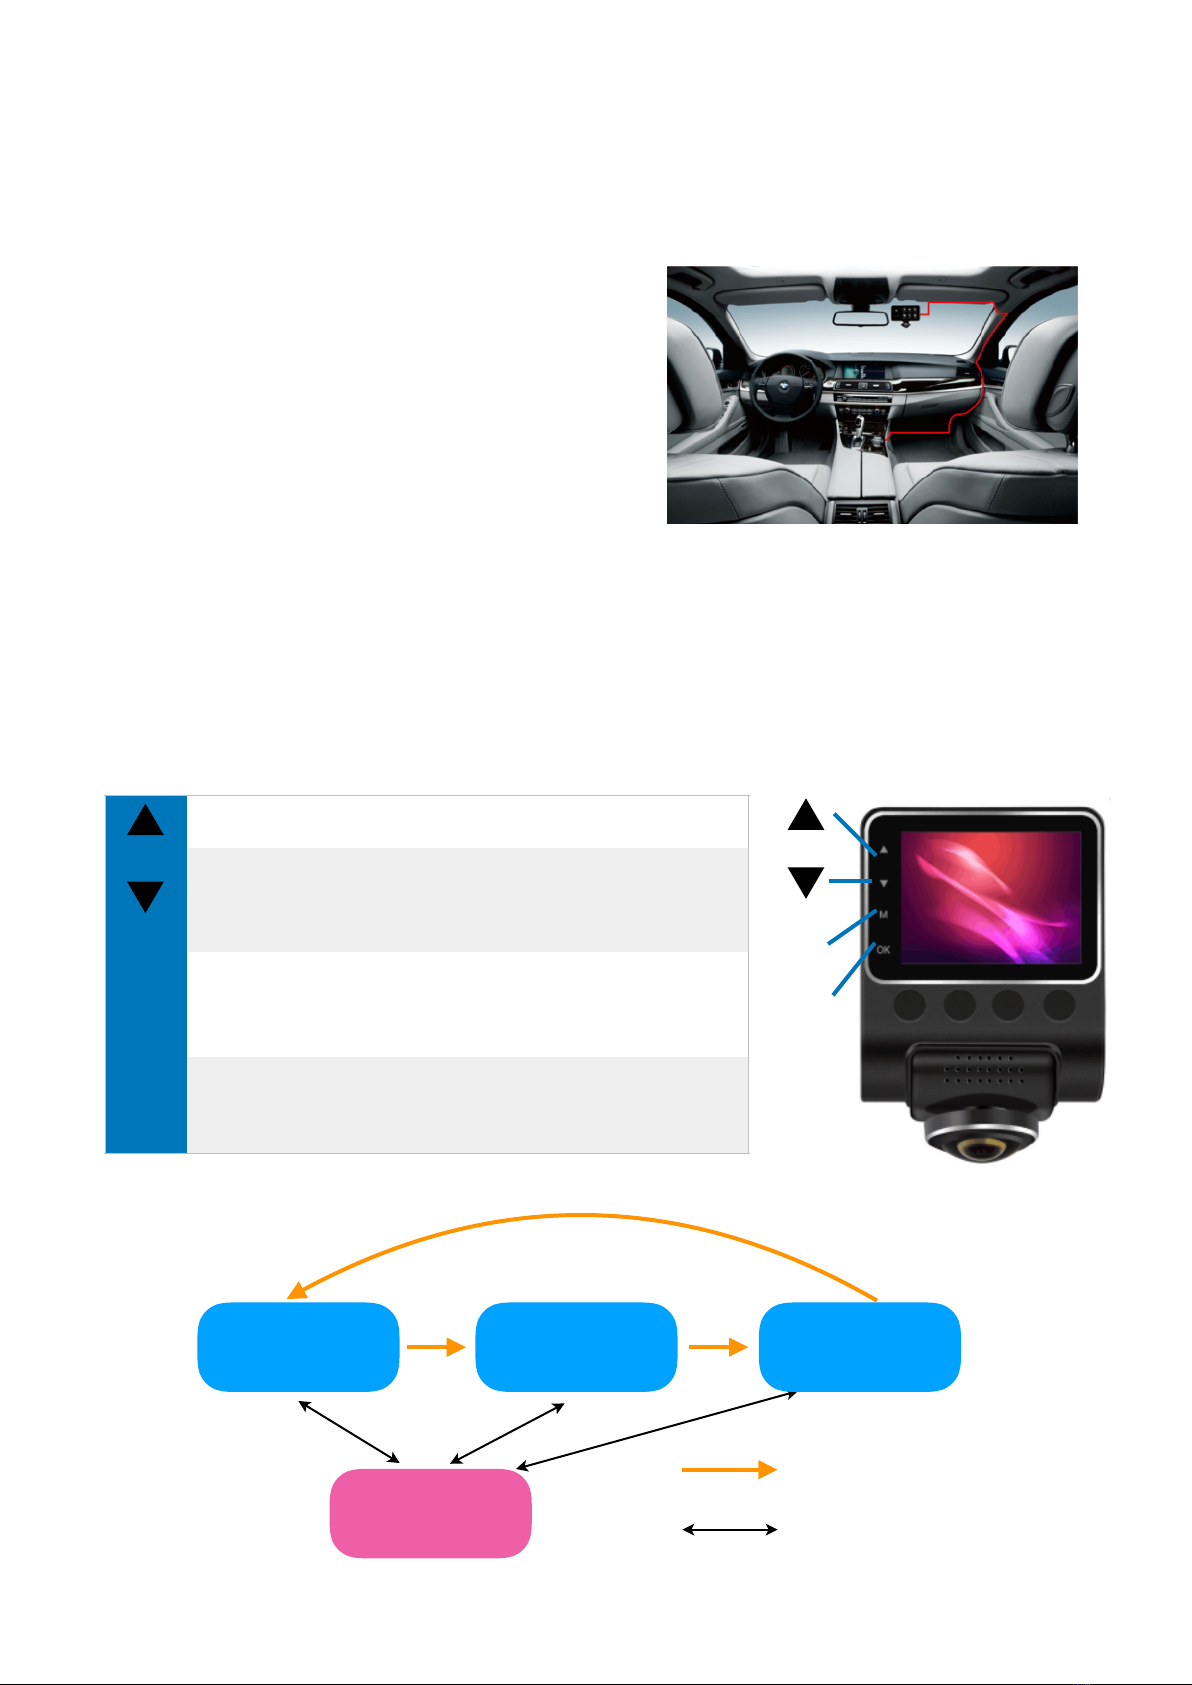
CABLE CONNECTION
Install and tuck away the cable properly to avoid
obstructing driver’s viewing. In most vehicles,
probably to tuck and hide the cables into the
headliner. Professional installation is recommended. !
BASIC OPERATION
User can use the function keys as well as the LCD screen as main interface to operate the
recorder device and preview the video, as well as check the operation status of device. Adjust the
Lens direction downward or forward to switch driving mode: surveillance (2-split screen) and
driver (super wide angle) mode. Long press [M] key to switch between three major menu setting
modes: video record, photo capture, and video playback. !
Operation Description of Function Keys
-[UP] Moving Backward in the Menu Setting or Playback mod
-[DOWN] Moving Forward in the Menu setting or Playback mode
-[MUTE] Short Press to ON/OFF audio at video recording
-[Wi-Fi] Long Press (2 sec) to enable Wi-Fi connectivity
M
-[MENU] Short Press to enter menu setting at standby status
-[LOCK] Short Press to activate emergency lock at video recording
-[MODE] Long Press (2 sec) to switch Video Record, Photo Capture
and Video Playback modes
OK
-[POWER] Long Press (3 sec) to Power ON/OFF
-[OK] Short Press to START/STOP recoding at Video Record mode
-[OK] Short Press to take a single photo at Photo Capture mode
-[OK] Short Press to START video playback at Video Playback mode
Mode Switch
Menu Setting
Video Record
Video Playback
Short Press [M] key
Long Press [M] key
Photo Capture
Enter/Exit Menu
OK
M

TRADEMARK, WARNINGS, AND DISCLAIMER
ABOUT THIS GUIDE
THE CONTENT IN THIS DOCUMENT IS FOR INFORMATION PURPOSE AND IS SUBJECT TO CHANGE
WITHOUT PRIOR NOTICE. WE MADE EVERY EFFORT TO ENSURE THAT THIS USER MANUAL IS
ACCURATE AND COMPLETE, HOWEVER, NO LIABILITY IS ASSUMED FOR ANY ERRORS AND OMISSIONS
THAT MAY HAVE OCCURRED.
PACKAGE INFORMATION OF PRODUCT MODELS
D520-02: RECORDER (W/ IR-LED), CAR CHARGER POWER CABLE
D520-03: RECORDER (W/ IR-LED), HARD WIRED KIT
D520-0X-2C: D520-0X MODEL WITH REAR CAM
D520-0X-GPS: D520-0X MODEL WITH GPS MODULE
TRADEMARK
BRAND NAME AND TRADEMARKS ARE THOSE IF THEIR RESPECTIVE OWNERS
NOTES ON INSTALLATION
•THIS PRODUCT SHALL BE INSTALLED NEAR THE REAR VIEW MIRROR, AT THE CENTER OF
WINDSHIELD, IF POSSIBLE, FOR OPTIMAL VIEWING.
•MAKE SURE THAT THE LENS IS WITHIN THE WIPING RANGE OF THE WINDSCREEN WIPER TO
ENSURE A CLEAR VIEW EVEN WHEN IT RAINS.
•A PROTECTIVE FILM (IF ANY) ON THE LENS WILL AFFECT THE VIDEO OR PHOTOGRAPHIC EFFECT,
REMOVE THE PROTECTIVE FILM BEFORE USING THE DEVICE.
•DO NOT TOUCH THE LENS WITH YOUR FINGERS. FINGER GREASE MAY BE LEFT ON THE LENS AND
WILL RESULT IN UNCLEAR VIDEOS OR SNAPSHOTS. CLEAN THE LENS ON A REGULAR BASIS.
•DO NOT INSTALL THE DEVICE ON A TINTED WINDOW. DOING SO MAY DAMAGE THE TINT FILM.
•MAKE SURE THAT THE INSTALLATION POSITION IS NOT HINDERED BY THE TINTED WINDOW.
•TO USE THE CONTAINED CAR POWER ADAPTOR ONLY. IN ORDER TO AVOID EQUIPMENT BURN OR
CAUSE THE BATTERY EXPLOSION, PLEASE DO NOT USE OTHER BRAND CAR POWER ADAPTOR.
CAUTION
•DUE TO LOCAL LAWS AND VEHICLES SAFETY CONSIDERATIONS, DO NOT OPERATE THE DEVICE
WHILE DRIVING.
•SETUP TIME AND DATE ACCURATELY BEFORE YOU USE THIS DEVICE.
•THIS PRODUCT GETS WARM WHEN IN USE, THIS IS NORMAL.
•DO NOT PLACE THE DEVICE NEAR A HEAT SOURCE OR DIRECTLY EXPOSE IT TO FLAME OR HEAT.
•NEVER PLACE THE DEVICE IN VICINITY OF EQUIPMENT GENERATING STRONG ELECTROMAGNETIC
FIELDS. EXPOSURE TO STRONG MAGNETIC FIELDS MAY CAUSE MALFUNCTIONS OR DATA
CORRUPTION AND LOSS.
•THE SYSTEM IS USED ONLY FOR NON-COMMERCIAL USE, WITHIN THE MAXIMUM LIMITS
PERMITTED BY APPLICABLE LAW. OUR COMPANY DOES NOT ACCEPT ANY RESPONSIBILITY FOR
ANY DATA LOSS DURING THE OPERATION.
•IMPROPER USE OR OPERATION OF THE PRODUCT MAY RESULT IN DAMAGE OF THE PRODUCT OR ITS
ACCESSORIES AND VOID THE WARRANTY.
•THE RECORDED VIDEO/AUDIO DATA IS FOR INFORMATION PURPOSE ONLY. OUTS DECLAIMS THE
LIABILITY OF DATA CORRUPTION OR LOSS CAUSED BY THE ABNORMAL USE OF THE PRODUCT.
•ANY ATTEMPT TO DISASSEMBLE OR ALTER ANY PART OF THE PRODUCT MAY LEAD TO
MALFUNCTIONS AND VOID THE WARRANTY.
User shall comply with this Guide, and modifications or parts not approved by OTUS Imaging
Corporation may violate related Rules and void authority to operate this equipment." " Operation is
subject to the condition that this device does not cause harmful interference.
For full product manuals, firmware updates and other technical information, please visit website of
OTUS IMAGING Inc. ( www.otusimaging.com ).!
Table of contents
Popular Automobile Electronic manuals by other brands


Dometic
Dometic MAGICWATCH MWE820 Installation and operating manual

Sony
Sony PEGA-CC5 operating instructions

Muller Elektronik
Muller Elektronik TRACK-Guide III Installation and operating instructions

Steelman
Steelman Codekey Operation manual

KW automotive
KW automotive 68510125 installation instructions

Safe Fleet
Safe Fleet RVS-218628 instruction manual


