Our K9 Bark Collar User manual


The Our K9 Bark Collar stops barking with progressively increasing Longer Sonic Blasts or
Beeps and Static Shock which is controlled by a Microprocessor and automatically delivers
correction after each bark. It does not work off the sound of your dogs bark but from air
pressure delivered through a small hole in the back of the collar. Therefore the fitting of the
collar is VITAL if the collar is to work correctly…
When the collar is fitted correctly IT DOES NOT MOVE… You can slide just one finger under
the collar. If it is NOT FITTED CORRECTLY it will go off randomly and NOT when your dog
barks… It is also Vital that the Hole is not Obstructed by Hair, So we highly recommend that
you trim the small area around where the hole is positioned on your dogs throat.
Congratulations on buying this Our K9 Bark Collar, if for any reason you are not 100%
completely satisfied with your Bark Collar, please contact me immediately so that I may help
you.. Once you have been through the users guide and watched all the videos if you are
unsure about anything, Please contact me at [email protected].
JENNA
Customer Service Manager
Our K9
GARNET STATIC SHOCK BARK COLLAR
PRESS PLAY FOR HOW
MY COLLAR WORKS
PRESS PLAY TO ACCESS
ALL INFORMATION
WATCH THIS VIDEO NOW… IT IS VITAL
THAT YOU UNDERSTAND HOW YOUR
COLLAR WORKS….
To access ALL your Training Videos
and Obtain Your FREE Dog Training
Books
HOW TO TURN ON / OFF YOUR COLLAR PRESS PLAY TO
WATCH VIDEO
INTRODUCTION
2

Our K9 Vibration Bark Collar can be adjusted to control the sensitivity of
your dogs bark, according to the size of your dogs bark
If your dog does not bark within the 40 sec limit then the collar will revert back to number 1.
The use of the warning tone followed by increasingly intense tones and vibration stimuli
sets up. A pattern that your dog will quickly learn is caused by its own barking. It takes time
to break bad habits.
When your dog forgets and barks again, the warning tone reminds your pet without
immediately applying any stimulus. At each step, your dog gets to choose whether it's worth
the increasing discomfort to bark again.
We have found this technique of progressively increasing sound and Vibration is not only
more humane, it is more EFFECTIVE in breaking the barking habit than Conventional
shocking bark control collars.
WHAT THE BARK COLLAR ACTUALLY DOES
WHEN YOUR DOG BARKS
SHOCK
FEATURES
BEEP SONIC
8TH BARK THE COLLAR WILL NOW ENTER RESET MODE
FOR 1 MINUTE
1ST BARK
N/A
1.5 SEC1.5 SEC
2ND BARK
N/A
2.5 SEC2.5 SEC
0.5 SEC
4 SEC4 SEC
1 SEC
4 SEC4 SEC
1.5 SEC
4 SEC4 SEC
2 SEC
4 SEC4 SEC
3 SEC
4 SEC4 SEC
WITHIN 40 SECONDS
3RD BARK
WITHIN 40 SECONDS
4TH BARK
WITHIN 40 SECONDS
5TH BARK
WITHIN 40 SECONDS
6TH BARK
WITHIN 40 SECONDS
7TH BARK
WITHIN 40 SECONDS
3

If the Collar is too long then cut the
excess and trim the end, then seal
using a flame, watch this video to do it
correctly….
Switch the Collar off so the collar has been disabled. And adjust to the correct length, (there
is a short video to help you if needed) the prongs MUST be against your dog's skin to work,
and the Hole MUST be free of any Obstruction.…
If for any reason you took your collar apart and are unable to put your collar together
correctly please watch the video provided
When the collar has been assembled correctly the collar DOES NOT SLIP, IT WILL NOT
LOOSEN.. The end of the strap will be on the inside and NOT the outside. If you are
experiencing problems with the collar loosening please re-watch the video using the pause
button.
Place the collar around your dog's neck, it must not move, if it does then adjust and tighten
the collar. Hold the unit and try to move it, when it does not move and you can slide just two
fingers under the collar that is now correctly fitted. NOW YOU MUST CHECK YOUR DOGS
NECK EVERY TWO TO THREE HOURS FOR THE FIRST FEW DAYS. IF YOU NOTICE ANY
REDNESS OR SORENESS REMOVE THE COLLAR.
PUTTING THE COLLAR ON YOUR DOG:
PRESS PLAY
TO WATCH VIDEO
SHORTEN
PRESS PLAY
TO WATCH VIDEO
4

SPECIAL INSERT
THE PRONGS MUST BE FULLY EXTENDED WHEN ADJUSTING THE
COLLAR. WHEN YOU HAVE FINISHED ADJUSTING THE COLLAR,
ENSURE THAT THE PRONGS ARE FULLY EXTENDED. THE PRONGS
ARE MADE FROM COPPER AND THEREFORE WILL NOT RUST BUT
WILL TURN GREEN, THAT IS NORMAL FOR COPPER AND IT IS
CALLED PATINA. SO IF YOU HAVE GREEN MARKS ON YOUR DOGS
NECK, IT IS NOTHING TO WORRY ABOUT... DOGS NEED THE
MINERAL COPPER AND THE AMOUNT THAT THEY WILL ABSORB
THROUGH THE PRONGS WILL NOT HARM THEM BUT WILL IN
FACT BENEFIT THEM
5

Now leave the collar on your dog, Do Not switch the collar on…. Wait for 24 – 48 hours until
your dog totally ignores the collar, initially they will scratch at it and just paw at it, when that
completely stops we are ready to start the training.
Remove the collar from your dog, you must be
prepared to stay when you switch on the collar
for the first time and start the training...
The collar is now on. Depress the button
again and either a 1 or a 2 will appear in the
screen. 1 is Beep and Shock and 2 is Ultra
Sonic and Shock.
To switch on the collar depress the button
for 2 seconds
When using 1, Beep and Shock you will hear the beep every time your dog barks, if you do not
want to have the collar beeping then choose number 2. When the collar is in Ultrasonic mode
you will not hear the collar but your dog will.
BEEP & SHOCK ULTRASONIC & SHOCK
We are now going to test the collar:- First the Beep Mode and Then the Ultrasonic mode.
press the button until a number appears in the panel. Now press the button until
number 5 appears in the panel this is just adjusting the sensitivity level.
PRESS PLAY
TO WATCH VIDEO
REMOVE THE COLLAR
6

Do this a further 4 times and each time the light will stay on a little longer each time. On the
8th blow the collar should not react, this means it has gone into reset mode. It will stay in
reset mode for 1 minute, this is a safety feature of the collar. (see page 3) Now do exactly the
same test in Ultrasonic mode.
Just hold it up with the back of the collar facing you, there is a small hole between the two
prongs, just puff into the hole and the collar will make a Beep sound, do it again, and the
collar will again make the another beep sound. Now do it a third time and the collar will make
the beep sound again, and then deliver a small static charge. To test this charge you will
need to place the testing light over the two prongs. So when you blow as soon as you hear
the beep attach the light and then the test light should light up.
PRESS PLAY
TO WATCH VIDEO
7
Switch over to number 2 and carry out the same test, remember you may not hear the
ultrasonic but you will see the static charge go through. Now you know you collar is working
correctly. We have videos which shows you exactly how to do it.
Now we are going to adjust the sensitivity level of the collar. Depending on your dog will
depend on where we initially set the sensitivity... hyper dogs set it around 2 or 3 normal dogs
around 4 or 5 and lazy barkers around 5 - 6...

PRESS PLAY
TO WATCH VIDEO
ARE THE PRONGS SUPPOSED TO DO THAT???
Now if the collar goes off when your doesn’t bark reduce the level down making the collar
less sensitive. If however the collar does NOT go of when your dog barks you will need to
make the collar more sensitive by increasing the sensitivity.
THE LAST AND MOST IMPORTANT STEP- IS SETTING UP THE CORRECTION LEVEL. THIS IS
VITAL THAT YOU FOLLOW THESE INSTRUCTIONS. START YOUR TRAINING ON THE
LOWEST SETTING. INSTRUCTING YOUR DOG NO! WHEN THEY BARK. IF THEY DON'T
REACT TO LEVEL ONE THEN INCREASE IT TO LEVEL 2. AGAIN IF THEY IGNORE LEVEL 3
INCREASE TO 4 AND SO ON. DOING IT THIS WAY YOU WILL FIND
To adjust the correction level of the collar simply press the lightning bolt button until you get
to number 1. You will notice that there are 7 levels of sensitivity and 7 levels of correction.
Always start correction on number 1, if your dog ignores the correction then increase it to
level 2, again if he ignores the correction increase once again to level 3 and so on until they
react positively to the correction. If you wish later to reduce the level of correction you may
do so, normally with very favorable results.
PRESS PLAY
TO WATCH VIDEO
THE PRONGS ARE MADE FROM COPPER AND WILL TURN GREEN THAT IS PERFECTLY
NORMAL. Your dogs neck may well change color as well, do not worry if your dog
absorbs the copper it is a Mineral that is of huge benefit to them
8

No!!
Woof!
Woof!
PRESS PLAY
TO WATCH VIDEO
Remember every time your dog barks you give the command NO the collar will reinforce that
command… If your dog continues to bark then you give a much more forceful NO and the
collar will do the same, again continuation you give a much more forceful NO! Again the
collar will mimic you... This way your dog will understand that the Sonic or Beep means no
and the Sonic / Beep and Shock means NO! And the way to stop the discomfort is to stop
barking…
You must say NO loud and clear every time your dog barks. This will help the
dog to make a connection between the impulse and the word NO
Now we are going to start the Training, under no circumstances should you just put the
collar on your dog and leave it them to figure out, your dog will get confused and extremely
upset.
9
You MUST teach them what you expect from them. Now please watch the training video

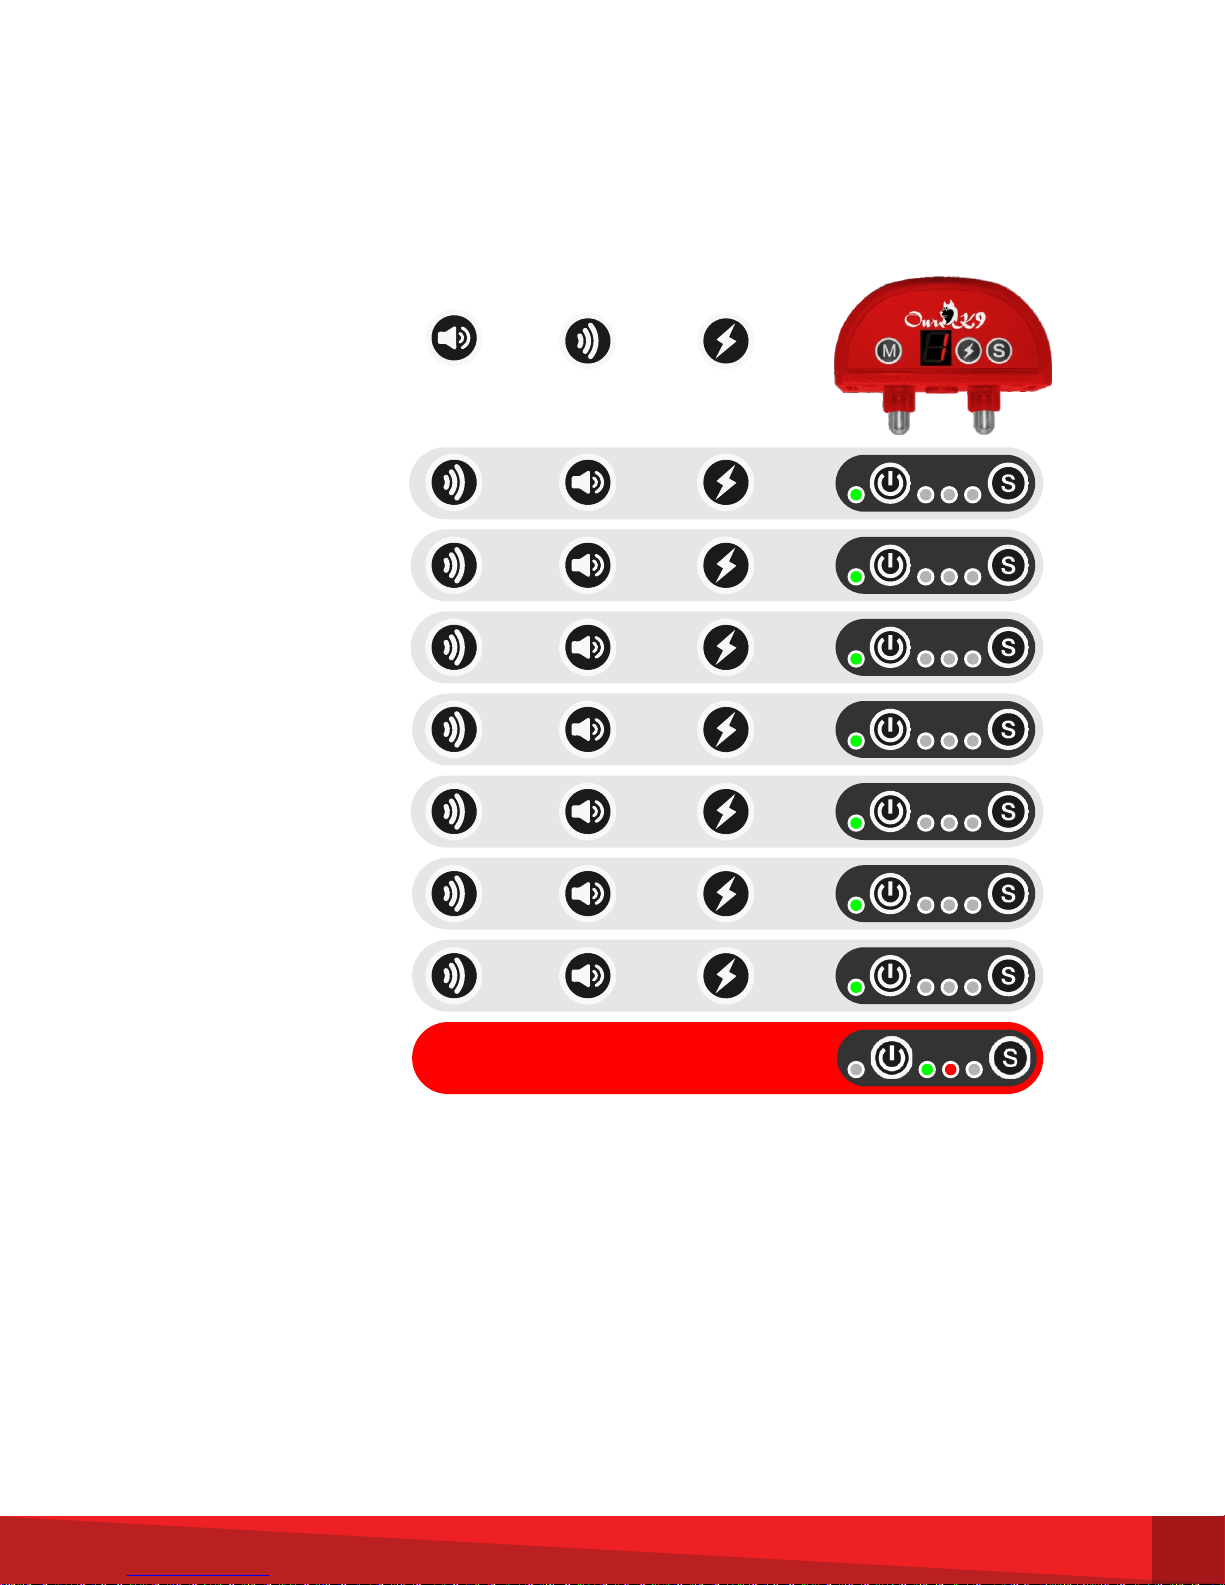
CHARGING YOUR COLLAR
When charging you will have the flashing in sequence.red lights
The Collar is fully charged when there are no lights
The Charging time for the Collar is Approx 4 Hours.
To Charge Your Collar Simply Plug Your Collar into Any USB Outlet on PC, Laptop or
Mobile Phone Charger. The Collar Does Not Come With its Own Dedicated Charger.
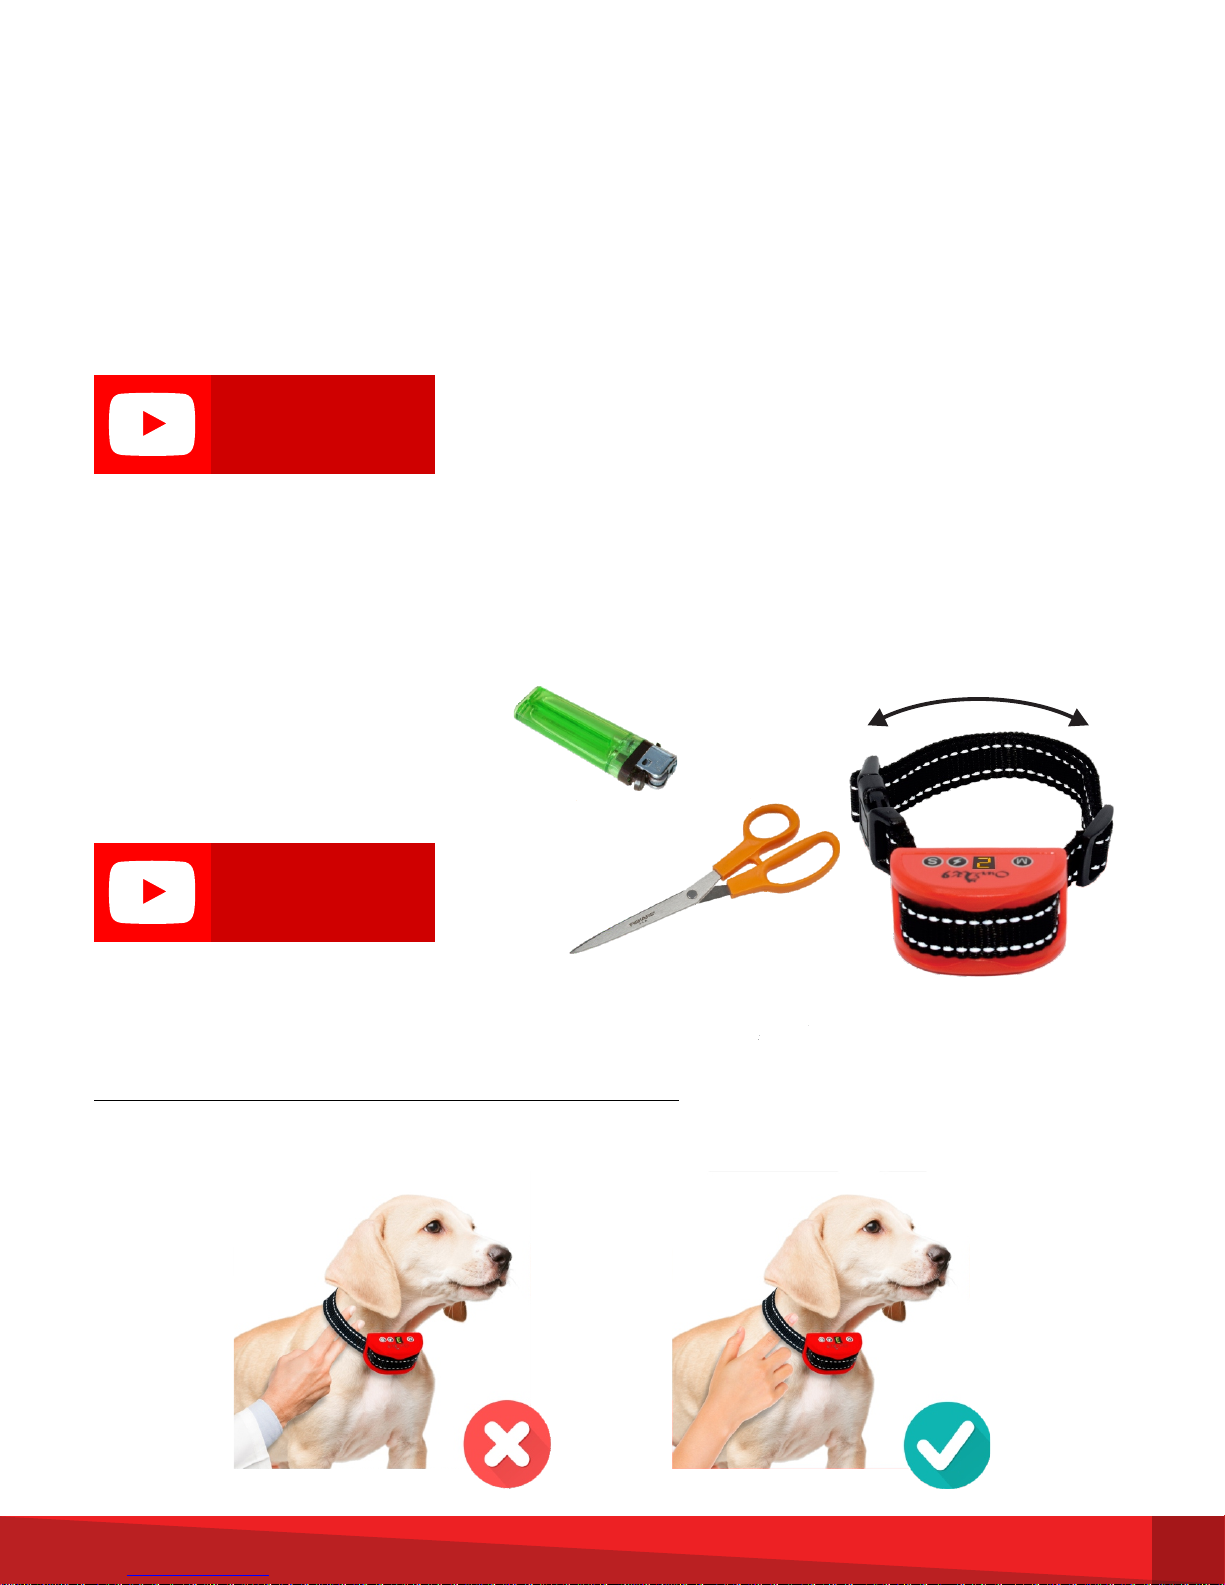
TRIM THE HAIR / FUR BEHIND THE COLLAR
REMOVE THE COLLAR DAILY
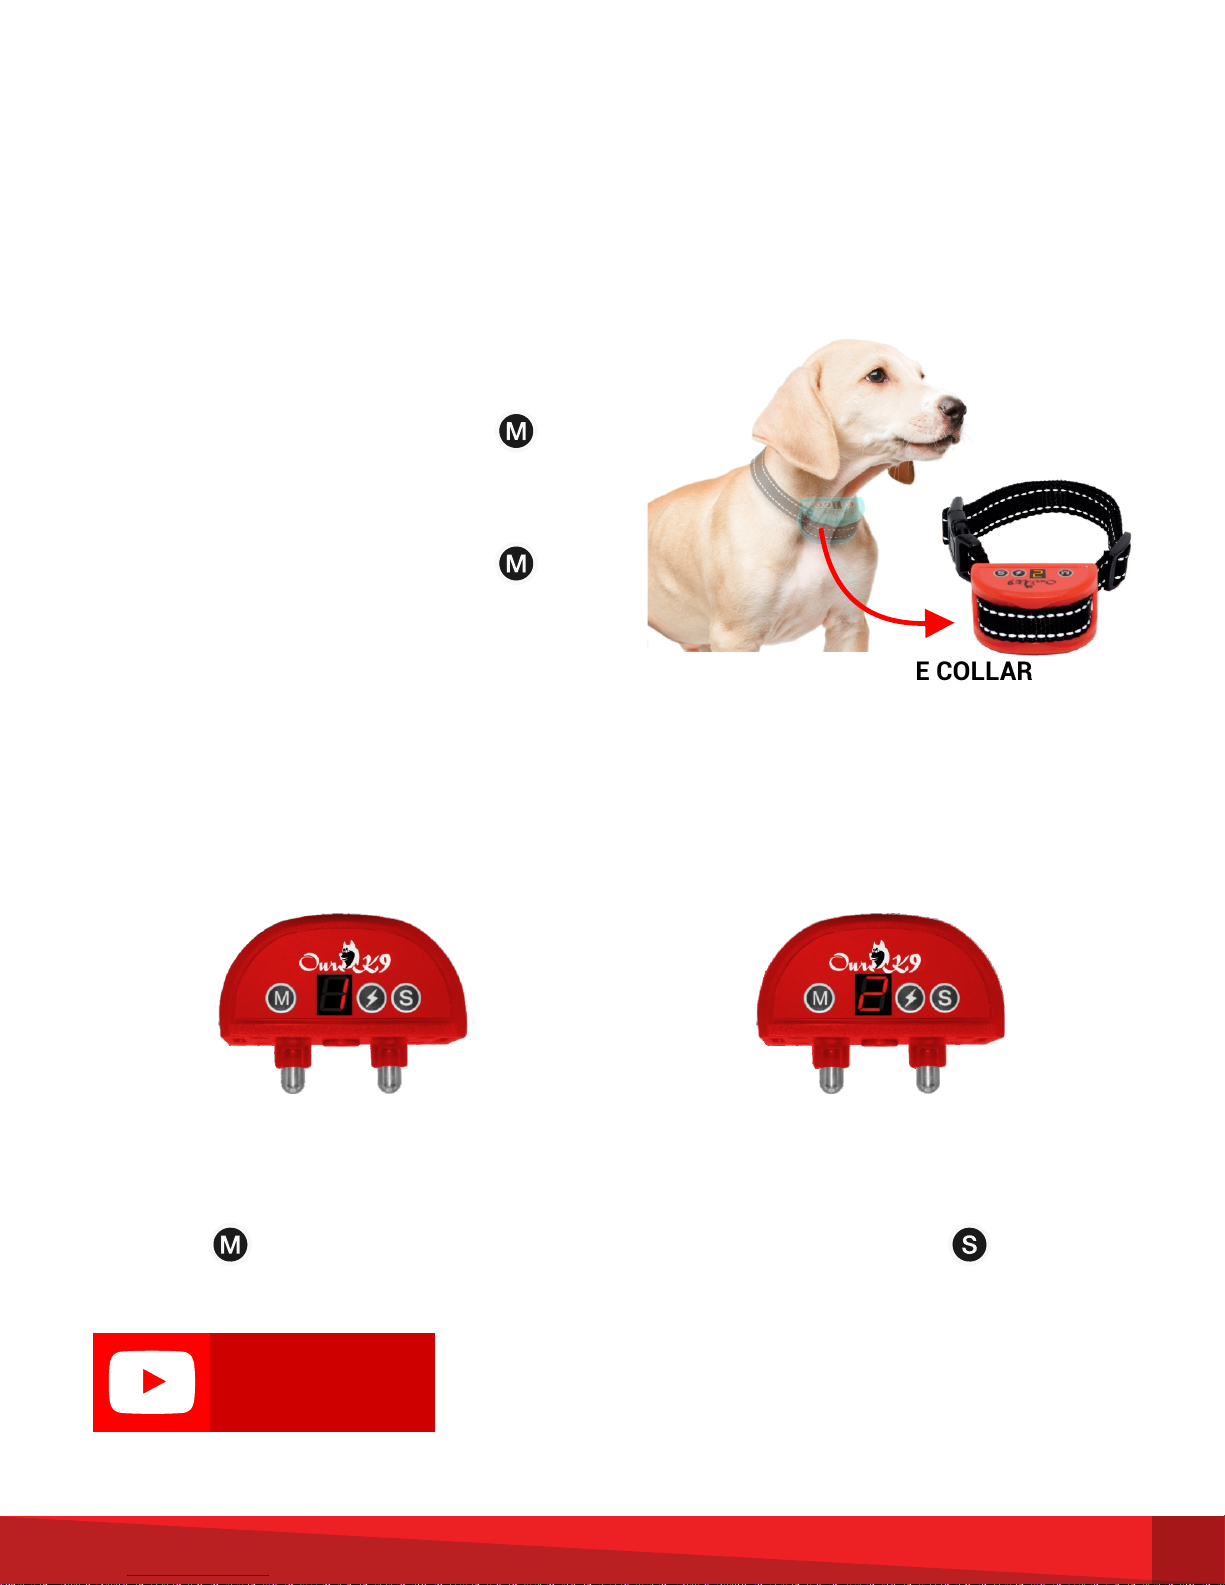
TOP TIPS
DO NOT JUST PUT THE COLLAR ON YOUR DOG AND EXPECT THEM TO UNDERSTAND
WHAT IT IS SUPPOSED TO MEAN
I WILL ADMIT SOME DOGS ARE SUPER SMART AND WILL UNDERSTAND ALMOST
IMMEDIATELY, BUT WHAT IF YOUR DOG DOESN'T UNDERSTAND, HELP THEM
UNDERSTAND, TEACH THEM…
ALWAYS ALWAYS REMOVE THE COLLAR WHEN YOUR DOG IS PLAYING AND YOU MUST
REMOVE IT EVERY 2 - 3 HOURS INSPECT AND CLEAN YOUR DOGS NECK FOR THE FIRST 2 -
3 DAYS, THEN YOU CAN EXTEND THAT TO 12 HOURS MAXIMUM PER DAY…
Always Remove the collar at playtime, which is a great time to check your dogs neck whilst
making it fun. It is very important that you do this. This collar is a behavioral aid and you do
not want to be telling your dog off while they are playing.
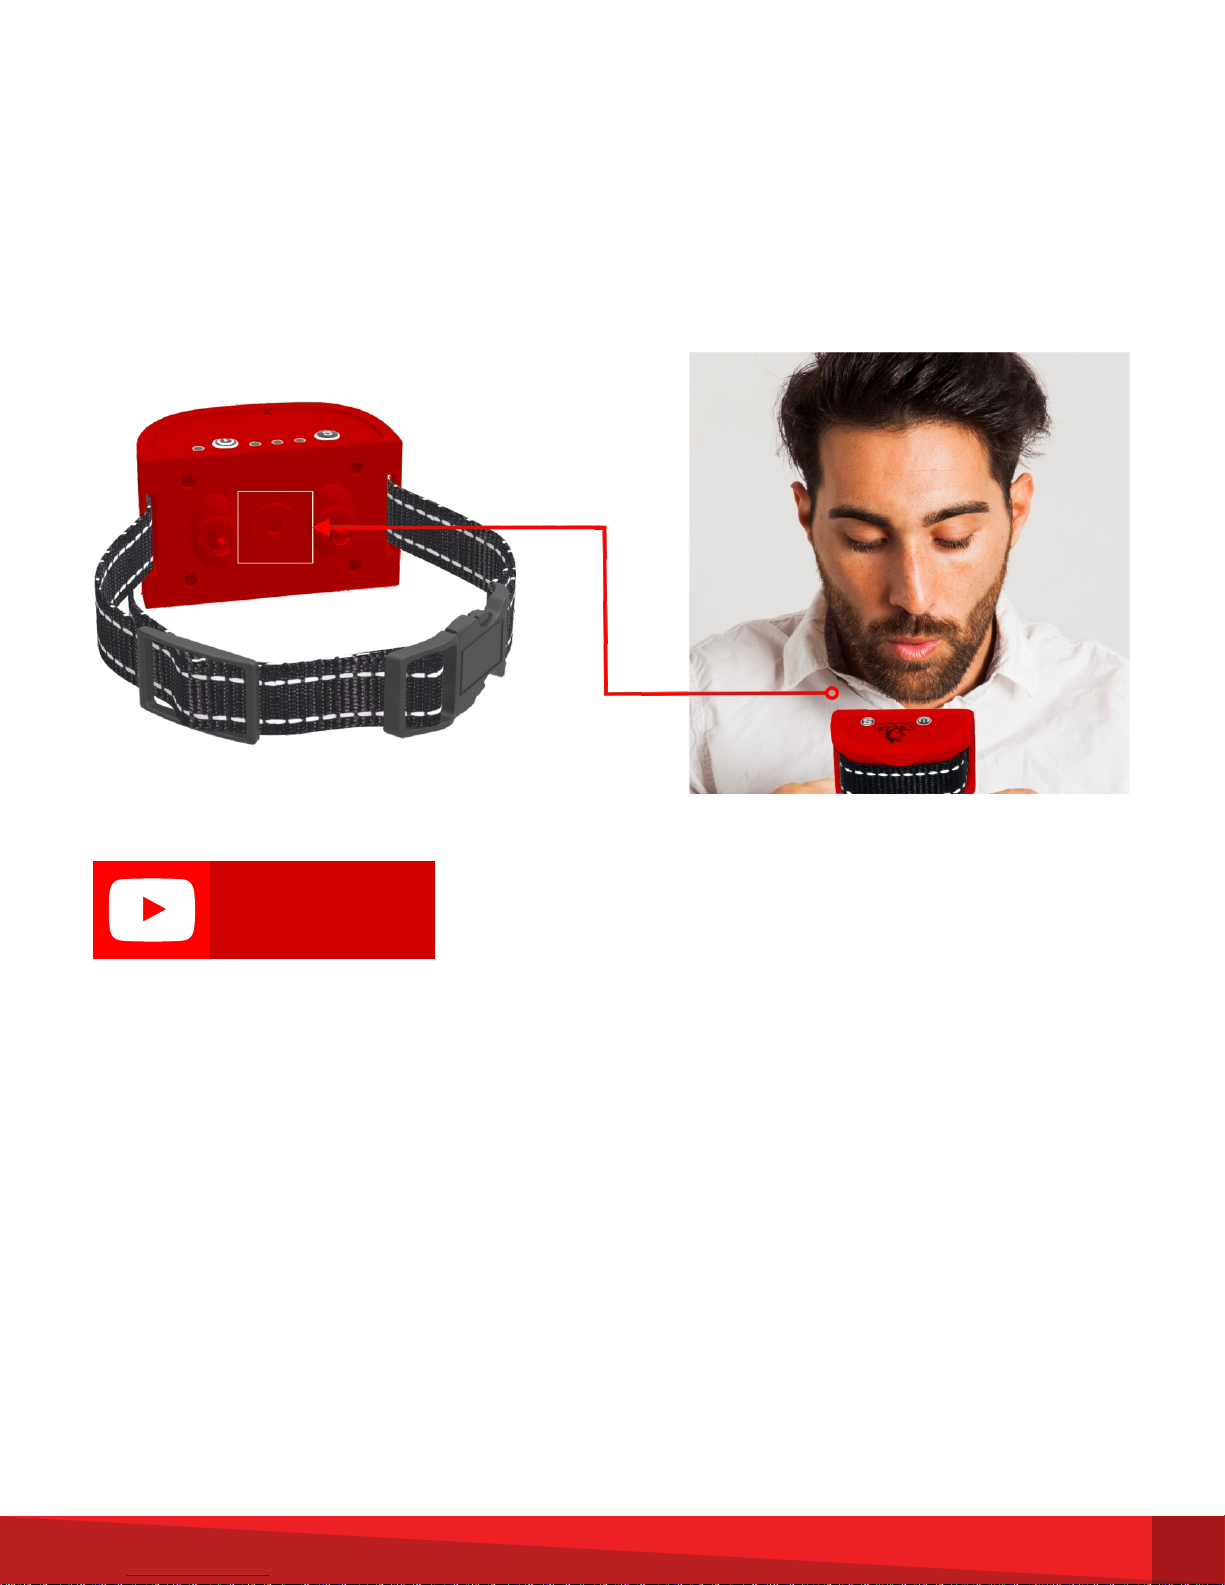
PLAYING WINDY DOGS IN THE CAR IS ALSO A NO NO... REMEMBER IT IS AIR MOVEMENT
THAT TRIGGERS THE COLLAR SO YOUR DOG STICKING HIS HEAD OUT THE WINDOW WILL
JUST TRIGGER THE COLLAR. PLEASE REMOVE THE COLLAR.
10

1.You Must Remove the Collar Daily, Clean and gently massage your dogs neck. Because
the collar is quite tight you must remove it daily to avoid any likelihood of your dog
developing any pressure sores
2. When Charging the Collar…. You must gently remove the rubber cover to access the
Mini USB Socket, When you have finished charging the collar you MUST replace the
Rubber Cover Correctly.
3. Do not allow your dog to chew this collar. You should also attempt to minimize
scratching or Clawing at the casing.
4. This device is made up of plastic and electronic components that are not digestible.
Consult your local vet if your dog swallows any part of this product.
5. The collar is not intended for use as a restraining collar. If you are using a leash, use it
with a separate restraining type of collar.
6. Although the Anti-bark Collar's microprocessor is designed to differentiate your dog's
Individual bark, the unit may occasionally be activated by other vibrations or movement.
This is normal but, it should not happen so often as to be confusing to your pet. If the
unit is falsely triggered by excessive scratching shaking of the head or rolling on the
ground, please remove the collar immediately and do not put the collar back on for a
couple of days, when you do put the collar back on do not turn it on, wait for your dog to
ignore the collar before you resume training.
CAUTION NOTES:
11
USB COVER OPEN USB LEAD
ATTACHED
WRONG RIGHT

Q. My Dog Barks and the collar doesn’t re-act.
A1.
This is normal, this means that the collar has gone into standby mode. So when your
dog sleeps the collar sleeps, when your dog is awake the collar is awake. So it may
take one bark to put the collar into standby mode.
Q. When and How often do I charge the Collar
A1.
We recommend that you charge the collar once a week try to do it at play time the
same time every week and you will know that your collar will always be ready and
able. You can use your computer, laptop USB port or any USB charger like your
Mobile Phone Charger.
Q. The Collar Just Keeps Going Off
A1.
The sensitivity is set too high… adjust the sensitivity by pressing the button
and reduce the sensitivity level by one.
A2.
The Collar is not tight enough, You should be able to slide just one finger under the
collar, It may seem tight to you and you may think that it is uncomfortable for your
dog, its Ok to think that.. Because the collar works of the air between the collar and
your dogs throat… As your dog barks his throat will go in and out pushing air into the
small hole at the back of the collar this is what will activate the bark collar. If the
collar is not tight enough then the air will not get pushed in…. So why does it keep
going off… because the collar is moving towards the throat and closing that gap
thereby triggering the collar..
Q.
.
My Dog Shakes his Head and the Collar Goes Off.
A.
FAULT FINDING GUIDE
12
Did You Follow the Guidelines in the Video “How to Use Your Our K9 Collar Correctly”
About NOT turning the collar for One to Two Days BEFORE Your Start Training?
Because the Collar Feels Unusual to Your Dog They Will Keep Shaking Their Heads
and scratching forcing the Collar to Activate…
If You Have Followed the Guidelines Now Check That the Collar is not too loose…
Tighten the Collar. The Collar Should Not Move…
Please remember that it is Air Pressure that Activates the Collar So a Loose Collar
Being Shaken Will Activate.
Note.. Dogs normally shake their heads when they have an ear infection or
something troubling them. Please keep a careful eye on them and if needed Seek
Medical Help.. If the shaking starts with the head and continues all the way down
the body that is quite different..

13
The Collar is Designed to STOP EXCESSIVE BARKING
and NOT to STOP ALL BARKING.
PLEASE REMEMBER
Q. My Dog Barks But the Collar Does Not Activate...
A1. Dead Battery - Check the Battery by Performing a Full Test. Refer Page 3
Q. My Collar Keeps Coming Loose…
A. Sorry But the Collar has been put together incorrectly. The collar has been tested to
90lb Breaking and slippage. Please Watch our Video Showing How to Put the Collar
Together Correctly. Refer Page 4
The Buckle Has Been Put Together Back to Front… the Buckle has Been Design
to Snap Apart. Refer Page 4
Q. The Collar is Difficult to undo…
A.
Q. Collar Will Beep but Will Not Vibrate
A. There is Enough Charge in the Battery to make it Beep but Not Vibrate. Please
Recharge the Collar Correctly.
Q. The Collar goes off when my dog doesn't bark.
A The collar will sometimes give false alerts…. Do not worry about this your dog will
learn very quickly that it is exactly that… a false alert. All dogs very quickly learn that
the two beeps are exactly that, just two beeps, so they will bark. But you as a
responsible dog owner want that, you want it so that they can talk…
FOUR POSSIBLE REASONS
A2. Sensitivity is set up Wrong. Adjust Sensitivity. Ref Page 5
A3. Collar is too loose. Adjust Collar to fit correctly. Ref Page 4
A4. Hole at the back of the Collar is Blocked. Remove Debris and Trim Excess Hair away
from the Hole. The Hole Must be clear at all times..
Table of contents
Other Our K9 Pet Care Product manuals
Popular Pet Care Product manuals by other brands

Prevue Pet Products
Prevue Pet Products PREVUE HENDRYX 31999 Assembly

ReptiZoo
ReptiZoo PALUDARIUM ECO instruction manual

ReptiZoo
ReptiZoo RKE KNOCK-DOWN GLASS TERRARIUM instruction manual

Kurgo
Kurgo JOURNEY BENCH SEAT COVER Instructions and care

AERTEK
AERTEK AT-919C owner's manual

Pettec
Pettec Modular Remote quick start guide