manuals.online logo
Brands
  1. Home
  2. •
  3. Brands
  4. •
  5. Ovation
  6. •
  7. Laboratory Equipment
  8. •
  9. Ovation QS Configuration guide

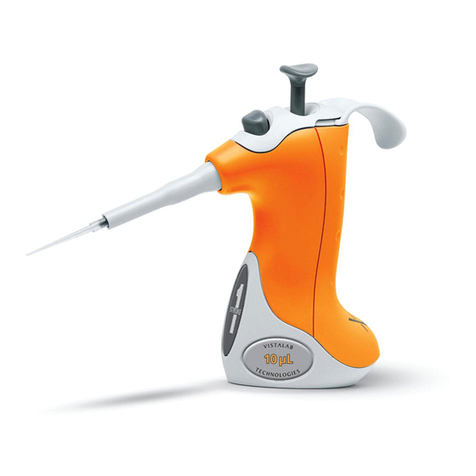
Ovation QS Configuration guide

L070-0010-001 Rev A
When to use:
VistaLab echnologies recommends the
use of the Air ube Cleaning Kit for the
Ovation QS pipette if the following
symptoms are occurring:
• Stiff plunger action (not due to a
clogged nozzle)
• Air ube blockage / contamination
Air Tube Cleaning Kit includes:
(Cat No. 9070-4020)
• Air ube Cleaner Syringe
• Air ube Cleaner Nozzle
• Cleaning Solution (99% Isopropanol)
• Silicone Sleeve
• 5/64’’ Allen Key
VistaLab Technologies, Inc.
2 Geneva Road
Brewster, NY 10509 USA
(914) 244-6226 • (888) 652-6520
Air Tube Cleaning Instructions
Ovation QS
To unblock and clean out air tube:
1. Set the pipette to its maximum volume
setting.
2. Loosen the captive Base Screw on
the bottom surface of the pipette
base using a small coin. This should
take approximately 5 full turns. Pull
the base from the rest of the body,
taking care to not remove the ribbon
cable from the circuit board in the
pipette’s Base; it is okay to let the
Base hang off of the Pipette Body by
the ribbon cable.
Figure 1: Captive screw being loosened
Figure 13: Put t e base back onto t e pipette
Figure 2: Pulling base from body
Figure 12: Tig ten captive screws
10. After the 30 minute drying period,
screw the original Nozzle (or new
Nozzle) back onto the pipette.
11. Reattach the ejector sleeve by sliding it
over the nozzle extension tube and
pressing firmly until a click is heard.
When properly installed, the sleeve
should remain attached to the pipette
when the ejector button is pressed. If it
comes off, you made need to press
harder to engage the snap ring.
12. Replace the Cylinder Assembly over
the exposed Plunger and Air Tube
opening. ake sure that the teardrop
shaped seal has not popped out of its
groove. Hand-tighten the three captive
screws with the provided Allen Key.
Avoid over-tightening by not using the
short end of the Allen Key. (see
Figures 11 & 12).
13 Put the Base back onto the pipette,
aligning the pins and tabs with their
respective holes, and secure in place
by tightening the plastic Base Screw
with a small coin.
14. Verify pipette performance.
Figure 11. Replace Cylinder Assembly
AirTubeC eanout_Instrct_Ovation QS_Sea Kit_Rep ce_InstrctRevB 10/29/14 1:23 PM Page 1
3. Loosen the three captive screws on the
underside of the pipette using the provided
5/64’’ Allen Key. Remove the Cylinder
Assembly to expose the bottom end of
the air tube. (see Figures 3 & 4)
4. Remove the white Ejector Sleeve from
the pipette by firmly pulling it outward.
(see Figure 5)
5. Remove the Nozzle by unscrewing it
counterclockwise from the extension
tube. You can slide the provided silicone
sleeve over the nozzle for better grip
and leverage. (see Figure 6)
6. Attach the Air Tube Cleaner Nozzle by
screwing the threaded end of the nozzle
onto the nozzle extension tube with the
aid of the same silicone sleeve if
needed. (see Figure 7)
Tighten until the nozzle sits flush with
the extension tube. Remove the silicone
sleeve when finished.
Wear Safety Glasses when
performing the next steps.
7. Aspirate approximately 1 mL of warm
water into the provided syringe. Attach
the syringe to the Air Tube Cleaner
Nozzle by inserting the syringe into the
open end of the nozzle and pushing
firmly to seal. (see Figure 8).
8.
With the open end of the air tube over
a liquid receptacle or a sink and the
Base held out of the way, slowly
force the warm water into the pipette.
It may take up to a minute of firm
pressure to clear out the blockage in
the Air Tube. (see Figure 9)
9. When the syringe is empty, pump the
syringe plunger all the way out and then
all the way in about 10 times to remove
any residual liquid. (see Figure 10)
10. Detach the syringe, fill syringe with the
cleaning solution, and re-attach it.
With the open end of the air tube over
a liquid receptacle or a sink and the
Base held out of the way, slowly
force the cleaning solution into the
pipette.
When the syringe is empty, pump the
syringe plunger all the way out and then
all the way in about 10 times to remove
any residual liquid. (see Figure 10)
Allow the unit to air dry for 30 minutes
before re-assembly
(continued)
Figure 3: Loosen 3 captive screws
Figure 4: Remove cylinder assembly
Figure 10: Unscrewing nozzle assy from extension tube
Figure 5: Remove Ejector Sleeve
Figure 6: Remove Nozzle Assembly
Figure 7: Attac Air Tube Cleaner Nozzle
Figure 8: Air tube cleaner nozzle and
syringe connection
Figure 9: Air tube cleaner syringe expel
AirTubeC eanout_Instrct_Ovation QS_Sea Kit_Rep ce_InstrctRevB 10/29/14 1:23 PM Page 3
L070-0010-001 Rev A
When to use:
VistaLab echnologies recommends the
use of the Air ube Cleaning Kit for the
Ovation QS pipette if the following
symptoms are occurring:
• Stiff plunger action (not due to a
clogged nozzle)
• Air ube blockage / contamination
Air Tube Cleaning Kit includes:
(Cat No. 9070-4020)
• Air ube Cleaner Syringe
• Air ube Cleaner Nozzle
• Cleaning Solution (99% Isopropanol)
• Silicone Sleeve
• 5/64’’ Allen Key
VistaLab Technologies, Inc.
2 Geneva Road
Brewster, NY 10509 USA
(914) 244-6226 • (888) 652-6520
Air Tube Cleaning Instructions
Ovation QS
To unblock and clean out air tube:
1. Set the pipette to its maximum volume
setting.
2. Loosen the captive Base Screw on
the bottom surface of the pipette
base using a small coin. This should
take approximately 5 full turns. Pull
the base from the rest of the body,
taking care to not remove the ribbon
cable from the circuit board in the
pipette’s Base; it is okay to let the
Base hang off of the Pipette Body by
the ribbon cable.
Figure 1: Captive screw being loosened
Figure 13: Put t e base back onto t e pipette
Figure 2: Pulling base from body
Figure 12: Tig ten captive screws
10. After the 30 minute drying period,
screw the original Nozzle (or new
Nozzle) back onto the pipette.
11. Reattach the ejector sleeve by sliding it
over the nozzle extension tube and
pressing firmly until a click is heard.
When properly installed, the sleeve
should remain attached to the pipette
when the ejector button is pressed. If it
comes off, you made need to press
harder to engage the snap ring.
12. Replace the Cylinder Assembly over
the exposed Plunger and Air Tube
opening. ake sure that the teardrop
shaped seal has not popped out of its
groove. Hand-tighten the three captive
screws with the provided Allen Key.
Avoid over-tightening by not using the
short end of the Allen Key. (see
Figures 11 & 12).
13 Put the Base back onto the pipette,
aligning the pins and tabs with their
respective holes, and secure in place
by tightening the plastic Base Screw
with a small coin.
14. Verify pipette performance.
Figure 11. Replace Cylinder Assembly
AirTubeC eanout_Instrct_Ovation QS_Sea Kit_Rep ce_InstrctRevB 10/29/14 1:23 PM Page 1

Other Ovation Laboratory Equipment manuals

Ovation F1 User manual

Ovation

Ovation F1 User manual

Ovation BioNatural 1160-0020 Manual

Ovation

Ovation BioNatural 1160-0020 Manual

Popular Laboratory Equipment manuals by other brands

Thermo Scientific GENESYS 10S Vis user guide

Thermo Scientific

Thermo Scientific GENESYS 10S Vis user guide

Quorum Q150T Fitting instructions

Quorum

Quorum Q150T Fitting instructions

Sanuvox Bio-Wall MAX troubleshooting guide

Sanuvox

Sanuvox Bio-Wall MAX troubleshooting guide

BioLAB BCLT-202 Operation manual

BioLAB

BioLAB BCLT-202 Operation manual

Becton Dickinson SERO-FUGE 2000 Series Operator's manual

Becton Dickinson

Becton Dickinson SERO-FUGE 2000 Series Operator's manual

Beckman Coulter UniCel DxH user manual

Beckman Coulter

Beckman Coulter UniCel DxH user manual

RuggedCom RUGGEDPOWER RP100 Hardware installation guide

RuggedCom

RuggedCom RUGGEDPOWER RP100 Hardware installation guide

MELAG MELAquick 12 Operation manual

MELAG

MELAG MELAquick 12 Operation manual

Thermo Electron IEC CL40 Series user manual

Thermo Electron

Thermo Electron IEC CL40 Series user manual

Sakura Cyto-Tek 2500 Quick reference guide

Sakura

Sakura Cyto-Tek 2500 Quick reference guide

Swan Analytical Instruments AMI Turbiwell Operator's manual

Swan Analytical Instruments

Swan Analytical Instruments AMI Turbiwell Operator's manual

Gilson Vortex Mixer user guide

Gilson

Gilson Vortex Mixer user guide

Grant-bio MM-1000 operating manual

Grant-bio

Grant-bio MM-1000 operating manual

TAU STERIL MINI AUTOMATIC Instructions for use

TAU STERIL

TAU STERIL MINI AUTOMATIC Instructions for use

Waters ACQUITY UPLC Care and use manual

Waters

Waters ACQUITY UPLC Care and use manual

Drucker 642E Operator's manual

Drucker

Drucker 642E Operator's manual

Velp Scientifica AREC.X F20500061 instruction manual

Velp Scientifica

Velp Scientifica AREC.X F20500061 instruction manual

Mobee STS-6051 OZ user manual

Mobee

Mobee STS-6051 OZ user manual

manuals.online logo
manuals.online logoBrands
  • About & Mission
  • Contact us
  • Privacy Policy
  • Terms and Conditions

Copyright 2025 Manuals.Online. All Rights Reserved.