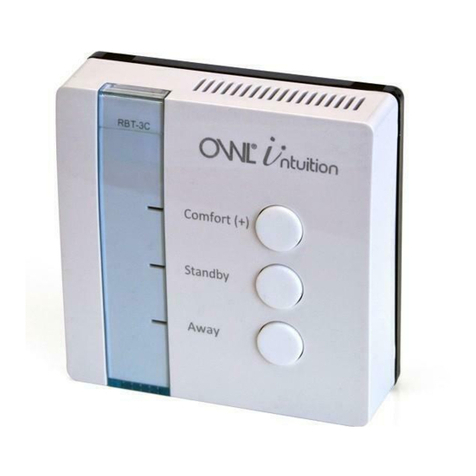
OWL Intuition RBT-3C User manual

© 2 Save Energy Limited 2012 1
Room Sensor [RBT-3C]
Installation Instructions
Room Sensor to replace existing wired room thermostat. Provides pro-
grammer / time clock functionality. Requires Network OWL to operate.
BackplateRoom Sensor

2 © 2 Save Energy Limited 2012
Introduction
This Room Sensor is a part of the OWL Intuition range of cloud connected monitoring and
control products. Its operation is dependant upon being paired to the broadband Internet
connected Network OWL (supplied separately).
This version of the Room Sensor is designed for use with a Combi boiler with existing wir-
ing to the Room Sensor location (see Installation Instructions).
The Room Sensor provides both room thermostat and programmer / time clock functional-
ity.
Basic day-to-day user operation changes can be made using the three buttons. Addition-
ally there is a comprehensive yet intuitive, easy to use controls via the OWL Intuition web
dashboard, from any Internet connected computer anywhere in the World. iPhone and
Android smartphone apps are also available for free download.
It is recommended that this product is installed by
a suitably qualied heating engineer, plumber or
electrician.

© 2 Save Energy Limited 2012 3
Installation Instructions
Network OWL installed and online
The Network OWL should already be installed. Refer to the Network OWL Getting Started
guide for guidance if required. Check that it is powered-up and connected to the OWL
servers (the top green LED should be ashing in a “triple blip pattern”).
Upgrade Network OWL rmware
Log in to the OWL Intuition account at1.
https://www.owlintuition.com (this is a secure connection). You will then see the
OWL Intuition web dashboard.
Click on the Devices menu. The Network OWL will appear in the list of devices. Click2.
on Network OWL image to open a new window. If an upgrade is required, an Update
Device button will be visible. Click on this button then wait for approximately 4 min-
utes for the upgrade to complete. You should check
that the upgrade was successful before proceeding
by repeating this instruction.
Steps Before Installing
Pair Room Sensor with Network OWL1.
Put the batteries into the Room Sensor. The 3a.
LEDs will start ashing together indicating that

4 © 2 Save Energy Limited 2012
the Room Sensor is ready to be paired.
Power down the Network OWL by removing the power connector. Then after 10b.
seconds re-insert the power connector into the Network OWL and wait. The 3
LEDs on the Room Sensor will stop ashing indicating that it is now paired to the
Network OWL.
Now wait until the Network OWL is connected to the OWL servers (the top greenc.
LED should be ashing in a “triple blip pattern”).
Log in to the OWL Intuition account atd.
https://www.owlintuition.com (this is a secure connection). You will then see
the OWL Intuition web dashboard.
A message box will pop-up indicating that a new device has been detected ande.
requesting you to log out and log back in.
When you log back in you will now have a Heating widget within your web dash-f.
board.
Congure Account Settings2.
Select the Settings menu. Select an appropriate Energy Performance Certicate
(“EPC”) rating for this property. Enter the actual EPC rating if you have one, if not just
estimate how you would rate the energy efciency of the property on the A to G scale
below. Be sure to click the “Save” button before closing the window.

© 2 Save Energy Limited 2012 5
Property EPC / Energy Efciency Rating
Rating Score Description
A 92+ Exceptional
B 81 - 91
Above Average
C 69 - 80
D 55 - 68 UK Average
E 39 - 54
F 21 - 38
Below Average
G 1 - 20
Congure Heating Settings3.
You can make any necessary changes to the various Heating settings by clicking on
the “gear wheels” icon on the grey Heating widget title bar.
Congure Time Clock4.
The Heating Time Clock denes the periods during which the home is automatically
heated and to what temperature. These periods are called Comfort Periods. OWL In-
tuition will intelligently calculate what time to switch the boiler on and off to maintain
the target temperature for the whole of the Comfort Period. Each day of the week can

6 © 2 Save Energy Limited 2012
be programmed with up to 10 different Comfort Periods.
The preset heating ‘Comfort’ Time Clock settings are shown in the table below. These
can be modied using the OWL Intuition web dashboard.
On the Heating widget click on the “Clock” icon. This opens the Heating Time a.
Clock widget.
Select the day you wish to amend, then click an option on the line you wish tob.
amend.
i. Pencil icon to edit the line.
ii. Cross icon to delete the line.
Amend details within the Edit box as required then click on the Tick icon to updatec.
the table.
To add a new line simply ll in the Add box with the required details and click on d.
the Tick icon.
When you are happy with your changes you can use the Copy Current Day featuree.
to quickly duplicate to other days.
IMPORTANT:f. When you have nished making changes you must save them to
your Network OWL by clicking on the “Save To Network OWL” button.

© 2 Save Energy Limited 2012 7
Preset Heating ‘Comfort’ Time Clock Settings
Monday to Friday
Start Time End Time Temperature
07:00 08:30 18°C
16:30 22:30 20°C
Saturday & Sunday
Start Time End Time Temperature
07:30 10:00 18°C
16:30 22:30 20°C
Note: Outside of these preset heating ‘Comfort’ periods, the Room Sensor will be in
Standby mode (15°C - congurable).

8 © 2 Save Energy Limited 2012
OWL Intuition Web Dashboard - Heating and Time Clock widgets

© 2 Save Energy Limited 2012 9
Installing the Room Sensor
The Room Sensor should be located on an internal wall approximately 1500mm above oor
level using the backplate provided. It should be positioned away from draughts, direct heat
and sunlight. The backplate is suitable for both direct wall mounting and mounting on to a
single gang ush wiring box complying with BS4662, using two M3.5 screws.
Check Signal Strength1. - With the Room Sensor at the chosen instal lation location
you should now check the signal strength icon shown on the web dashboard Heat-
ing widget. The signal should be at least 2 bars and preferably more. Try moving the
Network OWL closer to the Room Sensor i f you have a signal strength problem.
Ensure2. there will be enough space to allow easy screwdriver access to the two cap -
tive screws located at the base of the backplate.
Electrical Connections:3.
WARNING: ISOLATE THE MAINS SUPPLY BEFORE COMMENCING INSTALLATION
For existing installations
, remove the old room thermostat to expose the wiring back
to the boiler. Check the wiring at both ends to correctly identify which wire is
Live and which is Switched Live.
For new installations
, run a new cable between the boiler and chosen Room Sensor
Location. The recommended cable size is 1.0mm
2
. See diagram below.
Fix the backplatea. - Offer the backplate to the wall in the position where the
Room Sensor is to be mounted (with the cable through the central aperture of the
backplate) and mark the xing positions through the slots in the backplate. Drill

10 © 2 Save Energy Limited 2012
and plug the wall, then secure the plate into position. The slots in the backplate
will compensate for minor misalignment of the xings.
Wiringb. - All necessary electrical connections should now be made.
The Room Sensor is double insulated and does not require an earth connec-•
tion.
An earth connection block is provided on the backplate for terminating any•
cable earth conductors.
Earth continuity must be maintained and all bare earth conductors must be•
sleeved.
If one of the existing wires is a Neutral supply then this should be ‘parked’ on•
the terminal labelled ‘N’.
Ensure that no conductors are left protruding outside the central space en-•
closed by the backplate.
Refer to the diagram and table shown below for the wiring arrangement for•
a typical combi boiler system. This diagram is schematic and should be used
for guidance only.
Please ensure that all installations comply with the current IEE regulations.•
Please consult the boiler manufacturers installation instructions before mak-•
ing these connections and note that a link may need to be removed when
connecting external controls.

© 2 Save Energy Limited 2012 11
N L 1 2 3 4
OWL Room Sensor
Common
Call for heat
Heat satisfied
Green/Yellow
L EN
Mains Supply
Boiler
External Programmer
Connections
LSupply
LReturn
NSupply
N
L
Remove Link
Typical Combi Boiler System
OWL Intuition-c Room Sensor Wiring

12 © 2 Save Energy Limited 2012
Fit Safety Cover4. - Check all of the wiring is safely attached to the appropriate back-
plate terminals and the screws are tight. Then t the Safety Cover by clipping it into
place over the wiring terminals.
Complete5. the installation by mounting the Room Sensor to the backplate. To do this
engage the Room Sensor on the lugs at the top of the backplate, then carefully swing
the Room Sensor down and push it carefully back into its plug-in terminal connectors.
Locate over the captive screws at the base of the backplate and tighten them so that
the Room Sensor is locked into position.
Existing Programmer / Time Clock 6. - any existing programmer or time clock is
now redundant. You should either program it to be permanently on (24/7) or prefer-
ably remove it, ensuring that the two wires it was switching are safely electrically
linked together, preferably by installing a link wire within the boiler. Please check boiler
manufacturers wiring instructions for further details.
Finally7. check that the Room Sensor is functioning correctly and switching the boiler
on and off correctly. A simple test for this is to press and hold the Comfort (+) button
for 5 seconds. This will activate the Boost mode and turn the boiler on. Check that
the web dashboard Heating widget is now showing that the Boost is activated and the
boiler is running (Red-glow around house icon at top of Heating widget).
Handover8. - Please ensure you handover this document to the householder and direct
them to the User Instructions available for download by clicking on Support & Manuals
on the web dashboard (lower right).

© 2 Save Energy Limited 2012 13
Additional Installation Information
Room Sensor Factory Reset:
You can factory reset the Room Sensor by pressing both the Standby and Away buttons
together for a minimum of 10 seconds. The 3 LEDs will start ashing indicating that it is in
pairing mode. Refer to Getting Started with OWL Intuition Network Gateway guide if you
need to factory reset the Network OWL.
Terminal Description
N Neutral - Not used, may be used to ‘park’ unused neutral wire.
L Live - Not used, may be used to ‘park’ unused live wire.
1 Common terminal of Room Sensor latching relay
2 Not used
3‘Heat Satised’ - Normally closed terminal of Room Sensor latching relay
4 ‘Call for Heat’ - Normally open terminal of Room Sensor latching relay
Earth continuity connection
OWL Intuition-c Room Sensor Backplate Wiring

14 © 2 Save Energy Limited 2012
Programmer
/ Timer
19:30
Wireless Room
Thermostat
Room Thermostat
typically located in
Hall or Lounge
Existing wiring
Boiler

© 2 Save Energy Limited 2012 15
BEFORE: Typical Existing Combi Boiler Installation
Option 1 - Remove existing
Programmer / Timer and
link inputs.
Option 2 - Retain existing
Programmer / Timer and
program to always on.
Comfort (+)
Standby
Away
OWL Intuition
Room Sensor
RBx-3C
Room Sensor typically
located in Hall or Lounge
OWL Intuition
Occupancy
Sensor
OBxE-B
OPTIONAL
Occupancy Sensor
Digital Sensor
Attached to Water Main
Ground Riser
Existing wiring
Boiler
Broadband
Router
Network OWL
OWL Intuition
OWL Intuition
Energy
Monitor
Transmitter
OPTIONAL
Energy Monitor
Transmitter

16 © 2 Save Energy Limited 2012
Customer Support
If you have any further questions please check our frequently asked questions at:
http://www.theowl.com/faqs.html
(please ensure you state your Network OWL MAC ID)
2 Save Energy Limited operate a policy of continuous development and improvement,
therefore the content of this document is subject to change without notice.
Document Version 1.0 - December 2012
Other manuals for Intuition RBT-3C
2
Table of contents
Other OWL Temperature Controllers manuals
Popular Temperature Controllers manuals by other brands

Mitsubishi Electric
Mitsubishi Electric PAC-IF051B-E installation manual

Omron
Omron E5GN-RTC manual

Honeywell
Honeywell C7189A installation instructions

HydroStat
HydroStat 3150 Installation instructions and operating manual

ILX Lightwave
ILX Lightwave LDT-5910 instruction manual

VICI
VICI ITC2 instruction manual

Engineered Comfort
Engineered Comfort Fan Coil Controller EZstat Installation and operation manual

Proxel
Proxel 3WM+A quick start guide

Spirax Sarco
Spirax Sarco SA121 Installation and maintenance instructions

Omron
Omron E5EC-T datasheet

Auber Instruments
Auber Instruments SYL-2342 instruction manual

T&D
T&D RTR-501 user manual