OPERATOR’S Oxi-Go™ Premier
MANUAL With 2 Way Display
VER2.0C16
Fingertip Pulse Oximeter
General Description
Haemoglobin Saturation is percentage of HbO2 (Oxyhemoglobin), compounded with
oxygen, in haemoglobin (Hb). In other words, it indicates the saturation of HbO2 in blood.
It is a crucial physiological parameter for Respiration System. Many respiratory diseases
can lead to decrease of SpO2saturation. Moreover, such factors as organic automatic
adjustment malfunction derived from anesthesia, side effect of major operation and
injures aroused from physical check can also cause problems about SPO2 saturation
variation, which contributed to such adverse symptoms such as faint, vomit and feel
weakness and so on. What’s more, if can not get the right remedy, it can lead to dangers
to human’s life. Hence, it is very feasible for doctors to analyze patients’ SPO2
saturation as reference to detect the root of the causes, which is more effective to
relieve patients’ pain and conduct suitable therapy plan as soon as possible.
The fingertip pulse oximeter features of small dimension, low power consumption,
easy-to-use and convenience for carry. As long as you put your finger in the device
which read data though a light-sensitive probe, then the associated reading will be
displayed on the indicator. It is proved by clinical trial Pulse Oximeter have outstanding
precise and could repeat to measure the SPO2 more accurately and stably.
Measurement Principle
The fingertip pulse oximeter contains a dual light source and photodetector.Bone,
tissure, pigmentation, and venous vessels normally absorb a constant amount of light
over time. The arteriolar bed normally pulsates and absorbs variable amounts of light
during systole and diastole, as blood volume increases and decreases. The ratio of light
absorbed at systole and diastole is translated into an oxygen saturation
measurement.This measurement is referred to as SpO2.
The principle of the oximeter rely on the property of spectrum which collect data from
hemoglobin and oxyhemoglobin in glow area and area of approximate infrared source
and apply the formular “Lamnert Beer” to establish the evaluating equation. In fact, the
basic calculating technique is to combine electro-photo SPO2 detecting technology with
recording mock pulse rate technology to get the result, the process demonstrate as
below:
Firstly, use glow with wavelength of 660cm and approximate infrared with wavelength of
940cm to put light on the finger tip ready to read analogue data.
Secondly, to process the data by electric circuit and microprocessor, then convey the
data to LED display for reading.
Diagram of Operation Principle
1. Red and Infrared-ray Emission Tube
2. Red and Infrared-ray Receipt Tube
Technical Specifications
1. Display mode: LED.
Measuring range for SpO2: 70%-99%
Measuring range for PR: 30-235 BPM
PR display mode: bargraph.
Low power indication:
2. Battery standard: TwoAAA1.5V Alkaline Battery
3. Power consumption: Less than 40mA
4. Resolution: ±1% for SPO2 and ±1BPM for Pulse Rate
5. Measurement accuracy:
SpO2: 80%--99%, ±2%; 70%--79%, ±3%; ≤69%, no definition.
PR: 30-99BPM, ±2 BPM; 100-235 BPM ±2%
Operation Temperature: 41°F - 104°F, Storage Temperature: -4°F - 131°F
Ambient Humidity: ≤80% in operation, ≤93% in storage
6. Sensitive degree test: Under the condition of poor perfusion, when the amplitude of
pulse waveform is 0.6% detected by BIO-TEK INDEX tester. Then it can be proved
the sensitive degree is Ok.
7. Resistance capacity against ambient light: Device work normally when mixed noise
produced by BIO-TEK INDEX Pulse Oximeter tester
8. Automatic power off: When no finger in the device for 8 seconds, it will power off
automatically.
Precautions for use
1 Do not use the pulse oximeter in an MRI or CT environment
2 Do not use the pulse oximeter in situations where alarms are required. The
device has no alarms.
3 Explosion hazard: Do not use the pulse oximeter in an explosive atmosphere.
4 The pulse oximeter is intended only as an adjunct in patient assessment. It must
be used in conjunction with other methods of assessing clinical signs and
symptoms.
5 Check the pulse oximeter sensor application site frequently to determine the
positioning of the sensor and circulation and skin sensitivity of the patient.
6 Do not stretch the adhesive tape while applying the pulse oximeter sensor. This
may cause inaccurate readings or skin blisters.
7 Before use, carefully read the manual.
8 The pulse oximeter has no SpO2 alarms; it is not for continuous monitoring, as
indicated by the symbol.
9 Prolonged use or the patient’s condition may require changing the sensor site
periodically. Change sensor site and check skin integrity, circulatory status, and
correct alignment at least every 4 hours.
Inaccurate measurements may be caused by:
10 Autoclaving, ethylene oxide sterilizing, or immersing the sensors in liquid may
cause inaccurate readings.
11 Significant levels of dysfunctional hemoglobins(such as carbonxy-hemoglobin or
methemoglobin)
12 Intravascular dyes such as indocyanine green or methylene blue
13 SpO2 measurements may be adversely affected in the presence of high ambient
light. Shield the sensor area (with a surgical towel, or direct sunlight, for example)
if necessary.
14 Excessive patient movement
15 High-Frequency electrosurgical interference and defibrillators
16 Venous pulsations
17 Placement of a sensor on an extremity with a blood pressure cuff, arterial
catheter, or intravascular line
18 The patient has hypotension, severe vasoconstriction, severe anemia, or
hypothermia
19 The patient is in cardiac arrest or is in shock
20 Fingernail polish or false fingernails may cause inaccurate SpO2 readings.
21 WARNING! Oximeters are not for children’s play. Keep the oximeter away
from young children. Small parts such as the battery door, batteries etc. may
be hazardous if swallowed. The lanyard may cause strangulation in conditions
that may cause it to twist around the neck.
Follow local ordinances and recycling instructions regarding disposal or
recycling of the device and device components, including batteries.
Product Properties
1. Easy to use.
2. Small dimension, light in weight (total weight is about 50g including batteries) and
convenient for portable.
3. Lower power consumption; originally-equipped two AAA batteries can last to 30
hours.
4. Low voltage warning will be indicated in visual window when battery voltage is too
low and normal application of the Oximeter might be influenced.
5. No signal can be tested, device will power off automatically in 8 seconds.
Product Operation Scope
The fingertip oximeter can be used to measure human Haemoglobin Saturation and
heart rate through finger. The product is suitable for use in family, hospital (including
clinical use in internist/surgery, Anaesthesia, paediatrics, intensive care and etc.)
Oxygen Club, social medical organizations, physical care in sports (It can be used
before or after sports. Operation in sport procedure is not recommended) and etc.
The product is not suitable to monitor patient continuously. Spot Monitoring only.
The pulse oximeter requires no routine calibration or maintenance other than
replacement of batteries.
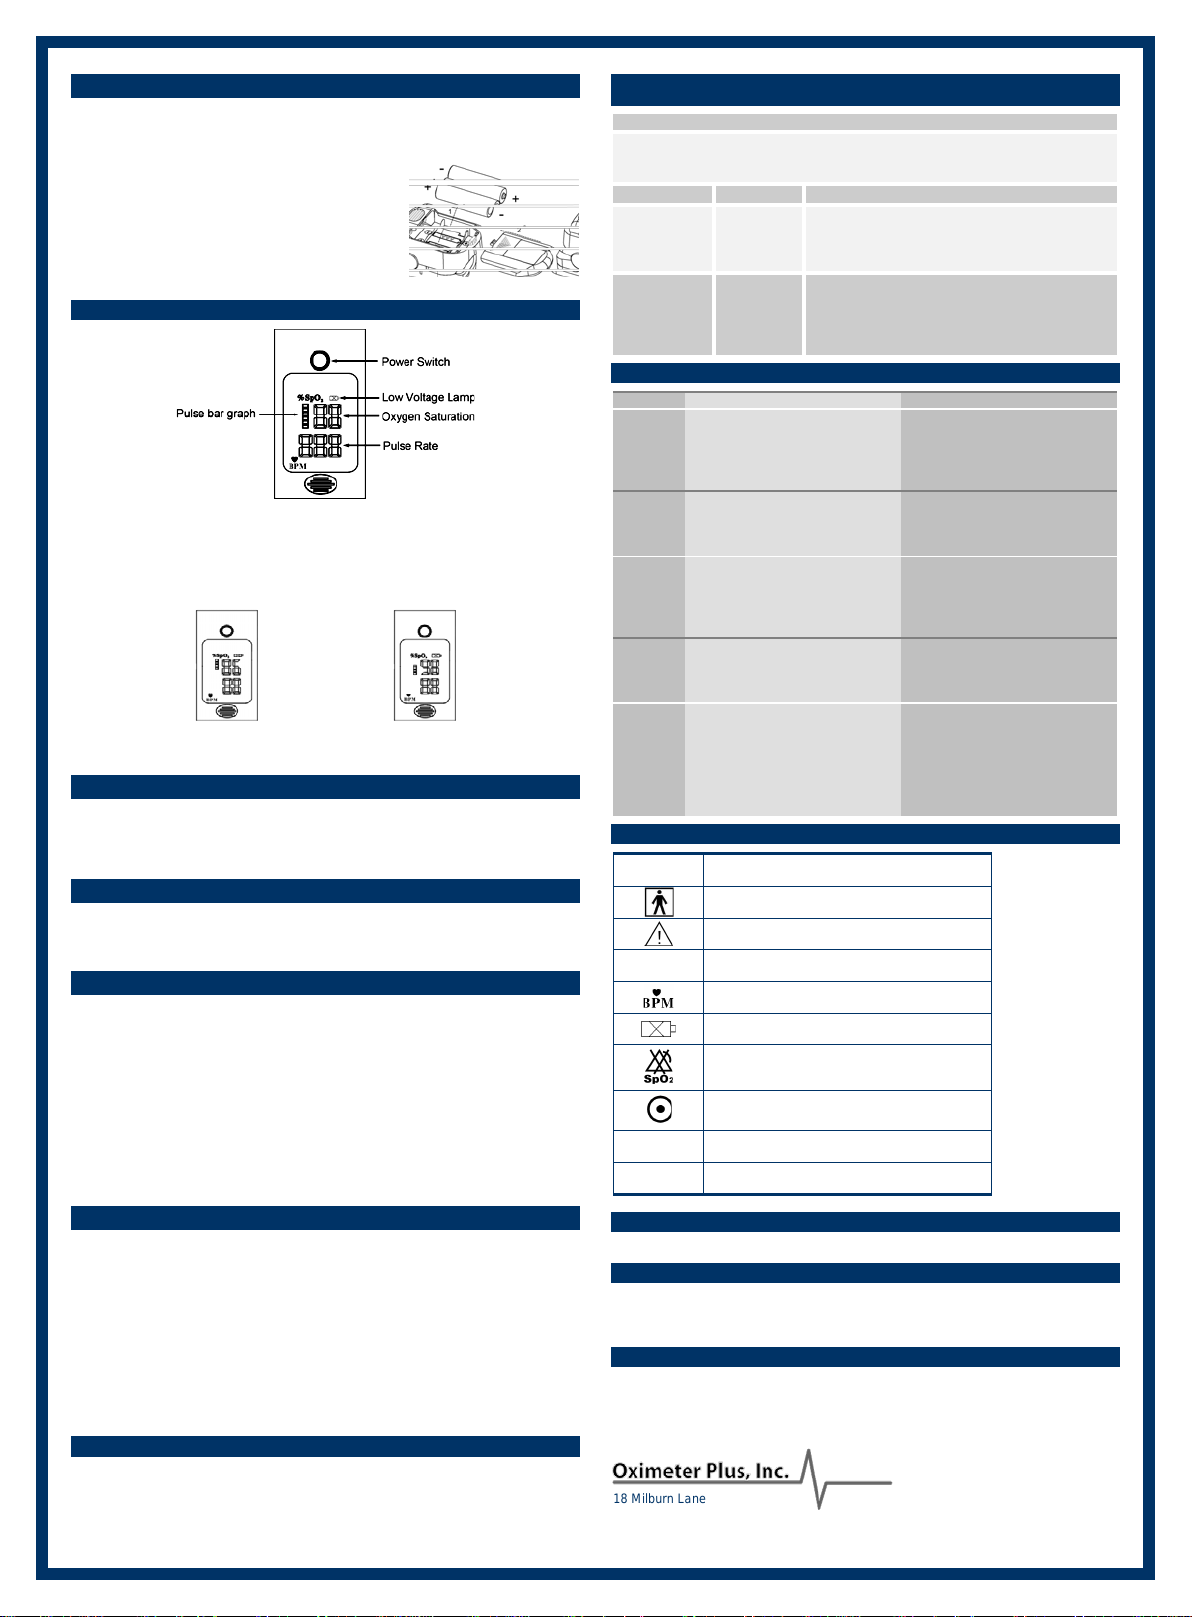
Operation Instructions
1. Installing two AAA batteries into battery cassette before closing its cover.
2. Open the clamp shown as in the picture below:
3. Put one of your fingers into rubber hole of the Oximeter (it is better to let your finger
touch the bottom.) before releasing the clamp
4. Press the switch button for one time on front panel.
5. Do not rock your finger when starting test. Recommend you do not move your body
at the same time.
6. Read correspondent data from display screen.
Declaration: Please use the medical alcohol to clean the rubber touching the finger
inside of Oximeter, and clean the test sensor using alcohol before and after operation.
(The rubber inside of the Oximeter is medical rubber, which has no toxin, and no harmful
to the skin of human being).
When you put finger into the Oximeter, your nail surface must be
upward.