Oxygen Wheel Chair Ready Type Chamber User manual

PO Box 2301, Naperville, IL 60540
USA
(630) 452-8431
SalesTeam@HyperbaricPro.com
www.HyperbaricPro.com
AIR
COMPRESSOR
AIR DEHUMIDIFIER

HYPERBARIC
Oxygen Chamber
Please read this manual to its entirety before using the system for the rst time. Keep this
manual handy for your reference. Please ensure that all items are removed from the box
before trowing the box away. Some customers have thrown away the protective padding
provided to protect the zipper when rolling the Wheelchair in and out of the chamber.

3
1. Foreword
2. Symbols
3. Safety Notice
4. Product Specications and Construction Chamber
Air Compressor
Oxygen Concentrator
Dehumidier
5. Product Assembly and Operation
6. Preparing before hyperbaric therapy
7. Maintenance and Cultivation
8. FAQ
9. Faults and Troubleshooting
10. Condition for Transportation and Storage
4
4
5
6
7
9
11
12
13
14
14
CONTENTS
Installation
Working Scheme
Accessories
Air Compressor and Oxygen Concentrator Connection
Frame Installation
Silencer and Oxygen Mask Installation
Dehumidier Installation
Water Drainer
Operation
Chamber maintenance and cleaning
Air Compressor Maintenance and Cleaning

4
1. FOREWORD
2. SYMBOLS
A NEW CONCEPT OF HEALTH AND BEAUTY.
Congratulations on your purchase of your Hyperbaric chamber from Oxygen Health Systems. Below you will find
instructions for installing and operating our Hyperbaric chamber with the Air Conditioning . We have also added links
to videos on some of our steps to provide additional insight into installation steps. Our support team is always available
to assist with any questions you might have during the installation process.
The following table is a list of symbols and definitions that used with the Hyperbaric Chamber.
MILD HYPERBARIC OXYGEN THERAPY.
Authorized
Representative In
The European
Community
HOT Surface
Do Not Touch
Allow to Cool Before
Servicing
Exhaust
Caution
Upward
Keep Dry
Date of
Manufacture
Refer to instruction
Manual / Booklet
Protective Earth
(Ground)
On
Type B Applied
Part
Manufacturer
CE Certication
Serial number
Mains fuse
Specication
Off
Intake
Warning
Air Deate Valve
Indicator Internal/
External
Correct Disposal of This Product
(Waste Electrical & Electronic
Equipment) Statement: Contact the
local authorities to determine the
proper method of disposal of
equipment and its part

3. SAFETY NOTICE
In order to ensure safety, please read the following precautions before use
WARNING
PROHIBIT THE USE UNDER THE FOLLOWING CONDITIONS
• Abnormal smell during use - Please turn off the power and pull out the plug.
• Please make sure the socket plug is fully inserted.
• Please do not disassemble the machine without permission from the supplier.
• This product needs to stay away from water and re and sharp objects.
• Children should only use under adult supervision with consent of a physician.
• Please do not touch any valves on the chamber while using.
• Please do not place heavy objects on the machine.
• Do not use if the wire is loose.
• Do not pull or twist the power cord.
• Hand wet do not touch the power plug and switch.
• Do not use it in a bathroom or other damp environment.
• 1. Pregnant women and people with severe infectious diseases and patients
• 2. Bad colds, Pneumothorax patients
• 3. Patients with severe emphysema
• 4. Hypertension exceeds 160 / 100ml
• 5. Severe heart problems
• 6. Severe COPD ( Mild COPD is OK)
Notice
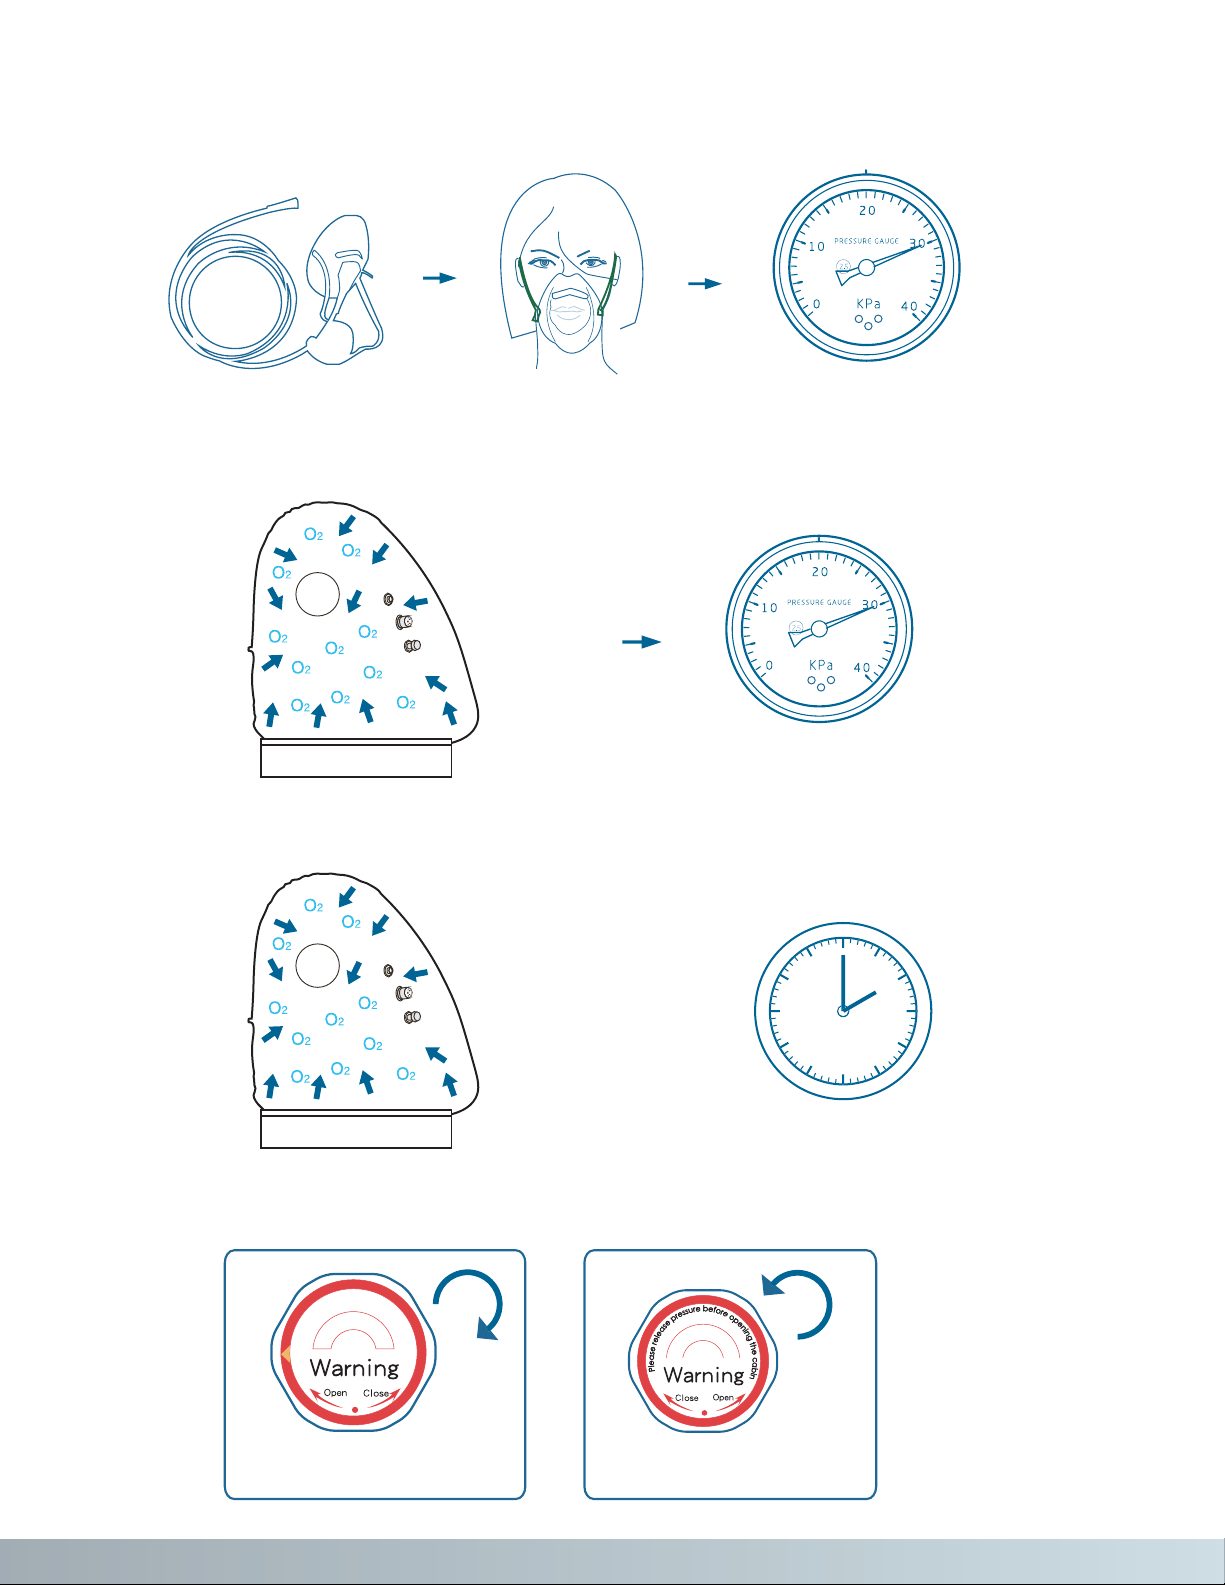
1. In the chamber, when the pressure is rising, the patients ears need to release pressure or they may experience
pain, just like the feeling of taking a plane up and down. This is normal. The following methods can be used to
alleviate pain and help balance pressure: A. Yawn; B. Chewing gum, C. Pinch nose and blow, D. Open the Air deate
valve to slow down ination if required. Once the pressure is stable at 30 KPa, This discomfort will gradually disappear.
2. Zippers can be opened only when the chamber has depressurized to 0 KPa.
Open the Valve Make sure that Pressure
Gauge Appears 0 KPa
After get out of the chamber, please turn off the power immediately after use, cleaning work in a timely manner.
P
l
e
a
s
e
r
e
l
e
a
s
e
p
r
e
s
s
u
r
e
b
e
f
o
r
e
p
u
l
l
i
n
g
t
h
e
z
i
p
p
e
r
s
Pull the Zippers
5

1. Cover
2. Oxygen Inlet Valve
3. Air Inlet Valve
4. Viewing Window
5. Anti-Roll Bolster
6. Zipper
7. Air Deate Valves
8. External Pressure Gauge
(BLUE --attach externally)
9. Internal Pressure Gauge
(BLACK --attach from inside)
10. Mufer / Silencer
11. Blank Port reserved for
future upgrades
12. Automatic Pressure Relief Valves
4. PRODUCT SPECIFICATIONS AND CONSTRUCTION
2. AIR COMPRESSOR
Voltage 110 / 220V
Air Flow 72 L / Minute
Power 400 W
Weight 18 KG
Model:
Size:(Chamber)
Size:(Door)
Pressure:
Weight:
140(L) * 100(H) * 160(W) cm
78(H) * 100(W) cm
1.3 ATA /4 PSI /30 Kilo Pascal
13 Kg
Wheel Chair Ready Type Chamber
1. CHAMBER
10
3
2
4
987
4
6
5
1
12
11
6

5. PRODUCT ASSEMBLY AND OPERATION
4. Dehumidier
Voltage 110/220V
Capability 150 L / Minute
Pressure 0.8mPa
Power 300 Watt
Weight 5kg / 12 LPS
Working Scheme
Installation
1. Please open the accessory box before installation accessories
7

2. Start the installation of the frame per the videos provided.
If two people are present for installation, have one person hold the chamber Bag Up
while installing the Frame.
Some users may wish to inflate the chamber whole installing the frame.
Install the end pieces first and then the horizontal pieces.
Note: Please install internal and external pressure gauges before use (the internal pressure gauge should
be installed inside the chamber, external pressure gauge should be installed outside the chamber)
3. Connect the air tube on the air compressor to the air inlet valve of the chamber.
Install internal & external pressure gauges.
4. Install mufer / silencer to the
compressor air inlet valve inside
the chamber.
External
Pressure Gauge
(0 - 40 Pa)
Internal
Pressure Gauge
( -40 - 0 Pa)
Mufer
/ Silencer
Oxygen
Mask
8

5. From the Exterior, Connect the Tubes with Air Compressor (Image 5.a), dehumidier and Chamber
as in the diagram below. Please connect air tubes from Air Compressor to the wet Air In Port of
Dehumidier and Connect air tubes from Chamber to the Dry Air Out port of Dehumidier.
There is water drainer on one side of the Dehumidier. Unscrew (Image 5.b) the black valve to drain
the Water when the drainer is full of water per the diagram on the right.
WET AIR IN
DRY AIR OUT
(Image 5.a) (Image 5.b)
5. PRODUCT ASSEMBLY AND OPERATION
Operation
1. Switch on the machines and adjust the oxygen generator 1 LPM below the maximum setting.
2. Get into the chamber and pull outside zippers and then the inside zippers closed and (make sure
to atten out the silicone strip between the zippers)
2A. Close the air deate valve
Zippers and Air Deate Valve can be operated both inside and outside the chamber.
or
Pull the inside and
outside zippers
Close the internal
pressure relief valve
anti-clockwise
Close the external
pressure relief valve
clockwise
P
l
e
a
s
e
r
e
l
e
a
s
e
p
r
e
s
s
u
r
e
b
e
f
o
r
e
p
u
l
l
i
n
g
t
h
e
z
i
p
p
e
r
s
ATTENTION: During Operation, once the Hyperbaric Chamber reaches its optimal pressure, per
design excess pressure is released outside the chamber. Hence, any pressure release sound through
the valves while in use is normal.
ON/OFF
ON/OFF
9

3. Sit down and wear oxygen headset or mask.
4. In about 10 mins, the chamber pressure gauge will slowly rise up to 30 KPa, at this time the
automatic pressure release valve will exhaust air automatically and stablize the pressure betwen
30 KPa and 32 KPa
5. It is recommended to use 40-80 mins per session.
(Pressure gauge error tolerance 3 KPa)
40-80mins
6. After use, please open the Air Deate Valve to reduce pressure rst.
open the external air deate
valve anti-clockwise
or
Open the internal air deate
valve clockwise
P
l
e
a
s
e
r
e
l
e
a
s
e
p
r
e
s
s
u
r
e
b
e
f
o
r
e
p
u
l
l
i
n
g
t
h
e
z
i
p
p
e
r
s
10

8. When the pressure gauge shows 0 KPa, open the zippers and get out of the chamber
9. After getting out of the chamber, turn off the air compressor and Dehumidifier.
6. PREPARING BEFORE HYPERBARIC THERAPY
When using for the rst time, Insure that the bubble wrap covering is removed from the Air deate
valve both internally and externally. Please test the empty chamber rst and observe whether the
equipment is operating normally. If the equipment is running abnormally, please do not use it.
Please contact your dealer promptly.
When you need to get out of the chamber, wait until the pressure gauge shows 0 KPa before you
open the inner and outer zippers. Do not force the zipper to open during use or when pressure relief
is not completed.
In the event of an emergency or if the air deate valve fails to operate properly, push the emergency
relief valve from inside the chamber to relieve pressure. When the pressure is 0, pull the zipper and
get out of chamber.
When you use the device for the rst time, if there is slight discomfort or pain in your ears. This is a
normal phenomenon caused by pressure increase. You can improve your discomfort by yawning,
chewing or swallowing. You can also slow pressurization by slightly opening the pressure relief valve
to adapt to the pressure more gradually. After several uses, this phenomenon will gradually disappear.
People may go to the chamber fully clothed, wear the loose, comfortable clothes.
Ladies should remove long socks(silk stocking) before entering into the chamber. Please take off shoes
before getting in the chamber.
Shoes, jewelry, or any sharp objects that could damage the chamber should always be removed.
Disposable feet and hair covers may be used for increased sanitation.
To make the therapy experience more pleasant, the person should get as comfortable as possible, that
means taking care of restroom breaks and/or drinking water before getting into the chamber.
The user should be advised to relax and breathe normally.
Breathe normally during the therapy. The air inside the chamber will be continually exchanged and people
should have no difculty breathing.
1. Clothing
or
External pressure gauge Internal pressure gauge
11
ON/OFF
ON/OFF

7. MAINTENANCE
During the pressurization if users feel pain in the ears. This is due to the persons not relieving the
pressure in the ears through one of the methods outlined below and thus tympanic membrane may
experience temporary soreness or tingling. The customer should slow or stop pressurization by
opening the pressure deate valve and then work on yawning or create a chewing gum motion or even
swallowing to adapt to the pressure change. Remember that the pressure relief valve is your best
friend in this instance and don't be afraid to open it to stop or slow pressurization. Users should be
able to rebalance or clear their ears every 7 to 10 KPa. If this is not occurring then approach pressurization
more slowly my only slightly opening the pressure deate valve. Once the pressure has reached its
maximum value for your chamber, the user start will feel normal after 10 more minutes as the pressure
has stabilized .
When a session is nished, unscrew the air deate valve slowly to depressurize the chamber, the
pressure will drop slowly from 30 KPa to 0 KPa, this depressurization process should be more than
5 minutes .
If the pressure is released too fast, people might feel pain in the ear and there is risk of decompression
sickness. When the pressure gauges appear 0 KPa, zippers can be opened and the user can exit the
chamber.
2. Chamber Pressurization
The person may communicate with the outside attendant, more clearly when the attendant is standing
by and looking into the chamber window.
A two-way communication system such as a walkie talkie may also be used during chamber operation.
3. Communication
1. Chamber maintenance and cleaning
Clean the chamber with either a solution of 70% Alcohol or HOCL water diluted. Blow a fan to air dry prior to next
session of zip the unit up and run the compressor for 15 minutes.
Use disposable non-woven sheet cover on the mattress and pillow.
It is recommended to replace the activated carbon every 6 months to 12 months.
2. Air compressor maintenance and cleaning
12

8. FAQ
13
1. What should I do to prepare for a
treatment?
People can go into the chamber fully clothed. It is
recommended to wear loose comfortable clothes. Shoes,
jewelry, or any sharp objects should be removed before
getting into the chamber. It is recommended that women
not wear stockings in the chamber, for additional comfort.
6. Are there any side effects?
The most common side effect is discomfort to the ears
caused by pressure changes. To minimize the risk,
users learn to promote the adequate clearing of ears
during pressurization. Some users may feel tired
and dizzy after using hyperbaric chamber for the rst
time. Hyperbaric Oxygen Therapy does speed up the
metabolism of our body. This can be an indication that
detoxication is occurring.
7. Are there any contraindications for
Hyperbaric Oxygen Therapy?
If a user has severe lung damage or severe COPD
he/she should not be in a Hyperbaric chamber.
Pregnant women are not recommended to be in a
Hyperbaric chamber.
Customers with Pacemakers and Customers who are
susceptible to seizures should have seizures under
control and be closely monitored.
View the following link for more information
https://rebrand.ly/Contradictions
There are other contradictions to Hyperbaric Oxygen
Therapy.
Please consult with your physician for a more
complete list of Contradictions.
8. How can I learn about the HBOT?
The most comprehensive book about HBOT is The
Oxygen Revolution by Paul Harch, M.D. This book is
geared toward consumers who would like to learn more
about how HBOT works and what conditions it treats. The
book explores the science behind HBOT, as well as case
histories of patients who have beneted from HBOT.
2. How will the HBOT treatment feel?
The chamber will be lled with compressed air. Once the
chamber has expanded to its lled size, it will start to
pressurize. While the chamber is pressurizing, your ears
will feel the change in pressure inside the chamber.
Otherwise it should be unnoticeable. To equalize the
pressure and avoid the feeling of fullness in your ears,
you will need to clear your ears by chewing (gum or food),
etc. swallowing, yawning; During the pressurization of the
chamber, your mouth may become dry. Once the
chamber is fully pressurized, your salivation will return to
normal. Additionally, the chamber may become slightly
warm while it is pressurizing. Once it reaches full pressure,
the relief valves will begin to pull the warmer air out of the
chamber. Then you can enjoy the session, meditate, read,
watch movie, listen to music, etc.
3. How long is the treatment?
Treatment times are usually 1-2 hours per session, 5-7
times per week.
4. Is Hyperbaric good for the Elderly?
Most denitely. Hyperbaric is great for those in their later
years. Hyperbaric provides an immeasurable boost which
counteracts the signs of aging. In fact, new research
indicates that hyperbaric oxygenation promotes cell life.
5. Is Hyperbaric good for Children?
Yes, hyperbaric yields positive results with children.
In fact, research with children suffering from brain-injuries
and ADHD have shown positive results and great promise.
We recommend that children under the age of 16 need to
be accompanied by an adult inside the chamber. Children
should always be monitored inside a chamber.
9. Prohibit the use under the following
conditions: Please note the following
contraindications and drug interactions to
mild Hyperbaric Oxygen Therapy:
10. If you are currently taking any of the
following medications, then hyperbaric
oxygen therapy should be avoided::
• Pregnant women and people with severe infectious
diseases.
• Patients with severe emphysema.
• Hypertension exceeds 160 / 100ml.
• Severe heart problems or Pacemaker.
• Congenital Spherocytosis.
• Severe COPD/Emphysema with air trapping.
• Untreated Pneumothorax.
• Bad Colds or Upper Respiratory Infections—URIs can
make it difcult for the patient to clear his/her ears, which
can result in inammation of sinuses, or sinus squeeze.
• Cisplatin—a chemotherapy agent.
• Disulram (Antabuse®)—an oral tablet used to treat
chronic alcoholism.
• Doxorubicin (Adriamycin®)—a chemotherapy agent.
• Mafenide Acetate (Sulfamylon®)—a topical cream used
to prevent and treat bacterial or fungal infections.

9. FAULTS AND TROUBLESHOOTING
10.CONDITION FOR TRANSPORTATION AND STORAGE
If your chamber fails to operate properly, please refer to the troubleshooting chart on the following pages for possible
causes and solutions. If the problems still can’t be solved, please contact your euipment provider.
Environment temperature scale : 10 °C to 40 °C
Comparative humidity scale : 30%-85%
Air pressure scale : 700hPa-1060hPa
14
Chamber pressurization very
slow
1. Air compressor joint or air inlet joint
quick connect may be loose.
2. Air lters full of dusts.
3. Air inlet on the air compressor is
clogged, The Air intake is no clear.
4. Air deate valve is loose.
5. Tubing may not be fully inserted.
1. Didn’t close the zippers.
2. Didn’t close the air deate valve or
didn’t close it fully.
3. Air tube is leaking air at one of the
joints.
4. The blue silicon sealing strip
between inside and outside zippers
is not at.
1. Air lter is clogged.
2. Air inlet on the air compressor is
clogged, no smooth intake.
3. Air compressor screws loose.
4. Internal parts loose.
1. Air tube is leaking at the joint.
2. Didn’t close the air deate valve or
didn’t tighten up.
3. Did not close one of the Zippers
completely.
1. Place your hand over all joints
to feel for an air leak.
2. Reinsert tubing if the connector
is leaking.
3. Replace new lters or clean the
dusts on the lters.
4. Clean the air inlet part of the air
compressor.
5. Tighten up the air deate valve.
1. Depressurize the chamber rst,
then, close the zippers and restart
2. Make sure no particles in
the valve holes, then close the
valve and tighten it up.
3. Stick the air tube in the connector.
4. Make the blue ap between
zippers is at.
1. Make sure there are no cracks
or Replace the lters.
2. Clean the air inlet part of the air
compressor.
3. Tighten up the screws on air
compressor.
4. Check for looses screws in the
air compressor
1. Find out the leakage source,
reinsert the air tube in the
connector.
2. Close the pressure deate valve
fully.
3. Close all zippers fully.
Pressure does not go to or hold
at proper KPa
Noisy sound or intense vibration
of air compressor
Chamber does not inate at all.
TROUBLE CAUSES SOLUTION

To help you choose the right
Hyperbaric Chamber that fits your needs.
One of our hyperbaric specialists will assist you.
Please Call 630 451-8821

This page intentionally left blank.
Table of contents