OYPLA Home 4716-4727 User manual

Page 1
Manual Version: V1.0
Model Code: 4716, 4717, 4718, 4719, 4720, 4721, 4722, 4723, 4724, 4725, 4726, 4727
Oypla.com LLP / www.oypla.com
User Manual
Model Code:
4716-4727
PVC Venetian Blind
Contents
1 Front Cover
2 Safety
Instructions
3 Assembly
Instructions
7 Operating
Instructions
7 Back Cover
*COLOUR MAY VARY

Page 2
Manual Version: V1.0
Model Code: 4716, 4717, 4718, 4719, 4720, 4721, 4722, 4723, 4724, 4725, 4726, 4727
Oypla.com LLP / www.oypla.com
Safety Instructions
Notice: Ensure you read and fully understand instructions before use
While every attempt is made to ensure the highest degree of protection in all equipment, we cannot
guarantee freedom from injury. The user assumes all risk of injury due to use. All merchandise is sold
on this condition, which no representative of the company can waive or change.
-Read these instructions carefully and familiarise yourself with the procedure before
assembling the unit. Keep these instructions for future use.
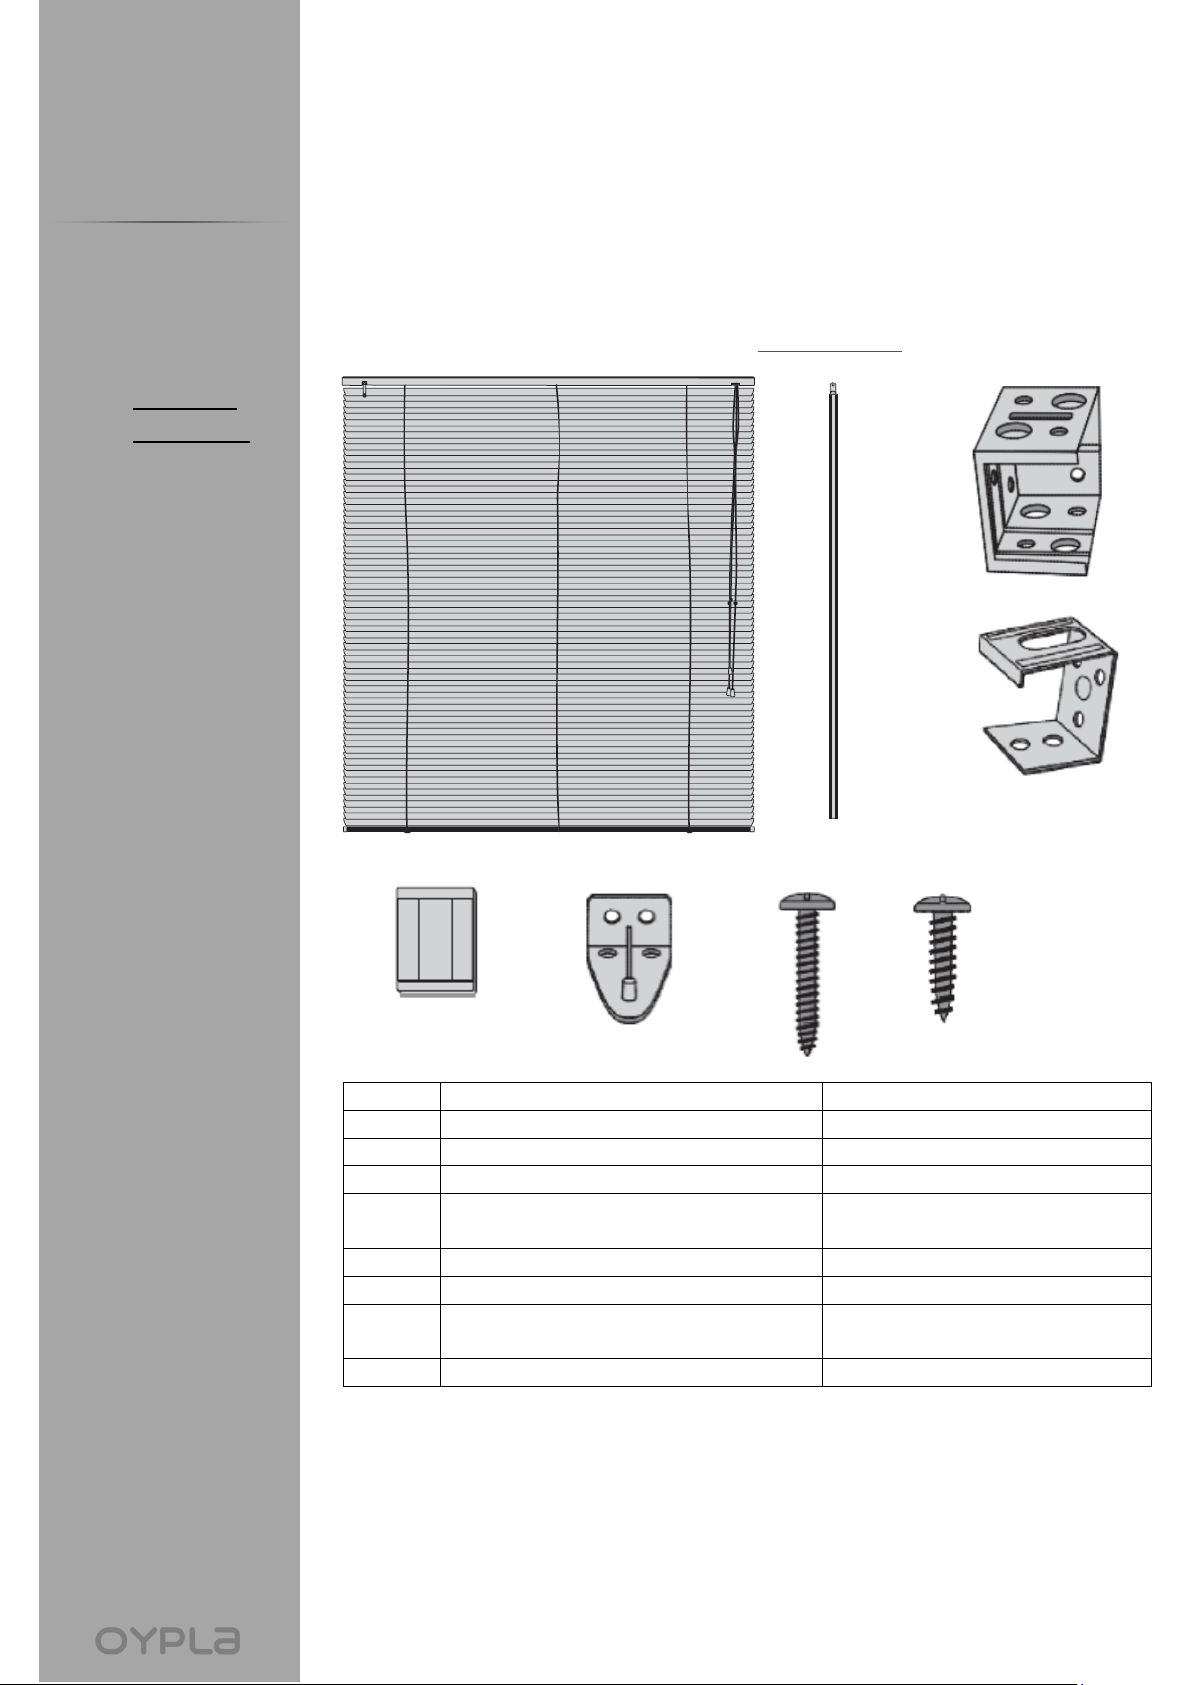
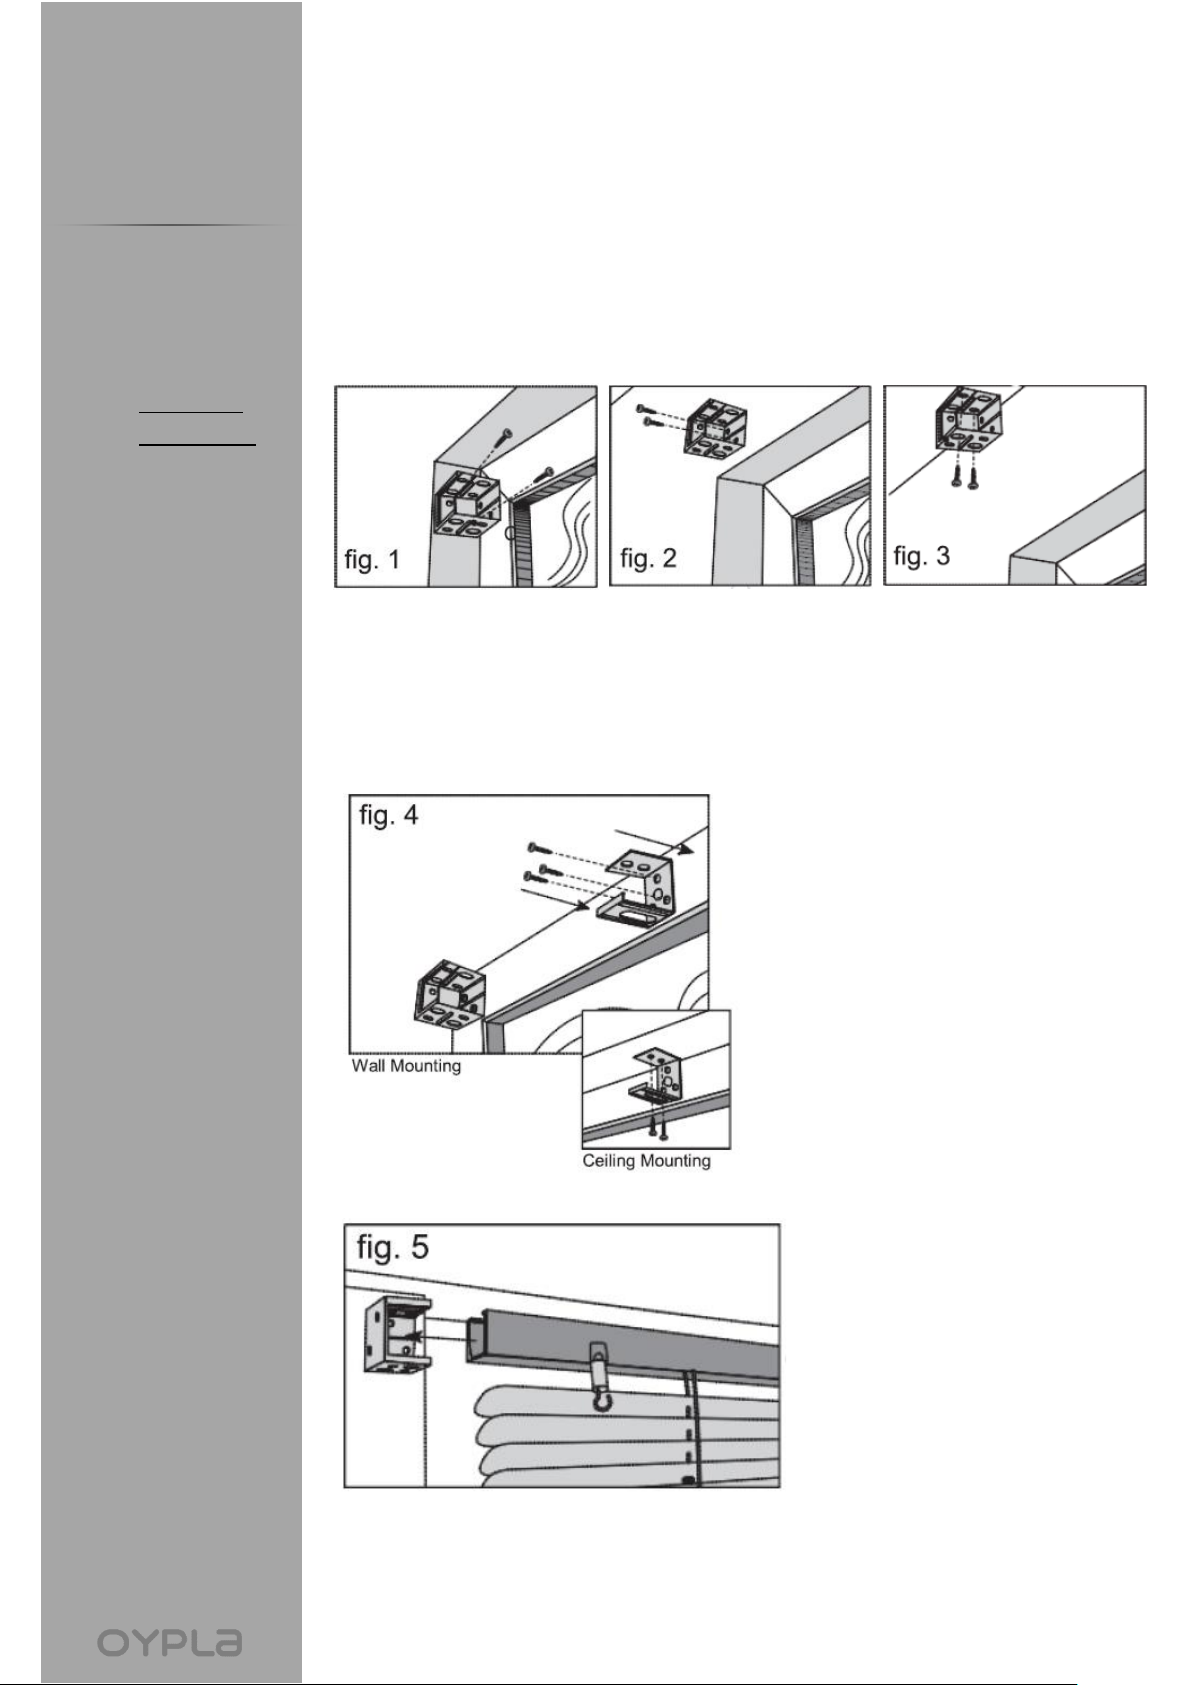
-Check that you have all the component parts following the list above and familiarise
yourself with each part before proceeding.
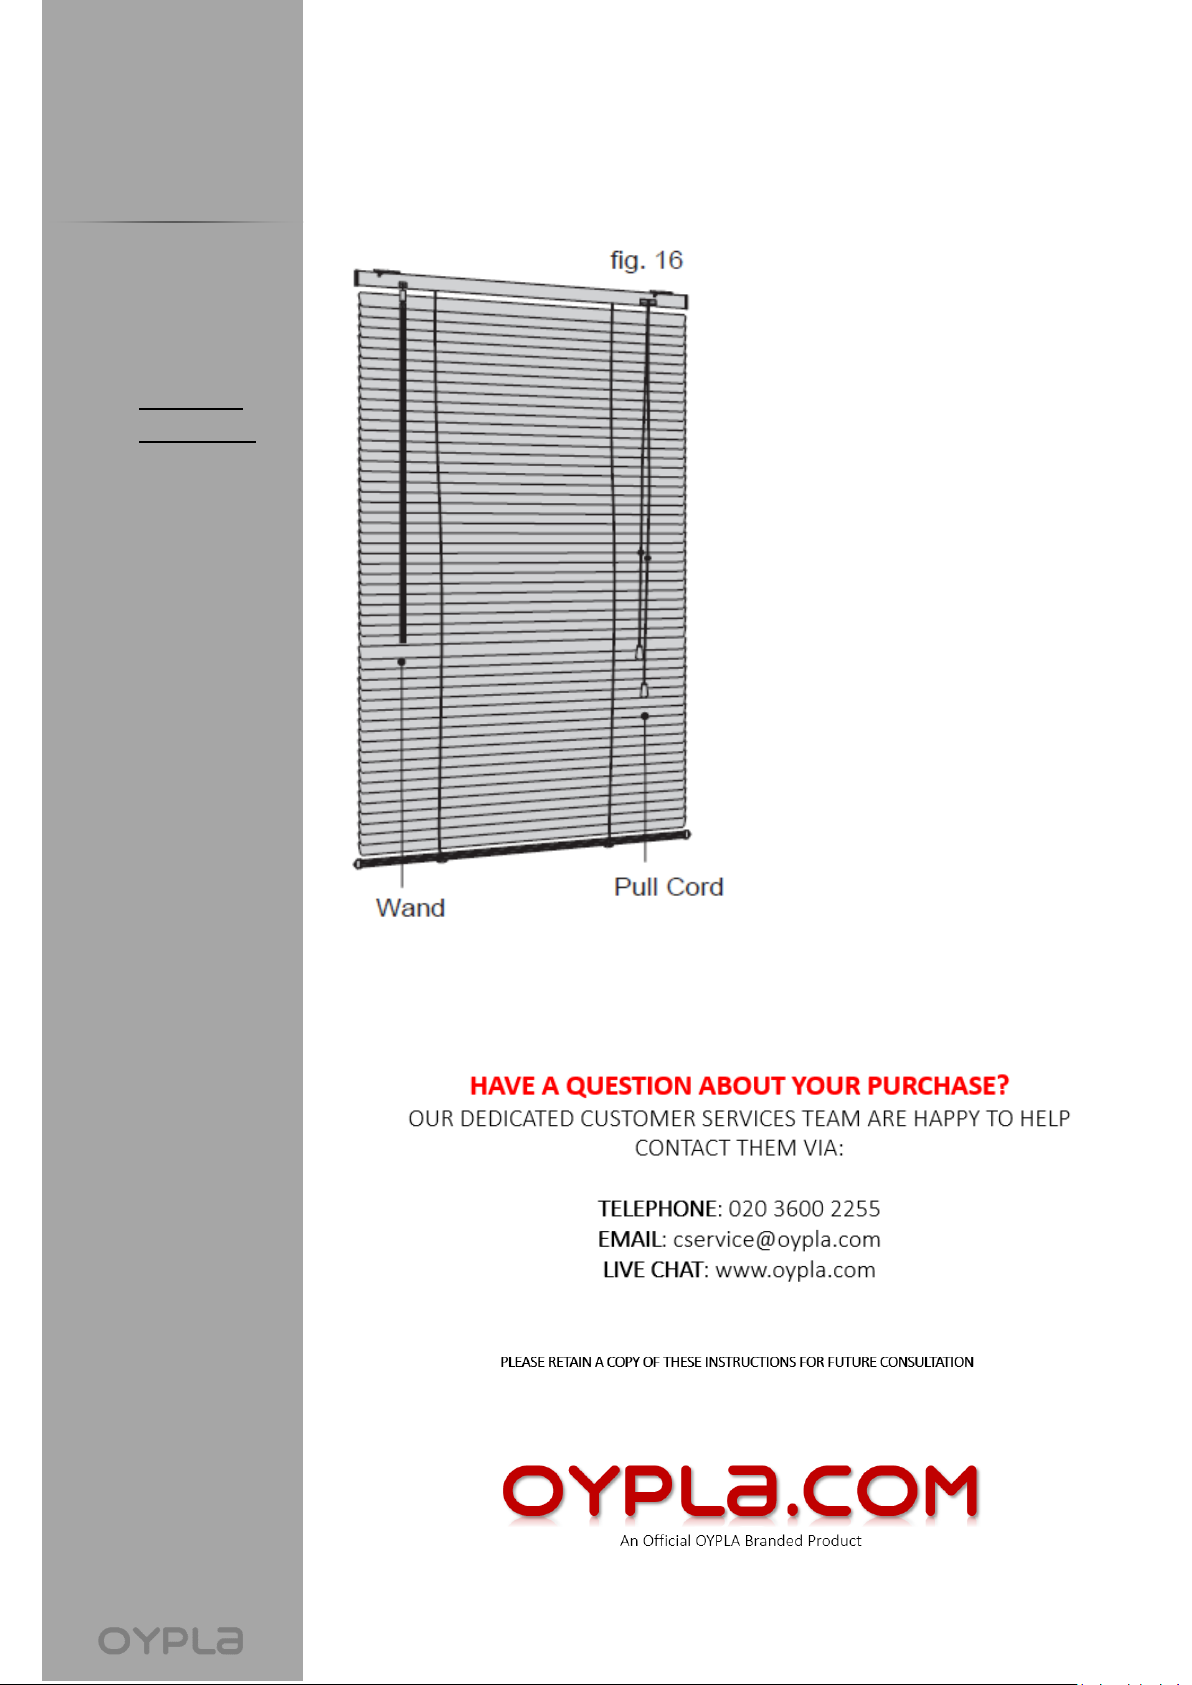
-Young children can be strangled by loops in pull-cords, chains and tapes, and cords that
operate the product. To avoid strangulation and entanglement, keep cords out of the
reach of young children.
-Do not tie cords together. Make sure cords do not twist and create a loop.
-Head rails of internal blinds with pull cords shall not be installed less than 1.5m from
the floor
-Move beds, cots and furniture away from window covering cords.
-Make sure all fastenings are tightly in place before using this product. This should be
checked periodically by an adult.
-Take care when operating the manual release with the internal blind retracted since it
may fall rapidly.
-This product is intended for indoor use only.
-This product is not a toy, and is only to be used for its designated purpose.#
-This product contains small parts that could be a choking hazard if swallowed. Keep
these items away from children.
-Do not discard any of the packaging until you have checked that you have all of the
parts and fittings required.
-Use the correct fixings as indicated. Do not overtighten any fixings.
-Keep product away from fire.
-Clean only using a damp cloth. Do not use strong industrial cleaning substances, as
these may damage the product.
-Before drilling holes in any walls or surfaces, ensure to check there are no hidden pipes
or cables.
-If the product is damaged or has any defects, please contact cservic[email protected]
Contents
1 Front Cover
2 Safety
Instructions
3 Assembly
Instructions
7 Operating
Instructions
7 Back Cover

Page 3
Manual Version: V1.0
Model Code: 4716, 4717, 4718, 4719, 4720, 4721, 4722, 4723, 4724, 4725, 4726, 4727
Oypla.com LLP / www.oypla.com
Part
Description
Quantity
A
Blind
1
B
Wand
1
C
Bracket
2
D
Central Support
60/80cm Model: 0pcs, 100/120cm
Model: 1pc
E
Bracket Face
2
F
Hold Down Bracket
2
G
Long Screw
60/80cm Model: 6pcs, 100/120cm
Model: 9pcs
H
Short Screw
4
Contents
1 Front Cover
2 Safety
Instructions
3 Assembly
Instructions
7 Operating
Instructions
7 Back Cover
Assembly Instructions
Parts List:
If you are missing any of the below parts, please contact cservice@oypla.com
A
B
C
D
E
F
G
H

Page 4
Manual Version: V1.0
Model Code: 4716, 4717, 4718, 4719, 4720, 4721, 4722, 4723, 4724, 4725, 4726, 4727
Oypla.com LLP / www.oypla.com
Contents
1 Front Cover
2 Safety
Instructions
3 Assembly
Instructions
7 Operating
Instructions
7 Back Cover
1. The blind can be positioned:
-Inside Mounting (fit to the inside of the window frame) (fig. 1)
-Outside Mounting (fit to the outside of the window frame) (fig. 2)
-Ceiling Mounting (fit to the ceiling above the window frame) (fig. 3)
2. To install Central Support –60/80cm Models Only
Using a long screw, fix the central support. The side with 2 screw holes should
face towards the ceiling. The side with 3 screw holes should face the wall. Ensure
the location allows the blind to sit horizontally when fitted or parallel to the
window when fitted on the ceiling. See figure 4.
3. Place the Blind (A) into the Bracket (C). See figure 5.

Page 5
Manual Version: V1.0
Model Code: 4716, 4717, 4718, 4719, 4720, 4721, 4722, 4723, 4724, 4725, 4726, 4727
Oypla.com LLP / www.oypla.com
Contents
1 Front Cover
2 Safety
Instructions
3 Assembly
Instructions
7 Operating
Instructions
7 Back Cover
4. Slide the Bracket Face Plate (E) into the Bracket (C). See figure 6.
5. Affix the Wand (B) onto the Blind (A). See figure 7.
6. Using the Short Screws (H) provided, affix the Hold Down Brackets (F)
The hole on the end of the bottom rail fits into the Hold Down Bracket at
the end of the window. See figures 8 and 9.

Page 6
Manual Version: V1.0
Model Code: 4716, 4717, 4718, 4719, 4720, 4721, 4722, 4723, 4724, 4725, 4726, 4727
Oypla.com LLP / www.oypla.com
Contents
1 Front Cover
2 Safety
Instructions
3 Assembly
Instructions
7 Operating
Instructions
7 Back Cover
Shortening the Blind
Note: Before fitting, you can custom-fit the blind to the correct height. *Use
figures 11 to 14 to help you through this process.
1) Height –when the blind is fully lowered, there should be no slats
overlapping at the bottom of the blind. If overlapping occurs, you can
remove slats to allow a custom fit.
2) Hold the blind at the desired location and allow it to fully lower. In the
open position, the slats should be approximately 2cm apart.
3) Lay the blind on a flat surface and remove the caps on the bottom end
slat. The caps are attached to the lift cords.
4) Cut lift cord 2cm above the cap and remove. Pull the lift cord from these
slats to allow them to slide out of the ladder rung.
5) Count the number of slats you wish to remove. Pull the lift cord from
these slats to allow them to slide out of the ladder rung.
6) Remember to allow for the bottom end slat to be reinserted. Reinsert the
lift cord through the cap holes and then insert back through the top and
the caps.

Page 7
Manual Version: V1.0
Model Code: 4716, 4717, 4718, 4719, 4720, 4721, 4722, 4723, 4724, 4725, 4726, 4727
Oypla.com LLP / www.oypla.com
Operating Instructions
Imported by Oypla.com LLP, Uxbridge, UB8 2FX
Contents
1 Front Cover
2 Safety
Instructions
3 Assembly
Instructions
7 Operating
Instructions
7 Back Cover
Lowering: Hold cord at eye level, and
push to the left pulling down gently –
until the cord lock releases. Allow the
cord to slip through fingers until blind
reaches desired level. Move pull cord to
the right and the blind will lock into place.
Raising: Pull cord downward until blind
reaches desired height, release cord, and
the blind should lock into place.
Tilting: Rotate the Wand on the left side
of the blind to attain the desired slat
position.
*Note: Always tilt blind horizontally
before raising or lowering the blind.
Table of contents
Popular Window Blind manuals by other brands

Coolaroo
Coolaroo EASY RELEASE Assembly & operating instructions

YewdaleDefiant
YewdaleDefiant C44-90 instructions

Creation Baumann
Creation Baumann PLITRIC PLE 30 Assembly instruction

Dometic
Dometic SKYVENETIAN Fitting & operating instructions

REMIS
REMIS REMIFLAIR IV Assembly instructions

LuxaFlex
LuxaFlex LUMINETTE Product information manual