P.I.T. PSB13-C5 User manual

PSB13-C5

GENERAL SAFETY PRECAUTIONS
1. Always keep the workplace clean. Contaminated workplace and workbenches increase the risk of accidents.
2. Follow the operation manual carefully. Do not use the tool when it rains. Also do not use the tool in damp
locations. The workplace should be well-lit. Do not use the tool near flammable liquids or gas. During operation, as
well as power on and power off, the tool generates sparks. Therefore, never use the tool in places where there are
varnishes, paints, gasoline, dissolvers, gas, adhesives and other flammable and explosive materials.
3. To prevent electric shock during operation, make sure that the drill case is not in contact with grounded objects,
for example, when laying pipes, when installing heating batteries, plates, refrigerators, etc.
4. Keep children away from the electric tool while it is operating. Keep unauthorized persons away from the electric
tool and power extender.
5. Store the tool in a dry and lockable place so that it does not fall into the hands of children or unauthorized
persons.
6. Use the tool without pressure and applying force. The drill will work better and more reliably if you use the
recommended speeds by the operation manual.
7. Use only those types of tools that directly comply with the requirements of this type of work. For jobs requiring a
high power tool, you cannot use a tool with a lower power. It is recommended to use tools suitable for the applica-
tion purposes, for example, do not use a circular saw in order to saw down knots or trees.
8. During work, wear comfortable and suitable clothing. Do not also wear jewelry during operation. Loose parts of
clothing or jewelry can be tightened by moving parts of the tool. During work on the street, rubber gloves and
comfortable shoes with lug sole should be worn on so that the sole does not slip.
9. If a large amount of dust forms during operation, wear safety goggles and an anti-powder mask.
10. Handle the cable with care. When unplugging, do not pull the cable. Do not leave the cable in the heat, on the
oil surface or on the surface with sharp edges.
11. Secure the workpiece securely. Use clamps and jaw vices if possible to secure the part. This is more reliable
than holding the part.
12. Do not tilt the tool too much. Always maintain a stable position and a good balance.
13. Watch closely for the tool conditions. For better and more reliable use, they must always be sharp and clean.
Follow the operation manual for lubricating and replacing the accessories. Regularly check the tool cable condition
and, if damaged, return it to the technical service centers for repairs. From time to time, check the power extender
and replace it if damaged. Keep handles in a dry, clean place; do not allow oil and grease to enter the handles.
14. Disconnect tool from the mains, when not in use, and do not power on them during servicing or replacing
accessories, such as a circular saw blade, drill bit, blade, etc.
15. Always check before power on the tool that the adjusting wrench and the wrench are removed.
16. Avoid involuntary power on the tool. Do not hold the connected tool by the switch. Before attaching, make sure
that the tool is disconnected.
17. When working outdoors, use an appropriate power extender. Use only a power extender fits the wire cross-sec-
tion.
18. Always keep the work process under control. Do not use tool if you are tired.
19. Inspect damaged parts carefully. Before further use of the tool, carefully check that the tool functions properly
and if all the prescribed functions are performed by the tool. Also check the installation and fastening of moving
parts, watch for parts breakage and other conditions that can adversely affect the operation of the tool. Damaged
parts and protective equipment must be exchanged only in technical service centers. Defective switches are also
exchanged in these centers. Do not use the tool if it cannot be powered on or off by the switch.
20. Use electric tools only for the purpose intended in the operation manual.
21. Using of the accessory components that are not listed in the operation manual or in the catalog may cause the
tool damage.
22. Repair the tool only in special technical service centers. The manufacturer is not liable for damage or damage
caused to the tool as a result of repair by persons who do not have special authority for this or as a result of
careless handling of the tool.
23. In order to ensure the production integrity of the tool, never remove the built-in cases or bolts.
24. Do not touch the moving parts and accessories if the tool is not powered off.
25. Use a tool with low power consumption as indicated on the type plate of the tool, otherwise, due to overload,
the quality of the surface to be treated, and consequently the efficiency, can be significantly reduced.
26. Do not wipe the plastic parts with solvent. Solvents such as gasoline, solvent, carbon tetrachloride, alcohol,
ammonia and oil can damage the plastic material or cause cracks. When cleaning plastic parts, use soapy water
and a wash-cloth.
27. Use only original replacement parts.
28. A detailed diagram of the elements in the operation manual is provided only for technical service centers.
1
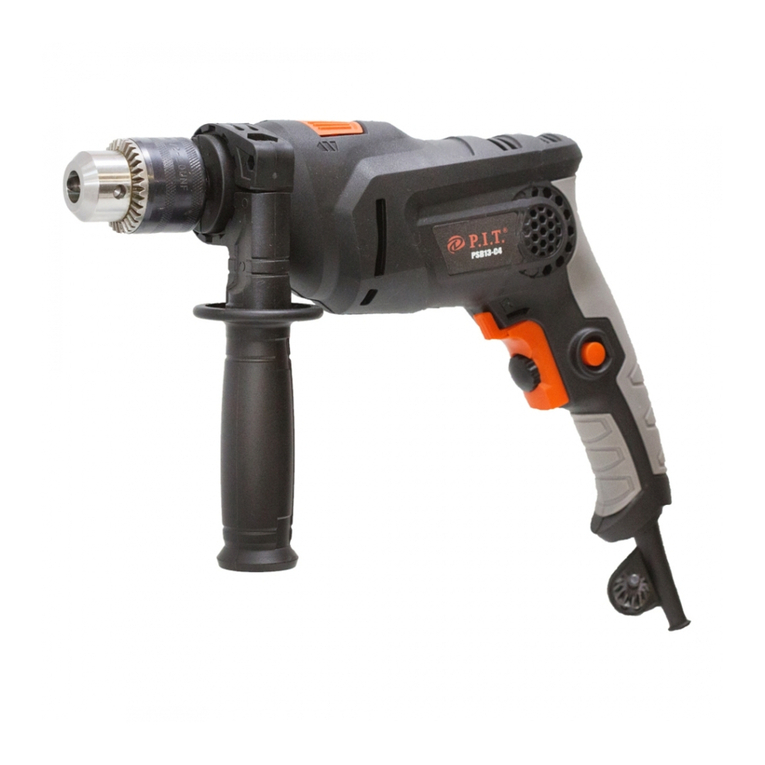
impact drill

EXPLANATION OF P.I.T. TRADEMARK
P.I.T. Progressive Innovational Technology
Currently, 10 kinds of mechanical and electrical equipment are produced under the P.I.T. trademark. In terms of
sales, impact drills occupy one of the leading positions.
Each letter and number in the designation of the model of P.I.T impact drills has the meaning.
For example, PBS13-C5
P-Trademark of P.I.T.
SB- impact drill
13 - diameter of the chuck
C5- modification series
INTENDED USE
The impact drill has a universal purpose for operation with various materials: as with concrete and stone, and
with metal, wood, plastic, etc. Such an option is provided by the function of a disabled impact, without which it
would be problematic to operate with materials such as concrete or brick.
The tool is used only for drilling bores and operates in two modes: drilling without impact and drilling with impact.
PRINCIPLE OF OPERATION
The impact drill from the drive mechanism transfers reciprocating impact forces to the drill bit, which performs
rotational motion and produces impacts simultaneously. The impact mechanism of the drill is of two types: gear
and ball type.
The toothed gear mechanism consists of a moving and a fixed disk. The moving disk is connected to the main
shaft via a gear wheel. The fixed disc is attached inside the aluminum socket. During operation, back-blow is
achieved by clutching the upper and lower teeth. A drill made from diamond substitute performs rotational and
percussive movements, which allows drilling bores in bricks, blocks, concrete and other brittle-acting materials.
When the functional key is released, the upper and lower teeth do not clutch, thereby not producing impacts. In
this case, the tool can be used as an ordinary drill.
SPECIFICATIONS
FUNCTIONAL CAPABILITIES AND FEATURES
Functional Capabilities:
With the help of the impact drill, drilling bores in a brick, concrete, stone is also suitable for drilling metal, plastic,
wood and other similar materials.
The impact drill is equipped with an electronic speed controller, a function of changing the direction of the drilling
rotation. The tool has a microswitch of rotation speed from 0 to 3000 rpm, as well as a mechanism for monitoring
the rotation direction for unscrewing and screwing of screws and for thread forming.
Features:
1. High power of the electromotor.
2. Timely implementation of the fan heat dissipation generated by the motor during operation, thereby achieving
a high cooling effect of the tool.
2
PSB13 - C5
Rated voltage 220 V
Rated frequency 50 Hz
Chuck 13 mm
Drill bit diameter 1.5 - 13 mm
No-load speed 0-3000rpm
Rated output capacity 950 W
Weight 2.4 kg.
impact drill

3. The output shaft gear wheels are made of high quality metal and have passed innovation technology of the
thermal treatment.
4. The design of double bearing on the output shaft increases accuracy and speed of drilling.
Note: ■ – available □ – not available
1.Clamping chuck 2.Depth meter 3.Additional handle 4.Case 5.Impact mode switch
6.Reserve rotation switch 7.On/Off control(With speed control) 8.Self-bloching key
9.Handle 10.Electric cable
3
MODEL
CASE
SPEED
CONTROLLER
IMPACT
MECHANISM
SELF-
BLOCKING
REVERSE
RORATION
DOUBLE
INSULATION
PSB13-C5 □
■ ■ ■ ■ ■
1
2
4
3
6
9
10
8
7
5
impact drill

4
RULES OF OPERATION
1. Wear appropriate working clothes (free, wide), jewelery, not buttoned cuffs and long hair are not allowed.
2. Always wear safety glasses when using this power tool. Use a dust mask to handle dust.
3. Use noise mongers when using power tools for long periods of time. Prolonged exposure to high intensity
noise can cause hearing loss.
4. Always use the extra handle for maximum control over the potential return from the power tool.
5. Position yourself during work so as not to be clamped between the tool or auxiliary handle and the walls or
pillars. If the nozzle bends, this will result in a kickback from the power tool and may cause injury.
6. Before work, check that the power source matches the rated voltage of the electric tool in order not to
mistakenly connect to a different power source.
7. Before using the impact drill, it is necessary to carefully check the device’s insulation protection, the reliability
and playability of the switches, the adjustment of the auxiliary handle and the depth gauge, and the tightness of
the screws.
8. In the hammer drill, in accordance with the requirements of the material, a percussion drill of alloyed steel or
ordinary, acceptable for this material, should be inserted. It is strictly forbidden to use drills that go beyond what
is permissible. Before starting operation, you need to work a few minutes at idle. Only with normal rotation can
you start work.
9. The wire of the impact drill must be well protected, it is strictly forbidden to scatter it and randomly pull, in order
to avoid cutting the cut, especially not to place the electric cable in an oily environment to prevent the cable from
breaking. 10. The power outlet for the impact drill should be equipped with a device against current leakage, it
is also necessary to check the serviceability of the power cable. If current leakage, extreme vibration, strong
overheating or the presence of extraneous noise during the operation of the impact drill is detected, it is
necessary to immediately complete the work and call an electrician for inspection and repair.
11. When drilling, the drill should touch the working surface a little, there is no need to exert excessive force in
order for the drill to not break and not to blow the electric motor.
12. When replacing the drill in the hammer drill, you need to use special wrenches, as well as a wrench to tighten
the drill in the chuck. Completely eliminate the use of foreign tools and tapping on the impact drill. After replacing
it with a new drill bit, it is not necessary to immediately make an effort to prevent the drill from breaking.
13. When operating a hammer drill, remember firmly that need to make excessive efforts or exercise oblique
drilling. It is necessary to tighten in advance corresponding drill bit, adjust the depth gauge hammer drill to work
hard gradually and evenly. Do not use too big drills.
14. In case of incomplete stopping of the work of the impact drill and the impossibility of removing, replacing the
drill, detection of incorrect operation of the tool, unauthorized persons shall not disassemble and assemble the
device. Only a specialist has the right to repair the instrument.
15. When a power outage, a break, weaning from the workplace ‚you must immediately disconnect the power
source.
16. When working with a hammer drill in places with high humidity, it is necessary to stand on an insulating
gasket or a dry board. When working at heights or in explosive and other dangerous places, take appropriate
safety measures.
17. To put the drill and isolated materials to separate place after use.
MAINTENANCE
For servicing the impact drill, use only the recommended replacement parts, nozzles, accessories. Using
improperly recommended consumables, attachments, and accessories may cause damage to the power tool or
injury. Use of some cleaning agents, such as: gasoline, ammonia, etc. may cause damage to the plastic parts.
At the same time, during operation, it is necessary to pay attention to maintenance and repair, below are a few
points:
1. The electrician should periodically replace the carbon brushes of the impact drill and check the spring
elasticity.
2. It is necessary to ensure that the impact drillis not damaged, clean, also make sure that the rotation of the
impact drillis free.
3. A qualified worker must regularly inspect all parts of the impact drill for damage, elements with serious
damage and parts that can no longer be used must be changed in a timely manner.
4. Timely add screws lost during operation and tighten them.
5. Regularly inspect the bearings, gears of the drive part, cooling fan for serviceability and free running, timely
lubricate the drive part to increase the service life of the hammer drill.
6. Immediately after the completion put back the impact drilling the tool suitcase, transfer for storage to the
impact drill

5
warehouse, while cleaning up the workplace.
ITEMS REQUIRING SPECIAL ATTENTION
In the usual situation, the impact drill cannot be used:
1. Since during operation, you cannot firmly hold the hammer drill, there are errors in operation, and the bore has
a large bevel.
2. The drill is not sharp, the bore is not neat, and there are chippings and cracks.
3. Insufficient effort to drill a bore only if you do not use special drills on wood. Since the rotation speed of the
electric drill is very high, a carbon deposit is easily formed at the drilling place and the drill is overheated, which
in turn affects the service life of the drill.
impact drill

TERMS OF WARRANTY SERVICE
1. This Warranty Certificate is the only document that confirms your right to free warranty service. Without
presenting this certificate, no claims are accepted. In case of loss or damage, the warranty certificate is not
restored.
2. The warranty period for the electric machine is 12 months from the date of sale, during the warranty period the
service department eliminates manufacturing defects and replaces parts that have failed due to the fault of the
manufacturer free of charge. In the warranty repair, an equivalent operable product is not provided. Replaceable
parts become property of service providers.
P.I.T is not liable for any damage that may be caused by operation of the electric machine.
3. Only clean tool accompanied with the following duly executed documents: this Warranty Certificate, Warranty
Card, with all fields filled out, bearing the stamp of the trade organization and the signature of the buyer, shall be
accepted for warranty repair.
4. Warranty repair is not performed in the following cases:
- in the absence of a Warranty Certificate and a Warranty Card or their incorrect execution;
- with failure of both a rotor and a stator of the electric engine, charring or melting of primary winding of the
welding machine transformer, charging or starting-charging device, with internal parts melting, burn down of
electronic circuit boards;
- if a Warranty Certificate or a Warranty Card does not correspond to this electric machine or to the form
established by the supplier;
- upon expiration of the warranty period;
- at attempts of opening or repair of the electric machine outside the warranty workshop; making constructive
changes and lubrication of the tool during the warranty period, as evidenced, for example, by the creases on the
spline parts of the fasteners of non-rotational parts.
- when using electric tools for production or other purposes connected with making a profit, as well as in case of
malfunctions related to instability of the power network parameters exceeding the norms established by GOST;
- in the events of improper operation (use the electric machine for other than intended purposes, attachments to
the electric machine of attachments, accessories, etc. not provided by the manufacturer);
- with mechanical damage to the case, power cord and in case of damages caused by aggressive agents and
high and low temperatures, ingress of foreign objects in the ventilation grids of the electric machine, as well as in
case of damage resulting from improper storage (corrosion of metal parts);
- natural wear and tear on the parts of the electric machine, as a result of long-term operation (determined on the
basis of the signs of full or partial depletion of the specified mean life, great contamination, presence of rust
outside and inside the electric machine, waste lubricant in the gearbox);
- use of the tool the purposes for other than specified in the operating instructions.
- mechanical damages to the tool;
- in the event of damages due to non-observance of the operating conditions specified in the instruction (see
chapter “Safety Precautions” of the Manual).
- damage to the product due to non-observance of the rules of storage and transportation.
Preventive maintenance of electric machines (cleaning, washing, lubrication, replacement of anthers, piston and
sealing rings) during the warranty period is a paid service.
The service life of the product is determined by the manufacturer and is 2 years from the date of manufacture,
The owner is notified of any possible violations of the above terms of warranty service upon completion of
diagnostics in the service center.
The owner of the tool entrusts the diagnostic procedure to be conducted in the service center in his absence.
Do not operate the electric machine when there are signs of excessive heat, sparking, or noise in the gearbox.
To determine the cause of the malfunction, the buyer should contact the warranty service center.
Malfunctions caused by late replacement of carbon brushes of the engine are eliminated at the expense of the
buyer.
5. The warranty does not cover:
- replacement of parts (accessories and furniture), for example: accumulators, disks, knives, drills, bores,
cartridges, chains, sprockets, collet clamps, buses, tensioning elements and fasteners, trim tabs, pads of
grinders and tape machines, etc.
- quick-wear parts, for example: carbon brushes, drive belts, glands, protective covers, guide rollers, guides/rails,
rubber seals, bearings, timing belts and wheels, shafts, brake band, ratchet wheels and starter cables, piston
rings, etc. Replacing them during the warranty period is a paid service.
- power cords, in case of insulation damage, power cords are subject to mandatory replacement without the
consent of the owner (paid service), casing of machine.
6
impact drill
7
impact drill

8

220B
9
5
5
5
3000
2.4
950
Диаметр зажимаемого сверла 1,5-13 мм

1
2
4
3
6
9
10
8
7
5
10
5
3000

11
Включение и выключение электроинструмента
ВНИМАНИЕ! Убедитесь в том, что напряжение используемой сети соответствует напряжению питания инструмента.
Информация об этом находится в таблице технических характеристик. В зависимости от задачи вставьте
необходимое сверло. При необходимости отрегулируйте глубину сверления. Инструмент включается нажатием на
кнопку выключения. Если кнопку выключения отпустить, то инструмент остановится. Если необходима длительная
работа дрели, то необходимо нажать на кнопку выключения и заблокировать его стопорной кнопкой. Для
выключения
инструмента нажмите на кнопку выключения еще раз и отпустите. Не прикасайтесь к зажимному патрону во время
работы инструмента. Чем сильнее Вы нажимаете на кнопку выключения, тем выше скорость вращения.
Регулировка скорости вращения
1. Нажмите на кнопку выключения.
2. Поверните регулятор скорости вращения против часовой стрелки, чтобы увеличить скорость вращения или по
часовой стрелке, чтобы уменьшить.
Переключение режима работы
Выбор режима работы «сверление» или «сверление с ударом» осуществляется переключателем, имеющим два
положения, обозначенные на корпусе значками в виде сверла и молота. Переключение режимов работы допускается
производить только после выключения дрели и полной остановки двигателя.
Советы по выполнению сверлильных работ
Правильно подбирайте размер и тип сверла. Установите переключатель реверса в правильном направлении. Держите
инструмент крепко двумя руками за обе рукоятки.
— Сверление в дереве
Для сверления дерева установите переключатель режимов работы на сверление. При сверлении в дереве наилучшие
результаты достигаются при использовании сверл для дерева, снабженных направляющим винтом. Направляющий
винт упрощает сверление, удерживая сверло в обрабатываемой детали.
— Сверление в металле
Для предотвращения скольжения сверла при начале сверления, сделайте углубление с помощью керна в точке
сверления. Вставьте острие сверла в выемку и начните сверлить. При сверлении металлов используйте смазку для
резки. Исключение составляют чугун и латунь, которые надо сверлить насухо.
— Сверление с ударным действием
Для сверления бетона, камня, кирпича установите переключатель режима работы в ударное сверление.
В случае использования дрели в качестве шуруповерта установите переключатель режимов работы на сверление.
Установите переключатель реверса на необходимое направление. Никогда не переключайте направление вращения
инструмента во время работы. После достижения желаемой глубины отверстия сначала выньте сверло из отверстия и
после того выключите ударную дрель. После продолжительной работы с низким числом оборотов
электроинструмент следует включать примерно на 3 минуты на максимальное число оборотов на холостом ходу для
охлаждения.
ВНИМАНИЕ! Чрезмерное нажатие на инструмент не ускорит сверление. На самом деле, чрезмерное давление только
повредит наконечник Вашего сверла, снизит производительность инструмента и сократит срок его службы.
Монтаж дополнительной рукоятки
Для монтажа дополнительной рукоятки поверните винт для установки дополнительной рукоятки против часовой
стрелки, наденьте через зажимной патрон на фланец дрели. После этого установите рукоятку в удобное для работы
положение и затяните винт по часовой стрелке.

12
Регулировка глубины сверления
На дополнительной рукоятке находится приспособление для установки ограничителя глубины сверления. Вставьте
сверло. Ослабьте зажимной винт фиксации ограничителя глубины. Выдвиньте ограничитель глубины сверления
вперед настолько, чтобы его конец был на одном уровне со сверлом. Теперь отодвиньте ограничитель глубины
сверления назад настолько, чтобы расстояние между его концом и концом сверла соответствовало требуемой
глубине сверления. Затяните зажимной винт, вращая его по часовой стрелке.
Установка и извлечение сверла.
ВНИМАНИЕ! Перед тем, как проводить какие-либо работы по замене оснастки или приспособлений, убедитесь в том,
что дрель отключена от сети. Дрель укомплектована ключевым патроном. Установка или извлечение сменного
инструмента осуществляется при помощи специального ключа. Установите ключ патрона в одно из отверстий в
патроне. При вращении ключа по часовой стрелке губки патрона сходятся, фиксируя, тем самым, хвостовик
сменного инструмента. При вращении ключа против часовой стрелки губки патрона расходятся и освобождают
инструмент.

13

14

15

16

17

18
P.I.T.
impact drill

Поставщик / производитель: Xinjiang Longbo Industrial Co., Ltd./Синьцзян Лонгбо
Индастриал Ко., Лтд.
Адрес производства: Rm. 602, 6th Floor, No. 531, Weixing Road, Economic And Technologi-
cal Development Zone, Urumqi, Xinjiang, China / Оф.602, 6 этаж, №531, Вейшинг Роад, Экономик
Энд Технолоджикал Девелопмент Зон, Урумчи, Синьцзян, Китай
Импортер/ организация, уполномоченная принимать претензии: ООО
«Турбо-Тулс»
Юридический адрес: 614058, Пермский край, г. Пермь, ул. Фоминская, 36
Сделано в КНР / Made in China
Other P.I.T. Drill manuals

P.I.T.
P.I.T. E-PSR18-D4-A1 User manual

P.I.T.
P.I.T. PROFESSIONAL PSB20H-10C User manual

P.I.T.
P.I.T. PBH26-C5 User manual

P.I.T.
P.I.T. PBH20H-22B/1 User manual

P.I.T.
P.I.T. PBH20H-18A User manual

P.I.T.
P.I.T. PSB20H-10B User manual

P.I.T.
P.I.T. PSB13-C2 User manual

P.I.T.
P.I.T. PBH24-C2 User manual

P.I.T.
P.I.T. PBH32-C5 User manual

P.I.T.
P.I.T. PBH40-C2 User manual