PADT SCA 1200 HT User manual

SCAHTUM-03 1 SCA 1200HT User Manual
User Manual
August 1, 2016
Phoenix Analysis & Design Technologies, Inc. (PADT, Inc.)
TEL : 1-800-293-PADT FAX : 480-813-4807
sca@padtinc.com
www.SupportRemoval.com

SCAHTUM-03 2 SCA 1200HT User Manual
This page left intentionally blank

SCAHTUM-03 3 SCA 1200HT User Manual
Table of Contents
1: SITE PREPARATION ............................................................................................................................ 4
1.1: LOCATING THE UNIT............................................................................................................................ 4
1.2: PREPARATIONS FOR DRAINING AND DISPOSAL.................................................................................... 4
2: IMPORTANT SAFEGUARDS............................................................................................................... 5
3: SAFETY WARNINGS............................................................................................................................. 6
4: WARRANTY INFORMATION............................................................................................................. 7
5: DECLARATION OF CONFORMITY, REGULATORY INFORMATION ..................................... 8
6: UNDERSTANDING YOUR SCA..........................................................................................................10
6.1: HOW IT WORKS ..................................................................................................................................10
6.2: KEY COMPONENTS .............................................................................................................................10
6.3: LABELS...............................................................................................................................................14
6.4: ASSEMBLY DRAWING.........................................................................................................................15
7: UNPACKING, INSPECTING AND INSTALLING YOUR SCA ......................................................16
7.1: PACKAGE CONTENTS..........................................................................................................................16
7.2: UNPACKING........................................................................................................................................16
7.3: INSPECTING UNIT ...............................................................................................................................16
7.4: INSTALLATION....................................................................................................................................16
8: OPERATING YOUR SCA.....................................................................................................................17
8.1: FILL THE UNIT WITH WATER ..............................................................................................................17
8.2: ADD CLEANING CONCENTRATE TO THE TANK ...................................................................................17
8.3: PREHEATING AND STARTING THE CLEANING CYCLE ..........................................................................18
8.4: LOADING PARTS AND TESTING LEVEL SENSORS ................................................................................18
8.5: CLEANING THE PARTS ........................................................................................................................19
8.6: REMOVING PARTS FROM THE UNIT.....................................................................................................19
8.7: READINESS FOR THE NEXT CLEANING CYCLE ....................................................................................20
9: MAINTAINING YOUR SCA ................................................................................................................21
9.1: COOLING THE TANK LIQUID ...............................................................................................................21
9.2: DRAINING THE TANK..........................................................................................................................21
9.3: DISPOSING OF SOLUTION ....................................................................................................................22
9.4: INSPECTING AND CLEANING DRAIN STRAINER...................................................................................22
9.5: INSPECTING AND CLEANING THE PUMP INTAKE SCREEN......................................................................22
9.6: REFILLING THE TANK .........................................................................................................................23
9.7: CLEANING ..........................................................................................................................................23
9.8: MOVING .............................................................................................................................................23
10: TROUBLESHOOTING........................................................................................................................24
11: TECHNICAL SPECIFICATIONS......................................................................................................28
12: TECHNICAL SUPPORT.....................................................................................................................29
12.1: REPLACEMENT PARTS ......................................................................................................................29

SCAHTUM-03 4 SCA 1200HT User Manual
1: Site Preparation
1.1: Locating the Unit
•Place the SCA on a sturdy horizontal surface or cart capable of supporting 200 lbs
(the weight when filled with water).
•Ensure there is no Aluminum or Zinc in the area where the SCA will be used. THE
CLEANING SOLUTION CONTAINS SODIUM HYDROXIDE AND REACTS
VIOLENTLY WITH ALUMINUM OR ZINC.
•The selected location should be isolated from unintentional contact from those
working in the area.
•It should be near a grounded wall outlet such that the power cord does not pose a
hazard to people or equipment passing by.
•The power cord plug-in receptacle is a disconnecting device that should be easily
accessible at all times. Position the unit so that it can be easily reached.
•It is strongly recommended that the unit be placed on a circuit with its own breaker
with a GFCI.
•Place the unit in a well-ventilated area.
1.2: Preparations for Draining and Disposal
•Placing the unit near a drain or sink will make draining the unit much easier.
Alternatively, the SCA can be kept on a cart for easy transport to a sink or drain.
•Use a 1” inner diameter hose made of PVC or equivalent on the drain tube to
facilitate draining. Ensure the tubing or hose can withstand the temperature and
caustic properties of the cleaning solution.
Used solution must be disposed of under applicable local waste disposal regulations. It is
the responsibility of the user to determine and verify what the local disposal
regulations are and to follow those regulations.

SCAHTUM-03 5 SCA 1200HT User Manual
2: Important Safeguards
These notes are intended to draw your attention to risks which only you can recognize and
avoid or overcome. They are intended to enhance your own safety consciousness.
THE CORRECT UNIT USAGE AND PROPER HANDLING IS SOLELY THE
USER’S RESPONSIBILITY.
ELECTRICAL PROTECTION WILL BE IMPAIRED IF USED IN A MANNER
NOT SPECIFIED BY THE MANUFACTURER.
Failure to follow these safeguards and/or common sense may result in significant personal
injury and will void the warranty.
The WaterWorks solution that may be added to the unit to aid in support removal contains
Sodium Hydroxide. Please read and remember the following safety information about this
material:
DANGER: WaterWorks SOLUTE CONTAINS SODIUM
HYDROXIDE WHICH CAN CAUSE SEVERE BURNS TO EYES,
SKIN AND RESPIRATORY TRACT.
Do not get in eyes, on skin or on clothing. Do not swallow or inhale powder. Keep
container closed. Use only with adequate ventilation. Wash thoroughly after
handling.
First Aid:
In case of contact, immediately flush eyes and skin with plenty of water for at least 15
minutes while removing contaminated clothing and shoes. Get medical attention
immediately.
NFPA Rating: Health H=3
Flammability F=0
Reactivity R=1

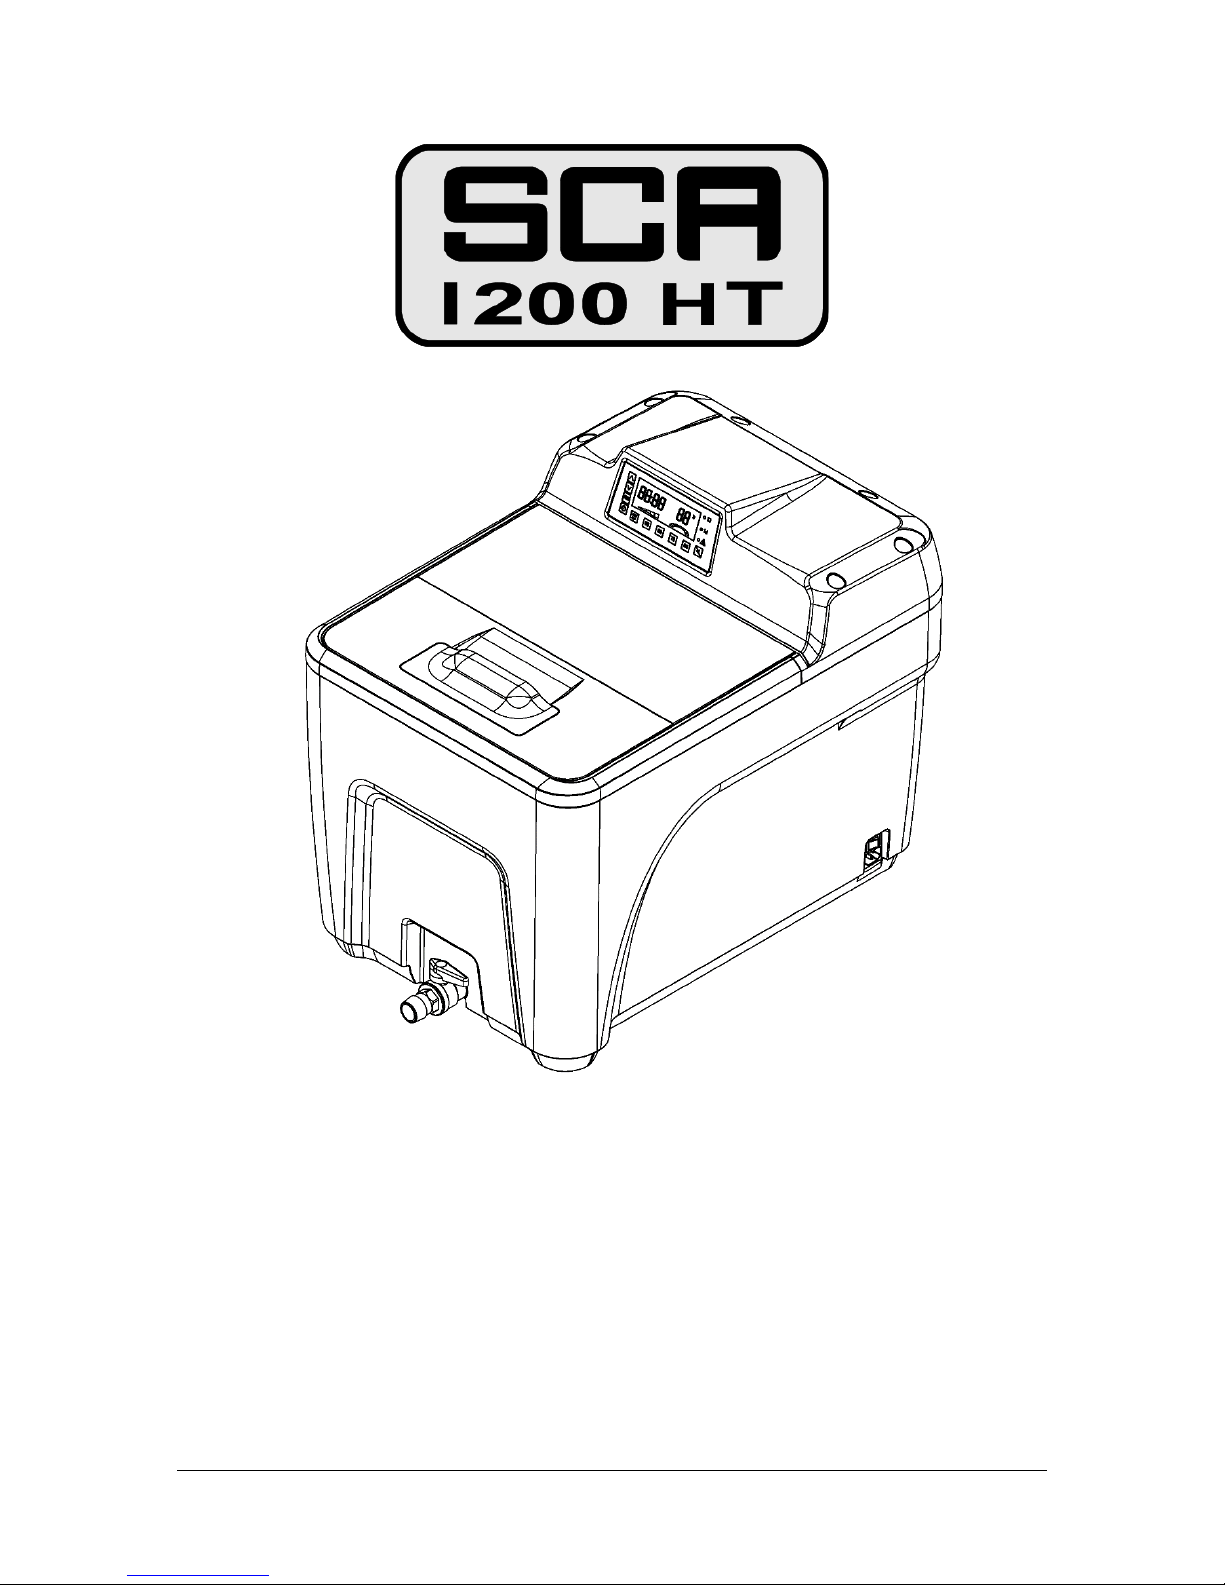
SCAHTUM-03 6 SCA 1200HT User Manual
3: Safety Warnings
READ ALL INSTRUCTIONS BEFORE OPERATING
WHAT TO DO WHAT NOT TO DO
Always wear thermal gloves and safety
glasses when working near the unit or
when touching any part of the unit.
Always keep this manual near the unit.
Always place unit on a flat, stable
surface.
Always wipe away any cleaning solution
spilled near the control panel.
Always locate the unit away from
locations where it might be bumped.
Always unplug the unit from the wall
when not in regular use.
Always use the power cord supplied by
the manufacturer.
Always make sure that the power plug
receptacle is easily accessible.
Always unplug the unit from the wall
when it is being cleaned, moved or
serviced in any way.
Always connect the device to a power
receptacle with a protective ground.
Always change the cleaning solution as
recommended in this manual.
Always clean the unit with mild soap and
a sponge or rag. Rinse tank completely
before refilling.
Always stand upright with your head
away from the tank when opening the lid
to avoid vapors.
Always remove some liquid from the
tank before adding large parts to avoid
overflow.
Always operate the unit in a well-
ventilated location.
Always operate within environmental
temperature range of 10 to 30 degree C.
Do not use the SCA for any purpose
other than removing Soluble Support
Technology (SST) material from parts
created on Stratasys 3D Printers.
Do not allow aluminum, zinc or acids to
come into contact with the WaterWorks
cleaning solution. WaterWorks cleaning
solution contains Sodium Hydroxide.
Do not use any liquid other than water
and Stratasys cleaning solution
products in the unit.
Do not add more than the recommended
amount of cleaning solution to the unit.
Do not overfill the unit.
Do not allow the fluid temperature to
exceed 85ºC (185ºF).
Do not clean the unit with solvents.
Do not immerse the unit in liquid of any
kind.
Do not operate the device if there are
any doubts regarding safe operation due
to the outer appearance (e.g. damages)
of the system or the operating
environment.
Do not operate the unit until you have
read this manual and understand all
aspects of the unit’s operation.
Do not move the unit until you are
certain that it is cool and all liquid has
been drained from the unit.
Do not operate the unit unless the water
level is above the low liquid level
indicator mark.
Do not operate the unit dry.

SCAHTUM-03 7 SCA 1200HT User Manual
4: Warranty Information
WARRANTY CERTIFICATE
Covering PADT, Inc. Support Cleaning Apparatus
Effective January 1, 2009
One Year Limited Warranty Coverage
All new Support Cleaning Apparatus (SCA) systems are warranted exclusively
by PADT, Inc.’s (“Manufacturer”) limited warranty as follows:
Each Support Cleaning Apparatus system (“System”) and its components
(“Components”), except those listed below under limits and exclusions, is
warranted against defects in the materials and workmanship for a period of one
(1) year from the date of installation at the end user’s (“Customer”) facility.
Repair or replacement only: manufacturer's liability under this agreement shall
be limited to repairing or replacing, at the discretion of manufacturer, parts, or
components sufficient to return the system to conform to the marketing
specifications of the system.
Components subject to wear during normal use and over time such as paint,
finish, light bulbs, seals, etc., are excluded from this warranty.
This warrantyis void if the system is subjected to mishandling, misuse, neglect,
accident, improper installation, improper maintenance, or improper operation
or application, or if the machine was improperly repaired or serviced by the
customer. This warranty is void if the system is not installed by a certified
distributor and the proper installation documentation provided by the
manufacturer has not been submitted.
Liability, whether based on warranty, negligence or other cause, arising out of
and/or incidental to sale, use or operation of the system, or any part thereof,
shall not in any case exceed the cost of repair or replacement of the defective
equipment, and such repair or replacement shall be the exclusive remedy of
the purchaser, and in no case will manufacturer be responsible for any and/or
all consequential or incidental damages including without limitation, and/or all
consequential damages arising out of commercial losses.
This warranty is transferrable from the original end user to another party if the
machine is sold via private sale before the end of the warranty period.
The foregoing is a limited warranty and it is the only warranty by manufacturer.
MANUFACTURER DISCLAIMS ALL OTHER WARRANTIES, EXPRESS OR
IMPLIED, INCLUDING BUT NOT LIMITED TO ALL WARRANTIES OF
MERCHANTABILITY AND FITNESS FOR A PARTICULAR PURPOSE.

SCAHTUM-03 8 SCA 1200HT User Manual
5: Declaration of Conformity, Regulatory
Information
Declaration of Conformity
Manufacturer
Phoenix Analysis & Design Technologies, Inc.
7755 S Research Dr, Suite 110
Tempe, AZ 85284, USA
Type of Equipment
Electrical Equipment for Measurement,
Control and Laboratory Use
(Support Cleaning Apparatus)
Model Number(s)
SCA-1200ES and SCA-1200HT
We declare under our sole responsibility that the devices mentioned above
comply with the following EU Directives:
Low Voltage
2014/35/EU
Electromagnetic Compatibility (EMC)
Waste Electrical and Electronic Equipment
(WEEE)
Restriction of Hazardous Substances
(RoHS)
2004/108/EC
2012/19/EU
2011/65/EU
Common Technical Specifications Used for Demonstration of Compliance:
EN61010-1:2010 / CAN/CSA-C22.2 No. 61010-1:2012 / UL 61010-1:2012;
EN61010-2-010:2014 / CAN/CSA-C22.2 No. 61010-2-010:2015 / UL 61010-2-010:2015;
EN61326-1:2013
Design and Technical Construction
File
Maintained at:
Hui Yang Zing Ear Industry Co., Ltd.
No. 258, 6th Zhongkai Road,
Chenjiang, Huizhou City,
Guangdong Province, China.
Name of Authorized Signatory
Eric Miller
Position Held in Company
Director
Signature
7755 S Research Dr, Suite 110, Tempe, AZ 85284 • www.PADTINC.com • 480.813.4884 V • 480.813.4807 F

SCAHTUM-03 9 SCA 1200HT User Manual

SCAHTUM-03 10 SCA 1200HT User Manual
6: Understanding your SCA
The Support Cleaning Apparatus (SCA) is a device specifically developed to provide
robust and efficient removal of support material from parts created with 3D printers from
Stratasys, Inc. that utilize their Soluble Support Technology (SST). This is an improved
model based on the feedback received from SCA users in the Stratasys 3D Printer
community. The original SCA system was developed with input from Stratasys, users and
distributors of SST based systems.
6.1: How it Works
The system removes support material by immersing parts created with Stratasys’ SST
material in a warm bath of water with a specific amount of cleaning solution added (see
operating instructions).The SCA heats the water and circulates the heated water around
the parts in the tank. The hot solution dissolves the support material without harming the
underlying model material. Over time, depending on geometry and the amount of support
material, all the support material is dissolved and the part is ready to be rinsed, dried and
used for its intended purpose.
6.2: Key Components
The SCA consists of several key components that all users should be familiar with.
Understanding the function of each component is important for the safe operation of the
system, and will aid in extending the life of your SCA.
Many aspects of the SCA have been designed specifically for safety. All electrical
components are properly grounded and labeled for safety protection.
6.2.1: Control Panel
Figure 1: Control Panel

SCAHTUM-03 11 SCA 1200HT User Manual
1Up/Down arrows (Add/Subtract time)
2Set timer
3Start/Pause
4No heat selection
5Temperature selection
6Silence alarm
7Alert indicator
8Low water indicator
9High water indicator
10 Temperature LED display
11 Pump operating LEDs
12 Progress LEDs
13 Time remaining LED display
6.2.2: Tank Area
Figure 2: Tank Area

SCAHTUM-03 12 SCA 1200HT User Manual
The tank area is used to hold the liquid and it is where the parts are cleaned. The SCA
improves part cleaning by circulating the liquid in the tank.
The Large Parts Basket is used to hold parts during cleaning and to
lift parts out of the tank. Users should wear thermal gloves when
lifting the basket from the tank.
The Small Parts Basket is used to hold small parts
during cleaning.
The Strainer over the drain opening in the tank
prevents debris from entering the drain when the
tank is emptied. It should be rinsed after emptying
the tank before refilling with fresh liquid.
The Heater is located behind the perforated Heater Shield. It heats the water in the tank.
The Spray Nozzle directs the flow of liquid into the tank. The spray nozzle can be removed
for cleaning if the holes are clogged. Simply unscrew the nozzle and rinse with tap water
to un-clog holes.
The Pump Intake Screen prevents large particulates from entering the pump. It may
occasionally need to be cleaned with a soft brush or toothbrush to remove debris trapped
in the holes.
The Temperature and Level sensors are used to sense the temperature and height of the
liquid in the tank. They are mounted behind the rear support bracket.
Figure 4: Small
Parts Basket
Figure 3: Large Parts
Basket

SCAHTUM-03 13 SCA 1200HT User Manual
6.2.3: Unit Side Area
Figure 5: Front and Side views
The Main Power Switch is located on the right-hand side of the unit. This turns power to
the unit on and off.
The Power Cord (not shown in figure) is used to connect the system to a wall outlet for
power. Only use a power cord provided by the manufacturer.
The Power Cord Receptacle is where the power cord is connected to the unit. The plug is
a disconnecting device and should be easily accessible at all times.
6.2.4: Front Area
The Drain Tube and Drain Valve are on the front of the tank for easy accessibility.
The tank is drained by connecting a hose to the Drain Tube and turning the Drain Valve to
the open position. The liquid in the tank should be at room temperature and the unit should
be turned off and unplugged from the wall before it is drained.
Drain Tube
Drain Valve
(closed position)
Power Switch
Power Cord
Receptacle

SCAHTUM-03 14 SCA 1200HT User Manual
6.3: Labels
The SCA includes labels that impart important product and safety information. Users
should take the time to familiarize themselves with each label and its meaning.
6.3.1: Product Identification Tag
The Product Identification tag is located on the back of the unit. It contains key support
information for the SCA including Model Number, Part Number, Serial Number and
contact information for support. It should never be tampered with or removed.
Figure 6: Product Identification Tag
6.3.2: Warning Labels
Hot Surface,
Do Not Touch
General Warning
Danger Electricity
GB/T 5465.2-5041
ISO 7000

SCAHTUM-03 15 SCA 1200HT User Manual
6.4: Assembly Drawing
Figure 7 shows the entire SCA assembly. Table 1 lists the replaceable components in the
system. Please consult this information when calling for support or ordering replacement
parts.
Figure 7: SCA Assembly
Table 1: List of Replaceable Components
Large basket
Small parts basket
Pump subassembly w/nozzle
Heater subassembly
Sensor subassembly
Display Control Panel
PCB subassembly
Power switch
Spray nozzle

SCAHTUM-03 16 SCA 1200HT User Manual
7: Unpacking, Inspecting and Installing your SCA
THE SCA SHOULD BE INSTALLED BY AN AUTHORIZED DISTRIBUTOR ONLY.
INSTALLATION BY THE USER MAY VOID THE WARRANTY.
Before removing your SCA from its packaging, completely read this manual. Follow all
safety recommendations while unpacking, installing and operating the system.
7.1: Package Contents
The SCA is shipped with the following contents:
SCA System (1)
Large Part Basket (1)
Small Part Basket (1)
Quick Reference Card (1)
Power Cords:
110V North America std.
220V Europe std.
User’s Manual & Warranty (1)
If any parts are missing you should contact customer support immediately.
7.2: Unpacking
Place the package on a stable horizontal surface and check inside for the
items listed above. Some items may be stored inside the tank for
shipping. Remove everything from the SCA unit itself before lifting the
SCA from the shipping container.
Unit weight is approximately 64 lb/29 kg. Two or more people should
lift the unit out of the packaging and place it on a table or cart.
7.3: Inspecting Unit
Carefully inspect the unit for damage during shipping. If any damage is found DO NOT
ATTEMPT TO OPERATE THE UNIT. Contact technical support immediately for
assistance.
7.4: Installation
1. Place the Large Part Basket into the tank after ensuring all packing material has
been removed.
2. Close the lid over the tank.
3. Attach the power cord to the system and then to a
grounded wall socket. Only use a power cord
provided by the manufacturer.
4. Press the ON/OFF Power Switch and check to
make sure that the display control panel lights up.
5. Turn the unit off.
6. Make sure the drain valve is in the closed
position. Remove the blue plastic cap from the
drain tube before use.
7. Complete the online registration form at
www.SupportRemoval.com. Figure 8: Power Switch and Plug Locations
Power Switch
Drain Tube
Drain Valve
(closed position)
Power Cord
Receptacle

SCAHTUM-03 17 SCA 1200HT User Manual
8: Operating Your SCA
Although the SCA is simple to operate, it is critical that all users follow the instructions in
this manual and adhere to all safety guidelines.
8.1: Fill the Unit with Water
Make sure that the strainer is clean. Make sure
that the drain valve is in the closed position.
Fill the tank up almost to the MAX slot on the
rear support bracket. If you plan on running
large parts, it is advisable to fill to a lower level
(but above the Minimum level) to make room
for the parts and basket. DO NOT use hot water.
The addition of WaterWorks to water is a heat-
releasing reaction and if added to HOT water
will result in dangerous spattering.
Never operate the tank unless the liquid level is above the liquid level MIN slot on the heat
shield. This is just below the bottom edge of the rear support bracket.
8.2: Add Cleaning Concentrate to the Tank
Users have two approved options for cleaning concentrate: either WaterWorks or
Ecoworks, both available from your local Stratasys reseller. The WaterWorks soluble
concentrate contains Sodium Hydroxide and care must be taken when working with the
solution and when disposing of it. Refer to section on Maintaining your SCA for disposal
instructions. The Ecoworks cleaning agent is both user- and eco- friendly. The
WaterWorks concentrate will generally remove support material in less time than the
Ecoworks. However, no personal protection equipment is required when handling the
Ecoworks concentrate and only dilution is required when disposing of the used solution.
If Using WaterWorks Soluble Concentrate:
Wearing protective gloves and proper eye protection, carefully and slowly add one
bottle (950 grams) of WaterWorks Soluble Concentrate P400SC into the filled tank. Never
add concentrate to a tank without water. Optimal pH for the cleaning solution using
WaterWorks is 12.6, and the solution begins to lose effectiveness below 11.5pH. Using
litmus paper on a room temperature sample of the solution is sufficiently accurate to
determine the pH.
If Using Ecoworks Cleaning Agent:
Carefully remove the entire contents of six packages (foil bags) and gently drop them into
the water in the tank. Make sure to use both sides A and B. Never place the cleaning agent
in a tank without water.
Note: As the parts are cleaned the cleaning solution becomes saturated with the support
material and loses its effectiveness. Refer to the Troubleshooting section for further
information about determining when the solution requires replacement.
Figure 9: Fill Unit to MAX line

SCAHTUM-03 18 SCA 1200HT User Manual
8.3: Preheating and Starting the Cleaning Cycle
Recommended Temperature Settings for Dissolving
Soluble Support from 3D Printed Parts
Build
Material
Temperature Setting
WaterWorks
EcoWorks
ABS
70°C
Yes
Yes
PC
85°C
Yes
No
Nylon
50, 60 or 70°C**
Yes
Yes
**depending on part wall thickness and desired dimensional accuracy.
For Polyjet parts select the ‘HEAT OFF’ option.
Connect the power cord to the side of the unit then to a suitable grounded wall socket.
The unit is compatible with both North America 110V~50/60Hz and International
220V~50/60HZ power. The unit ships with both power cords. Only use a power cord
provided by the manufacturer.
It is strongly recommended that the unit be placed on a circuit with its own breaker with a
GFCI. The power circuit must be grounded.
Press the ON/OFF rocker switch. The display control panel should be on.
Press one of the four temperature preset buttons or the Heat Off button to select the cleaning
temperature. The temperature can be changed at any time during the cycle by selecting a
different temperature button. If heating the water from room temperature to 70°C, it takes
about 2 hours to reach temperature.
Press the SET button and then press the up and down arrows to set the minutes. Press the
SET button again and use the up and down arrows to set the hours. Press the SET button
again to accept the time. Press the button to start the heater and pump.
8.4: Loading Parts and Testing Level Sensors
Wait until the SCA has reached the desired temperature before loading parts into the tank.
This minimizes the time the parts are immersed in the cleaning solution.
Open the lid on the large parts basket and place the parts inside.
For smaller parts, open the spring-latched door of the smaller, square basket, place the
part(s) inside and place small basket inside larger basket.
Before placing the basket into the cleaning solution, press the button to pause the
heater and pump. With the basket cutout facing the nozzle, slowly lower the large parts
basket into the solution-filled tank. The spray nozzle should be centered on the basket
cutout.
If the high level alert lights and the alarm sounds, press the button to silence the
alarm, and remove liquid by draining or scooping liquid from the tank until the alert
indicator is no longer lit.
Note: It is recommended that the level sensors be tested periodically. Adding water to
just above the MAX fill line should cause the high level alert to illuminate and the buzzer
to sound. Draining water until the liquid level is below the MIN fill line should cause the

SCAHTUM-03 19 SCA 1200HT User Manual
low level alert to illuminate and the buzzer to sound. If the level sensors are properly
working the system will not operate until the liquid level is between the MIN and MAX
fill lines.
Never operate the tank unless the liquid level is above the liquid level MIN slot on the heat
shield. This is just below the bottom edge of the rear support bracket.
The system will not run until the liquid level is properly adjusted.
When adding or removing liquid from the tank, always remember that the tank liquid
contains cleaning solution. Always use gloves and wear eye protection when adding or
removing water from the tank. Never use aluminum or zinc containers.
Close the lids on the SCA to prevent heat loss and evaporation. Never place your face
near the tank when opening the lid – vapors from the cleaning solution may cause eye
and respiratory irritation.
8.5: Cleaning the Parts
To activate the cleaning cycle after setting the time and temperature, and adjusting the
liquid level, press the button. Illuminated bars will sweep under the temperature display
when the pump is operating.
Parts can take a few hours or longer to clean. Cleaning time is affected by the size of the
part, the amount of support material, part geometry, and the pH level of the cleaning
solution.
Parts can be checked at any time during a cleaning cycle byopening the lid, carefully lifting
the Large Parts Basket from the tank, turning the basket 90° and resting it on the rear
support bracket and front tank ledge. Never place your face near the tank when opening
the lid - vapors from the cleaning solution may cause eye and respiratory irritation.
Protective gloves and eyewear should always be worn when lifting the basket from the
tank.
If the parts are clean before the end of the cleaning cycle, you can stop the cycle bypressing
the button on the display control panel.
After several cleaning cycles the cleaning solution becomes saturated with the support
material and loses its effectiveness. Refer to the Troubleshooting section for further
information about determining when the solution requires replacement.
8.6: Removing Parts from the Unit
Once the cleaning cycle is completed or has been stopped, the
parts can be removed from the system. Open the lid, slowly
lift the Large Parts Basket from the tank, turn the basket 90°
and rest it on the rear support bracket and front tank ledge.
Never place your face near the tank when removing the lid -
vapors from the cleaning solution may cause eye and
respiratory irritation.
Let the basket rest above the tank to let the liquid drain off of
the parts and the basket.
The proper gloves and eyewear should always be worn when
lifting the basket from the tank or handling wet parts before they
are washed.
Figure 10: Rest basket on tank
ledge and bracket

SCAHTUM-03 20 SCA 1200HT User Manual
Remove the parts and rinse them with water to wash away any residual cleaning solution.
Air dry or pat dry with a cloth or paper towels.
Lower the basket into the tank and close the lid on thetank when part removal is completed.
8.7: Readiness for the Next Cleaning Cycle
Once the cleaning cycle is completed and the parts have been removed, the system should
be turned off by pressing the ON/OFF rocker switch. Alternatively, if the SCA will be used
periodically use the 50°C temperature preset to maintain the water at an elevated
temperature. This will shorten the time required to heat the water to the optimal cleaning
temperature of 70 or 85°C.
If the system is not going to be utilized for an extended period, all liquid should be drained
from the system and the power cord should be removed from the wall socket.
Table of contents
Popular Ultrasonic Jewelry Cleaner manuals by other brands

Pattfield Ergo Tools
Pattfield Ergo Tools PE-28 FR Original instructions

Sanitas
Sanitas sur 42 operating instructions

DS Produkte
DS Produkte PC-P002W instruction manual

Gatan
Gatan PIPS II 695 Owner's manual and user's guide

Rothenberger
Rothenberger R 550 Instructions for use

Bissell
Bissell Deep Clean Essential 9585 manual