Welcome! This is your guide for achieving successful results with the Jstim™ joint therapy system
intro
The Jstim device is a new type of therapy system that combinationally deploys the use of advanced electro-
therapy, infrared heat, and compression to treat Osteoarthritis (OA) and Rheumatoid Arthritis (RA) of the joint.
The JStim is designed to be comfortable and practical to sleep with so as to fit into your life easier.
frequency of application
For optimal results, it is best to use your JStim system for the recommended 5-7 hours daily (5 to 6 days
per week). Using the infrared heat component in conjunction with the Jstim is recommended for 30 minutes
per treatment session (typically the first 30 minutes of therapy). The heat component can be removed if your
physician reccomends, or if it is discomforting.
The Jstim works through a cumulative therapy process, meaning benefits are often seen over time, and not
immediately. After 3 months of use, improvements should begin, and after 6 months to a year (approx. 1500
hours), you should notice even better results. Therapy can be scaled back once a certain pattern of relief has
maintained itself.
indications for use
The Jstim external, noninvasive, non-narcotic, electrotherapy system is indicated for use as a combined
therapy in reducing the level of pain and symptoms associated with Arthritis to include Osteoarthritis and
Rheumatoid Arthritis.
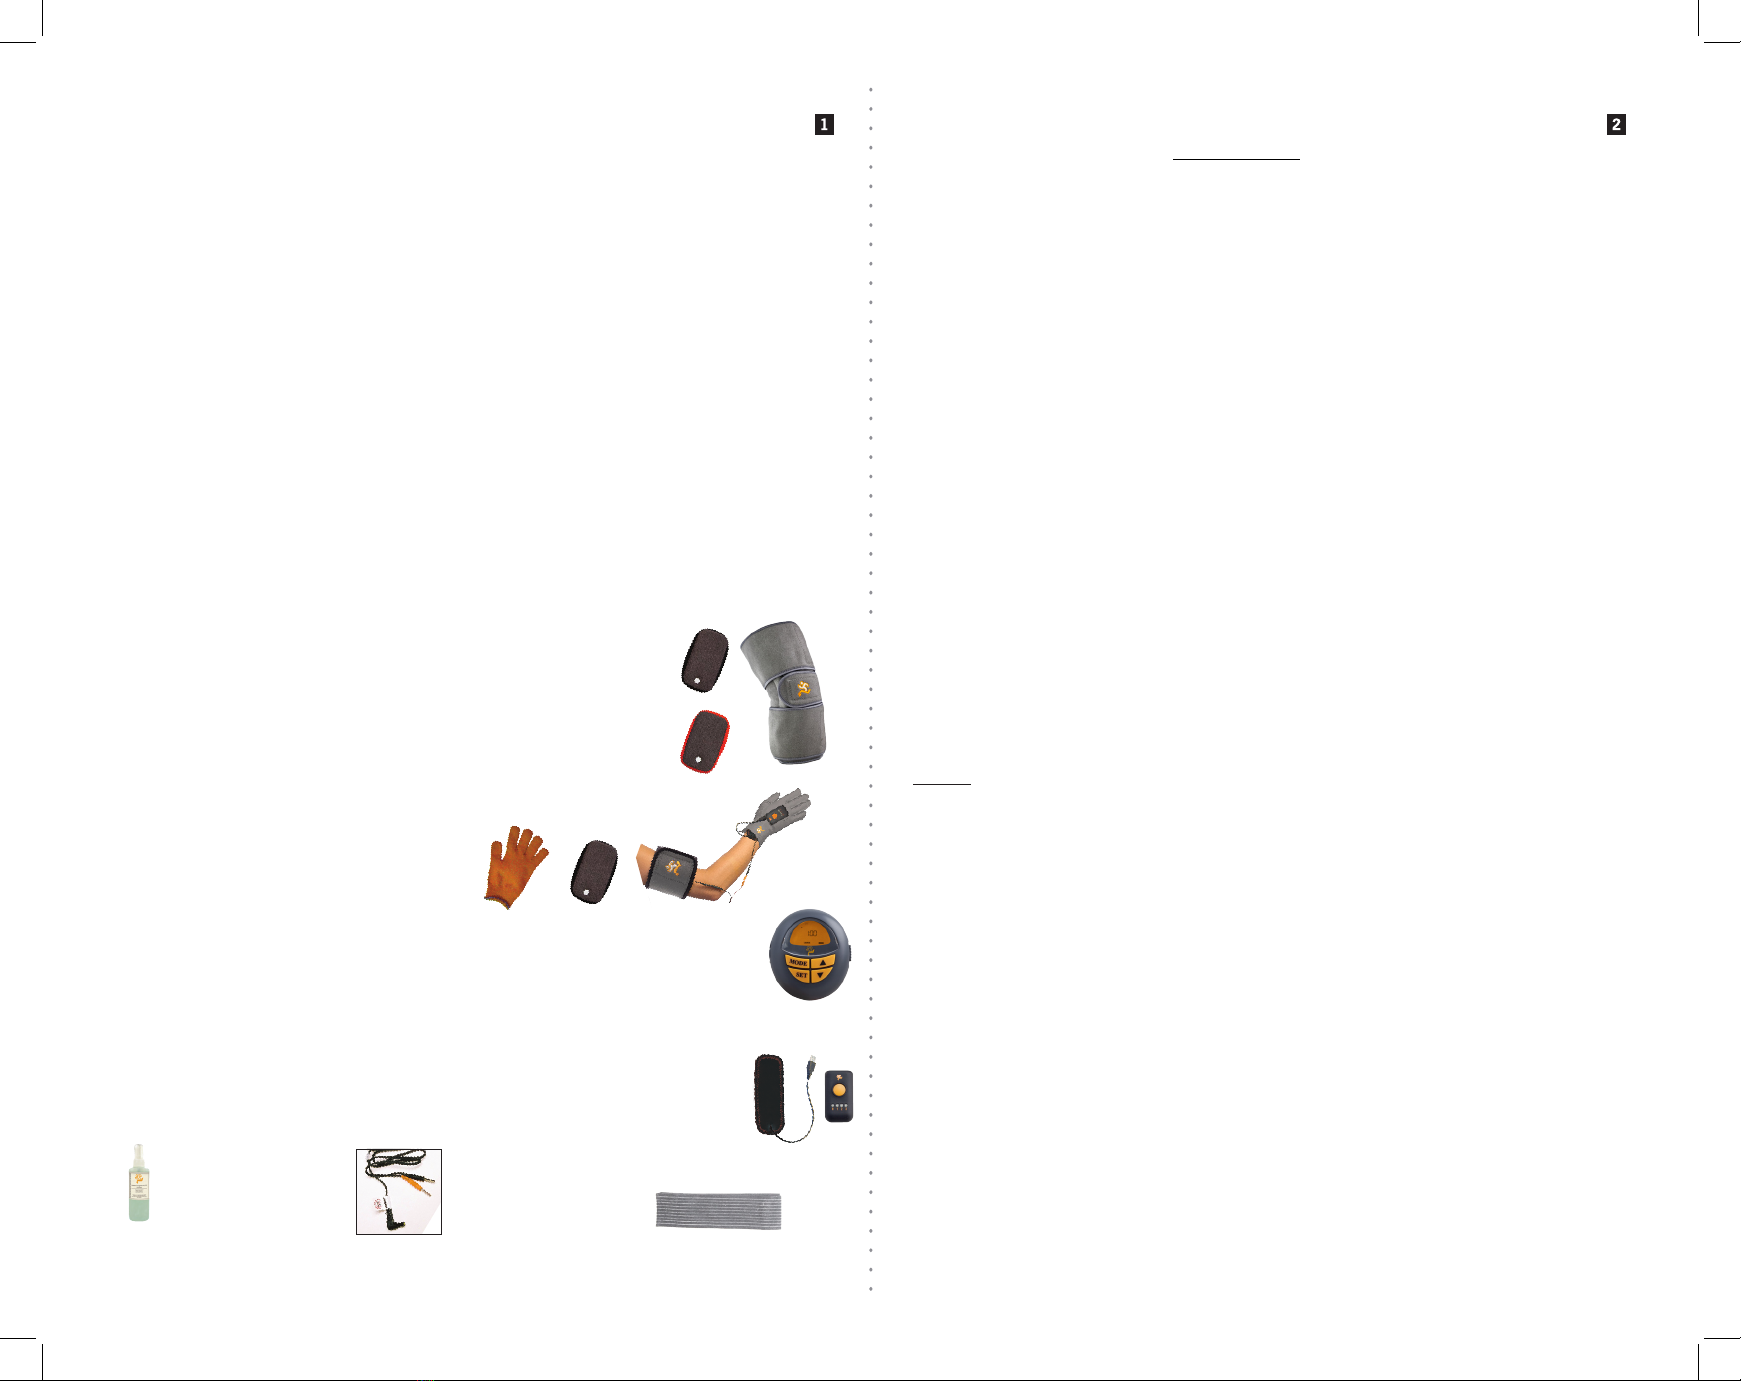
components that make up your jstim system
1. knee wrap
The knee wrap is made of comfortable, breathable and latex free material, which wraps around the knee and
thigh snugly. It is flexible, lightweight, and simple to wear. Attached to the wrap on the inside is the infrared heat
band, and the conductive patches. This wrap is adjustable and available in custom sizes if needed.
a. Conductive Pads for knee The electrotherapy conductive garment patches are used to stimulate the tar-
get treatment areas on the knee. Two electrode pads are used: an active electrode
(orange trim - for the knee), a grounding electrode (black trim - for the thigh).
*NOTE: The infrared heat band is positioned under the orange knee pad.
5. patient cables
(lead wires)
4. conductive spray
a. b. c.
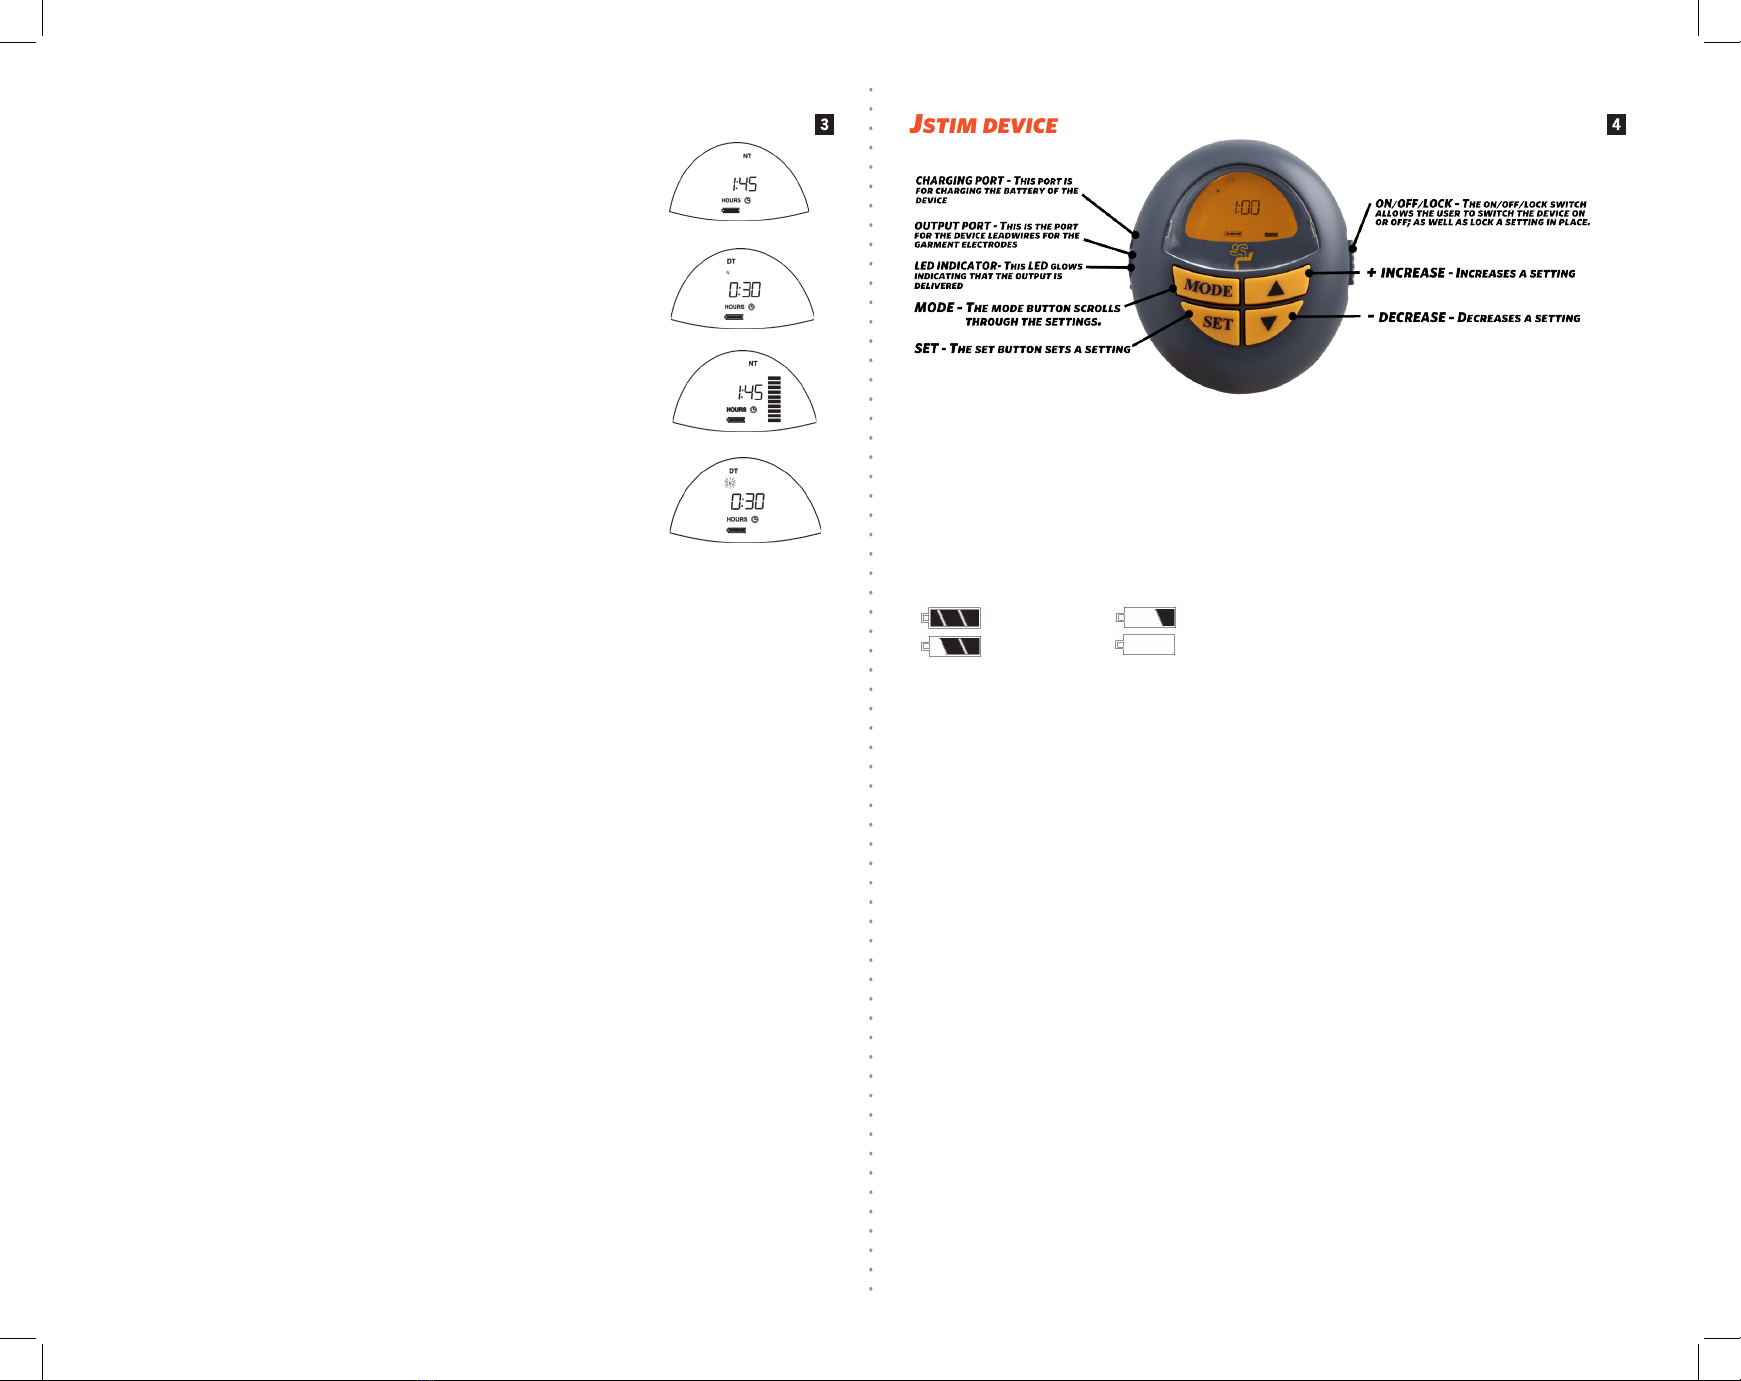
2. jstim device
The device is small, battery-powered, and fits with your system securely. The device generates
the proprietary electrical signal, and powers the garment electrode patches. The system uses a
Lithium-Ion battery, and incorporates a patient compliance timer so as to keep a record of treat-
ment. The signal generator is a single channel device, so that one knee or one hand can be treated
per session.
3. infrared heat band
The infrared heat band is activated via the heat controller. Note the heat has an automatic shut-
off of 30 minutes, and must be reset by the user to reactivate the heat. It is recommended to
use the heat for the first 30 minutes of electrotherapy. It is not recommended to go beyond this,
unless otherwise directed by your doctor. Note, infrared heat is set to a very low level, just above
body temperature, to ensure safety to the user.
OR
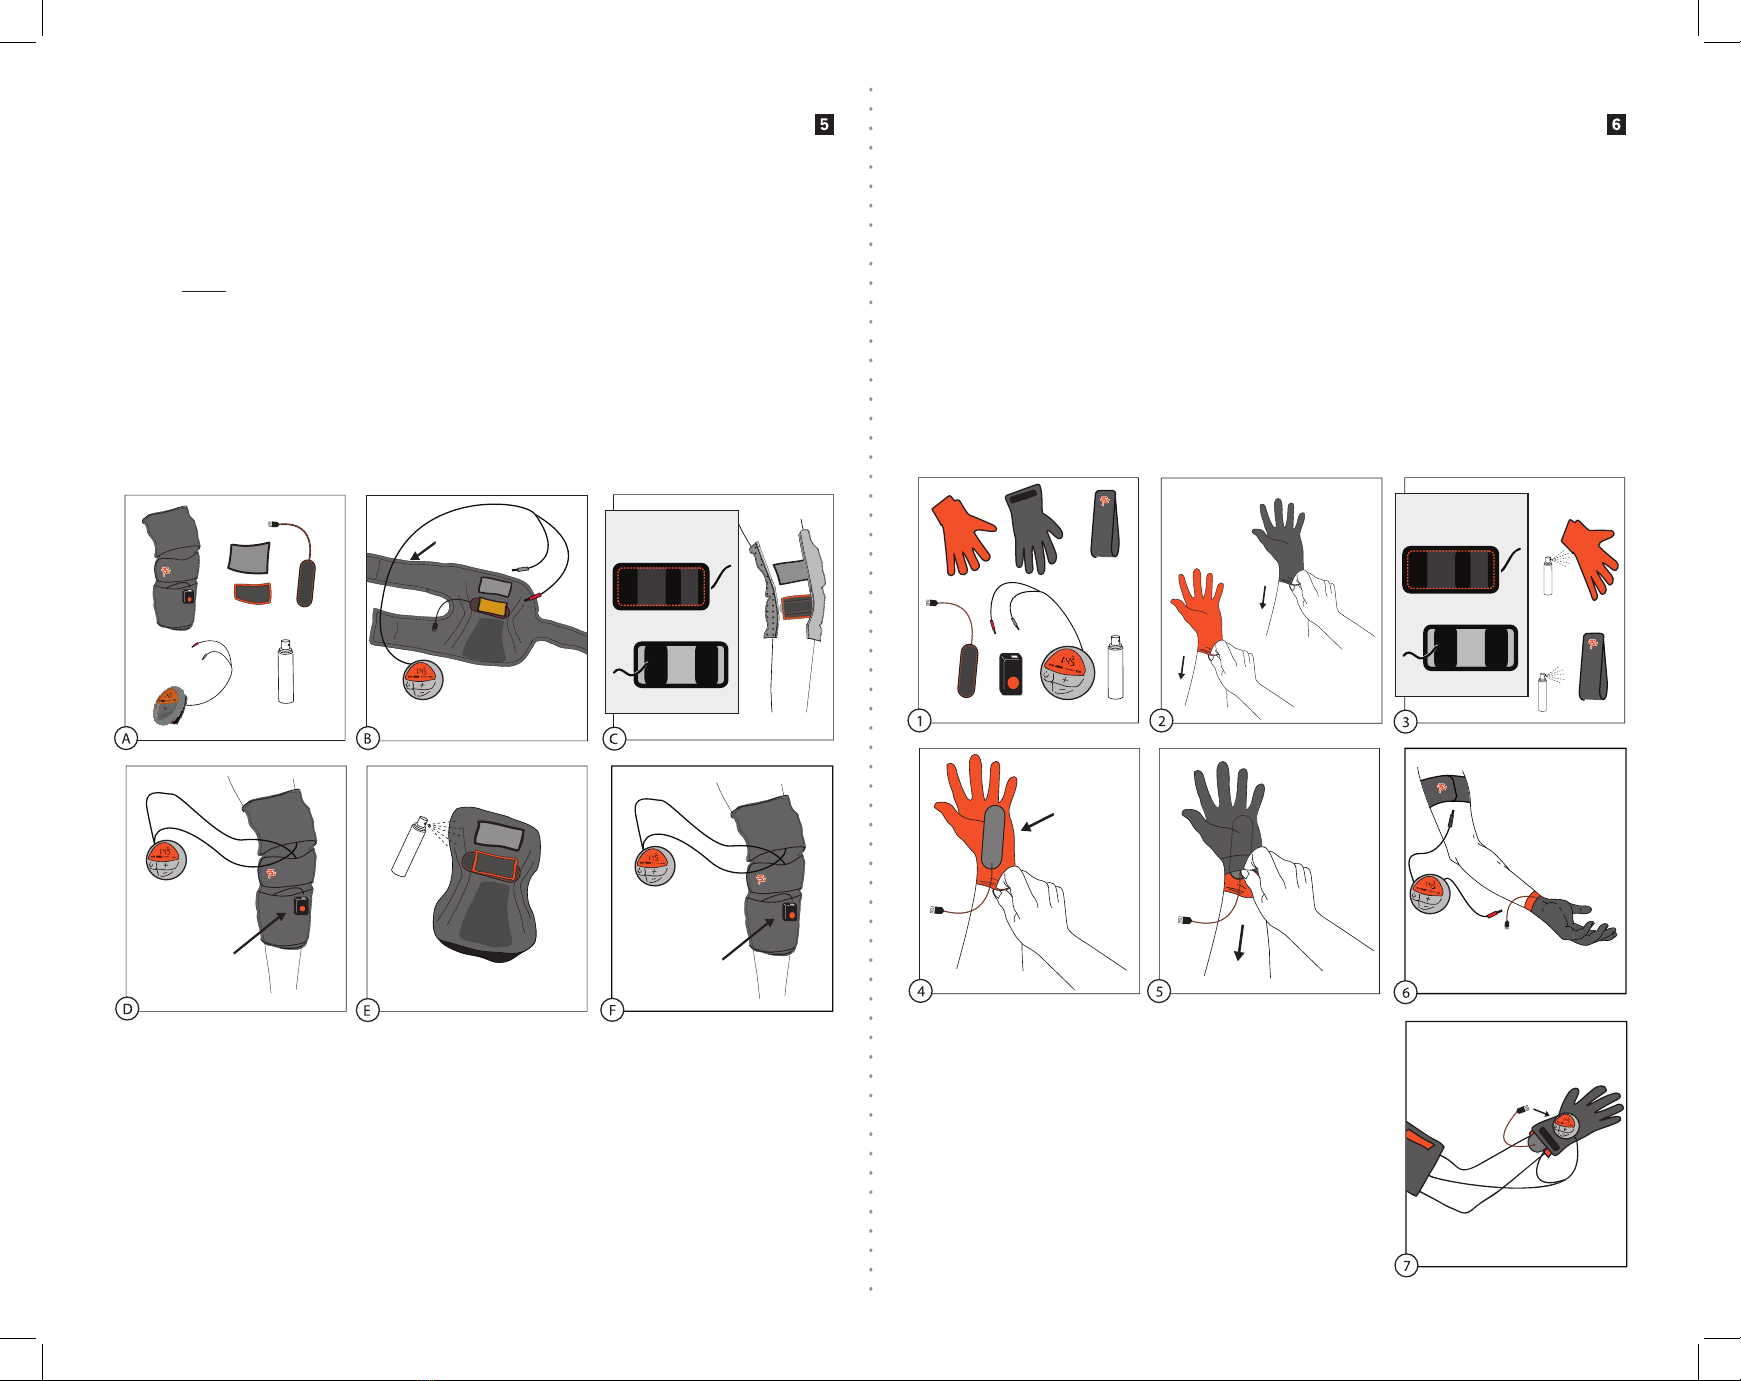
1. hand wrap
The hand wrap is made of a comfortable conductive garment material that is shaped
into a one size fits all glove. On top of this glove is another glove to add compression
to the treatment. An Arm Band is included to serve as the ground pad to activate the
electrotherapy in the conductive glove.
*The Infrared Heat Band is placed inbetween the compression glove and the conductive glove.
a. Conductive Glove (orange)
b. Conductive Ground Pad for Armband
c. Armband and Compression Glove (grey)
6. compression wrap
Note: there is a charging cord included for both the Jstim device and heat controller
warnings and cautions for jstim device and components
IMPORTANT SAFETY INSTRUCTIONS. DO NOT DESTROY
The manufacturer strongly recommends carefully reading the “Warnings and Cautions” below before using your
Jstim.
Prescription labeling: Federal law restricts this device to sale or use by or on the order of a practitioner so
licensed by the state.
contraindications
1. Do not place the pads on the carotid sinuses located at the two sides of the neck, (where a doctor feels for a
pulse), or over the eyes.
2. Do not use this Jstim unit if you have a heart pacemaker or serious heart rhythm problem.
3. Do not place your electrodes or wraps on any non-intended body parts or treatment areas unless discussed
with a physician.
warnings
1. Do not use the Jstim unit during the pregnancy or at anytime on the abdomen during pregnancy.
2. This Jstim Unit is not effective for pain of central origin. (include headache)
3. The Jstim unit should be used only under the continued supervision of a physician.
4. The Jstim unit has no curative value.
5. The Jstim is a symptomatic treatment which suppresses the sensation of pain, which would otherwise serve as a
protective mechanism.
6. The user must keep the device out of the reach of children
7. Electronic monitoring equipment may not operate properly when Jstim stimulation is in use.
8. Do not use Jstim unit if you are driving or operating machinery.
9. If you have epilepsy, consult your doctor about use of the Jstim.
Allergic reactions to the treatment pads can occur, even though they are hypoallergenic:
•Do not apply to broken skin.
•Do not apply pads to skin that does not have normal sensation. If the skin is numb, stimulation will not be felt and too
great an intensity might then be used accidentally.
PRECAUTIONS
1. Isolated cases of skin irritation may occur at the site of electrode placement following long-term application.
2. Effectiveness is highly dependent upon patient selection by a person qualified in the management of pain patients.
3. If any adverse reaction occurs, discontinue use immediately and contact your supplier and physician.
ADVERSE REACTIONS
Skin irritation and electrode burns are potential adverse reactions.
GENERAL WARNINGS
1. Do not immerse Jstim units in water.
2. Do not place the Jstim unit close to excessive heat.
warnings and cautions for jstim infrared heat therapy components
DANGER – to reduce the risk of burns, electrical shock and fire, this product must be used in accordance with the
following instructions. Please read and follow ALL instructions.
contraindications
• Safety for the Jstim for use during pregnancy has not been established.
• Caution should be used for patients with suspected or diagnosed heart problems.
• Caution should be used for patients with suspected or diagnosed epilepsy or other disease states.
warnings
• If you are pregnant, please consult your physician before using the Jstim.
• If you are over the age of 65, please consult your physician before using.
• If you have sensitive skin, or skin insensitivity, please consult your physician.
• The Jstim should be kept out of the reach of infants and children.
• This product is not to be used by an invalid, unconscious person or person with low blood circulation unless
attended.
• Discontinue use if you experience a rash or if any discomfort occurs from use.
• Check skin underneath therapy wrap periodically throughout a heat treatment session.
• The Jstim should not be applied over cancerous lesions, wounds, infected areas or open sores.
• Burns can occur regardless of control setting. Check skin under pad frequently when using the heat treatment.
• Never use in an oxygen enriched environment or near equipment that stores or emits oxygen
• Turn off when not in use
• Do not sleep with your Jstim in the DT mode.
precautions
• Sensitive skin patients or patients with compromised circulatory disorders must consult their physician in all
situations.
• There is absolute danger in using the Jstim in conjunction with external analgesics. Placing methyl salicylate, camphor,
or menthol-containing external analgesics on the painful area increases superficial blood flow. If a heating product is
subsequently placed on the medicated area, the heat delivered to the site cannot be redistributed via blood flow. This
increases the risk of burns.