Paloma PJC-W18FR User manual

1
UNFLUED PORTABLE GAS CONVECTION
ROOM HEATER
CUSTOMER INSTALLATION
AND
OPERATING INSTRUCTIONS
Thank you for purchasing a Paloma/Rheem Convection Gas Space Heater
1. To operate and maintain this appliance safely and correctly, please read these instructions
thoroughly.
2. This appliance must be installed in accordance with:
a. Local Gas Fitting Regulations
b. Municipal Building Codes
c. Australian Standard for Gas Appliance Installations AS/NZS5601.1:-2010
d. Any other relevant Statutory Regulation
e. Manufacturer’s installation instructions
3. This appliance must be serviced by a qualified person.
4. Room heater application: This unflued gas portable convection heater is designed for use in a
single family domestic dwelling for the purpose of room heating. Its use in an application other
than this may shorten its life.
To suit Paloma & Rheem Models:
PJC-W18FR & PJC-S18FR
PJC-W25FR, PJC-S25FR & PJC-C25FR
RAC-W25FR, RAC-S25FR & RAC-C25FR
Gas Types: Natural Gas (NG) or Propane (LPG)

2
Product Overview..........................................................................................................................................3
Features..........................................................................................................................................................5
Specifications.................................................................................................................................................6
Preparation.....................................................................................................................................................7
Safety Instructions........................................................................................................................................8
Danger............................................................................................................................................................8
Warnings........................................................................................................................................................9
Caution..........................................................................................................................................................10
Installation....................................................................................................................................................11
Regular Care & Maintenance.......................................................................................................................12
Operating Instructions
Start Up...........................................................................................................................................14
Turning Heater Off.........................................................................................................................14
Automatic Economy Operation....................................................................................................15
Room Temp Adjustment...............................................................................................................15
Timer Over-ride Function .............................................................................................................16
Remote Control Operation............................................................................................................16
Setting Clock..................................................................................................................................17
Programming Timers.....................................................................................................................18
Pre-Heat Function..........................................................................................................................20
Operation of Timers.......................................................................................................................21
Child Lock.......................................................................................................................................22
Trouble Shooting........................................................................................................................................23
Error Codes.................................................................................................................................................24
Warranty......................................................................................................................................................25
Service & Spare Parts................................................................................................................................28
Approval......................................................................................................................................................28
Contents

3
General Design Layout
Product Overview
Control Panel
Carry Handle
Use when carrying the
heater
Warning Label
Rating Plate
Shows model No. Gas
Type, Month of
Manufacture
Warm Air Outlet
Warm air is discharged
.
Louvres
Air Filter (1)
Prevents dust entering
the appliance.
Gas Hose
Electric Plug
Air Filter (2)
Prevents dust entering
the appliance.
<< FRONT VIEW >>
<< REAR VIEW >>

4
Control Panel
Infrared Remote Controller
SET
OFF BUTTON
ON OFF
DOWN UP TIMER 2
BUTTON
OVER-RIDE
BUTTON
TIMER1
BUTTON
TEMP
ADJUSTMENT
BUTTON
ON BUTTON
1TIMER 2
OVERRIDE
Battery replacement (AAA size 1.5V 2 pieces)
(1) Remove access panel.
(2) Ensure that batteries are correctly fitted.
(3) Replace access panel and gently push
into position.
TIMER1
BUTTON
TIMER2
BUTTON TEMPERATURE
ADJUSTMENT
BUTTON
OVER-RIDE
BUTTON
CHILD LOCK
LIGHT
ON / OFF
BUTTON
FILTER
LIGHT
SET-TIMES
BUTTON
ON / OFF
LIGHT
ECONOMY
LIGHT
DISPLAY
SCREEN (SET TEMP, ROOM TEMP.)
(TIME. ERROR CODE)
TIMER2
[OFF] LIGHT
TIMER2
[ON] LIGHT
TIMER 1
[OFF] LIGHT
TIMER 1
[ON] LIGHT
OVER-RIDE
LIGHT
ECONOMY
ROOM
ON
OFF
FILTER OVER
RIDE
TEMP/TIME
TIMER
2
TIMER
1
SET
TIMES
ON OFF ON OFF
AM
FM

5
•AS4553 Efficiency Star Rating of 5.9 Stars.
•One touch ON / OFF button.
•Electronic ignition.
•Adjustable room temperature - you can adjust the room temperature by pressing the up and down
arrows on the control panel.
•Dual timers – the heater can be set to operate automatically at two separate periods of the day.
•Remote control operation – ON / OFF, temperature control (up/down), timer 1 & 2, override.
•Child lock function prevents accidental operation as well as children interfering with the controls.
•Automatic Economy function – when the room reaches the required temperature the heater
automatically decreases room temperature by 1 deg C for every 30 minutes up to 2 deg C.
•Preheat function allows the heater to automatically operate one hour prior to the programmed starting
time.
•Override function allows the user to manually override the preset program and operate the heater.
•Low Emission Technology – Class 1 Appliance AS4553:2008. Less than half the emissions of the
Australian Standard.
•Energy efficient 7 stage modulating gas valve.
•Manufactured in Japan.
Safety Devices
•Filter Clean Warning Device - When the air filter is clogged or hot-air outlet is blocked, the filter safety
device will switch off the heater and the filter light will flash.
•Anti-tilt Safety Switch automatically shuts off gas flow if the heater is knocked or bumped.
•Oxygen Depletion Safety System automatically shuts off gas flow if the oxygen level in the room drops
below a safe level.
•Flame Failure Device prevents flow of gas to burner if ignition fails or flame goes out.
•Power Failure Device prevents flow of gas to burner if there is a power failure.
•Overheat Safety Device – if the fan stops rotating for any reason the overheat switch shuts off the gas
supply.
•Over Current Safety System.
•Back Burner Protection.
•Unattended Appliance Shut Off Device – the heater shuts off after 8 hours continuous operation.
•Air Volume and Combustion Control.
Features

6
MODEL
PJC-W25FR,PJC-S25FR,PJC-C25FR
RAC-W25FR, RAC-S25FR, RAC-C25FR
PJC-W18FR,PJC-S18FR
Space Heater Type Convection Heater Convection Heater
High (MJ/h) 25 18
Low (MJ/h) 9 9
High (MJ/h) 23 18
Low (MJ/h) 8.2 8.2
Output (kW) 6.1 4.7
AS4553 EfficiencyStar Rating 5.9 5.9
AS4553 Annual Energy
Consumption
6790 5596
AS4553 EmissionStar Rating - NG 3.9 4.4
AS4553 NO2 Emmission
Performance (ng/J) - NG
2.08 1.65
AS4553 EmissionStar Rating - LPG 3.6 3.6
AS4553 NO2 Emmission
Performance (ng/J) - LPG
2.36 2.44
Approx. Heating Capacity -
Maximum (Sq.m)
97 70
Minimum Room Sizing (Cu.M) 62.5 45
NG(kPa) 0.86 0.47
LPG(kPa) 2.0 1.2
NG(kPa) 0.13 0.13
LPG(kPa) 0.3 0.3
NG(mm) 2.4 2.4
LPG(mm) 1.45 1.45
Number of Injectors 1 1
Temperature Settings 16⁰C to 26⁰C16⁰C to 26⁰C
Ignition Continuous DirectSpark Continuous DirectSpark
Hose Connections (mm) Φ 9.5 Φ 9.5
Gas Hose Length (M) 3.0 1.5
Electricity Consumption (high/low) 31/18 27/18
Electrical Cord length 3.0 1.5
Electrical Supply 240V/50Hz/1Phase 240V/50Hz/1Phase
Standby Electrical Consumption
(watts)
1 1
Colours Off White, Silver & Charcoal Off White
Heater WEIGHT (KGS) 13.1 13.1
Heater External Dimensions
HxWxD 494 x531 x242 494 x531 x242
Gas Input - NG
Gas Input - LPG
Test Point Pressure
Test Point Pressure at Turndown
Injector Sizes
Specifications

7
EXTERNAL DIMENSIONS (mm)
(1) Remove heater from carton.
(2) Please ensure that the gas specified on the rating plate matches your gas supply.
WARNING:
Using a different type of gas may cause an explosive ignition resulting in injury, damage to heater or
malfunction of the oxygen depletion safety system. Do not install heater if it is the wrong gas type.
Please contact your place of purchase immediately.
(3) Check room sizing – refer specifications. Do not install if the actual room size is less than the specified
minimum room size requirements as the heater may shut down due to oxygen depletion (showing Error
Code 12 refer page 24).
(4) A dedicated 240V Earthed 10 Amp power point must be used with this heater.
Notice to Victorian Customers: This appliance must be installed by a licensed person as required by the
Victorian Building Act 1993. Only a licensed person will give you a compliance certificate showing that the
work complies with all relevant standards. Only a licensed person will have insurance protecting their
workmanship for 6 years. Make sure you use a licensed person to install this heater and ask for a
compliance certificate. – Message from the Victorian Plumbing Commission.
Preparation

8
To ensure safe and proper use of this heater, please read these instructions carefully.
Danger – Indicates an immensely hazardous situation which, if not avoided, will result in serious
injury or death in the most extreme situations.
Warning – Indicates a potentially hazardous situation which, if not avoided, could result in serious
injury or death in the most extreme situations.
Caution – indicates a potentially hazardous situation which, if not avoided, may result in minor
injury.
If a gas leak is detected:
•Do not turn power switches on or off.
•Do not plug or unplug electrical appliances.
•Do not use the telephone.
Flame or sparks may ignite the gas and cause a fire:
•Cease operation immediately by closing the gas valve.
•Open windows and doors for ventilation.
•Contact your gas supplier, a licensed plumber or Rheem Service on 131 031.
Danger
Safety Instructions

9
•DO NOT PLACE ARTICLES ON OR AGAINST THIS APPLIANCE.
•DO NOT SPRAY AEROSALS IN THE VICINITY OF THIS APPLIANCE WHILST IT IS IN OPERATION.
•DO NOT USE OR STORE FLAMMABLE MATERIALS NEAR THIS APPLIANCE.
•DO NOT MODIFY THIS APLLIANCE.
•THIS HEATER IS NOT INTENDED FOR USE AS A FIREPLACE INSERT.
•NOT TO BE CONNECTED TO AN LPG GAS CYLINDER LOCATED INDOORS.
•PLEASE ENSURE THAT THE GAS SPECIFICIED ON THE RATING PLATE MATCHES YOUR GAS
SUPPLY. USING A DIFFERENT TYPE OF GAS MAY CAUSE AN EXPLOSIVE IGNITION RESULTING
IN INJURY, DAMAGE TO HEATER OR MALFUNCTION OF THE OXYGEN DEPLETION SAFETY
SYSTEM. DO NOT INSTALL HEATER IF IT IS THE WRONG GAS TYPE. PLEASE CONTACT YOUR
PLACE OF PURCHASE IMMEDIATELY.
•For information on the gas consumption and gas type please see data plate.
•Electrical supply must be 240v, 50 Hz.
•Use only the gas hose supplied with the heater to avoid risk of gas leakage.
•Ventilation and room sizing must comply with local regulations.
•Ensure your room is correctly ventilated while unit is operating. Continuous use decreases the oxygen
level in the room which activates the oxygen depletion safety system.
•Do not allow curtains or other flammable materials or aerosol cans to come into contact with the heater.
It may cause a fire or the pressure in the aerosol-can may increase resulting in an explosion.
•Do not use or store gasoline, benzene, aerosol or any other flammable material near this appliance. It
may result in a fire.
•Do not post or allow children to post articles such as paper, cloth or any other foreign material into the
louvres or air inlet of the heater. Do not block the louvres or the air inlet of the heater. This may cause a
fire or overheat the appliance.
•Do not leave the heater unattended or alight when you leave the house.
•Do not sit, stand or sleep directly in front of the heater. Receiving direct heat continuously may cause low
temperature burns. The aged, children, a very tired person, a person with sensitive skin or an intoxicated
person must be supervised at all times.
•If your heater fails to operate correctly or you detect any unusual odours during its operation, cease
operation immediately and close the gas valve. Refer to the trouble shooting section of these instructions
and if the problem cannot be fixed please contact Rheem service.
•This heater must be repaired or serviced by a qualified person. Repairs carried out by an unqualified
person may cause abnormal operation. The heater must be serviced at least once every twelve (12)
months.
•Do not use this heater in areas where spray painting is taking place or in areas such as hairdressers
where there may be lots of fluff and dust or where aerosols may be used.
•All replacement parts must be approved Paloma spare parts.
•This heater may circulate large volumes of air. If the air in the room contains any cigarette smoke or
cooking vapours, it may affect the appearance of carpets, furniture and drapes, etc.
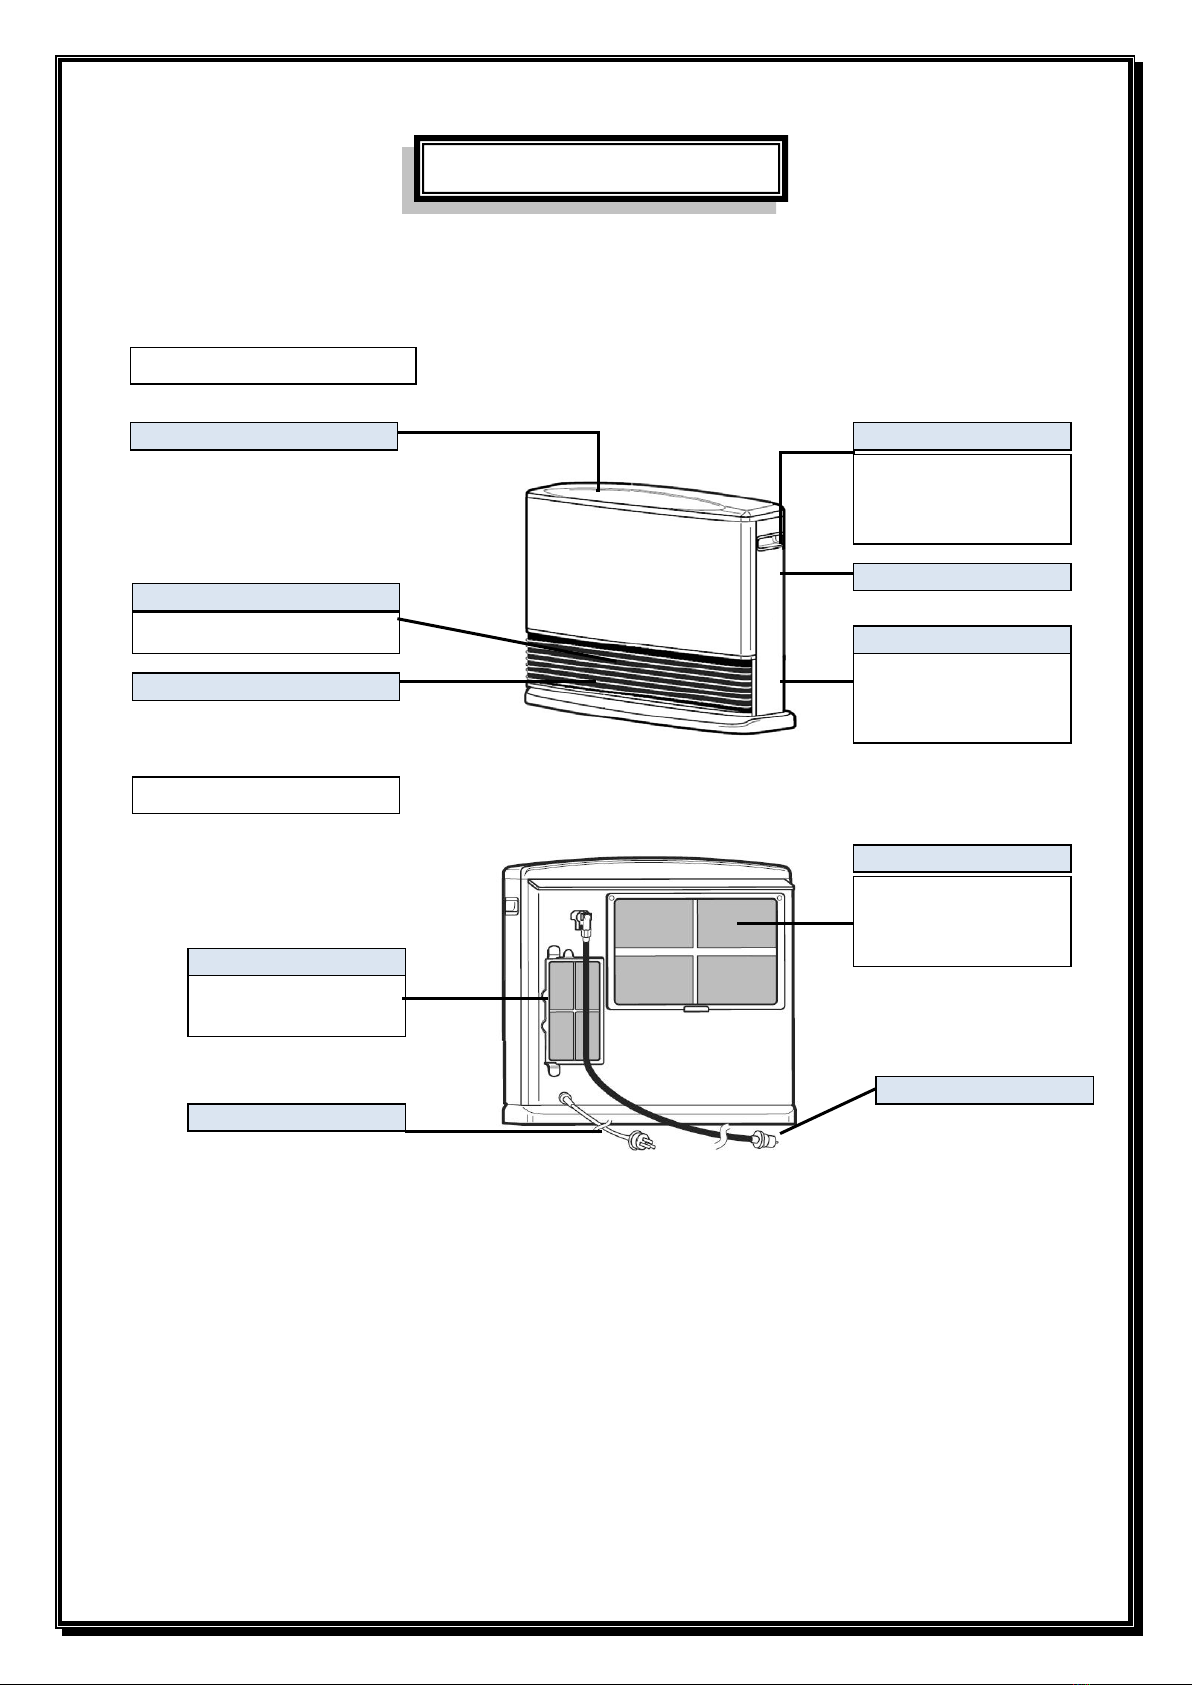
•Clean the air filter regularly (at least once a week).
Warnings

10
•Do not move the heater during operation.
•Do not use for any other purpose other than for heating. Must only be used as a space heater.
•Do not touch the warm air outlet during operation. Supervise young children or infirm persons near the
heater.
•Do not sit, stand or lean on the heater.
•Do not insert your fingers into the louvres or the air inlet of the heater.
•Do not cut the electrical cord to extend the lead. Install the heater where the original electrical cord
reaches a wall socket. If the supply cord is damaged, it must be replaced by the manufacturer, its service
agent or similarly qualified persons in order to avoid a hazard.
•Do not unplug or shut down during operation. This may cause overheating.
•Do not place the heater near an opening door. The heater could be knocked over.
•Do not touch the electric plug with wet hands as this could cause an electric shock.
•Do not pull the electrical cord to unplug as this could break the cord and start a fire.
•Place a flat board for stability when placing the heater on soft or thick carpet. Placing directly on to a
carpet may discolour the carpet.
•Ensure that recommended clearances are maintained at all times.
•This heater is designed for use in a single family domestic dwelling for the purpose of room heating. Its
use in an application other than this may shorten its life.
•In case of thunderstorms, cease operation and unplug the electrical cord.
•Do not use sprays containing silicon in the vicinity of the heater. It damages the oxygen depletion safety
device.
•Do not install in a place where the heater may be affected by wind. The flame could be blown out by a
strong wind.
•Do not place articles on or against or in front of warm air outlet or air filter of this appliance.
•If the heater is shut off by the oxygen depletion safety system, please ensure you ventilate the room
immediately for satisfactory combustion.
•Prior to operation of the unit please ensure that the gas hose is removed from the holding clips, uncoiled
and installed into your bayonet fitting without any kinks in the hose.
•This appliance is not intended for use by persons (including children) with reduced physical, sensory or
mental capabilities, or lack of experience and knowledge, unless they have been given supervision or
instruction concerning use of the appliance by a person responsible for their safety.
•Children should be supervised at all times to ensure that they do not play with the appliance.
Caution

11
•This room heater must be installed in accordance with this advice to be covered by the Paloma/Rheem
warranty.
•This room heater is suitable for indoor installation only.
•This appliance must be installed in accordance with:
oLocal Gas Fitting Regulations
oMunicipal Building Codes
oAustralian Standard for Gas Appliance Installations AS/NZS5601.1:-2010
oAny other relevant Statutory Regulation
oManufacturer’s installation instructions
•This appliance must be serviced by a qualified person.
•This heater must be installed with a minimum clearance of 50mm (5cm) from the rear and sides. These
clearances must be maintained at all times.
•There must be a minimum clearance of 750mm (75cm) from the hot air outlet.
•Do not install in a room with inadequate ventilation – refer to Australian Standard AS/NZS5601.1:-2010.
•Do not install on an uneven surface or a vibrating floor.
•Do not install directly on to carpet, timber, vinyl or cork floors. Heat emanating from these appliances
may discolour the carpet or damage your floor. It is recommended that a mat or flat board be placed in
front of this appliance extending at least 800mm in front of it.
•Do not install near a door or windy location or under shelves or in a confined space. E.g.; fireplace.
•Do not install in a bedroom, bathroom, combined living/sleeping areas, toilets, sauna or hallways.
•Do not install where flammable materials are likely to come into contact with the heater.
•Do not install where water may splash or near another heat source.
•Do not install in a caravan, mobile home or recreational vehicle.
•Do not connect to a Propane (LPG) gas cylinder indoors.
•This appliance is not designed to be built into walls or cupboards.
•If you move house check the gas type in the house where you are moving to.
•The bayonet plug on the factory fitted flexible hose simply plugs into your bayonet fitting.
•Do not place heater against wall or on a shelf.
•Always place heater on flat surface and away from strong draughts.
•It is recommended that a dedicated 240V 10Amp power point be used with this appliance. Do not use
power boards or double adaptors to operate this appliance. Heater must not be located adjacent to a
power socket – outlet.
•Turn the heater off after use. Do not unplug the heater while it is in operation or while the fans are still
cycling.
•Do not move the heater while it is in operation.
•When the heater is operated for the first time or after long periods of non use a slight odour may be
emitted, this is normal. However if odours persist switch off the heater and contact Rheem Service.
•Do not install in a room smaller than the recommended minimum room size.
Installation

12
It is the responsibility of the owner to carry out all regular care and organise maintenance and/or service
work on this convection heater. All service work must be carried out by a qualified person.
Before carrying out any maintenance or service work turn heater off and disconnect hose. After the heater is
turned off the convection fan will continue to operate for up to 4 minutes. This is to lower the temperatures
inside the heater and is normal. Do not unplug the heater while the fan is still operating. Unplug the power
cord only when the fan has stopped and wait until the heater cools down.
•Be sure to carry out daily inspection and maintenance.
•Do not use the heater if you believe something is wrong.
•It is recommended that your heater be serviced every 12 months.
Points to check
1. There are no flammable materials in the vicinity of the heater.
2. Air filter is fitting correctly and is not dirty.
3. The hose is correctly connected without kinking or twisting.
4. There is no damage to the electric cord.
Maintenance
Caution
Wear gloves
•Be careful of sharp edges.
Warning
Do not use cleaning cloth, thinner, benzene, acid or alkaline detergent.
This will avoid discoloration of the paint and plastic components.
Maintenance of Heater Outer Casing
It is recommended that the heater be cleaned once a month. Always keep the heater clean
•Use damp soft cloth to wipe.
•Use mild soapy water for severe dirt.
Maintenance of the Louvre
Use a vacuum cleaner to remove dirt from the louvre.
Make sure that the fan is not working before cleaning.
White powder may form on the louvre. Wipe off with soft cloth.
Caution
Do not press the louvre heavily. Do not apply strong pressure
to the Louvre.
•The louvre may break causing discolouration of the
floor or carpet due to the change in heat
discharge.
Regular Care & Maintenance

13
WEEKLY MAINTENANCE OF THE AIR FILTER
•If the Air Filter lamp flashes, clean Air Filters (1) and (2)
•Use a vacuum cleaner to remove dirt on the Air Filters.
•Air Filter (1) could be taken off to clean. Use mild soapy water for severe dirt and refit after drying.
If Air Filter is wet, the heater may not operate correctly.
•Do not remove Air Filter (2)
REMOVE THE FILTER
1. Remove the screw.
2. Hold the upper side of Air Filter (1) and pull upward. (Do not
hold and pull strongly. It may cause the air filter to break).
REFIT THE FILTER
1. Hold the upper side of the Air Filter (1) and place the filter onto
the notch
2. Tighten the screw
Servicing Your Heater
Any repair or service work must be carried out by a qualified person.
We recommend that this convection heater be inspected and serviced every 12 months or prior to every
winter season.
For repairs and service please contact Rheem Service on 131 031. Rheem Service can carry out repairs and
service on site.
The heater must not be operated without the filter. Please refit
filter correctly.
Warning

14
Before you begin ensure that the gas hose is connected to your bayonet gas point and electrical cord is
plugged in correctly.
START UP – TURNING HEATER ON
•Press and release the ON/OFF Button once to start the heater and the operation light (green) will light
up.
•After a short delay the combustion light (red) will light up, this indicates proper ignition has been
achieved and the burner is on.
•Set temperature and room temperature are displayed on the screen.
Note: When the ON/OFF light is glowing green the heater can be switched on by pressing the Remote
Control button.
TURNING HEATER OFF
•The appliance can be turned off by pressing and releasing the ON/OFF button. The green (or red)
ON/OFF operation LED will immediately extinguish and the digital display will revert to the time (if set).
Then press the OFF button on Remote Controller.
•After the heater is turned off the convection fan will continue to operate for up to 4 minutes. This is to
lower the temperatures inside the heater and is normal.
•Do not unplug the heater while the fan is still operating.
Important Information:
•When using the heater for the first time or after long periods of disuse, ignition may not occur the first
time it is operated as there may be air within the pipes.
•The unit may make noises after igniting or extinguishing the heater. This is due to expansion and
contraction of the heater components and is normal.
•If the heater fails to light, repeat the procedure after first pressing the ON/OFF button to turn the unit off.
•Do not start then stop immediately. This may cause the heater to overheat or the filter light to come on.
•The economy operation will not function if the set temperature reaches a temperature in excess of the
room temperature.
•For safety reasons the heater will automatically stop after 8 hours of continuous operation.
Operating Instructions

15
AUTOMATIC ECONOMY OPERATION
•The ECONOMY mode is automatically operated and designed to increase efficiency of the appliance.
•The ECONOMY operation allows the heater to heat the room to the set temperature and after a period of
30 minutes it allows the temperature to automatically reduce by one degree. After another 30 minutes
the temperature is reduced by a further one degree to a maximum of two degrees.
•This subtle reduction in temperature is not noticed by the user.
ROOM TEMPERTATURE ADJUSTMENT
•When the heater is operational the display screen will show the [SET] temperature and the [ROOM]
temperature:
•[SET] indicates your desired temperature and [ROOM] indicates current room temperature.
•You can pre-set the [SET] temperature by raising or lowering the temperature selection buttons. For Eg;
Select 22 Degrees C as your desired temperature and this temperature is then memorised into the
control system.
•[SET] temperature selection can range from 16 Degrees C (low) – 26 Degrees C (high).
•[ROOM] temperature is indicated as follows:
o{L} – lower than 0 Degrees C
o{1} – {30} Degrees C
o{H} – Higher than 31 Degrees C
Important Information:
•Please assume the ROOM temperature is not an exact temperature.
•Your room may not arrive at the [SET] temperature or may exceed the [SET] temperature due to the size
of room, construction of room, location of the heater or external temperature. If this occurs please switch
heater OFF and then ON again. In the case of immediate re-operation the [ROOM] temperature shown
on the display screen may be higher than the actual [ROOM] temperature for at least 3 to 4 minutes.
•Please note for the heater to ignite the [SET] temperature must be higher than the [ROOM] temperature.

16
TIMER OVER-RIDE FUNCTION
The OVERRIDE function allows the user to manually over-ride the preset timer program to operate the
heater
[Press OVER-RIDE button]
If a timer(s) is selected and the heater is operating within a timer programmed ‘time period’ or ‘pre-heat
period’ (burner on), the timer may be over-ridden and the burner turned off by pressing and releasing the
OVERIDE button once. The OVERIDE LED will illuminate, the timer LED’s will stop flashing and the ON/OFF
LED will change from red to green after the heater has turned off.
If the OVERIDE button is pressed and released once again, the OVERIRDE LED will extinguish and the unit
will operate provided the current time is within the programmed ‘on period’ of the selected timer including
pre-heat period.
If a timer(s) is selected and the heater is operating outside a timer programmed time period (burner off), the
timer may be over-ridden and the heater turned on by pressing and releasing the OVERRIDE button once.
The OVERIRDE LED will illuminate; the timers LED’s will remain on and the unit will operate.
If the OVERIRDE button is pushed and released once again, the OVERRIDE LED will extinguish and the
heater will turn off provided the current time is not within the ‘on period’ of the selected timer including pre-
heat time.
REMOTE CONTROL OPERATION
The remote controller cannot be used for any programming however it can be used to turn the appliance ON
and/or OFF provided the ON/OFF button on the heater control panel has been turned ON first. The remote
controller can be used to adjust set point up or down or activate or de-activate TIMER 1 and/or TIMER 2.
Operation of the timer override function can also be performed or cancelled.
ON BUTTON
TEMPADJUSTMENT
BUTTON
TIMER1 BUTTON
OVER-RIDE
BUTTON
OFF BUTTON
TIMER 2
BUTTON
ON OFF
DOWN UP
1TIMER 2
OVERRIDE

17
SETTING THE CLOCK
When the unit is first plugged in and switched on at the power point the digital display will show flashing bars
indicating that the time is required to be set. The appliance will operate without the time being set however
timer function(s) will not operate. Set or change the time as follows:
Press and release the ON/OFF button.
•ON/OFF Light glows
•The Set temp and Room temp are displayed on
the screen.
Press and release SET TIMES button
•12.00PM (or a previously entered time) will appear
on the digital display.
Adjust the time
•To adjust the time of day press the ▼ down or ▲
up button until the correct time is reached.
[Example] To set clock for 11:12am
(1) Adjust the hour.
Keep pressing the adjustment button until
11.00am is displayed.
(2) Adjust the minute.
Press the adjustment button again until
11:12am is displayed.
Press and release the SET TIMES button five times to
accept the setting.
•The screen goes back to Set temperature and
Room temperature mode.
Press ON/OFF button to exit clock setting mode.
•ON/OFF Light goes out.
•Clock will be shown on the screen.
Important Information:
If the heater is unplugged or if there is a power failure please reset the clock.
1
2
3
4
5

18
PROGRAMMING THE TIMER(S)
Two timers are available – TIMER 1 and TIMER 2. Each TIMER can be programmed to turn the appliance
ON and OFF at predetermined times. For a TIMER to operate the actual time must be set, the timers ON and
OFF times must be programmed, the heaters ON/OFF button must be turned on and the TIMER/S must be
turned on (selected). Before programming the TIMER/S, please ensure that the correct time is set
.
Press and release ON/OFF button to turn the
heater ON
•ON/OFF Light glows.
•The Set temp and Room temp are displayed on
the screen.
Press SET TIMES button twice to enter timer
programming mode.
•The TIMER 1 “ON” LED light flashes and the
TIMER 1 ‘on time’ is displayed on the screen.
Adjust TIMER 1 “ON” or start up time as required.
•To set the TIMER 1 “ON” time press the ▼ down
or ▲ up button until the correct time is reached.
[Example] To set the TIMER 1 “ON” time to 5:30AM.
(1) Adjust the hour
(2) Keep pressing the adjustment button until
5:00AM is displayed.
(3) Adjust the minute.
(4) Press the adjustment button until 5:30AM is
displayed.
Press and release the SET TIMES button once.
•TIMER 1 “OFF” LED light flashes and the TIMER
1‘off time’ is displayed on the screen.
Adjust TIMER 1 “OFF” or shut off time as required.
•To set the TIMER 1 “OFF” time press the ▼
down or ▲up button until the correct time is
reached.
Example] To set the TIMER 1 “OFF” time to
10:25AM.
(1) Adjust the hour
(2) Keep pressing the adjustment button until
10:00AM is displayed.
(3) Adjust the minute.
(4) Press the adjustment button until 10:25AM is
displayed.
1
2
3
4
5

19
Press and release SET TIMES button once to Set
TIMER 2
•TIMER 2 “ON” LED light flashes and the TIMER
2‘on time’ is displayed on the screen.
Adjust TIMER 2 “ON” time as required
•To set the TIMER 2 “ON” time press the▼
down or▲ up button until the correct time is
reached.
Example] To set the TIMER 2 “ON” time to 8:10PM.
(1) Adjust the hour
(2) Keep pressing the adjustment button until
8:00PM is displayed.
(3) Adjust the minute.
(4) Press the adjustment button until 8:10PM is
displayed.
Press and release SET TIMES button once
•TIMER 2 “OFF” LED light flashes and TIMER 2
‘off time’ is displayed on the screen.
Adjust TIMER 2 “OFF” time as required
•To set the TIMER 2 “OFF” time press the ▼
down or ▲up button until the correct time is
reached.
Example] To set the TIMER 2 “OFF” time to
11.10PM.
(1) Adjust the hour
(2) Keep pressing the adjustment button until
11:00PM is displayed.
(3) Adjust the minute.
(4) Press the adjustment button until 11:10PM is
displayed.
Press SET TIMES button to exit SET TIMES mode.
•The screen goes back to SET temperature and
ROOM temperature mode.
6
7
8
9
10

20
To complete the process
•Press and release TIMER 1
. The selected
TIMER 1 [ON] [OFF] lights will glow.
•Repeat operation for TIMER 2. The selected
TIMER 2 [ON] [OFF] lights will glow.
•Your TIMER’s have now been set.
Note: The TIMER operation is not set and will not
function if the TIMER 1 &/or TIMER 2 “ON” and
“OFF” lights are not glowing.
Important Information:
1. The operation and shut down times for the timers are stored in memory. If the requested operation and
shut down times for the timers are the same it is not necessary to set up anew.
2. If you program TIMER/S outside of the selected or programmed times the heater will shut off and
automatically turn itself on once the ‘on time, of the selected time is reached. When the ‘off time’ of the
selected or programmed time is reached the heater will automatically turn itself off.
3. To deselect a timer, press and release the selected timer button (TIMER 1 or TIMER 2). The relevant
timers ON and OFF indication LED’s will extinguish and the burner will turn on (as the ON/OFF button is
in the ON position).
4. It should be noted that the TIMER times are not required to be programmed and the timer programming
mode can be exited at any stage by pressing and releasing the SET TIMES button repeatedly until all
timer ON and OFF indication LED’s are extinguished.
PRE-HEAT FUNCTION
This heater has a pre-heat function which operates the heater one hour prior to the programmed starting
time of the timer. This function will warm the room before the programmed starting time of the timer. This is
an automatic function and cannot be cancelled.
At one hour prior to the timers programmed ON time the unit will automatically turn on (pre-heat function);
the timers ON LED will flash, the timers OFF LED will remain illuminated and the ON/OFF light will change
from green to red upon successful ignition.
When the timers programmed ON time is reached the timers OFF LED will also start to flash.
When the timers programmed OFF time is reached the unit will turn off and the timers ON and OFF LED’s
will stop flashing but remain on solid (as the timer is selected). The ON/OFF LED will revert from red to green
after the unit has extinguished.
11
Other manuals for PJC-W18FR
1
This manual suits for next models
7
Table of contents
Other Paloma Heater manuals
Popular Heater manuals by other brands

Bosch
Bosch Heat Radiator 4500 Installation and operating instructions

Ducasa
Ducasa M-28 SPLIT user manual

ecofort
ecofort ecoQ Sole 2000 instructions

Heatstore
Heatstore HSQH3000 Installation and operating instructions

BASETech
BASETech 560566 operating instructions

Ruffneck
Ruffneck AH-12A Installation, operation & maintenance instructions