panana MWJG-6 User manual

Number of
packages
1
80 MIN
APPROXIMATE
ASSEMBLY TIME
2
2 PERSON ASSEMBLY 2 M
2
REQUIRED
ASSEMBLY SPACE
FLOOR AREA1M x 2M
01/24 02/24
MWJG-6
Assembly Manual
Maintenance skills
1.Use a clean and soft cloth to remove dust regularly; do not use solvents;
2.If you are in a humid environment for a long time, you must ventilate
and exhaust moisture to avoid the furniture from being immersed in ater;
3.Keep away from high temperature sources such as stoves, radiators, etc.
to prevent the furniture from deforming.
2-Drawer Wood Lateral File Cabinet
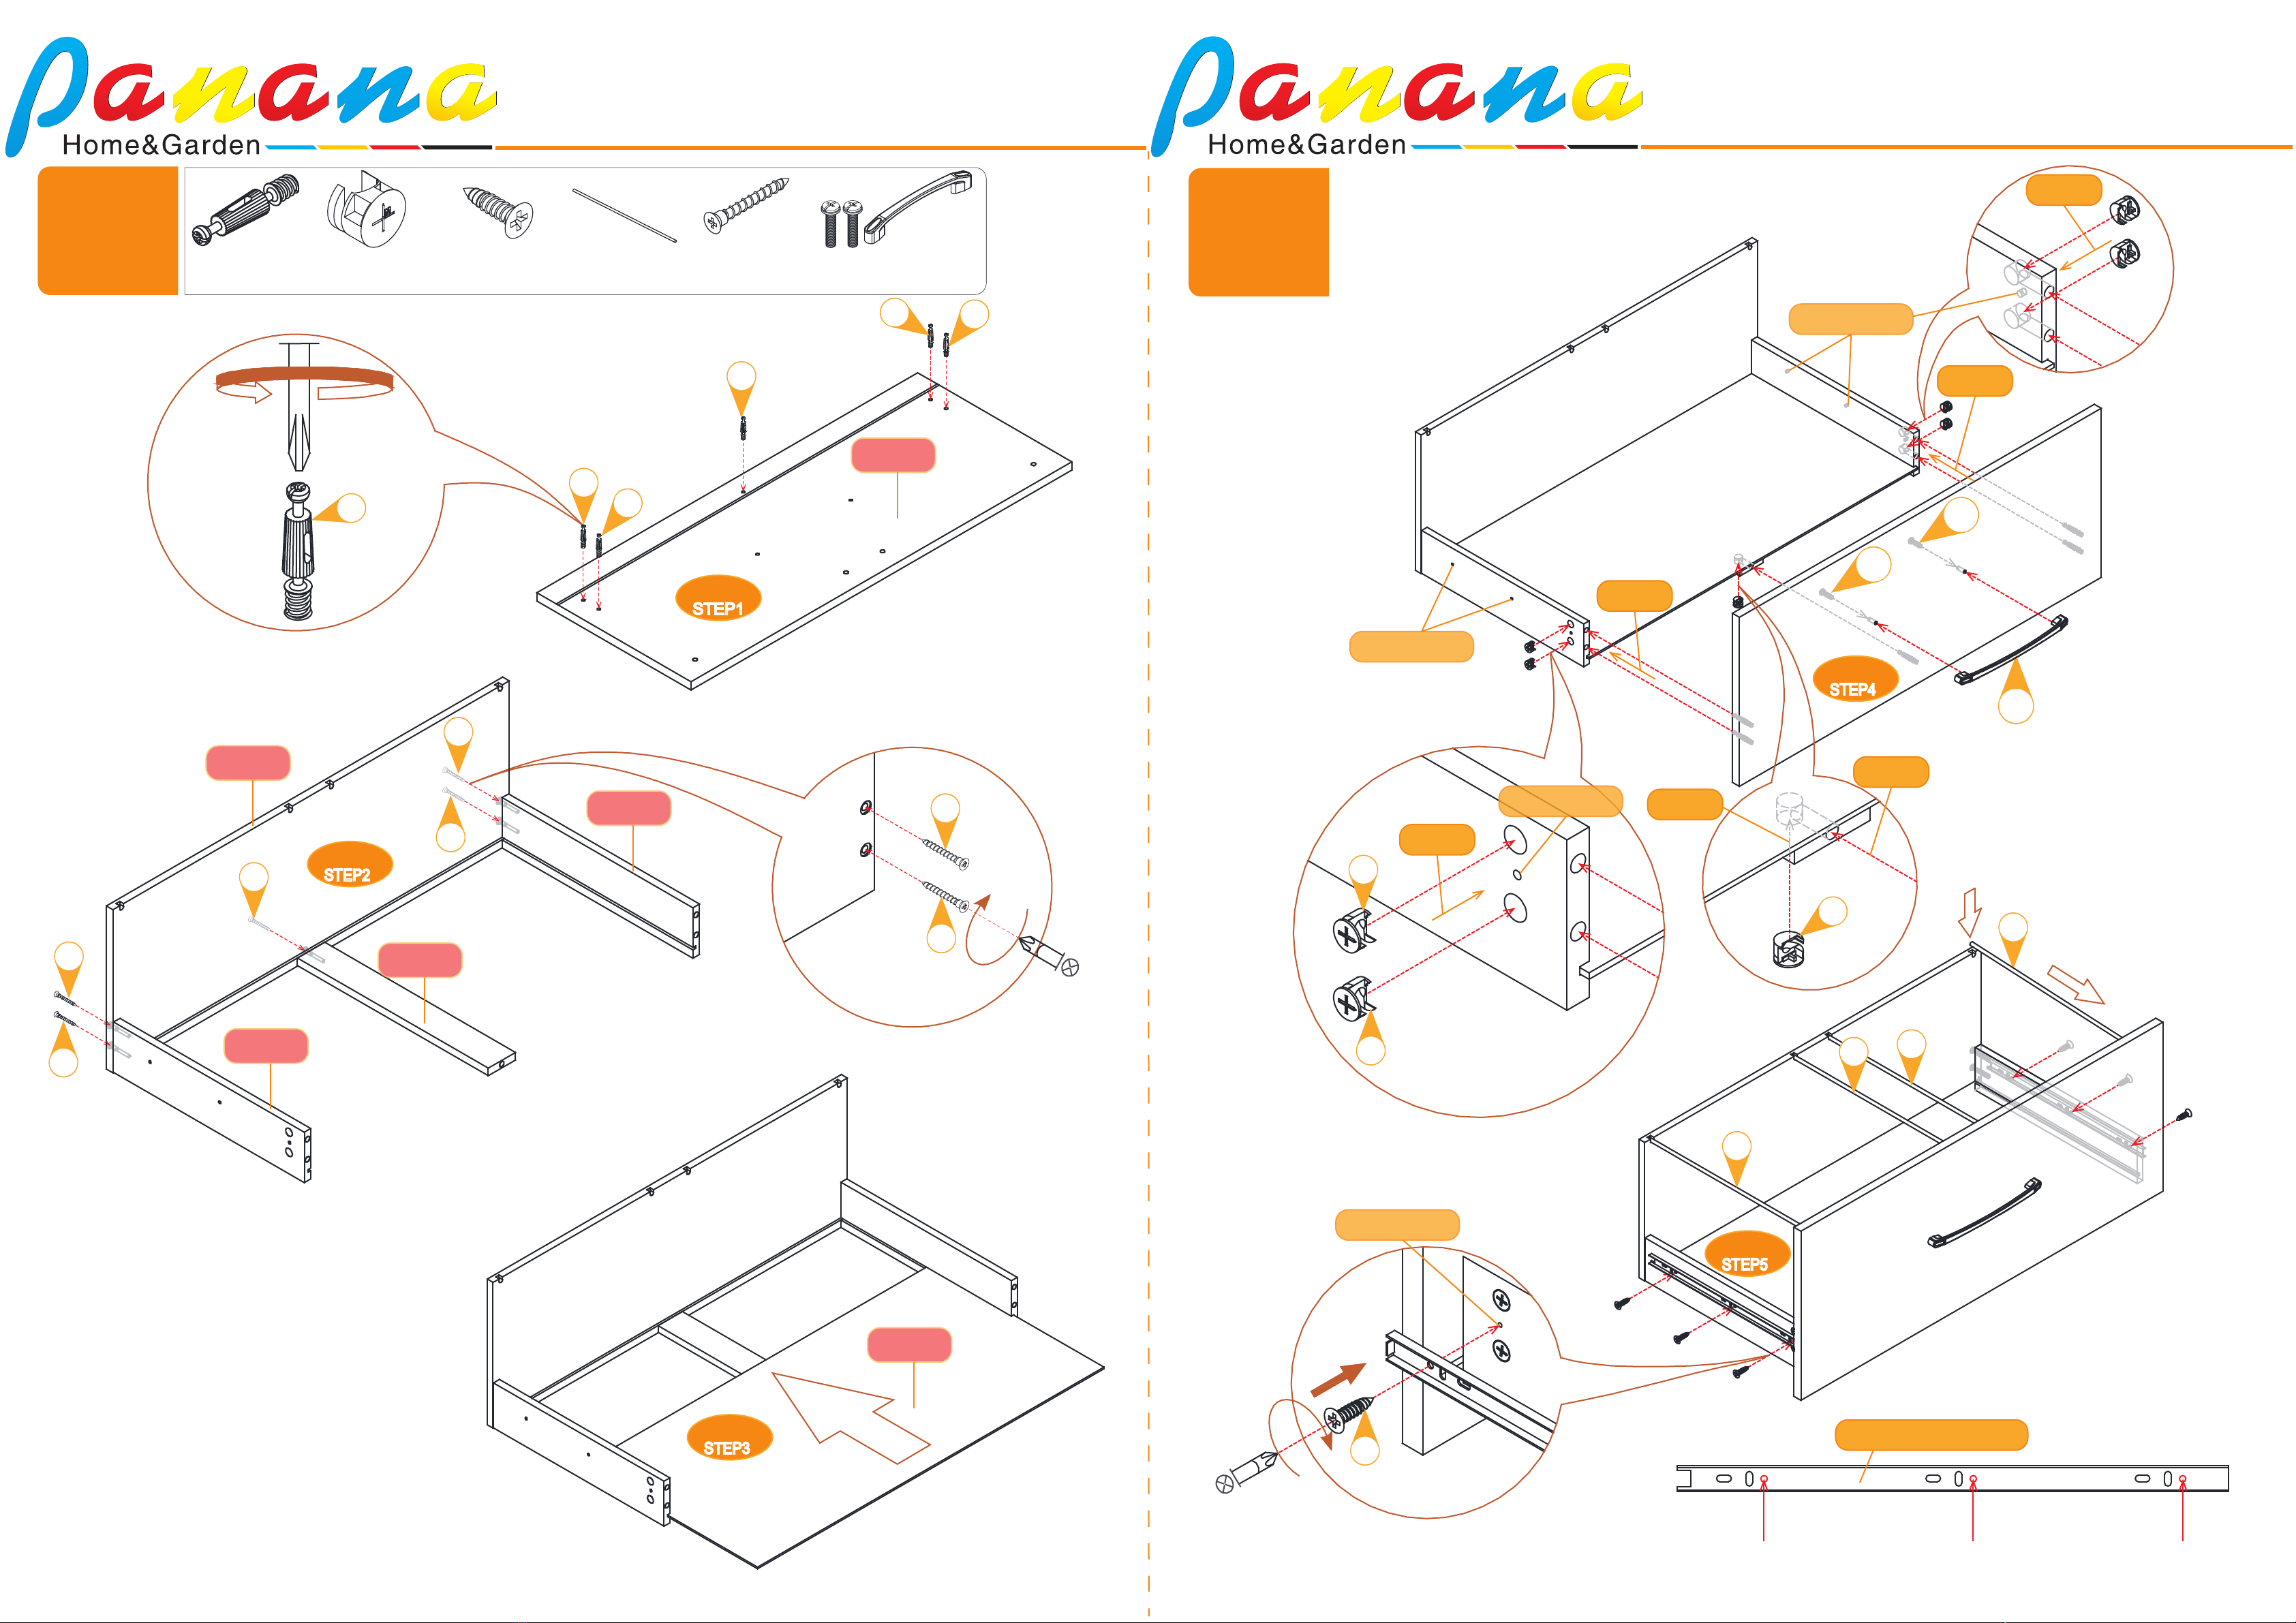
Tools needed:
Crosshead
Screwdriver Hammer
Keep all parts out of the children’s reach.
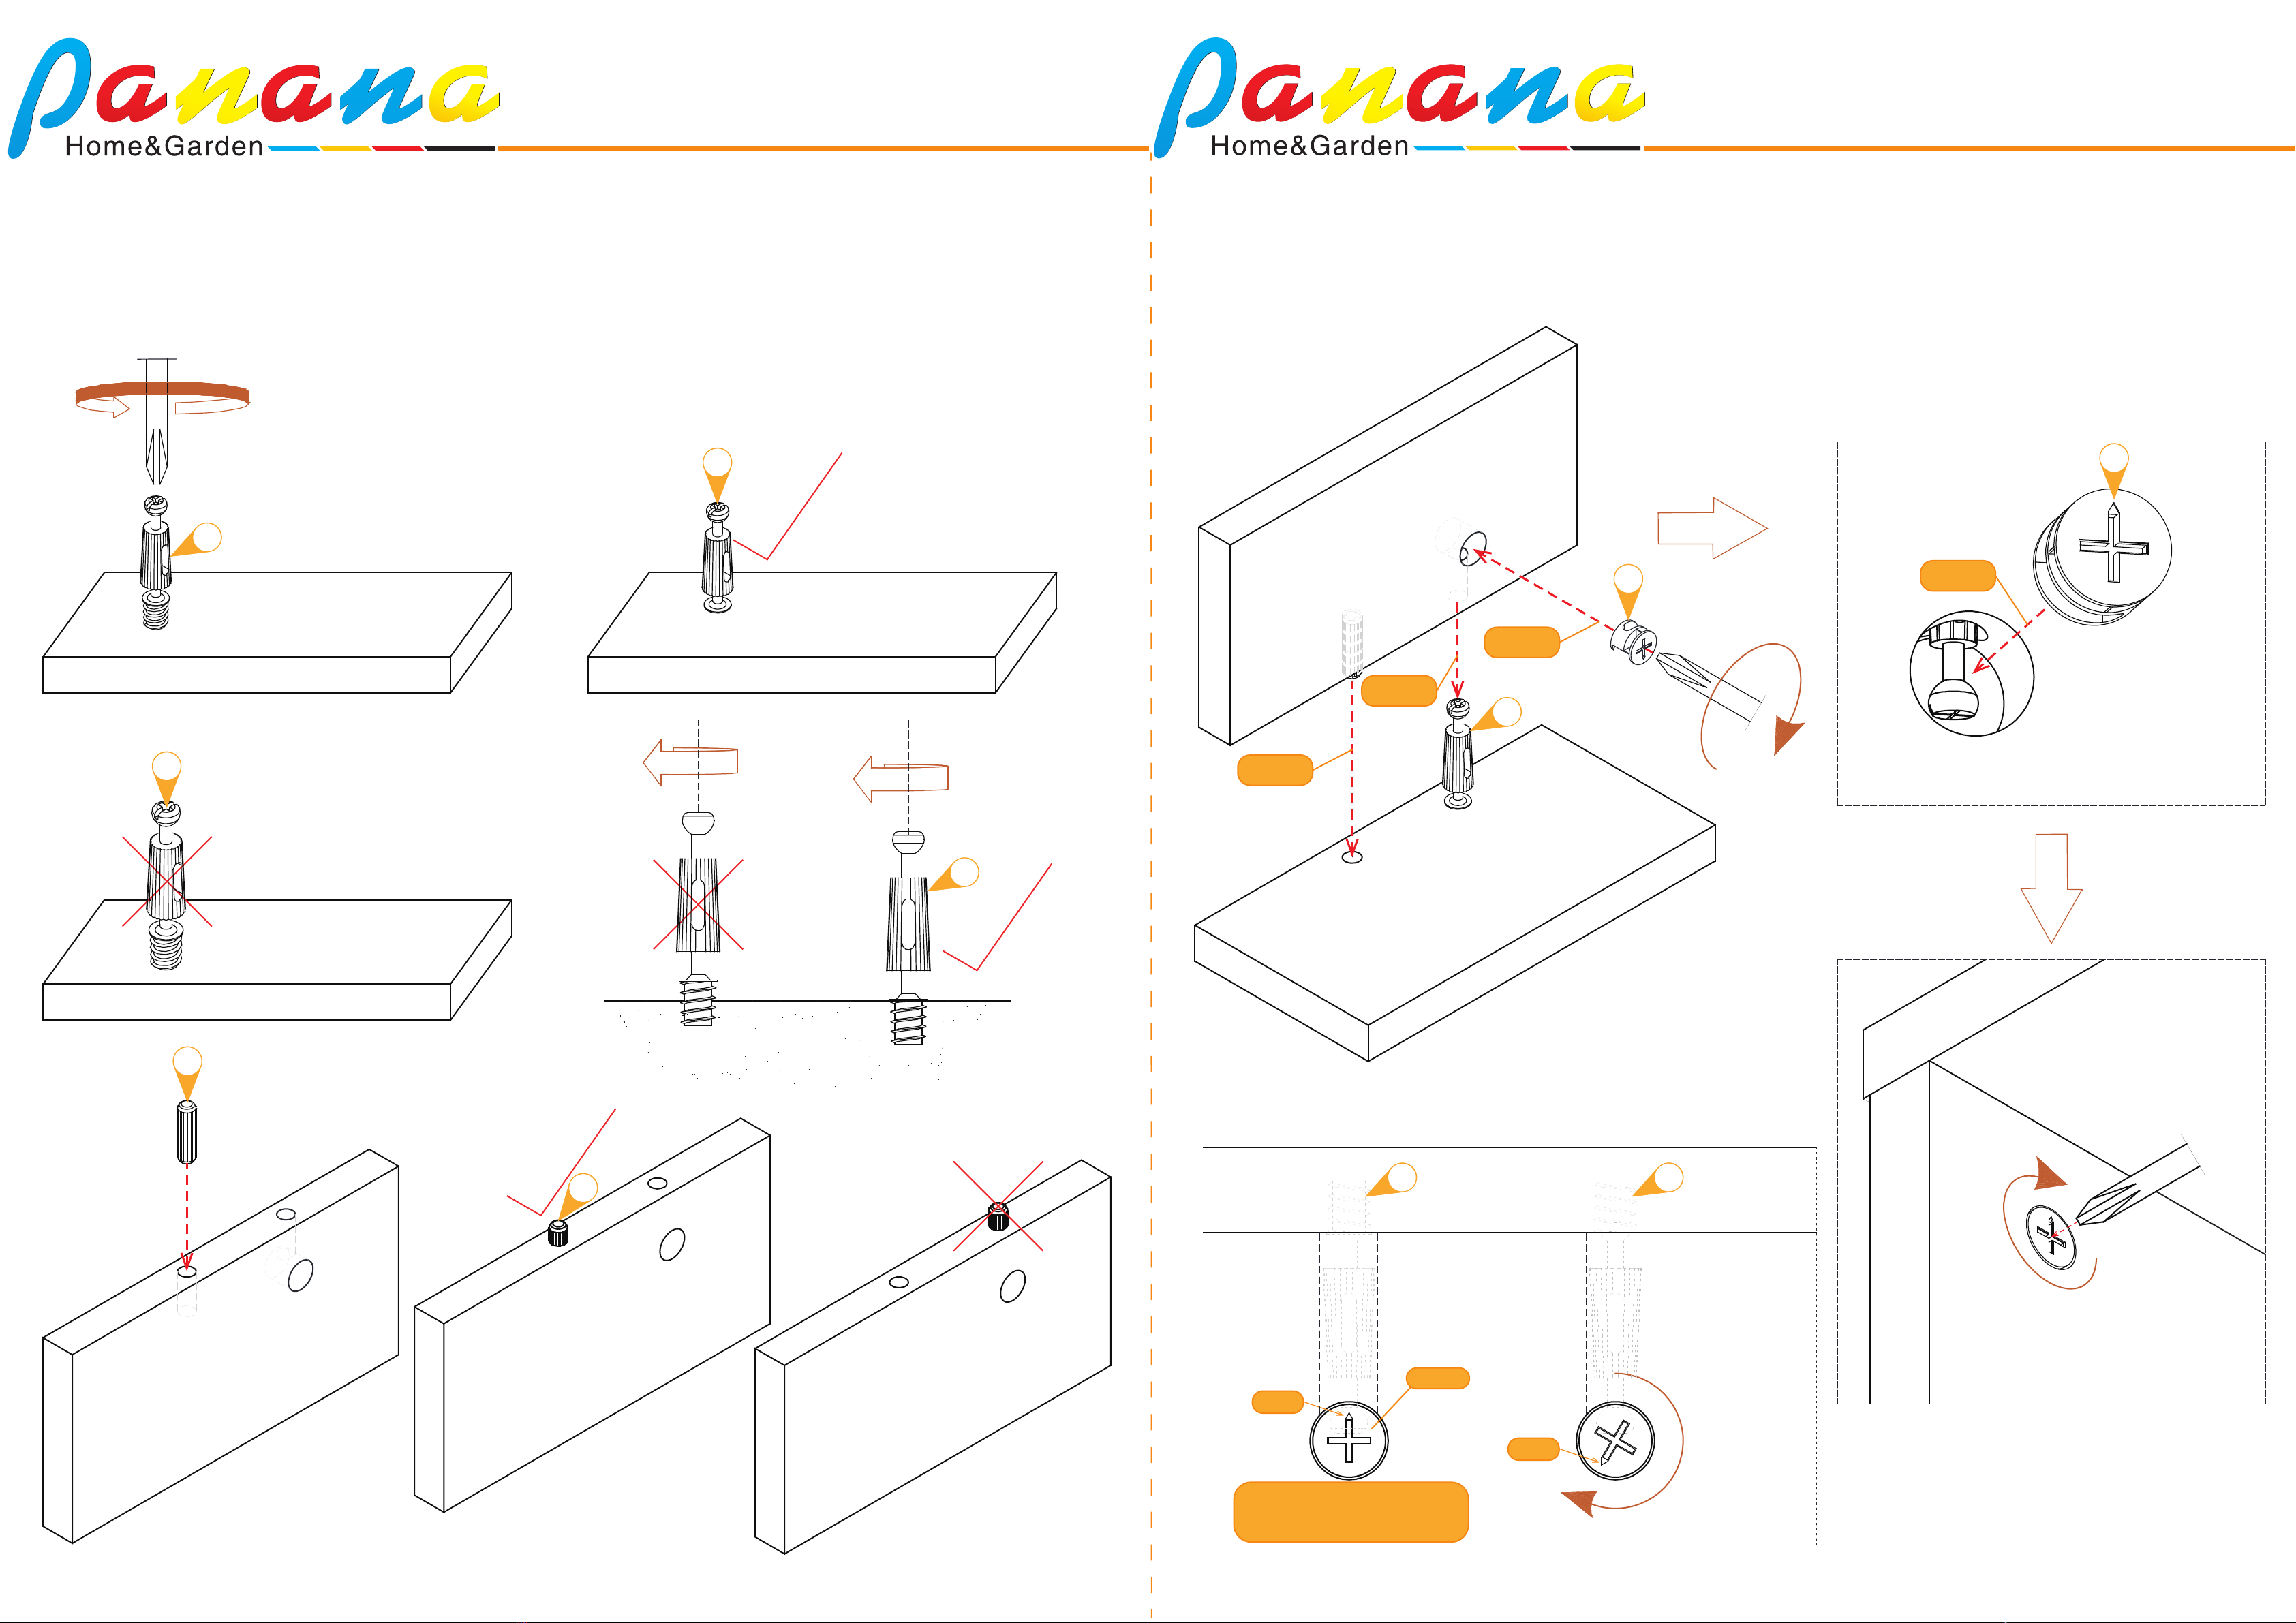
NOTE
crosshead screwdriver
Place all the panels on a clean and smooth surface, such as a rug orcarpet,
to prevent them from being scratched.
Make sure that all parts in your product package, including panels and
accessories, match up with those listed in the Panels & Accessories list.
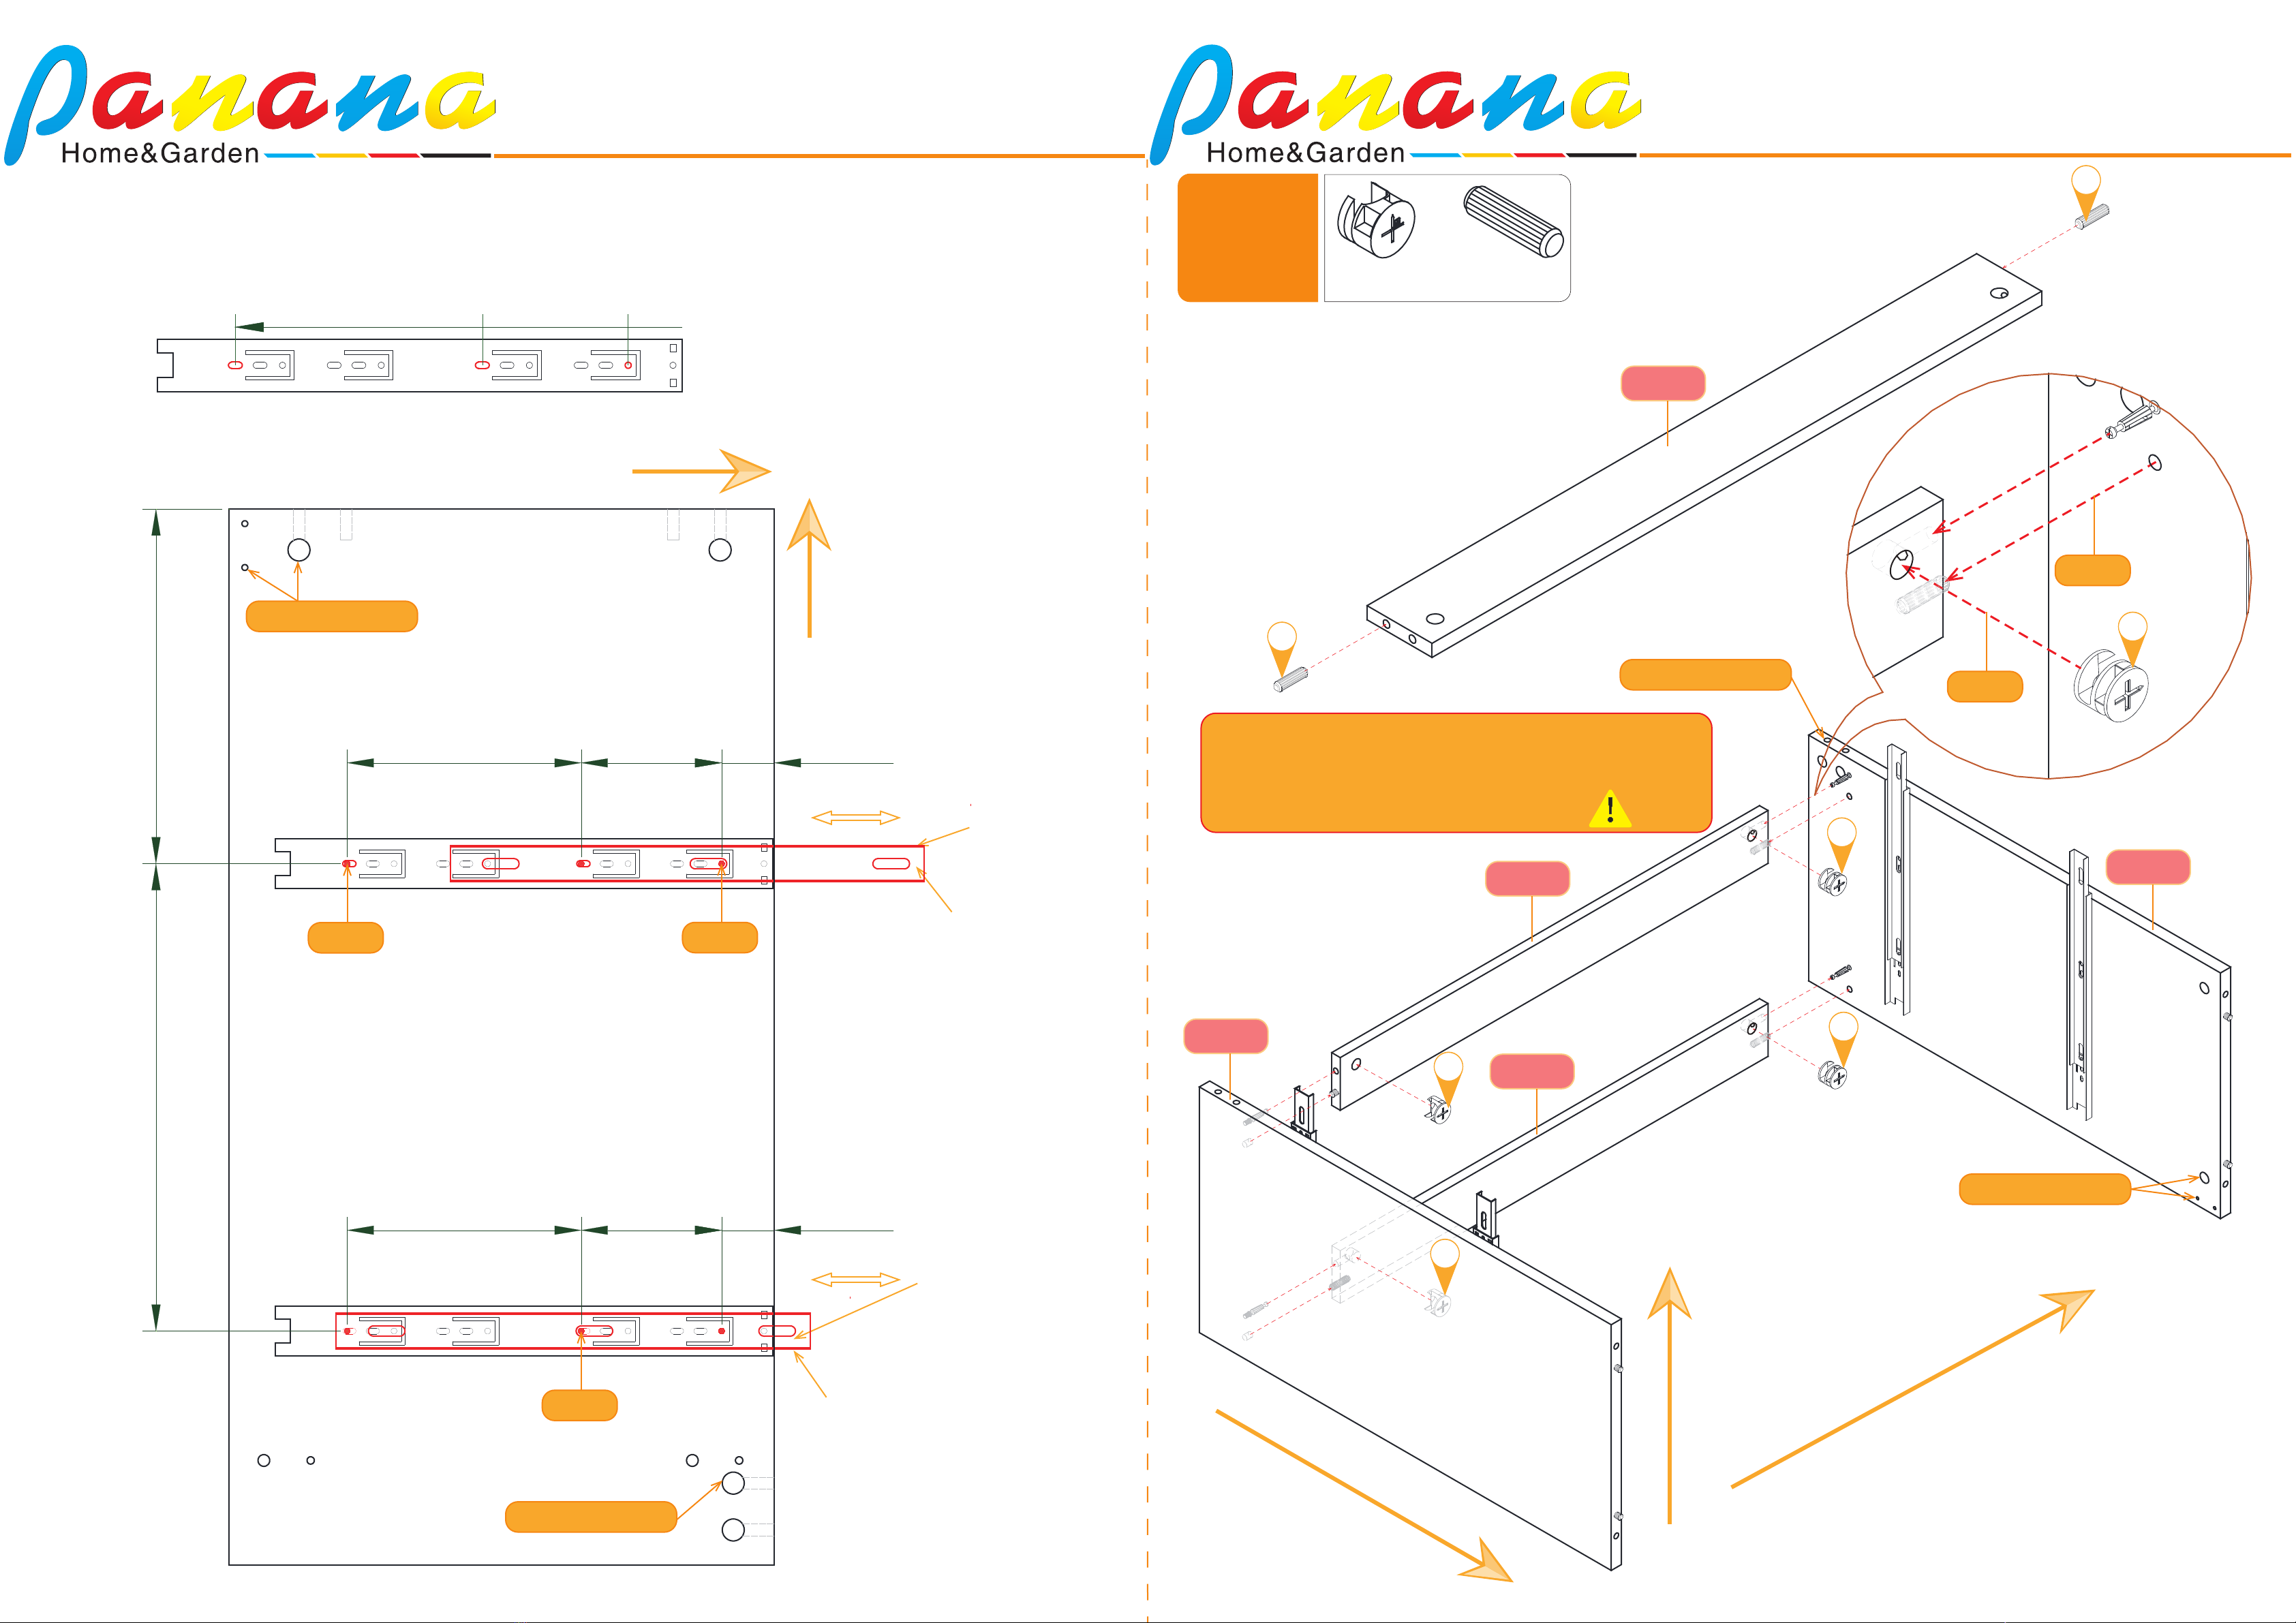
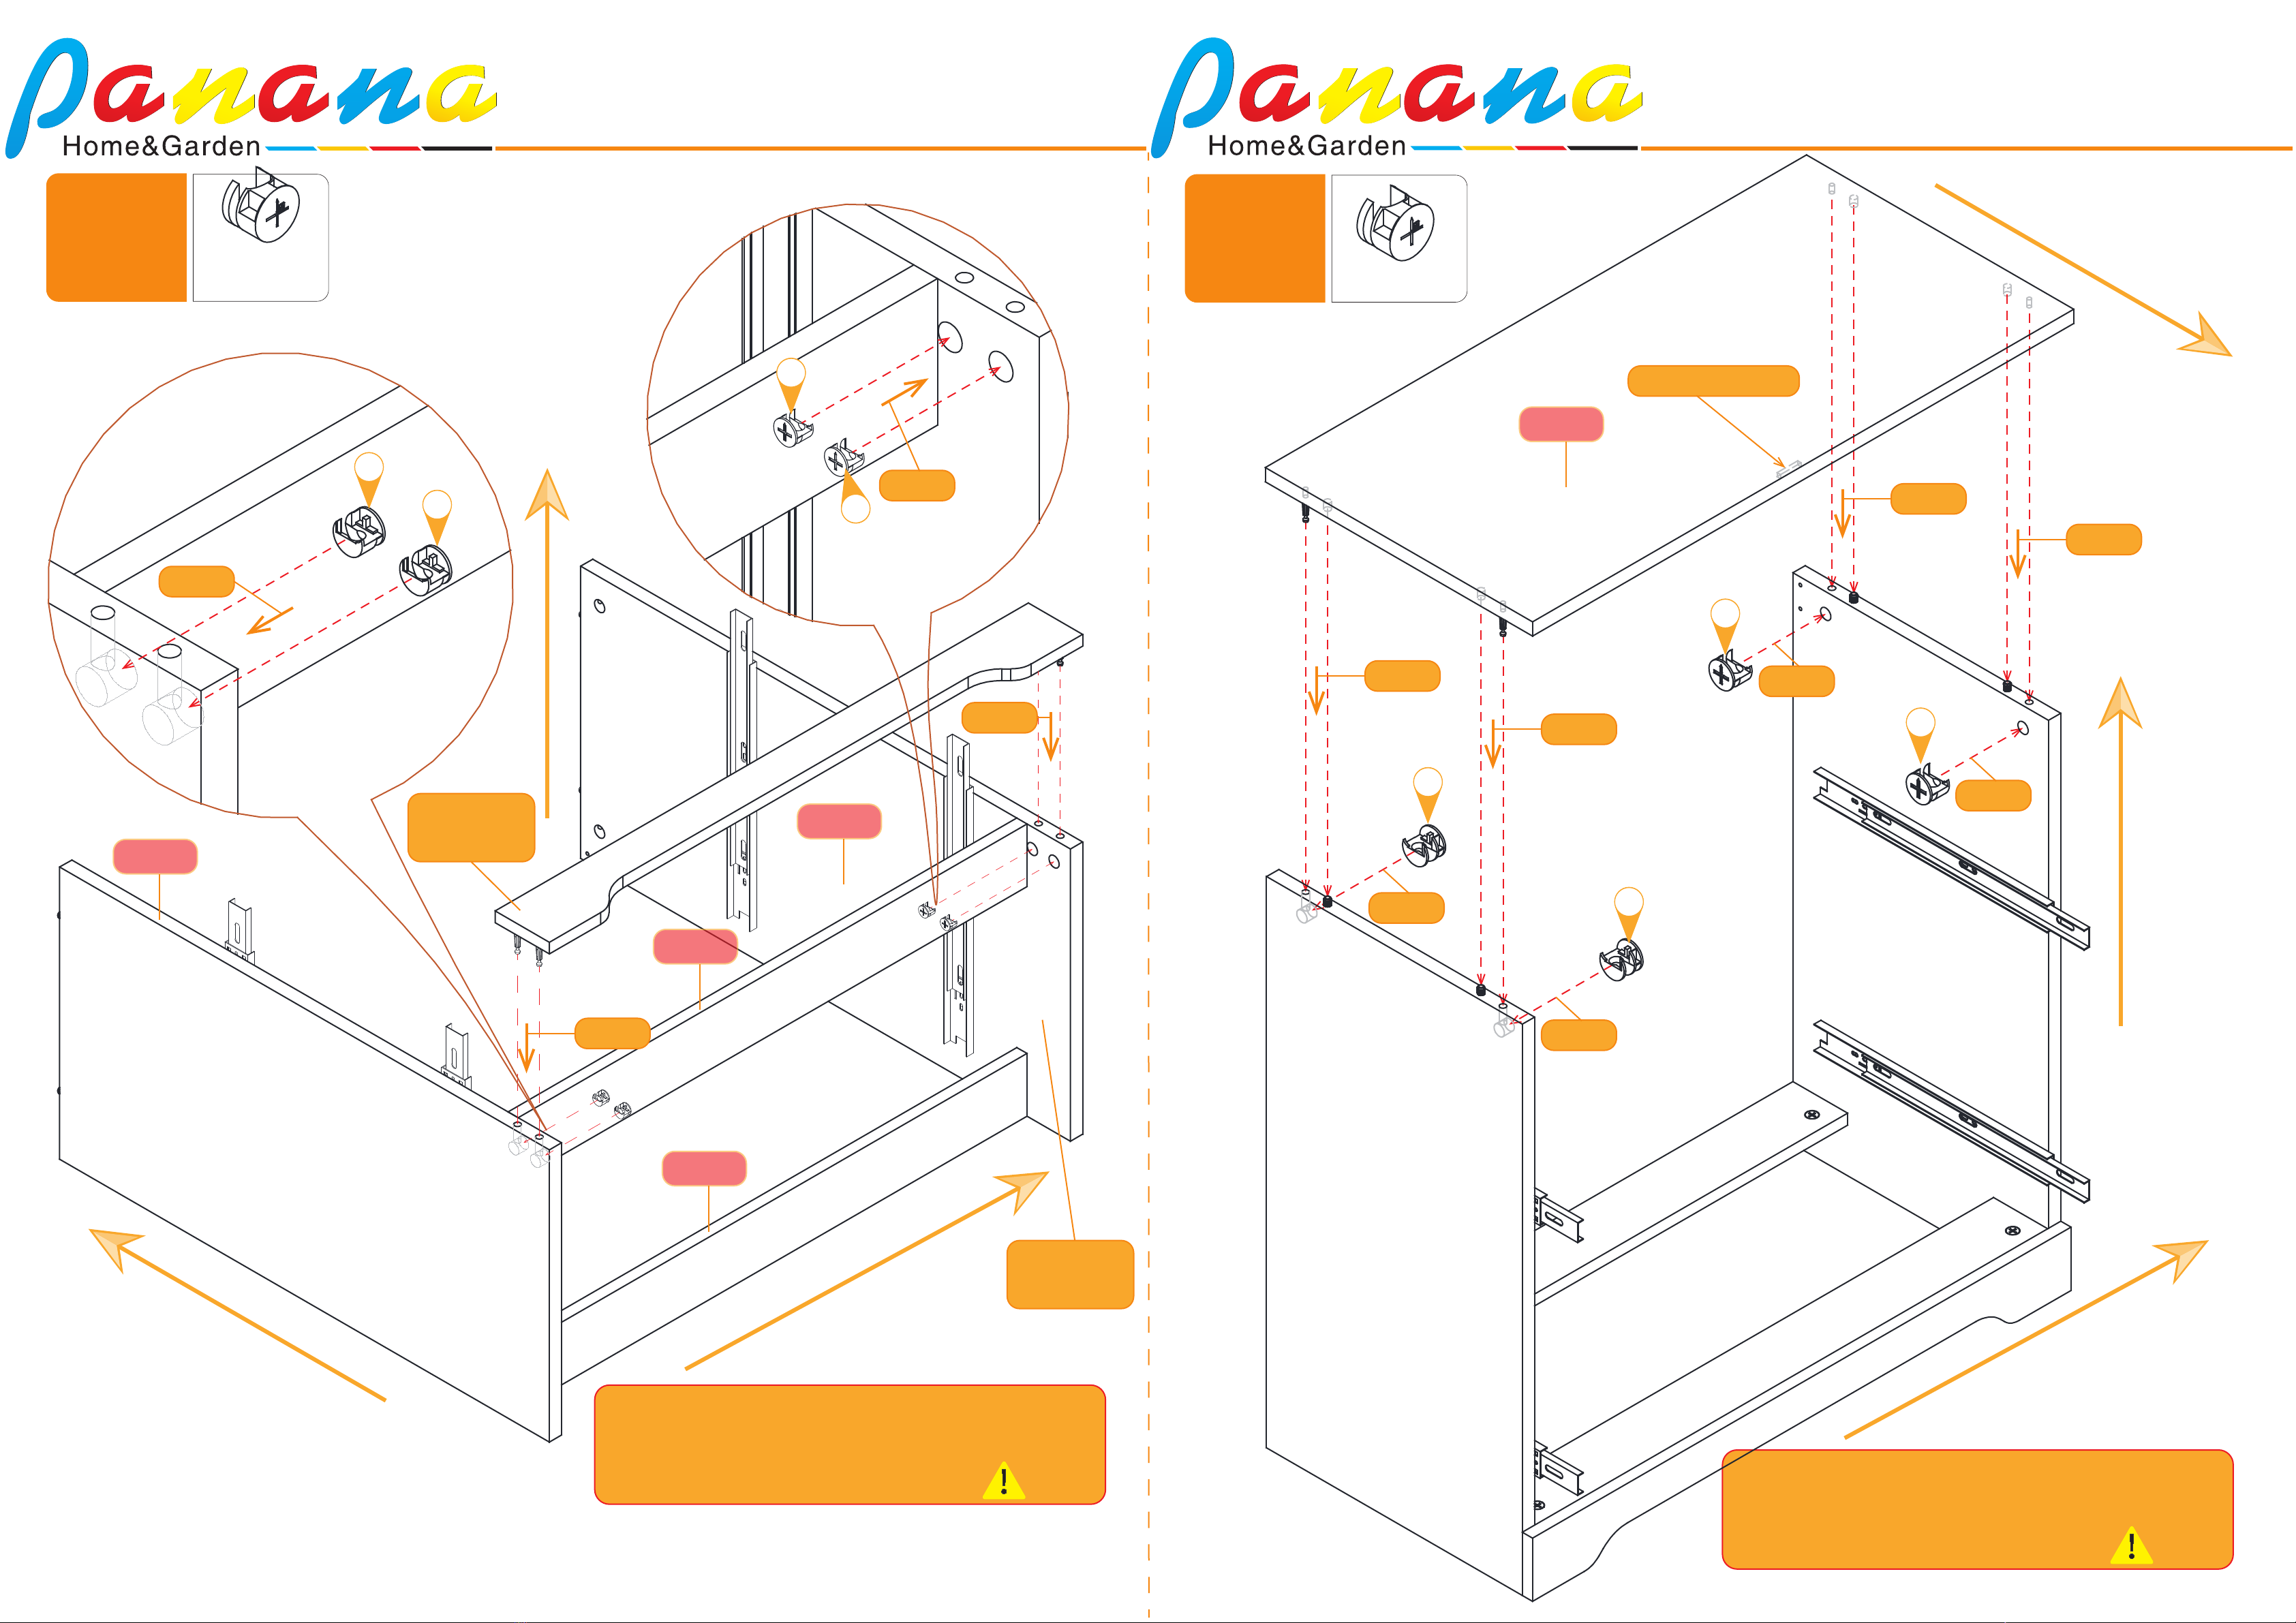
Don’t tighten screws or bolts until all the pieces are fitted.
It is recommended to have 2 persons to complete the assembly.
You need to have a crosshead screwdriver and hammer beforehand.
Both not included in package.
hammer
IMPORTANT: Tipping can injure young children.
NOTE
①Safe carriage,multi-people are needed.
②Handle with care,protective layer is required. ③In case of any doubts,contact Panana.
Home&Garden
WARNING
MWJG-6
Assembly Manual
CONTACT US
If you have any issue regarding the product, please contact us;
The paper version is not clear, please contact customer service to obtain the
electronic version.
Climbing Prohibit
MWJG-6 Assembly Manual

03/24 04/24
Exploded View
Note:
The accessories list is classified by the smallest packaging unit, and the kit accessories
represent the matching accessories and are packed in a separate package.
In order to facilitate installation, the panel has pre-drilled positioning holes for the
accessories. When installing, only need to match the mounting holes of the accessories
with the pre-drilled holes on the panel and lock them with the matching screws. For
details, see the relevant installation instructions.
MWJG-6
Assembly Manual
MWJG-6
Assembly Manual
①
②
③
④
⑤
⑤
⑥
⑥
⑦
⑧
⑨
⑩
⑨
⑩
Carpet
It is recommended to install
on soft pads such as carpets
⑬
⑬
⑪
⑪
⑫
⑫
X2
X1
⑤
⑥
①X1
②X1
X1
③
X1
④
X1
⑦
X1
⑧
X2
⑨
X2
⑩
X2
X2
X2
Please check the Panel list before installation.
Panel List
Item
no. Reference Image Qty. Item
no. Reference Image Qty.
⑬
⑪
⑫

05/24 06/24
MWJG-6
Assembly Manual
MWJG-6
Assembly Manual
A
Cam Lock Nuts
X22
BX12
Mini Cam Lock Nuts
CX10
X8
D
WoodDowel
E
Self-tapping screws
X24
ST4*12
FX2
14''
F(A)L
F(A)R
F(B)L F(B)R
3-Section Ball Bearing Slide Rail Kit
Detachable
G
vice
H
ST5*38
Back plate nail
LX1
X2
M
File Lever
J
The same left and right
X22
Cabinet Lock Kit
I
X10
X8
X18
K
L1
L2
L1
L1
L1
L3
L4
Cam Lock Nuts Cover
X2
Anti falling parts Kit
ST3.5*25
ST4*14
K1 K1
K2
K2
K3 K4
K4
K5
K5
Please check the Accessories list before installation.
Accessories List
Cam Screws
Φ6*35
Φ15*12
Φ12*10
Φ8*30
Φ6*365
Handle Kit
M1 M2
M1
M4*18
Center to Center:96mm/3.78"
Item
no. Reference Image Qty. Item
no. Reference Image Qty. 3-Section Ball Bearing Drawer Slide Rail Kit
Use Accessory "F"
IMPORTANT PRECAUTIONS
12.7mm/0.5in 12.7mm/0.5in
Side
panel
Side
panel
Drawer
Drawer side panel Drawer side panel
IMPORTANT PRECAUTIONS
Match the pre-drilled lead holes, and then fix
them with screws; (all accessory of our products
can use this method)
F(A)L/R
F(B)L/R
F(A)L/R F(B)L/R
Press the plastic part and pull out
F(B) to separate the drawer slides.
The same method is used for the left and
right slide rails. Fixed to the bottom of
the drawer side panel
F(A) F(B)
A
A
Section(A-A)
Fixed on the side
panel of the cabinet
Before installing the drawer slide rail, F must be split into two parts, F (A) and F (B).
F(A) Fixed on the side panel of the cabinet,F(B)Fixed to the bottom of the drawer
side panel.
Normal
Status
Please grip the F(A)
part while sliding the
F(B) part
The same left and right
Lever
2
7
13
a
b
c
Sliding parts
PULL
PRESS
Step1
Step2
Lever

07/24 08/24
MWJG-6
Assembly Manual
MWJG-6
Assembly Manual
Horizontal Panel Panel
Vertical Panel
Vertical Panel
Vertical Panel
WoodDowel
Horizontal Panel Horizontal Panel
Use Cam Screws 、Cam Lock Nuts、Dowel Kit(a)
IMPORTANT PRECAUTIONS
Cam Screws
RIGHT TURN
UNTIL TIGHT
ENSURE
THERE IS NO
GAP BETWEEN
THE PANELS
RIGHT TURN
UNTIL TIGHT
Use Cam Screws 、Cam Lock Nuts、Dowel Kit(b)
IMPORTANT PRECAUTIONS
RIGHT TURN
UNTIL TIGHT
ENSURE THERE IS NO GAP
BETWEEN THE PANELS
B for cabinet body,
C(mini) for drawer
Horizontal Panel
Vertical Panel
Step1
Step2
Step1
Step2
Open
Lock
B
B
A
A
A
A
A
D
DAA
B or C
Cam Lock Nuts

09/24 10/24
MWJG-6
Assembly Manual
MWJG-6
Assembly Manual
2
A 4X D 4X E 12X
1
A 8X
Front
A
A
A
A
A
A
A
A
Direction mark
A
Front
Note: The direction is based on the normal
placement of the product as a reference.
F(A)R
2
Direction mark
A
A
Direction mark
E
F(A)L X1
F(A)L X1
F(A)R X1
F(A)L X1
A
A
E
E
E
E
E
EE
E
E
E
E
E
D
D
D
D
Pre-drilled
Pre-drilled
Pull out this part
until it stops. At
this time, can see
all the mounting
holes.
Move this part until the
pre-drilled hole on this panel,
and then tighten it with a screw
Step1
Step2
Sliding
parts
Sliding
parts
Top
Front
①X1
④X1
②X1
③X1
Pre-drilled
Pre-drilled

11/24 12/24
MWJG-6
Assembly Manual
MWJG-6
Assembly Manual
3
Drawer slide rail positioning size parameter
IMPORTANT PRECAUTIONS
Top
Front
2
7
13
Sliding
parts
Sliding
parts
Move this part until
the pre-drilled hole
on this panel, and
then tighten it with
a screw
Pull out this
part until it
stops. At this
time, can
see all the
mounting
holes.
160 96 36
160 96 36
23
1
23
242.5319.5
1
Step1
Step1
Step2
Top
Left
Front
Direction mark
B
B
B
B
Step1
Step2
B
D
D
B 4X D 4X
Please pay attention to the direction
before assembling to avoid repeated
disassembly and assembly.
③X1
⑤X1
⑤X1
②X1
⑤X2
Direction mark
Direction mark
Direction mark

Please pay attention to the direction
before assembling to avoid repeated
disassembly and assembly.
13/24
14/
24
MWJG-6
Assembly Manual
MWJG-6
Assembly Manual
45
B 4X
Front
Right
Top
Step1
Step1
Step2
Step2
B
B
B
B
Please pay attention to the direction
before assembling to avoid repeated
disassembly and assembly.
④X1
③X1
B 4X
B
B
B
B
Step1
Step1
Step1
Step1
Step2
Step2
Step2
Step2
Direction mark
Right
Top
Front
②X1
⑤X1
⑤X1
③X1
①X1

15/24 16/24
MWJG-6
Assembly Manual
MWJG-6
Assembly Manual
6
I 18X
90°
90°
90°
90°
How to fine-tuning the cabinet.
IMPORTANT PRECAUTIONS
After the cabinet-body is installed, check whether the
cabinet-body is in the state shown in the figure below; if
there is any deviation, you can gently push the top panel
to fine-tune; the state shown in the figure is good, and the
back panel is fixed to make the whole cabinet stable.
Top
Left
⑥
⑥
The panel ⑥plays a great role in the
stability of the whole cabinet.
If panel ⑥is not in the state indicated
by "Picture 1" after ordering, please
remove the back panel and adjust it
before ordering panel ⑥, otherwise it
will affect the alignment of the panel
and the smoothness of the drawer
opening.
⑥
IX18
⑥X1
Picture1

17/24 18/24
MWJG-6
Assembly Manual
MWJG-6
Assembly Manual
77
M1
M2
M1
G 4X
A 5X C 5X E 6X H 5X M 1X
A
A
A
A
A
A
H
H
H
H
H
H
H
⑦X1
⑨X1
⑩X1
⑫X1
⑪X1
⑬X1
G
M2
a
b
c
a
b
c
a
abc
F(B)Rx1/F(B)Lx1
C
C
M1
M1
C
Step2
Step2
Step1
Step1
Step1
Step2
Pre-drilled
Pre-drilled
E
E
E
E
E
E
E
G
G
G
Pre-drilled
Pre-drilled
STEP1
Drawer installation
STEP2
Drawer installation
STEP3
Drawer installation
STEP4
Drawer installation
STEP5
Drawer installation

19/24 20/24
MWJG-6
Assembly Manual
MWJG-6
Assembly Manual
abc
88
L 1X
L1
L2
L1
L1
L1
L3
M1
M2
M1
G 4X
A 5X C 5X E 6X H 5X M 1X
A
A
A
A
A
A
H
H
H
H
H
H
H
⑧X1
⑨X1
⑩X1
⑫X1
⑪X1
⑬X1
G
M1
C
Step2
F(B)Rx1/F(B)Lx1
Pre-drilled
E
G
G
Pre-drilled
Pre-drilled
L1
L1
L1
L1
L2
L3
a
E
E
E
E
E
E
a
b
c
a
b
c
Step3
C
C
C
C
Pre-drilled
G
M1
M2
Step1
STEP1
Drawer installation
STEP2
Drawer installation
STEP3
Drawer installation
STEP4
Drawer installation
STEP5
Drawer installation

21/24 22/24
MWJG-6
Assembly Manual
MWJG-6
Assembly Manual
9
K 2X J 22X
1
4
2
10
Drawer Assembly
Effect After Assembly
J
3
K1
K3
K1
K4
K2
K4
K4
K5
K1
Walls
K3
Walls

23/24 24/24
MWJG-6
Assembly Manual
MWJG-6
Assembly Manual
How to remove the drawer.
IMPORTANT PRECAUTIONS
DREAWER FRONT VIEW
Make room for what matters.
Climbing Prohibit
Table of contents
Other panana Indoor Furnishing manuals