Panasonic SC-ALL2 User manual

RQT0A27-2B
Operating Instructions
<Full version>
Wireless Speaker System
Model No. SC-ALL2
Thank you for purchasing this product.
Please read these instructions carefully before using this product,
and save this manual for future use.

- 2 -
Table of contents
Accessories............................................................................................. 3
Unit care.................................................................................................. 4
About Bluetooth®..................................................................................... 5
Control reference guide........................................................................... 7
Network indicator illumination ................................................................. 8
Connections .......................................................................................... 10
Network settings.................................................................................... 12
Streaming music over the network ........................................................ 21
Bluetooth® operations............................................................................ 30
AUX input .............................................................................................. 35
Rear surround ....................................................................................... 36
Firmware updates ................................................................................. 38
Others ................................................................................................... 39
Troubleshooting..................................................................................... 47
Specifications ........................................................................................ 52
How to use this manual
Click/Tap this icon to jump to “Table of contents”.
≥Pages to be referred to are indicated as “l±±”. You can jump to the
corresponding page by clicking/tapping this.

- 3 -
Accessories
≥Do not use AC mains lead with other equipment.
≥Product numbers provided in this operating instructions are correct as of May
2015. These may be subject to change.
1 AC mains lead
For the black model: (K2CT2YY00097)
For the white model: (K2CT2YY00110)
For the black model: (K2CQ2YY00119)
For the white model: (K2CQ2YY00136)
(K2CJ2YY00101)
- 4 -
Unit care
Clean this unit with a soft, dry cloth.
≥Never use alcohol, paint thinner or benzine to clean this unit.
≥Before using chemically treated cloth, carefully read the cloth’s instructions.
∫To dispose or transfer this unit
The unit may keep the user settings information in the unit. If you discard
this unit either by disposal or transfer, then follow the procedure to return
all the settings to the factory defaults to delete the user settings.
(l47, “To restore the settings to the factory defaults”)
≥The operation history may be recorded in the memory of this unit.
Disposal of Old Equipment
Only for European Union and countries with recycling
systems
This symbol on the products, packaging, and/or
accompanying documents means that used electrical and
electronic products must not be mixed with general household
waste.
For proper treatment, recovery and recycling of old products,
please take them to applicable collection points in accordance
with your national legislation.
By disposing of them correctly, you will help to save valuable
resources and prevent any potential negative effects on
human health and the environment.
For more information about collection and recycling, please
contact your local municipality.
Penalties may be applicable for incorrect disposal of this
waste, in accordance with national legislation.

- 5 -
About Bluetooth®
∫Frequency band used
This system uses the 2.4 GHz frequency band.
∫Certification of this device
≥This system conforms to frequency restrictions and has received
certification based on frequency laws. Thus, a wireless permit is not
necessary.
≥The actions below are punishable by law in some countries:
– Taking apart or modifying the unit.
– Removing specification indications.
∫Restrictions of use
≥Wireless transmission and/or usage with all Bluetooth® equipped
devices is not guaranteed.
≥All devices must conform to standards set by Bluetooth SIG, Inc.
≥Depending on the specifications and settings of a device, it can fail to
connect or some operations can be different.
≥This system supports Bluetooth® security features. But depending on
the operating environment and/or settings, this security is possibly not
sufficient. Transmit data wirelessly to this system with caution.
≥This system cannot transmit data to a Bluetooth® device.
∫Range of use
Use this device at a maximum range of 10 m.
The range can decrease depending on the environment, obstacles or
interference.
∫Interference from other devices
≥This system may not function properly and troubles such as noise and
sound jumps may arise due to radio wave interference if this system is
located too close to other Bluetooth® devices or the devices that use the
2.4 GHz band.
Panasonic bears no responsibility for data and/or information that is
compromised during a wireless transmission.

- 6 -
≥This system may not function properly if radio waves from a nearby
broadcasting station, etc. are too strong.
∫Intended usage
≥This system is for normal, general use only.
≥Do not use this system near an equipment or in an environment that is
sensitive to radio frequency interference (example: airports, hospitals,
laboratories, etc.).

- 7 -
Control reference guide
1Display
2Network indicator (l8, 9)
3Internet radio preset channel
switches [1] to [6] (l28)
(These switches are without
illumination.)
4
Display switch and indicator [DISP]
5Alarm switch and indicator [ ]
6AUX switch and indicator [AUX]
7Bluetooth® switch and indicator
[]
8Network switch and indicator
[NET]
Enter WPS pairing mode (l17) /
firmware update mode (l38)
9Standby/on switch and
indicator [Í/I]
Touch to switch the unit from on to
standby mode or vice versa. In
standby mode, the unit is still
consuming a small amount of
power.
10 Volume control switch and
indicator [VOL –]/[VOL +]
Adjust the volume (0 (min) to
50 (max))
§These switches work just by
touching the marks. Each time you
touch the switch, there will be a
beep sound. The beep sound can
be set to off. (l45)
3
45678
910
12
※
※※※※※
※※
Top view
- 8 -
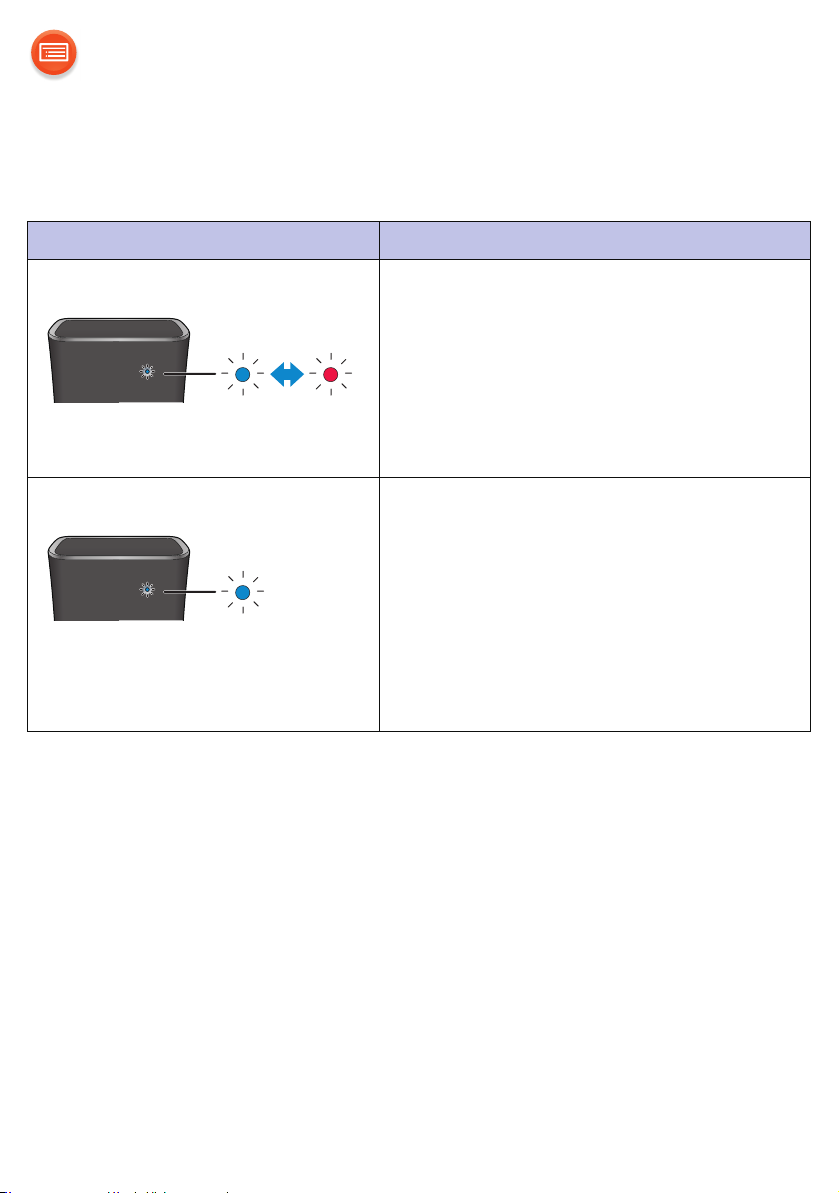
Network indicator illumination
The below illustrates the network indicator illumination patterns.
Network indicator Description
Illumination: blue/red Blinks alternately
≥The unit is carrying out an internal
process.
– Wait for approximately 1 minute
before the blinking stops.
– Do not disconnect the AC mains lead.
Doing so may cause malfunction or
damage.
Illumination: blue Blinks slowly
≥The unit is ready for network setup.
(l12)
Blinks
≥The unit is waiting for the WPS
PUSH connection. (l17)
Blinks fast
≥The unit is waiting for the WPS PIN
code connection. (l17)


- 10 -
Connections
≥This unit consumes a small amount of AC power (l52) even when turned off.
≥For the purpose of power conservation, disconnect the power supply if you will
not be using it for extended period of time.
Some settings will be lost after you disconnect the system. You have to set
them again.
≥This speaker does not have magnetic shielding. Do not place them near a TV,
PC or other magnetic devices.
≥Do not disconnect the AC mains lead when the unit is on. Doing so may cause
malfunction or damage.
To a household mains socket
AC mains lead
(supplied)
Other manuals for SC-ALL2
3
Table of contents


