Panio CH8820K User manual

1
PANIO
CH8820K User manual

2
Contents
1. Packing ..................................................................................................................3
2. Panel description .................................................................................................. 3
3. Matrix Switcher control ........................................................................................ 4
Remote Control ..................................................................................................... 4
WEB GUI Browser control ..................................................................................... 4
Application(MCS) Control ......................................................................................6
Front Panel Switching Operation .......................................................................... 6
COM Control Commands .......................................................................................7
EDID Dip Switch ..................................................................................................... 8

3
1. Packing
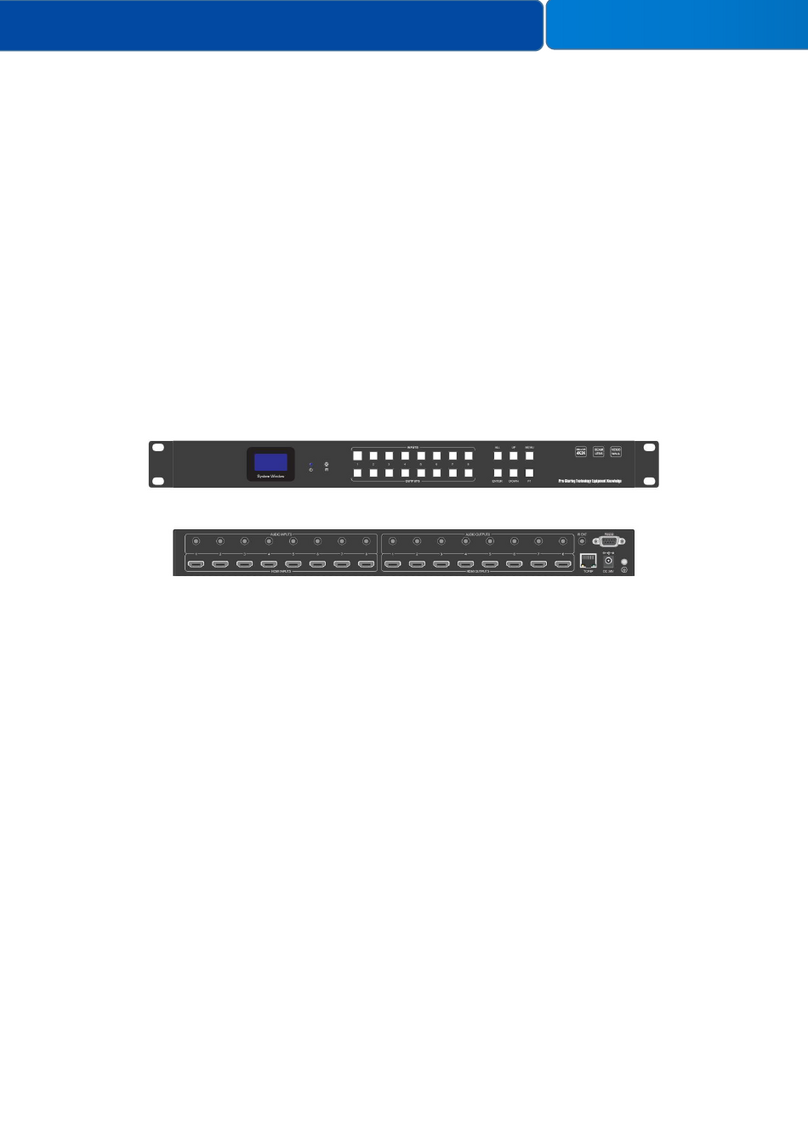
2. Panel description
Front panel
1LCD screen: displays input-output selection status, EDID information, etc.
2Signal indicator light: used to display the machine signal status.
3INPUT: 8 HDMI input buttons
4OUTPUT: 8 HDMI output buttons
5Control:
MENU: Select between View, Switch, Scene Save/ Recall and Setup
UP: for upward controlling, Press INPUT N+UP All screens display N screen.
Down: for upward controlling
SAVE: Press to save the switching status.
ENTER: Press to confirm to save the setting.
RECALL: Press it to recall the presets/ scenes.
Back panel
1LAN: for the IP/TCP control, the default IP address LAN1: 192.168.0.80 LAN2: 192.168.1.80
RS232 : Female RS232 port for the R232 control
2HDMI IN:HDMI input interface, 8 HDMI signals are input at the same time
No.
Name
Qty
Unit
1
CH8820K
1
Pcs.
2
DC 12V power adapter
1
Pcs.
3
Remote Control Battery not provided
1
Pcs.
4
User manual
1
Pcs.

4
3HDMI OUT:HDMI output interface, 8 HDMI signals output at the same time
4INPUT AUDIO: Add an external audio source
5OUTPUT AUDIO: External speaker equipment
6DC12V: power supply port
7ON/OFF: power off/on switch
3. Matrix Switcher control
This Matrix switcher can support IR remote, APP, RS232/TCP/IP software, WEB GUI browser or the front
push-buttons control.
Remote Control
Switch: first press Input + Auto + Output + ENTER
Scene save: Press the Input number + SAVE
Scene recall: Press the Input number + RECALL
WEB GUI browser Control
The default IP address LAN1: 192.168.0.80, LAN2: 192.168.1.80
After opening the browser, users can type the matrix switcher IP address and press enter:
The default user name is admin and the password is admin.
Switch interface:
All input and output ports can be renamed,Multi-function buttons area, through simple Settings, can
be controlled through the serial port peripheral devices, such as projector switch. No setting is the
scene call shortcut button.
Or users can use the shortcut buttons on the right for the fast switching:

5
Scene interface:
It can support 40 scenes in total, users can preview each scene switching status by clicking on any
of the scene number. Click “Save” to save the switching status, and “Load” to recall the scenes.
“Back” to return back to the switch interface. All scenes support to be renamed.
Caption interface:
Users can rename the scenes, input and output names here, users can change all the names and
then need to click the“Save”button on the right. After renamed the names, users will see the
input, output and the scenes names have changed once click to the“Switch”and “Scenes”
interface. With this renaming function, it can be easier for the users to know the sources and
ends.

6
Setup interface is for users to change the login user name and password, the default user name and password is
admin.
More interface:
For the more interface, users mainly can do the firmware upgrade here.
Screen is for the other matrix models which with the touch screen, so users can monitor the
touch screen switching status.
For the upgrade, users need to check with the factory to get the firmwares, the firmware is “.zip”
format.
License and Debug is for factory engineering team to have the technical support.
Manager interface:
This Manager interface, it allows the users to manage at most 254 units of the matrices which are
installed at the same area network and at the same gateway but different IP addresses. As below
are showing 3 matrices, users can rename each matrix and click button to do the switching or
open in a new manage window.
APP control
The matrix switchers also can support the iOS and Android APP control, users can search the
keyword “Matrix Control System” in Apple store or the Google Play Store.
Step 1: Make sure the matrix well connected with the WIFI router, and the iPad/Android
devices are connected to this same WIFI. Then open on the MCS(matrix control system) APP
and Enter the IP address of the matrix switcher(the default IP addresses are: 192.168.0.80 or
192.168.1.80).
Step 2: After Enter the IP address, it will need to login, the default user name and password
both are the admin.
Step 3: After log in successfully, users can do the same functions as the WEB GUI operation.
Font buttons switching operation

7
Switching operation
Switching with industry 2-key fast switching, first press the input button and then select/press output
button. Details are as follow:
There are 8 input buttons, 8 output buttons. First press MENU to show SWITCH interface, then
can continue the next switching step.
Press input number at the INPUT area, the input button will light up with blue light.
Then press output number at the OUTPUT area, and the output button will light up. Users also
can press the UP button to realize 1 to ALL switching.
If need to cancel switching, can press the button again to cancel. Users also can press the DOWN
button to cancel all outputs.
Scene Operation
The system can save 40 scenes, after switching successfully in the SWITCH interface, press MENU
button and switch to SCENE interface.
Enter the wanted scene save number(1~8), then press SAVE. If want to reload the saved scene,
press the scene number and press RECALL button
Note: When the scene save/recall is made through the front button, the maximum number of
save/recall is 16.
Setup Operation
First press MENU switch to SETUP interface, then continue next operation
Via SETUP, it can realize IP address changing, in SETUP interface can use UP/ DOWN button to
position, enter the needed IP address from the left button side, then press SAVE button to save
View Operation
Via MENU button switch to VIEW interface, will display the current switching status
COM Control command
RS232 cable with straight-through connection (USB-RS232 can be used directly to control)
Communication protocol:
Baud rate: 115200
Data bit: 8
Stop bit: 1
Check bit: None
Commands
Explanation
Function description
YAll.
Y=1,2,3,4......
Switch Input Y to all the outputs
Eg. “1ALL.” means switch input 1 to all outputs
All1.
One to one
Switch all the channels to be one to one. Eg.1->1, 2->2,
3->3……
YXZ.
Y=1,2,3,4......
Z=1,2,3,4......
Switch Input Y to Output Z
Eg. “1X2.” means switch Input 1 to output 2
YXZ&Q&W.
Y=1,2,3,4......
Z=1,2,3,4......
Q=1,2,3,4......
W=1,2,3,4......
Switch Input Y to Output Z, Q, W
Eg. “1X2&3&4.” means switch Input 1 to Output 2, 3, 4

8
Note:
ery command ends with a period “.” and it can’t be missing.
The letter can be capital or small letter.
Switch success will return as “OK”, and failed will return as “ERR”.
EDID Dip-switch
Input
Output
SaveY.
Y=1,2,3,4......
Save current status to scene Y
Eg. “Save2.” means saving current status to Scene 2
RecallY.
Y=1,2,3,4......
Recall the saved scene Y
Eg. “Recall2.” means recall the saved Scene 2
BeepON.
Beep sound
Buzzer on
BeepOFF.
Buzzer off
Y?.
Y=1,2,3,4.......
Check the Input Y to outputs switching status
Eg. “1?.” means to check Input 1 switching status
No.1
No.2
No.3
No.4
0
0
0
External EDID
3.5mm Audio
1: 3.5mm Audio embed
0: 3.5mm Audio De-embed
0
0
1
DVI-1080
0
1
0
DVI-1200
1
0
0
1080P 2.1
0
1
1
1440*900
1
0
1
HDMI-1200
1
1
0
4K 2.1
1
1
1
4K 60Hz
No.1
No.2
No.3/4
0
0
Resolution bypass
No functions
0
1
Force the 4K 30/50/60Hz resolution
to 1080P30/50/60
1
0
Force 4K 50/60Hz 4:2:0 resolution
to 4K 50/60Hz 4:4:4
1
1
Resolution bypass
Table of contents
Other Panio Matrix Switcher manuals

Panio
Panio HD1400K User manual

Panio
Panio HD1800K User manual

Panio
Panio HD4420K User manual

Panio
Panio HD8820K User manual

Panio
Panio CH8800K User manual

Panio
Panio CH8830K B User manual

Panio
Panio CH8810K User manual

Panio
Panio CH4400K User manual

Panio
Panio CH8810K User manual

Panio
Panio HW2250K User manual
Popular Matrix Switcher manuals by other brands

DirekTronik
DirekTronik SX-SMX99B Operation manual

Eurosound
Eurosound HM88A-4K-IP user manual

Intelix
Intelix FLX-3232 Installation and operation guide

AMX
AMX AVS-OCT-4864-217 Product View

Key Digital
Key Digital KD-MSVA4X4 FatBOY operating instructions

Planet Networking & Communication
Planet Networking & Communication IKVM-210 M Series user manual