Paratec NeXt Wingman User manual

Edition 1 - 2019
Personal Emergency Parachute
- Manual -

- 2 -
Content
1. Preface........................................................................................................................................ - 3 -
2. Description ................................................................................................................................. - 4 -
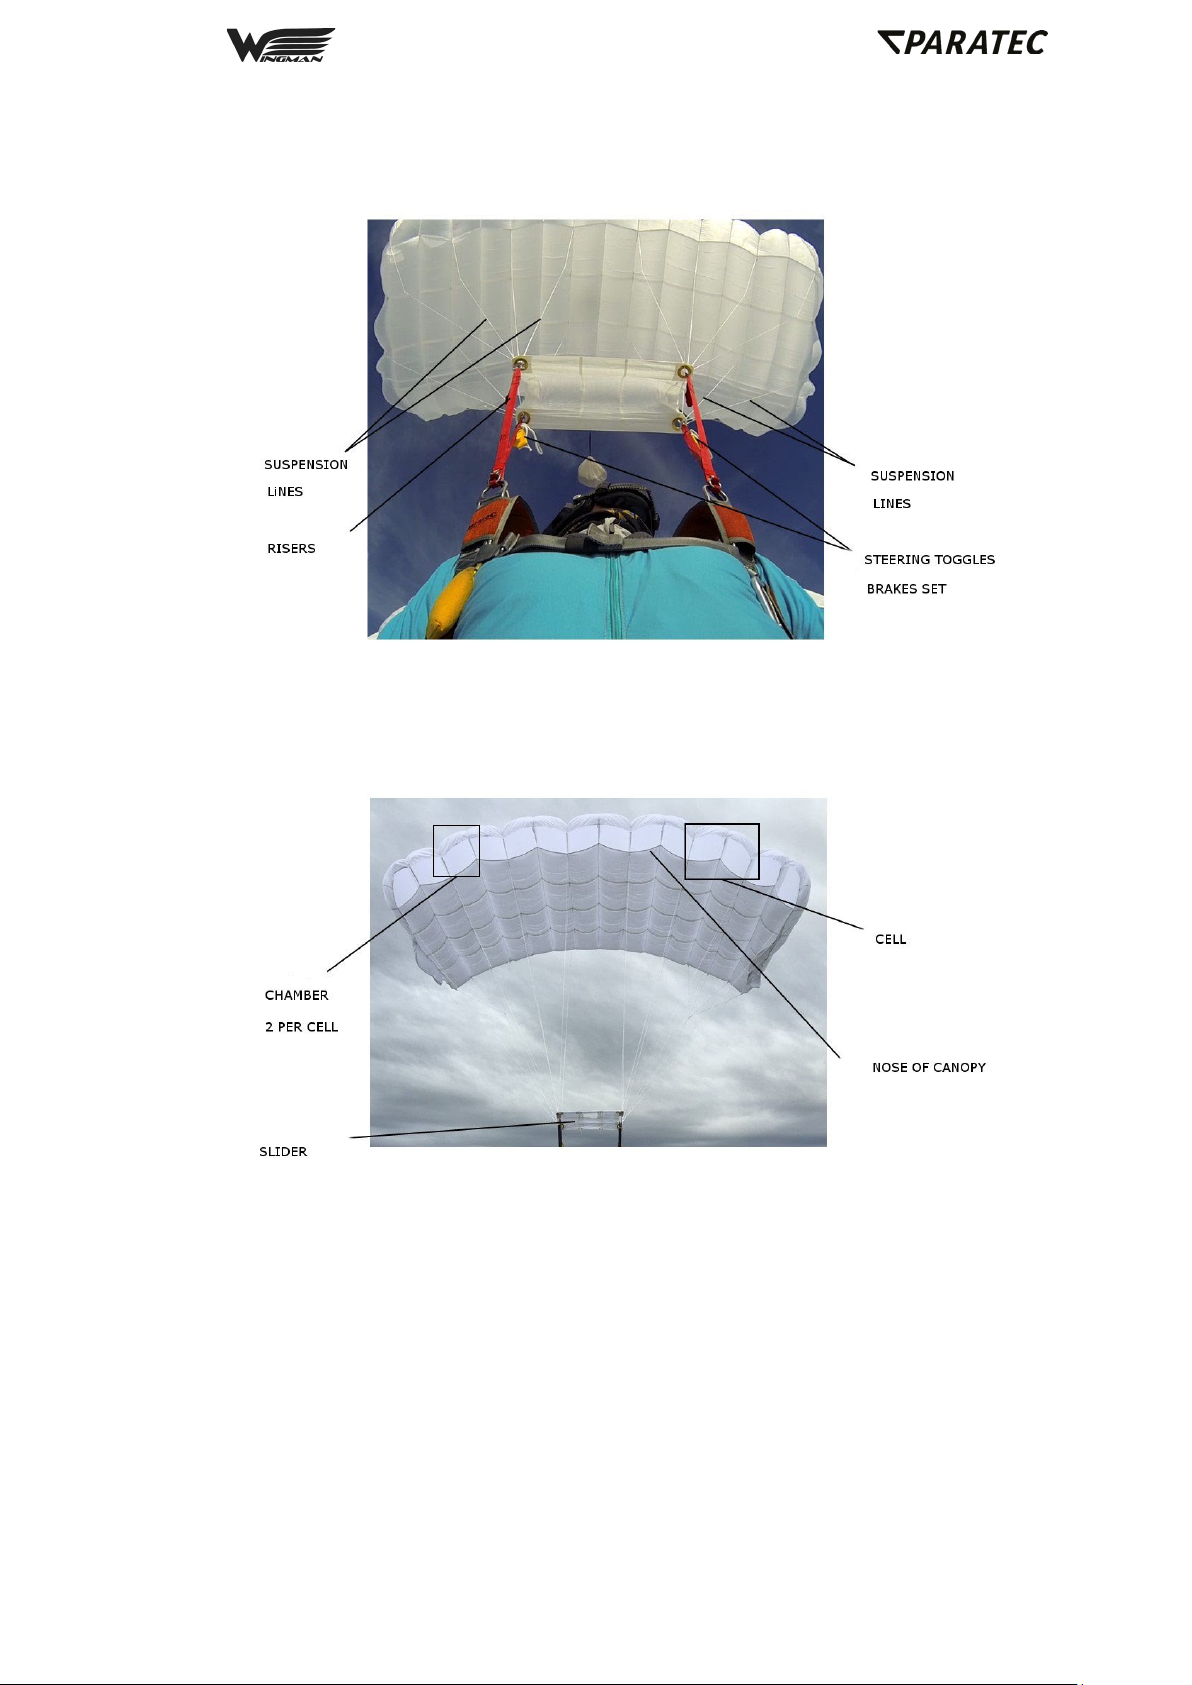
3. Description of Parts .................................................................................................................. - 5 -
4. Parachute Activation................................................................................................................. - 6 -
4.1. Manual Activation: Ripcord ................................................................................................ - 6 -
4.2. Automatic Activation: Static Line........................................................................................ - 7 -
5. Opening Characteristics: Ram-Air Parachute ........................................................................ - 8 -
6. Line Twist ................................................................................................................................... - 9 -
7. Operation: Ram-Air Parachute...............................................................................................- 10 -
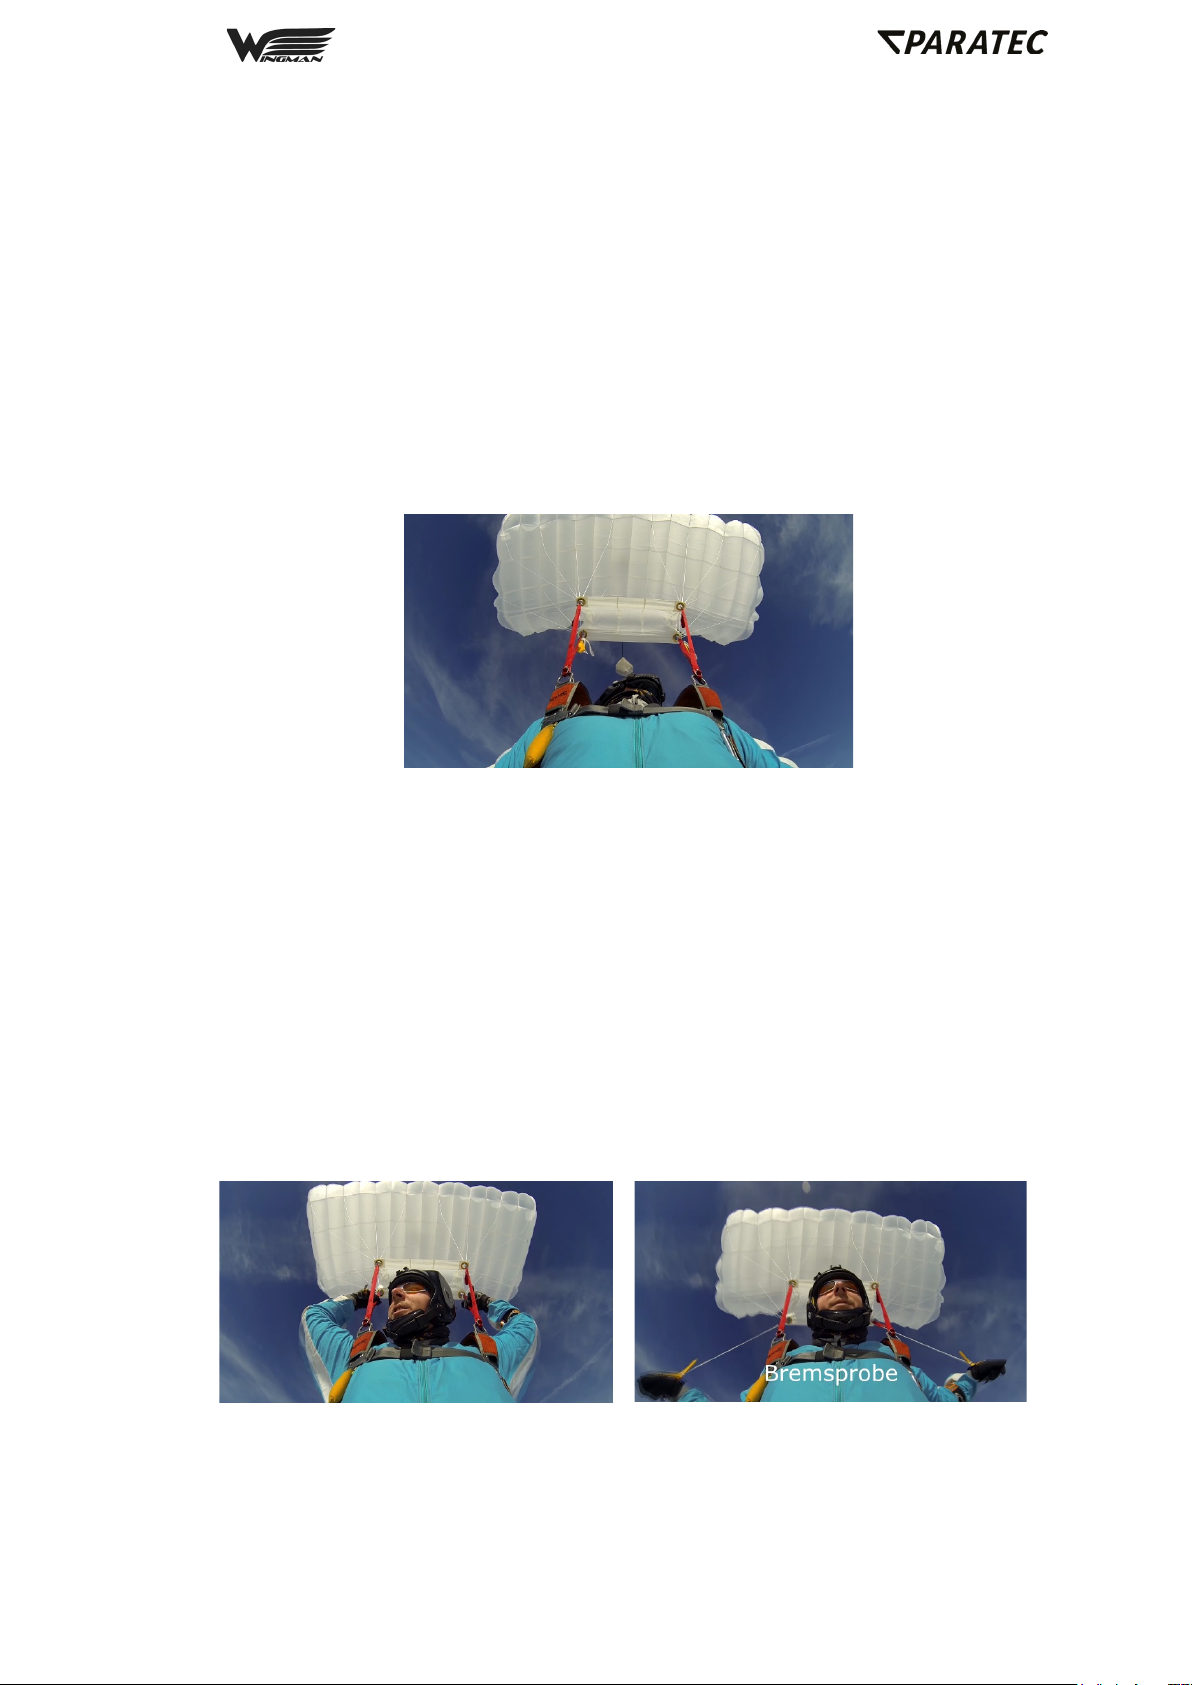
7.1. Canopy Flight: Brakes Set at 50% (see picture 14.3.1.2)................................................ - 10 -
7.2. Canopy Flight: Brakes Released ....................................................................................- 10 -
7.2.1. Releasing the Brakes...................................................................................................- 10 -
7.2.2. Manuvering: Steering Toggles (Brakes Released)...................................................... - 11 -
7.2.3. Landing: Steering Toggles (Brakes Released)............................................................ - 11 -
7.3. Parachute Landing Fall ....................................................................................................- 12 -
7.3.1. Prepare for the PLF ..................................................................................................... - 12 -
7.3.2. Sequence of PLF ......................................................................................................... - 12 -
8. Maintenance of the Parachute System.................................................................................. - 13 -
8.1. Maintenance Guidelines ……………………………………………………………………… - 13 -
8.1. Avoiding Damage .............................................................................................................- 13 -
8.2. Cleaning ........................................................................................................................... - 14 -
9. Storage .....................................................................................................................................- 14 -
10. Disposal...............................................................................................................................- 15 -
11. Spare parts and part numbers (P/N).................................................................................- 15 -
12. Packing Instructions ..........................................................................................................- 16 -
12.1. Tools ( recommended) .....................................................................................................- 16 -
12.2. Preparison of the free bag................................................................................................ - 17 -
12.3. Packing / Flaking of Canopy ............................................................................................- 18 -
12.3.1. Prepare break setting .............................................................................................. - 18 -
12.3.2. Prepare the canopy .................................................................................................- 19 -
12.3.3. Prepare and pack canopy into free bag ..................................................................- 20 -
12.4. Pack and close the container ........................................................................................... - 23 -
12.4.1. Installation of closing loop and stowing of risers .....................................................- 23 -
12.4.2. Pack free bag into container....................................................................................- 24 -
12.4.3. Compress the pilot chute.........................................................................................- 25 -

- 3 -
1. Preface
This manual is intended to serve as both a source of information for users, regardless of
parachute jump experience, as well as a reference for technical personnel.
The following product descriptions, explanations and examples may contain specific
terminology and names not commonly used or understood.
In case of any open questions, please feel free to contact us.

- 4 -
2. Description
The NeXt WINGMAN System was specifically designed for the pilot and their unique
environment. Remarkably thin, ergonomic and extremely comfortable, it has been optimized
for the use in all types types of aircraft.
The NeXt Wingman consist of two main components, the harness/container (available in
“Standard” or “Long” version) and a SPEED 2000 7-cell square ram-air reserve parachute.
The parachute (aka “canopy”) is available in three sizes based on operator exit weight
(sizes: 190, 220 or 250sqft). The system is equipped with both an automatic and manual
parachute deployment option and includes a protective storage abd carry bag made of 1000
Denier Cordura®.
The system is approved under U.S. Federal Aviation Administration (FAA) Technical
Standards Office (TSO) C23d standard.
Pic 2.1
Wingman Container right side view
Pic 2.2
Wingman Container front (inside) view
Pic 2.3
Wingman Container left side view
Pic 2.4
Wingman Container rear view

- 5 -
3. Description of Parts
Pic 3.1
Canopy Lines and Attachment Points
Pic 3.2
Canopy Terminology

- 6 -
4. Parachute Activation
4.1. Manual Activation: Ripcord
The ripcord handle is located on the left side of the operator’s harness.
It is secured to the inside of the handle pouch with a layer of Velcro. For activation: pull the
handle sideways out of the pocket towards the center of your body, then pull handle down
forcefully as illustrated below.
Pic 4.1.1
View of the ripcord handle
Pic 4.1.2
First pull the handle towards the center of the
body , then downwards.

- 7 -
4.2. Automatic Activation: Static Line
The NeXt Wingman is equipped with an activation static line which is located under the left
Riser cover (see picture 4.2 below). The static line must be attached to the aircraft prior to
exit. ! Attention !
In order to ensure an automatic opening of the parachute.
If, after leaving the aircraft, the pilot and the damaged aircraft move
independently of one another at a constant speed and distance in the
same direction, an automatic opening may not occur.
In this case, the parachute must be activated manually!
Pic 4.2.1
Visible part of static-line
Pic 4.2.2
Static-line; view under the cover

- 8 -
5. Opening Characteristics: Ram-Air Parachute
After the activation of the parachute deployment sequence by either ripcord or static line, the
parachute canopy will deploy within seconds and begin performing as designed.
The parachute opening takes place in 3 phases:
Phase1: The container opens. The spring of the auxiliary pilot parachute, which is under
tension, is released and immediately transports the pilot parachute into the air
flow. It then pulls the inner pack tray (aka freebag), which houses the packed
parachute, out of the container.
Phase 2: The canopy is extracted from the freebag and cells start to inflate.
Phase 3: The canopy is now open, inflated and fully functional.
Note: The auxiliary pilot parachute and freebag are separated from the system during phase
2 and drift to the ground independently.
Pic 5.1
Canopy inflating (scheme)
Pic 5.2
Canopy fully inflated

- 9 -
6. Line Twist
Although the Speed 2000 reserve parachute is designed to mitigate line twist after canopy
inflation, they principally could occur in any parachute canopy.
Therefore, should a line twist occur, the operator must grip the risers and actively counter
the twist with swinging the body and legs in the opposite direction.
Pic 6.1
Scheme: line twist
! Attention !
While the lines are twisted:
• Do Not Release the Brakes
• Do Not Steer with the Risers
Line Twists usually correct themselves after a while.
The untwisting procedure is reinforced with counter body swing.

- 10 -
7. Operation: Ram-Air Parachute
7.1. Canopy Flight: Brakes Set at 50% (see picture 14.3.1.2)
SPEED 2000 reserve parachute brake lines are pre-set and stowed at 50% when the canopy
is packed. Following opening and inflation of the canopy, this setting translates to a more
equivalent horizontal and vertical speed with the trailing edge of the canopy pulled slightly
down.
The SPEED 2000 reserve parachute can be safely flown and landed in this pre-set (50%)
braked configuration. Pulling down on either the left or right rear riser will cause the canopy
to change direction respectively. This method allows the operator to avoid obstacles as well
as steer the canopy into the wind in order to slow the forward speed over ground to facilitate
a safe landing at slower speeds.
Pic 7.1.1
Flight configuration „Brakes Set”. trailing edge of the canopy
pulled slightly down.
7.2. Canopy Flight: Brakes Released
7.2.1. Releasing the Brakes
Releasing the brakes after canopy inflation increases the forward speed of the canopy (aka
Full Glide).
To release the brakes take both steering toggles (secured on the rear risers with velcor
fastners) in your hands, loosen them from the Velcro fasteners and pull them down about 5
cm with a small tug. The brakes should now be released and changes in direction can now
be initiated via the toggles and control lines.
Pic 7.2.1.1
Flight position „arms up – neutral“ for full glide
Pic 7.2.1.2
Flare exercise with toggles
Helpful Hint: It is not necessary to release the brakes to change direction. It can be done by the rear
risers with brakes set.t

- 11 -
7.2.2. Manuvering: Steering Toggles (Brakes Released)
In order to initiate a change in direction, pull the toggle downwards, parallel to the
longitudinal axis of the body; left toggle initiates a left turn and right toggle initiates a right
turn. To stop the turn (rotation) and resume straight ahead flight simply return the toggle
position to neutral (see pic 7.2.1.1.)
Pic 7.2.2.1
Right turn
Pic 7.2.2.2
Left turn
7.2.3. Landing: Steering Toggles (Brakes Released)
In order to perform a landing with the brakes released, actively pull both steering toggles
parallel to the longitudinal axis of the body down to shoulder height (aka “the flare”). This
toggle position corresponds to about 50% brake input and represents a safe landing
configuration. In certain situations, the toggles can be pulled further to reduce more speed,
however lower forward speed will result in less lift and the potential for a stall if the
approach is too high.
Note: The parachute canopies do not have a stall warning!
Pic 7.2.3.1
Landing by active flare with steering lines

- 12 -
7.3. Parachute Landing Fall
In order to better absorb the vertical energy when landing, execute a Parachute Landing Fall
(PLF). A PLF is appropriate at any time and provides the best protection against injury when
landing in or on obstacles such as roof tops, trees, roads, shallow water, power lines, etc.
Pic 7.3.1
Scheme of a Parachute landing fall
! Attention !
It is strongly recommended to perform a
Parachute Landing Fall (PLF) in all cases!
7.3.1. Prepare for the PLF
Always prepare for the PLF in advance of touching the ground
•Press your knees and feet together
• Bend your knees slightly to the side
• Bring the elbow in front of the body
Keep hands at head height (do not let go of the toggles or rear risers)
• Place your chin on your chest
• Push the hip to the intended direction of the PLF
• Reduce body tension as much as possible
7.3.2. Sequence of PLF
• Feet touch the ground first
• The side of the leg and hip touch the ground one after the other in a rolling motion
• Roll your upper body diagonally over your back
• Fold the legs that are still closed to the other side

- 13 -
8. Maintenance of the Parachute System
8.1. Maintenance Guidelines (as per German § (15) LuftGerPV)
"The airworthiness of the air sports device must be checked by the owner or checked on his
behalf in accordance with the instructions given by the manufacturer.
The owner is responsible for the timely and complete performance of the inspection. He must
immediately report any defects in the parachute or the test instructions to the manufacturer”.
Types of maintenance (measures to maintain airworthiness)
The airworthiness of the system is determined during each annual inspection and is based on
system “condition”. (There is no pre-determined limit or lifespan of the system).
All maintenance must be carried out and documented by trained and certified technical
personnel with a valid license or a qualified person with equivalent authorization in accordance
with the manual.
The following table provides an overview of the minimum requirements (based on German
Aviation Equipment Ordnance) for the maintenance of the parachute equipment and
components manufactured by Paratec GmbH. (The repair permissions, maintenance intervals,
and scope of repair may vary from country to country. Please consult your local/national
Skydiving Organization and/or your National Aviation Authority for further information).
Type of
Maintenance
Manufacturer Recognized
Service Company
Certified
Personnel
Maintenance
Interval
Assembly and
Compatibility
Check (Initial)
Yes
Yes
Initial Release to
Service (In accordance
with Manufacturer’s
Instructions)
Airworthiness
Inspection and
Reserve Repack
Yes
Yes
Periodic (Every 12
Months)
Minor Alteration
Minor Repair
Yes
No
As Required
(Water Contact)
Major Alteration
Major Repair
Yes
No
Immediate
As Required
8.2. Avoiding Damage
In order to prevent damage from UV radiation such as weakened harness materials and
bleached colors, avoid prolonged exposure to direct sunlight.
Acid, of any kind, is damaging to nylon. It weakens the straps and especially the seams of
the canopy.

- 14 -
8.3. Cleaning
! Attention !
Do not use acidic agents!
Avoid salt water contact!
•Remove dirt and grass stains with soap, a brush and warm water.
•The cover of the removable back pad cushion is made of cotton, it is machine
washable at 30 ° C but is not suitable for drying in a tumble dryer..
Pic 8.2.1
Removable back pad cushion (if applicable)
Helpful Hint: If you notice any damage or changes, please contact us, the dealer or a service person.
9. Storage
Store parachutes in a dark, dry location away from UV radiation and free from vermin.
If the system is to be stored for a longer period of time, it is advisable to remove the Parachute
canopy from the container, shake them up and put all into the transport bag or in a pillowcase.
When traveling to tropical regions, make absolutely sure, that the parachute is not stored in
excessive heat (e.g. in the trunk of a car during the midday heat). If this has happens, open
the complete system before the next jump and have it checked for airworthiness by a service
person.
If the harness/container is stored or permanently kept in the aircraft when not in use, it must
be covered to protect it from damaging UV radiation.

- 15 -
10. Disposal
The NeXt Wingman parachute system consists mainly of woven fabrics, as well as metal and
plastic parts. For disposal, the individual parts should be separated according to applicable
waste separation criteria and, if necessary, sent to recycling.
Based on the custom composition of individual Wingman systems, cadmium-plated fittings
may have been used. Due to their coating, these cadmium-plated hardware components must
be disposed of separately and may not be recycled with other metals.
Label and Serial Number
Pic 12.1
Position of label
Pic 12.2
Label with serialnumber
11. Spare Parts and Part Numbers (P/N)
All lost or damaged components have to be replaced by original spare parts.
Component Description
P/N
Steering Toggles
50107
POD, Inner Pack Tray (Freebag)
50116
Spring-loaded Pilot Parachute
50118
Reserve Handle
50114
Static-line
50128
Back Pad Cushion (Removable)
35040153

- 16 -
12. Packing Instructions
The following instructions, to include pictures and tables, are provided as a guide for
licensed rigging specialists to safely and effectively pack the NeXt Wingman. (The reserve
should only be packed by qualified personnel).
12.1. Tools (Recommended)
(Not included in scope of delivery)
Pic 14.1.1
Tools and packing aids
1. Velcro
2. Packing Cord
3. Fixing Clamp
4. Packing Aid
5. Loop and Washer
6. Pull Up Cord
7. Temporary Pin
Helpful hint:The packing instructions contain terms and procedures which are not specifically defined
as these are familiar to trained and licensed parachute rigging personnel. (If there are questions or a
need for clarification, please contact Paratec GmbH).

- 17 -
12.2. Preparing the Free Bag
Pic 14.2.1
Cover the hook part of the Velcrco using packing
aid (1)
Pic 14.2.2
Feed packing cord (2) through free bag
Pic 14.2.3
After inspecting H/C and canopy; place canopy as
shown
Pic 14.2.4
Attach H/C (as required)

- 18 -
12.3. Packing / Flaking the Canopy
12.3.1. Prepare Toggles and Brake Lines Setting
Pic 14.3.1.1
Pull down untwisted steering line until the „eye“ is
below the break ring
Pic 14.3.1.2
Slide the hard toggle tip through the eye and
match the toggle and riser Velcro
Pic 14.3.1.3
„S“ fold the steering line extension
Bild 14.3.1.4
Close the Velcro; make sure to cover up all hook
Velcro

- 19 -
12.3.2. Prepare the Canopy
Pic 14.3.2.1
Temporarily
connect the 4 riser below the
connector links (e.g. with a clamp)
Pic 14.3.2.2
Separate the lines ( front/rear/steering) and check
all the way up to the canopy
Pic 14.3.2.3
Lift up the canopy, check lines, and hold them
under tension
Pic 14.3.2.4
Check steering lines for free unentangled routing
Pic 14.3.2.5
Route lines over the shoulder and start to flake
the canopy
Pic 14.3.2.6
Organize and split cells (3 each side)
Pic 14.3.2.7
Ensure a symmetrically organized canopy
Pic 14.3.2.8
Lay organized canopy gently on packing surrface

- 20 -
12.3.3. Prepare and Pack Canopy Into Free Bag
Pic 14.3.3.1
Reorganize lines and canopy fabric
Pic 14.3.3.2
Organized canopy; 3ea. cells left and right; center
cell facing down
Pic 14.3.3.3
Prepare free bag and pull down center cell
Pic 14.3.3.4
Prepare separation of canopy left and right
Pic 14.3.3.5
Separate canopy simultaneously, keeping lines
under tension using your knees
Pic 14.3.3.6
Compress center cell
Pic 14.3.3.7
Dress left side of canopy and gently push air out
Pic 14.3.3.8
lift up left side of the canopy; cell openings should
face down
Table of contents