manuals.online logo
Brands
  1. Home
  2. •
  3. Brands
  4. •
  5. Parker
  6. •
  7. Ladder
  8. •
  9. Parker PTL-3200 User manual

Parker PTL-3200 User manual

TELESCOPIC LADDER
EN
OWNERS MANUAL
PTL-3200, 3800, 4100, 4400, 4900, 5200
2 3
CONTENTS
INTRODUCTION/INTENDED USE
DESCRIPTION OF PARTS 4
SAFETY INFORMATION 6-10
PRE-OPERATION CHECKLIST 9
OPERATION 10-11
EXTENDING THE LADDER 12-13
CLOSING THE LADDER 14-15
GUARANTEE 17
SPECIFICATIONS 18
DECLARATION OF CONFORMITY 19
This manual has been produced by Parker Products Ltd. and
should be kept with the product and referenced for operation,
maintenance and troubleshooting.
This manual contains an overall description of the product,
together with all the necessary information for using the
product correctly and safely. It is highly recommended that this
manual is read prior to any operation or maintenance of this
product. The safety precautions and warnings are to ensure
your safety and protect you from harm or damage to the
product.
All photographs and drawings in this manual are supplied by
Parker Products Ltd. to help you with the operation and
maintenance of the product. The information contained in this
manual was accurate at the time of production, however Parker
Products Ltd. may make modifications to the product without
notification. This Telescopic ladder has been designed for
personal and private use only.
The product is to be used only for its prescribed purpose, any
other use is deemed to be a case of misuse. The user/operator
and not the manufacturer will be liable for any damage or
injuries of any kind caused as a result of this.
Please note that our equipment has not been designed for use
in commercial, trade or industrial applications. Our warranty
will be voided if the machine is used in commercial, trade or
industrial businesses or for equivalent purposes.
4 5
SLIDE LATCH
DESCRIPTION OF PRODUCT PARTS
SECURING STRAP
SAFETY NOTES
NON-SLIP RUBBER FEET
SPACER
GRIP HANDLE
SLIP-RESISTANCE RUNG
COUPLING
THIS PAGE HAS INTENTIONALLY BEEN LEFT BLANK
6 7
SAFETY INFORMATION
SAFETY INFORMATION
• Always extend the ladders from the bottom.
• Do not exceed the maximum total load.
• Do not overreach, users should keep both feet on the same step throughout the task.
• Do not step o a leaning ladder at a higher level without additional security, such as tying o or use of a suitable stability device.
• Do not use standing ladders for access to another level.
• Do not stand on the top three steps/rungs of a leaning ladder.
• Ladders should only be used for light work of a short duration.
• Do not use the ladder outside in adverse weather conditions, such as a strong wind.
• Take precautions against children playing on the ladder.
• Face the ladder when ascending and descending.
• Do not use the ladder as a bridge.
• Wear suitable footwear when climbing a ladder.
• Avoid excessive side loadings e.g. drilling brick or concrete.
• Do not spend long periods on a ladder without regular breaks (tiredness is a risk).
• Leaning ladders used for access to a higher level should be extended at least 1m above the landing point.
• Equipment carried while using a ladder should be light and easy to handle.
i
WARNING- To reduce the risk of injury, user must read instruction manual.
PLEASE READ THESE INSTRUCTIONS FULLY BEFORE USE/OPERATING
Description Of Symbols.
Symbols are used in this manual to attract your attention to possible risks. The safety symbols and the explications which accompany them
must be perfectly understood. The warning themselves do not prevent the risks and cannot be a substitute for proper methods of avoiding
accidents.
This symbol, before a safety comment, indicates a precaution, a warning or a danger. Ignoring this warning can lead to an
accident for yourself or for others. To limit the risk of injury, fire, or electrocution always apply the recommendations
indicated.
8 9
PRE OPERATION CHECKLIST
SAFETY INFORMATION
BEFORE USE
• Ensure that you are fit enough to use the ladder. Certain
medical conditions or medication, alcohol or drug abuse could
make the ladder unsafe.
• When transporting ladders on roof bars or in a truck, ensure
they are suitably placed to prevent damage.
• Inspect the ladder after delivery and before first use to confirm
condition and operation of all parts.
• Visually check the ladder is not damaged and is safe to use at
the start of each working day when the ladder is to be used.
• Regular periodic inspection is required.
• Ensure the ladder is suitable for the task.
• Do not use a damaged ladder.
• Remove any contamination from the ladder such as wet paint,
mud, oil or snow.
• Before using a ladder at work a risk assessment should be
carried out respecting the legislation in the country of use.
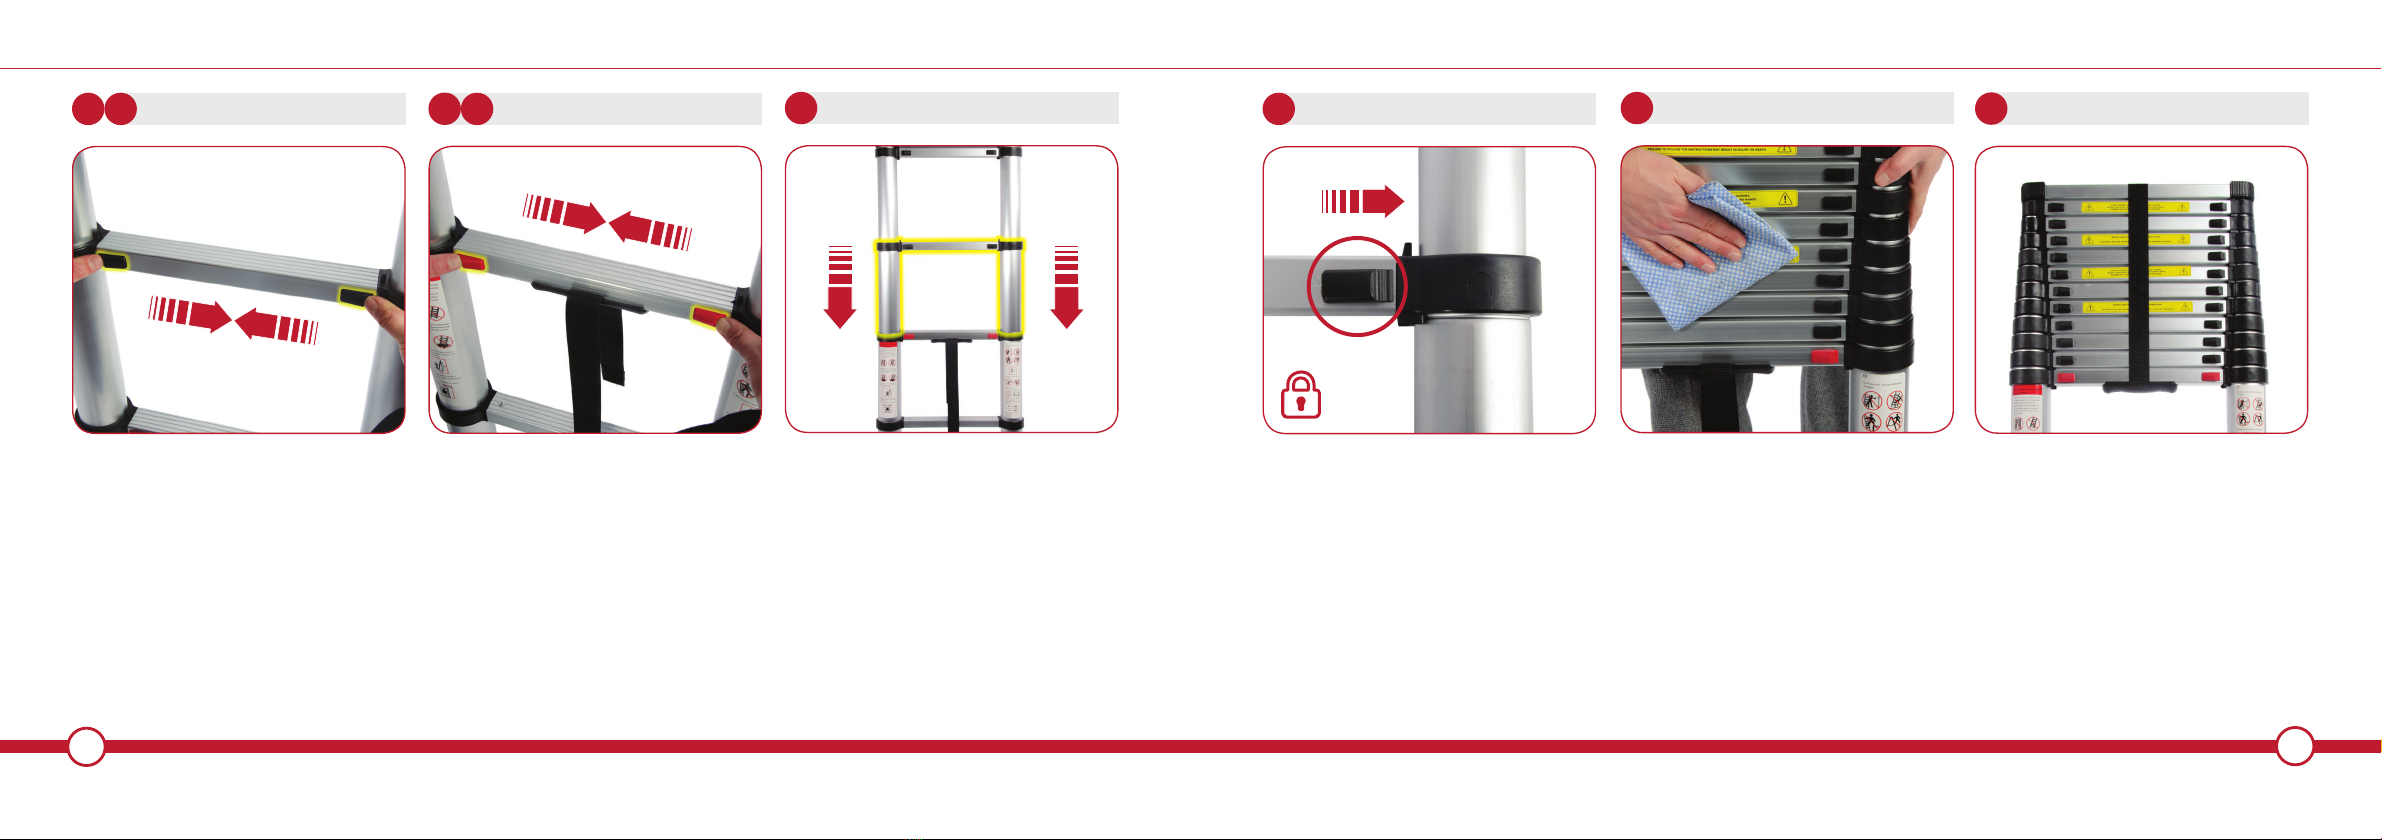
POSITIONING AND ERECTING THE LADDER
• Always extend the ladder from the bottom.
• Inclination angle should not exceed 75 degrees.
• The ladder should be on an even, level and unmovable base.
• The ladder should lean against a flat non-frangible surface and
should be secured before use, e.g. tied or use of a suitable
stability device.
• When positioning the ladder take into account the risk of
collision with the ladder e.g. from pedestrians, vehicles or doors
(no fire exits) and windows where possible in the work area.
• Identify any electrical risks in the work area, such as overhead
lines or other exposed electrical equipment.
• The ladder should be stood on its feet, not the rungs or steps.
• Ladders should not be positioned on a slippery surface (such as
ice, shiny surface or significantly contaminated solid surface)
unless additional eective measures are taken to prevent the
ladder slipping or ensuring contaminated surfaces are
suiciently clean.
PLACE LADDER ON A FIRM
AND LEVEL SURFACE
ENSURE GROUND AND LADDER
IS FREE FROM CONTAMINANTS
ERECT AND PLACE LADDER
AT PROPER 75 ANGLE
MAX LOADING CAPACITY
150KG /330lbs
DO NOT OVERREACH
EXTEND LADDER 1M ABOVE
LANDING POINT
BEWARE OF ELECTRICAL
HAZARDS WHEN
TRANSPORTING LADDER
DO NOT STEP OFF THE SIDE
OF THE LADDER
10 11
OPERATION
OPERATION
AUTOMATIC LOCKING MECHANISM
Automatic Locking: each rung of your ladder has 2 locking pins that
are automatically inserted into slots on the uprights when the ladder
is extended.
The status of the lock is indicated by the two black slide latches on
the side of each rung.
• The slide latch is in the unlocked when positioned furthest away
from the coupling (see Fig 1)
• The slide latch is in the locked position when positioned closest
to the coupling (see Fig 2)
• Always check that slide latches are located in the exact position
“locked”, before you climb the ladder.
Fig 1.
Fig 2.
EN 131 is a certification which confirms a product meets the European
minimum safety standards expected of manufacturers. It governs
aspects of construction, performance and the clarity of the attached
instructions, ultimately resulting in ladders which are reliably built
and easy to use.
In accordance with the EN 131 certification all ParkerBrand Telescopic
Ladders MUST be extended from the bottom rung upwards. Please
follow this user guide closely to ensure not only the proper use of this
product but also for your own personal safety whilst in use.
NOTE: Always use your ladders as described within the guidelines of this user manual.
WARNING!: When partially extending your telescopic ladders always extend from the bottom rung upwards.
UNLOCKED
LOCKED
WARNING! Under no circumstances should you attempt
to ‘UNLOCK’ slide latches whilst ladders are in use.
EXTEND THE LADDERS
FROM THE BOTTOM
12 13
EXTENDING THE LADDER
Check the ladder is not damaged and all components
are in good working order before use. Regular periodic
inspection is required to ensure the ladder is suitable for
the task.
Before using the ladder a risk assessment should be
carried out respecting the legislation in the country of
use.
EXTENDING THE LADDER
Before using the extended ladder check
that all the slide latches are in the correct
‘LOCKED’ position.
The latches are spring loaded and should
lock automatically on extension.
INSPECT THE LADDER
1EXTEND & LOCK
3
Hold the couplings on the section to be
extended and pull upwards. Remember to
extend from the bottom.
After every section is fully extended the slide
latches will lock into place. (See step 4)
CHECK SLIDE LATCHES
4
LOCKED
Place Ladder on a dry, firm and level surface.
Stabilize by placing a foot on the bottom
rung.
STABILIZE BASE
2
EXTEND THE LADDERS
FROM THE BOTTOM
NOTICE
14 15
LOCKED
CLOSING THE LADDER
CLOSING THE LADDER
To reduce the height of the ladder - slide the
latches on the level to which you want to
reduce the height to.
Ensure your hands are not between the
rungs when collapsing the ladder, follow
the above safety guidelines at all times.
PARTIALLY CLOSING LADDER
1
Make sure all slide latches are in the
‘LOCKED’ position (shown above). Take time
to check all latches.
For your own safety it is essential that the
slide latches are in the ‘LOCKED’ position
before use.
CHECK SLIDE LATCHES
3
To fully collapse the ladder regardless of the
height set, hold the ladder firmly and slide
the two red latches to the unlock position.
The red latches are at the bottom of the
ladder and should only be used to fully
collapse the ladder.
FULLY CLOSING LADDER
1
After use check the condition of the ladder.
Clean surfaces of any contaminants that
may have come into contact during use.
Regular periodic inspection is required to
maintain the ladder.
INSPECTION & MAINTENANCE
4
When the ladder is in the fully closed
position you can now secure the strap and
pack away until next required.
Please remember that when the ladder is in
the fully closed position always carry from
the grab handle to prevent opening.
STORAGE
5
A
The ladder will collapse from the bottom
upwards. As an added safety feature each
section will ‘Soft Close’.
When the ladder has collapsed - check
all the slide latches on the other levels to
ensure they are in the fully locked position.
SECTION SOFT CLOSE
2
B
16 17
GUARANTEE
Parker Products Ltd Guarantees the product against defective material or damage for period of 12
months from the date of purchase. A proof of purchase must be provided with the product.
In case of any fault please return the product to Parker Products Ltd or an authorised repair agent.
If any fault is caused by defective materials or quality of build, repair will be carried out free of charge.
However, this guarantee does not apply in the case of normal wear and tear, nor any damage caused
by misuse, accident or any repair from an unauthorised agency.
NOTE: In order for you to eect this guarantee you must provide proof of purchase in the form of a
dated receipt or invoice within a 12 month period of purchase. If repairs are outside of the warranty
period a quote will be made accordingly.
Parker Products Limited
THIS PAGE HAS INTENTIONALLY BEEN LEFT BLANK
18 19
Description & Function:
Telescopic Ladder
Model/Type:
PTL-3200/3800/4100/4400/4900/5200
Manufacturing Date/Serial Number:
2018
Conforms to the following Directives:
☑
EN131
Manufacturer’s authorised representative within the EC:
Parker Products Ltd.
Richmond Park
Richmond Road
Louth
LN11 0FU
Confirmed and completed by:
Parker Products Ltd
Being the responsible person appointed by the manufacturer.
Signed:
Date: 01/01/18
Name: Jason Parker
Position: Managing Director
Company: Parker Products Ltd.
DECLARATION OF CONFORMITY
SPECIFICATIONS
TECHNICAL SPECIFICATION PTL-3200
Folded Height 0.8m (80cm)
Fully Extended Height 3.2m (3,200cm)
Width 470mm (47cm)
Number. of Rungs 11
Width of Rungs 39mm (3.9cm)
Weight 8KG
Grab handle Plastic
Securing Strap Velcro
Construction Aluminium
TECHNICAL SPECIFICATION PTL-3800
Folded Height 0.86m (86cm)
Fully Extended Height 3.8m (3,800cm)
Width 480mm (48cm)
Number. of Rungs 13
Width of Rungs 39mm (3.9cm)
Weight 10KG
Grab handle Plastic
Securing Strap Velcro
Construction Aluminium
TECHNICAL SPECIFICATION PTL-4100
Folded Height 0.89m (89cm)
Fully Extended Height 4.1m (4,100cm)
Width 480mm (48cm)
Number. of Rungs 14
Width of Rungs 39mm (3.9cm)
Weight 11.1KG
Grab handle Plastic
Securing Strap Velcro
Construction Aluminium
TECHNICAL SPECIFICATION PTL-4400
Folded Height 0.92m (92cm)
Fully Extended Height 4.4m (4,400cm)
Width 480mm (48cm)
Number. of Rungs 15
Width of Rungs 39mm (3.9cm)
Weight 12.3KG
Grab handle Plastic
Securing Strap Velcro
Construction Aluminium
TECHNICAL SPECIFICATION PTL-4900
Folded Height 0.94m (94cm)
Fully Extended Height 4.9m (4,900cm)
Width 480mm (48cm)
Number. of Rungs 14
Width of Rungs 39mm (3.9cm)
Weight 12.8KG
Grab handle Plastic
Securing Strap Velcro
Construction Aluminium
TECHNICAL SPECIFICATION PTL-5200
Folded Height 0.97m (97cm)
Fully Extended Height 5.2m (5,200cm)
Width 480mm (48cm)
Number. of Rungs 15
Width of Rungs 39mm (3.9cm)
Weight 14.2KG
Grab handle Plastic
Securing Strap Velcro
Construction Aluminium
WWW.PARKERBRAND.CO.UK
PTL-3200, 3800, 4100, 4400, 4900, 5200
Rev 2.0Jan 2019

This manual suits for next models

5

Popular Ladder manuals by other brands

Werner Telescopic Soft Close Extension Ladder instruction manual

Werner

Werner Telescopic Soft Close Extension Ladder instruction manual

Louisville PK-E05R Assembly instructions

Louisville

Louisville PK-E05R Assembly instructions

INNOVAPLAS Lumi-O ROYAL ENTRANCE II quick start guide

INNOVAPLAS

INNOVAPLAS Lumi-O ROYAL ENTRANCE II quick start guide

Surespan Zip 8 Fitting instructions

Surespan

Surespan Zip 8 Fitting instructions

Bestway 58331 owner's manual

Bestway

Bestway 58331 owner's manual

USTEPS Prime Line instruction manual

USTEPS

USTEPS Prime Line instruction manual

FACAL Castiglia Use and maintenance handbook

FACAL

FACAL Castiglia Use and maintenance handbook

Louisville Ladder LP-2400-00 Assembly instructions

Louisville Ladder

Louisville Ladder LP-2400-00 Assembly instructions

Clas Ohlson WR2491A quick guide

Clas Ohlson

Clas Ohlson WR2491A quick guide

sellwood ELC30 installation instructions

sellwood

sellwood ELC30 installation instructions

Rockler Library Ladder Assembly instructions

Rockler

Rockler Library Ladder Assembly instructions

Batavia GIRAFFE TLL001 installation instructions

Batavia

Batavia GIRAFFE TLL001 installation instructions

Power Step PSA-EX5500-FRS manual

Power Step

Power Step PSA-EX5500-FRS manual

Power Step PSA-EX3600-FRS manual

Power Step

Power Step PSA-EX3600-FRS manual

AmazonBasics B07PMK78R8 instructions

AmazonBasics

AmazonBasics B07PMK78R8 instructions

safety platforms EASY STAIR user guide

safety platforms

safety platforms EASY STAIR user guide

Little Giant Quick-N-Lite instructions

Little Giant

Little Giant Quick-N-Lite instructions

Mac allister AC9A manual

Mac allister

Mac allister AC9A manual

manuals.online logo
manuals.online logoBrands
  • About & Mission
  • Contact us
  • Privacy Policy
  • Terms and Conditions

Copyright 2025 Manuals.Online. All Rights Reserved.