Parkis Exclusive User manual

USER MANUAL
PARKIS
I Exclusive IStainless Steel IBasic I


1
DEAR USER,
Congratulations on purchasing your PARKIS!
PARKIS is a household equipment for vertical bicycle parking which lets you free up pre-
cious storage space on the oor. Should you need more information on PARKIS purpose,
usage and installing, please visit us at www.parkis.eu. If you have any questions, we’l
have answers!
IMPORTANT
These instructions accompanying the product are original instructions.
It is important that you read the entire USER MANUAL to familiarise with this product
before use. Persons not acquainted with the information provided in this manual are
not allowed to use the equipment. Adult supervision is highly recommended for junior
users of the PARKIS. \We do not take any responsibility and we are not liable for any
damage caused through use of PARKIS in case you fail to strictly follow the instruc-
tions provided in this manual. Warranty will not be applied if the damage is caused by
your failure to follow the instructions. Having read the manual carefully, please keep
it for future reference or subsequent holder of the product as this manual is part of a
product. Whilst every eort has been made to ensure the accuracy of the information
contained in this manual, the PARKIS policy of continuous improvement determines
the right to make modications without prior warning.
INTRODUCTION
This USER MANUAL applies for PARKIS Exclusive, Stainless Steel, Basic. Further in the
text - PARKIS. All USER MANUALS are updated continually, user should make sure that
they use the very latest version. Downloads are available here: www.parkis.eu
UAB PARKIS
Piliakalnio str. 7
Vilnius
Lithuania
LT-06229
WEBSITE: www.parkis.eu
SUPPORT: [email protected]

2
EC DECLARATION OF CONFORMITY
The undersigned Company hereby declares that the equipment described below:
Type of machine: Bicycle Parking Lift
Model: Parkis
Serial number(s): –
complies with the provisions of the “Machinery directive 2006/42/EC”
(Directive 89/392/EEC, as amended) and the regulations
transposed it into the national law.
Harmonized standards applied:
ISO 12100:2010 “General principles for design.
Risk assessment and risk reduction”.
Other technical standards and specications used: –

3
CONTENT
1. INTENDED USE
page 4
2. SET
page 5
3. KEY ELEMENTS
page 5
4. ASSEMBLY INSTRUCTIONS
page 6
5. USE (OPERATION)
page 7
6. MAINTENANCE
page 8
7. DEACTIVATION
page 8
8. SAFETY
page 9
9. DISMANTLING
page 9
10. WARRANTY
page 9

4
1. INTENDED USE
1.1 This bicycle parking lift PARKIS (models Exclusive, Stainless Steel and Basic), further
in the text – PARKIS, is a mechanical equipment designed for vertical parking of your
bicycle.
1.2 PARKIS ts the most popular bicycle models. Only these criteria apply:
*tire width max. 61 mm (2.4”) (g. 1.A)
*rim + tire total height max. 77 mm (3.0”) (g. 1.B)
*wheel diameter min. 61 cm (24”)
*weight on front bicycle axis up to 15 kg (33 lb) (g. 1.E)
*mud aps ends must be above the wheel axis (g. 1.C, 1.D). Suitability can be checked
by leaning the bike’s rear wheel against the wall. If the wheel (not a mudguard) touches
the wall – PARKIS is suitable for your bike’s mud aps (g. 1).
IMPORTANT! Before parking your bicycle make sure it meets these criteria.
1.3 PARKIS is designed for installation and use in stationary environment. It is not al-
lowed to install and use it in any means of transportation.
1.4 For using PARKIS in public places it is highly recommended to install an optional
Locking Gates accessory.
PARKIS reference dimensions: 170 x 25 x 15 cm (67 x 10 x 5,9 in), reference weight 6 kg
(13,2 lb).
Fig. 1.
1.A 1.B
15 kg
(33 lb)
MAX
MAX. 61 mm
(2.4”)
MAX. 77 mm
(3.0”)
MAX. 61 mm
(2.4”)
MAX. 77 mm
(3.0”)
1.E
1.C 1.D

5
1.
2.
3.
3.
Fig. 2.
2. SET
Set includes:
1. Parking lift PARKIS
2. 4 screws for masonary wall installation
3. User manual
3. KEY ELEMENTS
1. Stand
2. Wheel locking mechanism (dolly)
3. Screws (set includes masonry screws)
4. Safety-catch for transportation only.
Having fastened the equipment to the wall,
safety-catch is removed.
4.

6
4. ASSEMBLY INSTRUCTIONS
4.1 To install PARKIS, wall and oor surface must be even and level. Place the parking
equipment on the oor, lean it to the wall and mark the spots for screws to be fastened.
If you intend to mount PARKIS to the masonry wall (which is recommended), make pi-
lot holes for fastening screws, install screw anchors, lean the equipment along the wall
accurately and screw the equipment to the wall tightly. For other types of wall please
obtain suitable screws.
4.2 Remove safety-catch (g. 3.A).
4.3 Put a wheel’s support to the horizontal position (g. 3.B).
4.4 Push a wheel locking mechanism (in further text – dolly) to the ground position lim-
it. You will normally feel resistance while pushing. It will x automatically on oor level
(g. 3.C), now your PARKIS is ready to use!
3.A 3.B 3.C
Fig. 3.

7
5.1 USE - PARKING
1. Before parking your bicycle make sure that there are no children or pets around to avoid
accidents. Hold your bicycle so that both wheels are on the line perpendicularly to the sur-
face that PARKIS is fastened to.
2. Use one hand to lightly hold a handle bar of your bicycle (rst time users are advised to
pick the bar underhand) and rmly take the saddle with the other hand. We recommend
you to hold the saddle with your leading hand. (g. 4.A)
3. Firmly push the saddle forward while lifting up the handlebar lightly (stronger for heavy
bicycles) and directing the front wheel towards the wheel locking mechanism until the
wheel locks. Attention! Do not push the handle bar downwards! Let the front wheel go up
freely (g. 4.B and 4.C). At the same time hold rmly the saddle and direct a rear wheel so
that it goes in the middle of the stand. Your bike is parked! (g. 4.D)
NOTE!If the wheel has not been locked from the rst time and the dolly has moved up-
wards, just put your bicycle aside safely, use a hand to push the dolly down until xed
position (g. 3.C) and repeat the parking process once again. Some practice is necessary
to get used to parking your bicycle this way. While parked your bicycle has to be protected
from accidental impact (eg. turning or bending) as this can damage the equipment, your
bicycle or harm a person.
4.A 4.C 4.D4.B
5.2 USE - REMOVING A BICYCLE
Hold the saddle (not the handlebar!) by hand and rmly pull the bicycle towards yourself
(g. 5.A). As the bicycle starts descending push a handlebar down with your other hand
(g. 5.B & 5.C) until the front wheel reaches the ground and is removed from the wheel
locking mechanism (g. 5.D). Your bicycle is removed from the parking equipment!
5.A 5.C 5.D5.B

8
6. MAINTENANCE
PARKIS construction allows to use it for a long time without any particular maintenance.
Consider these tips to enjoy PARKIS even more:
1. Get your bike clean before you park it in PARKIS.
2. Do not use materials containing solvents or diluents to clean PARKIS.
If you intend not to use PARKIS for a longer period of time (month or more), we rec-
ommend keeping a dolly in the upper position on the stand (deactivated) – how it is
positioned when a bicycle is parked or the equipment is not activated (see par. No. 7). It
increases durability of the spring inside the stand.
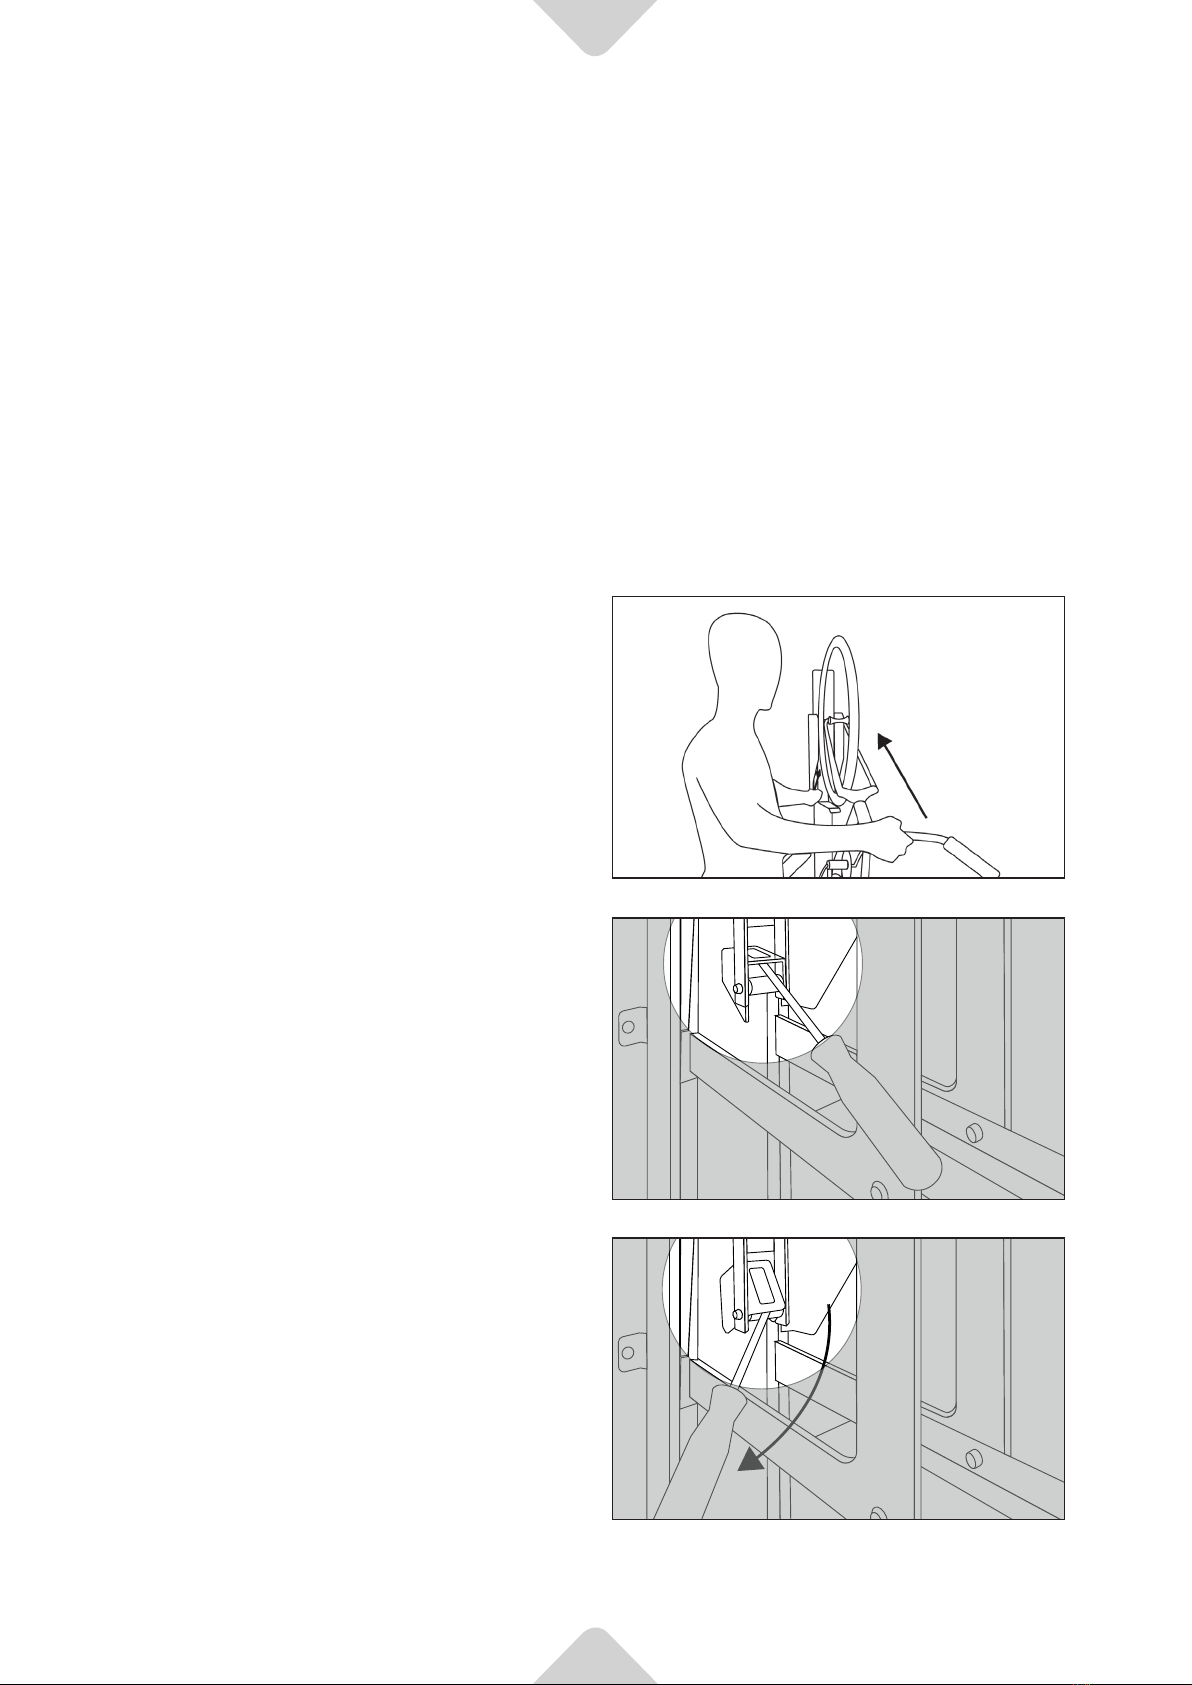
7. DEACTIVATION
Perform deactivation prior to dismantling,
maintenance, cleaning or leaving PARKIS
without parked bicycle for a longer period
of time (month or more).
A screwdriver is required for deactivation
process
We strongly recommend you to call some-
one for assistance to hold bicycle in place
to easedeactivation process
1. While bicycle is parked in vertical po-
sition, hold your bicycle rmly in the mid-
dle of handlebar (on stem) and apply light
pressure towards PARKIS (g. 6.A).
2. Place the screwdriver between at met-
al part and pin (g. 6.B).
3. Lever the screwdriver down, (g. 6.C),
until mechanism releases the bicycle
wheel. Please note that bicycle will fall
out if not held rmly and may cause dam-
age or harm.
4. Remove the bicycle and put up PARKIS
wheel support. You have now performed
PARKIS deactivation.
6. A
6. C
6. B

9
8. SAFETY
When unpacking, make sure that the item is intact and undamaged. If any parts are bro-
ken, please contact your seller.
Use PARKIS to park only technically accurate bicycles and only those that meet the above
listed specications (see par. no. 1.2).
Having parked your bicycle make sure that the front wheel is properly locked and the
rear wheel rests centered to the PARKIS stand.
Do not use bicycle lift if stand surface got damp due to humidity condensation, precipi-
tation or other reason.
ATTENTION! When the dolly is xed in lower position (activated), it possesses poten-
tially dangerous energy (springs inside the stand are stretched!!!).
When the equipment is in use or dolly is in lowered position (activated):
DO NOT place hands inside the dolly!
DO NOT place ngers inside any part of the equipment!
DO NOT try to dismantle or repair the bicycle lift!
DO NOT allow children to play near the bicycle lift!
DO NOT allow pets to be around the device!
9. DISMANTLING
1. Deactivate the parking equipment (see par. No. 7)
2. Remove screws that hold the equipment in place (it’s recommended to start with the
lower ones).
10. WARRANTY
This warranty covers all manufacturing and material defects for a period of 12 months
from the day of product purchase. In case of a warranty claim please provide seller the
warranty and the proof of purchase (a receipt).
The warranty does not cover transportation or post costs. During the period of the war-
ranty, we will not cover damages and/or defects resulting from typical wear and tear.
The warranty does not cover damage resulting from abuse, misuse, failure to follow op-
erating instructions or incorrect maintenance by the purchaser or third parties. The war-
ranty does not apply if alterations have been made to the original construction.

Follow us on social media
for more inspiration and ideas!
www.parkis.eu
2018 08
All rights reserved
This manual suits for next models
2
Table of contents
Other Parkis Bicycle Accessories manuals
Popular Bicycle Accessories manuals by other brands

Cateye
Cateye STRADA SMART Troubleshooting

Wuxi LingDe Microelectronics
Wuxi LingDe Microelectronics LD906GBU instruction manual

Bosch
Bosch CUI100 Original operating instructions

Specialized
Specialized Roval Rapide Wheelset None installation guide

Shimano
Shimano SL-3S35-E Service instructions

Quarq
Quarq AXS TyreWiz user manual