Parkis MTB User manual

USER MANUAL
PARKIS
I MTB I

2
DEAR USER,
Congratulations on purchasing your PARKIS!
PARKIS is equipment for vertical bicycle parking, which lets you free up precious storage
space on the oor. Should you need more information on PARKIS purpose, usage and
installing, please visit us at www.parkis.eu. If you have any questions, we’ll have answers!
IMPORTANT
These instructions accompanying the product are original.
It is important that you read the entire USER MANUAL to familiarise with this product
before use. Persons not acquainted with the information provided in this manual
are not allowed to use the equipment. Adult supervision is highly recommended for
junior users of the PARKIS. We do not take any responsibility, and we are not liable for
any damage caused through use of PARKIS in case you fail to follow the instructions
provided in this manual strictly. Warranty will not be applied if your failure to follow
the instructions causes the damage. Having read the manual carefully, please keep it
for your or subsequent PARKIS holders reference as this manual is a part of the product.
While every eort has been made to ensure the accuracy of the information contained
in this manual, the PARKIS policy of continuous improvement determines the right to
make modications without prior warning.
INTRODUCTION
This USER MANUAL applies for PARKIS MTB. Further in the text - PARKIS. All USER
MANUALS are updated continually. Users should make sure that they use the latest
version. Downloads are available here: www.parkis.eu
UAB PARKIS
Piliakalnio str. 7
Vilnius
Lithuania
LT-06229
WEBSITE: www.parkis.eu
SUPPORT: [email protected]

3
CONTENT
1. INTENDED USE
page 4
2. SET
page 5
3. KEY ELEMENTS
page 5
4. INSTALLATION
page 6
5. USE (OPERATION)
page 6
6. MAINTENANCE
page 7
7. DEACTIVATION
page 8
8. SAFETY
page 9
9. DISMANTLING
page 9
10. WARRANTY
page 9

4
1. INTENDED USE
1.1 This bicycle parking lift PARKIS MTB, (further in the text – PARKIS), is mechanical
equipment designed for vertical parking of your bicycle.
1.2 PARKIS ts the majority of popular bicycle models. Only these criteria apply:
* tire width – max. 77 mm (3.0”) (g. 1.A)
* rim + tire total height – max. 77 mm (3.0”) (g. 1.B)
* wheel diameter – min. 61 cm (24”)
* recommended weight on front bicycle axis – up to 15 kg (33 lb) (g. 1.E)
* mud aps end must be above the wheel axis (g. 1.C, 1.D).
Suitability can be checked by leaning the bike’s rear-wheel against the wall. If the gap of
two ngers (or bigger) is left between the wall and the mud ap – PARKIS is suitable for
your bike’s mud aps (g. 1).
IMPORTANT! Before parking your bicycle, make sure it meets these criteria.
1.3 This version of PARKIS is designed for installation and use in a stable environment.
It is not allowed to install and use it in any means of transportation, without using a
special accessory for a dynamic environment.
1.4 For using PARKIS in public places, it is highly recommended to install an optional
Locking Gates accessory.
PARKIS reference dimensions: 170 x 25 x 20 cm (67 x 10 x 7,9 in), reference weight 6 kg
(13,2 lb).
Fig. 1.
1.A 1.B
15 kg
(33 lb)
MAX
MAX. 77 mm
(3.0”)
MAX. 77 mm
(3.0”)
MAX. 61 mm
(2.4”)
MAX. 77 mm
(3.0”)
1.E
1.C 1.D

5
1.
2.
3.
Fig. 2.
2. SET
Set includes:
Parking lift PARKIS
4 screws for masonry wall installation
User manual
3. KEY ELEMENTS
1. Stand
2. Wheel locking mechanism (dolly)
3. Screws (set includes masonry screws)
4. Safety-catch (for transportation only).
Having fastened the equipment to the wall,
the safety-catch is removed. 4.

6
4. INSTALLATION
4.1 To install PARKIS, the surface of the wall has to be even, and the oor has to be level.
Rest the lower end of the Parkis on the oor, lean it to the wall and mark the spots for
screws. If you intend to mount PARKIS to the masonry wall (which is recommended),
make pilot holes for fastening screws, install screw anchors, lean the equipment to the
wall accurately and screw the equipment to the wall tightly. For other types of wall,
please obtain suitable screws.
4.2 Remove safety-catch (g. 3.A).
4.3 Put a wheel’s support to the horizontal position (g. 3.B).
4.4 Push a wheel locking mechanism (further in the text – dolly) to the ground position
limit. You will normally feel resistance while pushing. It will x automatically on oor
level (g. 3.C), now your PARKIS is ready to use!
3.A 3.B 3.C
Fig. 3.
5.1 USE - PARKING
1. Before parking your bicycle, make sure that there are no children or pets around to avoid
accidents. Hold your bike so that both wheels are on the line perpendicularly to the surface
that PARKIS is fastened to.
2. Use one hand to lightly hold a handlebar of your bicycle (rst-time users are advised to
pick the bar underhand) and rmly take the saddle with the other hand. We recommend
you to hold the saddle with your leading hand. (g. 4.A)
3. Firmly push the saddle forward while lifting up the handlebar lightly (stronger for heavy
bicycles) and directing the front wheel towards the wheel locking mechanism until the
wheel locks. Attention! Do not push the handlebar downwards! Let the front wheel go up
freely (g. 4.B and 4.C). At the same time hold the saddle rmly and direct a rear wheel so
that it goes in the middle of the stand. Your bike is parked! (g. 4.D)

7
4.A 4.C 4.D4.B
5.2 USE - REMOVING A BICYCLE
Hold the saddle (not the handlebar!) by hand and pull the bicycle towards yourself (g.
5.A). As the bike starts descending push a handlebar down with your other hand (g.
5.B & 5.C) until the front wheel reaches the ground and is removed from the wheel locking
mechanism (g. 5.D). Your bicycle is removed from the parking equipment!
5.A 5.C 5.D5.B
NOTE!If the wheel has not been locked from the rst time and the dolly has moved
upwards, just put your bicycle aside safely, use a hand to push the dolly down until xed
position (g. 3.C) and repeat the parking process once again. Some practice is necessary
to get used to parking your bicycle this way. While parked, your bike has to be protected
from accidental impact (e.g. turning or bending) as this can damage the equipment, your
bicycle or harm a person.
6. MAINTENANCE
PARKIS construction allows to use it for a long time without any particular maintenance.
Consider these tips for enjoying PARKIS even more:
1. Get your bike clean before you park it in PARKIS.
2. Do not use materials containing solvents or diluents to clean PARKIS.
If you intend not to use PARKIS for a more extended period (a month or more), we
recommend keeping a dolly in the upper position on the stand (deactivated) – the way it
is positioned when a bicycle is parked or the equipment is not activated (see par. No. 7).
It increases the durability of the springs inside the stand.

8
7. DEACTIVATION
Perform deactivation before dismantling, maintenance, cleaning or leaving PARKIS without
parked bicycle for an extended period (a month or more).
1. While the bicycle is parked in the vertical position, widen upper lid ends by thumbs,
move the lid upwards to open side holes (g. 6.A).
2. Get hold of a front-wheel fork by one hand and a bottom part of the dolly by the other. Lift
the system by both hands up until the dolly’s outside rollers get into prole holes (g. 6.B).
6.D 6. F6. E
6. A
6. C
6. B
3. Holding the bike fork and the frame
rmly, lower down the bicycle on the
ground (g. 6.C). Please note, the bike will
fall out if not held rmly and may cause
damage or harm.
4. Push the brake lever till the end (g. 6.D)
and lower the dolly a bit (g. 6.E). Release
the brake lever.
5. With both thumbs move the lid down until
it covers the prole holes (g. 6.F). You have
now performed deactivation.

9
8. SAFETY
When unpacking, make sure that the item is intact and undamaged. If any parts are
broken, please contact your seller.
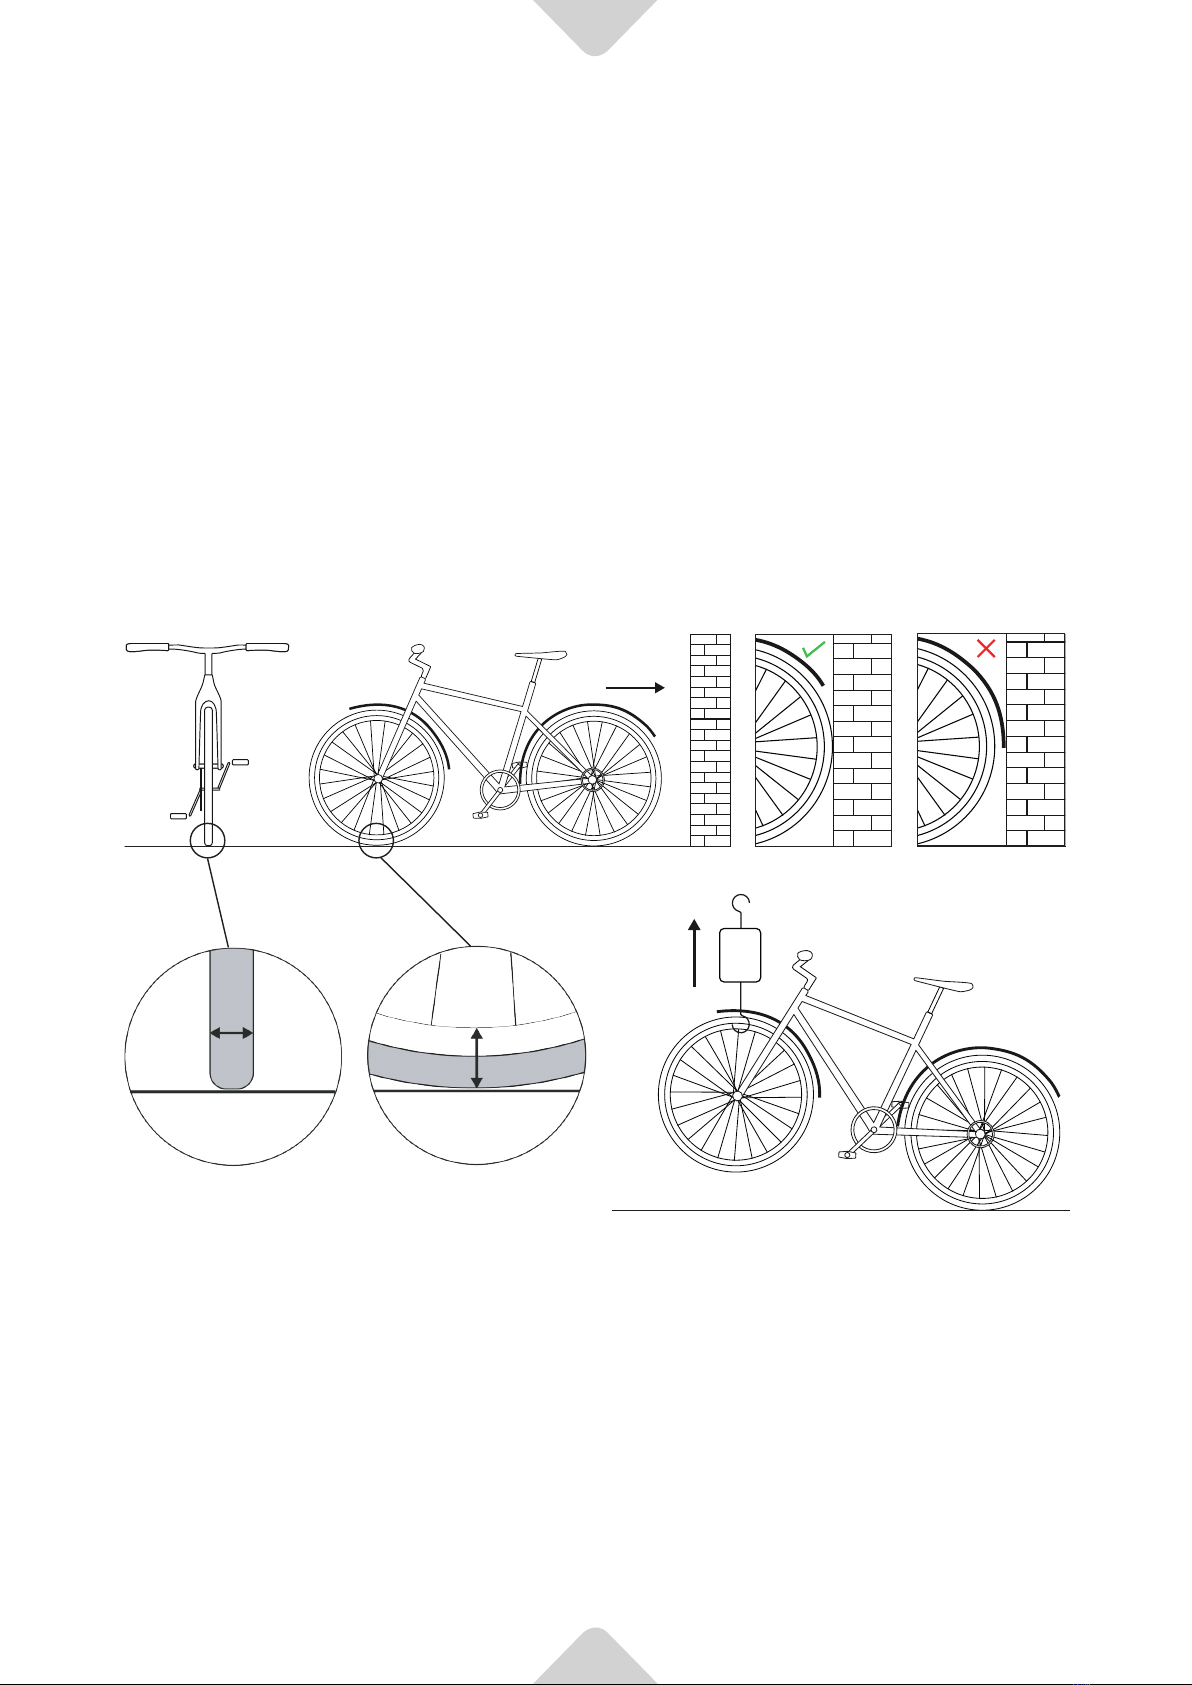
Use PARKIS to park only technically accurate bicycles and only those that meet the above
listed specications (see par. no. 1.2).
Having parked your bicycle make sure that the front wheel is properly locked and the
rear wheel rests centred to the PARKIS stand.
Do not use bicycle lift if the stand surface got damp due to humidity condensation,
precipitation or other reason.
ATTENTION! When the dolly is xed in the lower position (activated), it possesses
potentially dangerous energy (springs inside the stand are stretched!!!).
When the equipment is in use or dolly is in the lowered position (activated):
DO NOT place ngers inside any part of the equipment!
DO NOT try to dismantle or repair the bicycle lift!
DO NOT allow children to play near the bicycle lift!
DO NOT allow pets to be around the device!
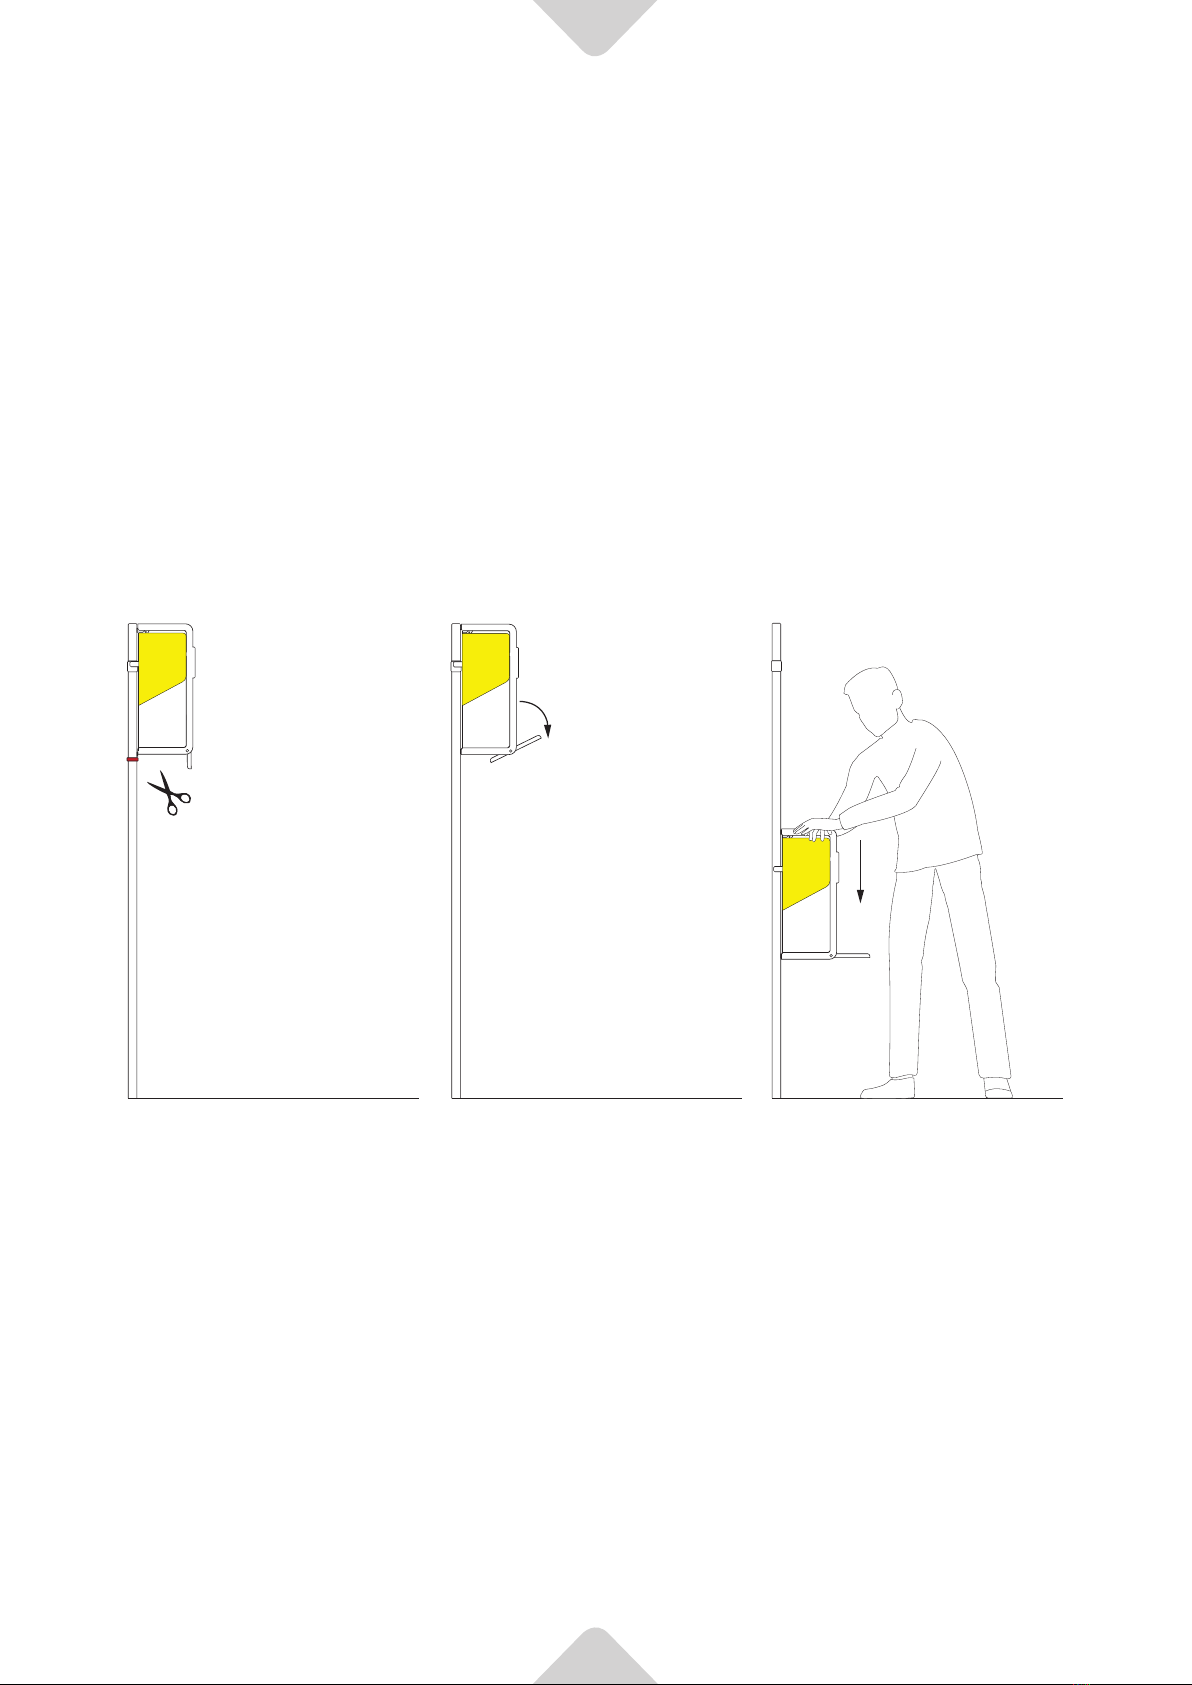
9. DISMANTLING
1. Deactivate the parking equipment (see par. No. 7)
2. Remove screws that hold the equipment in place (it is recommended to start with the
lower ones).
10. WARRANTY
This warranty covers all manufacturing and material defects for a period of 12 months
from the day of product purchase. In case of a warranty claim, please provide the seller
with the proof of purchase (a receipt).
The warranty does not cover transportation or post costs. During the period of the
warranty, we will not cover damages and/ or defects resulting from typical wear and
tear. The warranty does not cover damage resulting from abuse, misuse, failure to follow
operating instructions or incorrect maintenance by the purchaser or third parties. The
warranty does not apply if alterations have been made to the original construction.

Follow us on social media
for more inspiration and ideas!
www.parkis.eu
2020 07
All rights reserved
Table of contents
Other Parkis Bicycle Accessories manuals
Popular Bicycle Accessories manuals by other brands

Cateye
Cateye STRADA SMART Troubleshooting

Wuxi LingDe Microelectronics
Wuxi LingDe Microelectronics LD906GBU instruction manual

Bosch
Bosch CUI100 Original operating instructions

Specialized
Specialized Roval Rapide Wheelset None installation guide

Shimano
Shimano SL-3S35-E Service instructions

Quarq
Quarq AXS TyreWiz user manual