Parrot Uncle KATO-1500B-D1 Manual

BEFORE OPERATING THIS PRODUCT, READ, UNDERSTAND, AND FOLLOW THESE INSTRUCTIONS.
BE SURE TO SAVE THIS BOOKLET FOR FUTURE REFERENCE
KATO-1500B-D1
Parrotuncle Owner’s Installation Manual
WARNING: SHUT POWER OFF AT FUSE OR CIRCUIT BREAKER
Installation & Operating Instructions for the
KATO-1500B-D1

2
When using electrical appliances, basic safety precautions should always be followed,
following:
1. Read all instructions.
2. Do not touch hot surfaces. Use handles or knobs.
3. To protect against electrical shock, do not immerse cord, plugs, or any electrical parts
in water or other liquid.
4. Close supervision is necessary when any appliance is used by or near children.
5. Unplug from outlet when not in use and before cleaning. Allow to cool before putting on
6. Do not operate any appliance with a damaged cord or plug or after the appliance
malfunctions or has been damaged in any manner. Return appliance to the nearest
service facility for examination, repair, or adjustment.
7. The use of accessory attachments not recommended by the appliance manufacturer may
cause injuries.
8. Do not use outdoors.
9. Do not let cord hang over edge of table or counter, or touch hot surfaces.
including the
or taking off parts.
authorized
10. Do not place on or near a hot gas or electric burner, or in a heated oven.
11. Extreme caution must be used when moving an appliance containing hot oil or other hot
liquids.
12. To disconnect, , then remove plug from wall outlet.
13. Do not use appliance for other than intended use.
14.Use extreme caution when removing tray or disposing of hot grease.
metal scouring pads. Pieces can break off the pad and touch electrical
parts, creating a risk of electric shock.
"off "turn any control to
parts, creating
16. Oversize foods or metal utensils must not be inserted in a toaster-oven as they may
create a fire or risk of electric shock.
o not clean with15. D
Parrotuncle Owner’s Installation Manual
WARNING: SHUT POWER OFF AT FUSE OR CIRCUIT BREAKER
KATO-1500B-D1
Installation & Operating Instructions for the
IMPORTANT SAFEGUARDS

3
17. A fire may occur if the toaster-oven is covered or touching flammable material, including
curtains, draperies, walls, and the like, when in operation. Do not store any item on top
18. Extreme caution should be exercised when using containers constructed of other than
oven when not in use.
20. Do not place any of the following materials in the oven: paper, cardboard, plastic, and
21. Do not cover crumb tray or any part of the oven with metal foil. This will cause
.
of the appliance when in operation.
metal or glass.
like.
overheating of the oven
23. Remove plug from outlet when the appliance is not in use, before putting on or taking
22. Caution-To ensure continued protection against risk of electric shock, connect to
properly grounded outlets only.( If the appliance is of the grounded type)
19. Do not store any materials, other than manufacturers recommended accessories, in this
TECHNICAL INFORMATION
~
SKU Rated Voltage Rated Consume
Parrotuncle Owner’s Installation Manual
WARNING: SHUT POWER OFF AT FUSE OR CIRCUIT BREAKER
KATO-1500B-D1
Installation & Operating Instructions for the
off parts, and before cleaning. Allow to cool before handing.
24. Avoid contacting moving parts.
25. For household use only.
26. In the process of cooking, press “ON/OFF” to stop the oven working.
SAVE THESE INSTRUCTIONS!!!
KATO-1500B-D1
120 V AC 60Hz
1600W
Net weight: 17.3 lbs / 7.9kg
Product dimension: 18.3 x 16.9 x 16.3 in
Inner space dimension: 12.2 x 12.6 x 8.07 in
Certification: ETL Listed

4
great as the electrical rating of the appliance.
2) The cord should be arranged so that it will not drape over the countertop or tabletop
a) A short power-supply cord should be used to reduce the risk resulting from becoming
3-wire cord.
SHORT CORD INSTRUCTION
Parrotuncle Owner’s Installation Manual
WARNING: SHUT POWER OFF AT FUSE OR CIRCUIT BREAKER
where it can be pulled on by children or tripped over unintentionally.
3) If the appliance is of the grounded type, the extension cord should be a grounding-type
KATO-1500B-D1
Installation & Operating Instructions for the
entangled in or tripping over a longer cord.
b) Longer extension cords are available and may be used if care is exercised in their use.
c) I f a longer extension cord is used:
1) The marked electrical rating of the cord set or extension cord should be at least as
BEFORE FIRST USE
1. Remove all accessories and shipping materials packed inside the oven.
2. Wash the rack and tray with warm soapy water. Wipe the inside of the oven with a
damp cloth or sponge.
Wipe up the inside of the oven with paper towels before using it.
3. Place oven on a flat counter or other stable surface. DO NOT OPERATE ON THE
SAME CIRCUIT WITH ANOTHER APPLIANCE.
4. Make sure that crumb tray is properly installed before using it.
5. Leave at least 5 inch of space above and around all sides of the oven.
6. Don not place anything on top of the oven and do not block the air vents.

5
Parrotuncle Owner’s Installation Manual
WARNING: SHUT POWER OFF AT FUSE OR CIRCUIT BREAKER
KATO-1500B-D1
Installation & Operating Instructions for the
Fetch rack Fry Net
Drip tray Rack
CONTROL PANEL
FUNCTION AREA CHICKEN FORK BUTTON
LIGHT BULB BUTTON
Chicken fork / ROTISSERIE

6
HOW TO USE
CAUTION: THE OVEN SURFACES ARE HOT DURING AND AFTER USE
GENERAL INSTRUCTIONS
1.
2. The food must be placed on the grill tray to avoid the fire danger that caused by the
3.
accumulation of food chipping on the heating pipes.
Place the grill tray and rack at a position suitable for the height of the food to be cooked.
Make sure to use an ovenproof container in the oven. Do not use plastic or cardboard
Parrotuncle Owner’s Installation Manual
WARNING: SHUT POWER OFF AT FUSE OR CIRCUIT BREAKER
Installation & Operating Instructions for the
KATO-1500B-D1
OPERATION:
1. When the oven is electrified, the buzzer will ring once. All the indicators are displayed
and after 1 second the default function is displayed.
2. When the oven is electrified, all the indicators are put out if nobody works it after
30 seconds. Pressthe ON/OFF button and the indicators will display again.
3. Press the indicators to select different operation modes, including -AIR FRY,
containers in the oven.
4. Clean the heating pipe periodically.
5. Never use glass or ceramic pans or lids.
6. DO NOT let juices flow to the bottom of the oven. Use the crumb tray when cooking.
7. Set the temperature according to the recipe or as desired.
8.
Securely shut the door and set the cooking time to begin operating the oven.
9.
When you use the rack, please put the convex upward.
10.
Please don’t unplug the power cord before the oven has finished its work.
-BROIL,- BAKE,-CON.BAKE, -TOAST, -BAGEL, -PROOF, -WARM, -SLOW COOK,
-DEHYDRATE. Press the TEMP/TIME button to choose time, temperature, the slice,
color and the other defaultsetting.
4. Press the LIGHT BULB button to turn on the inner lights.
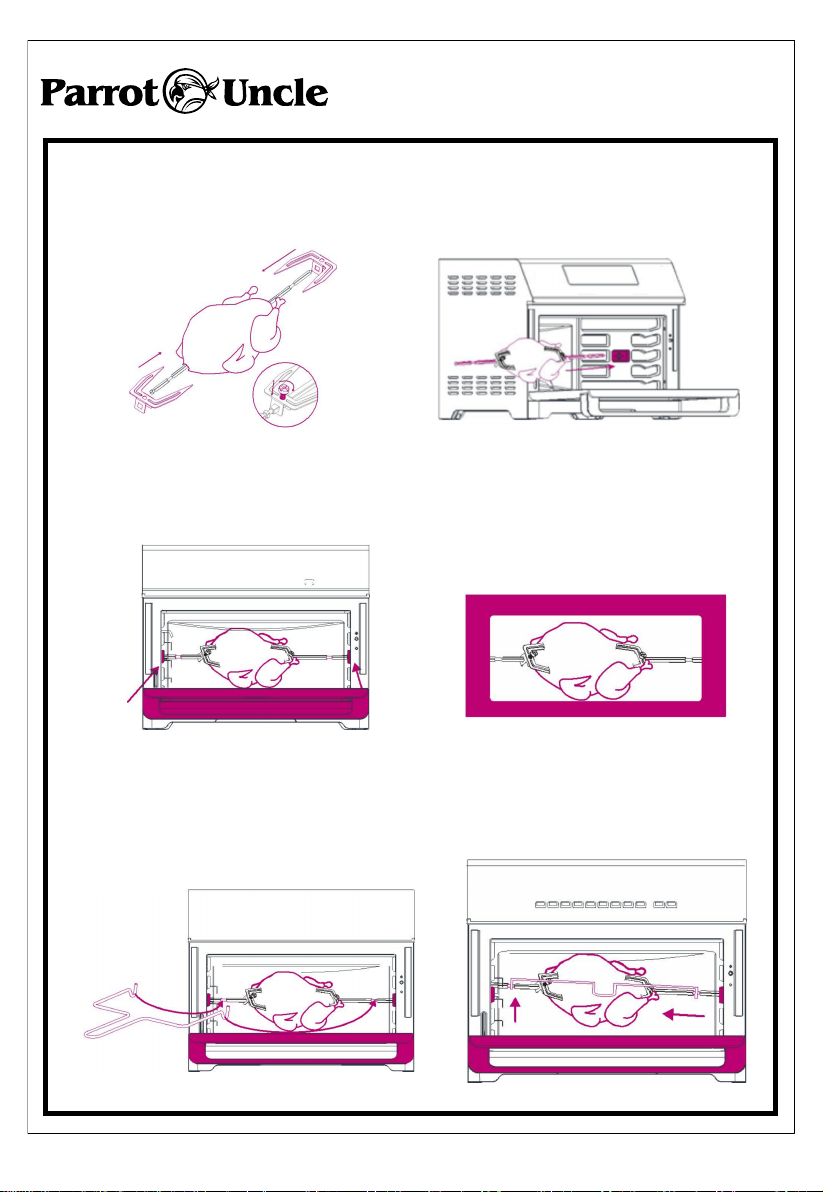
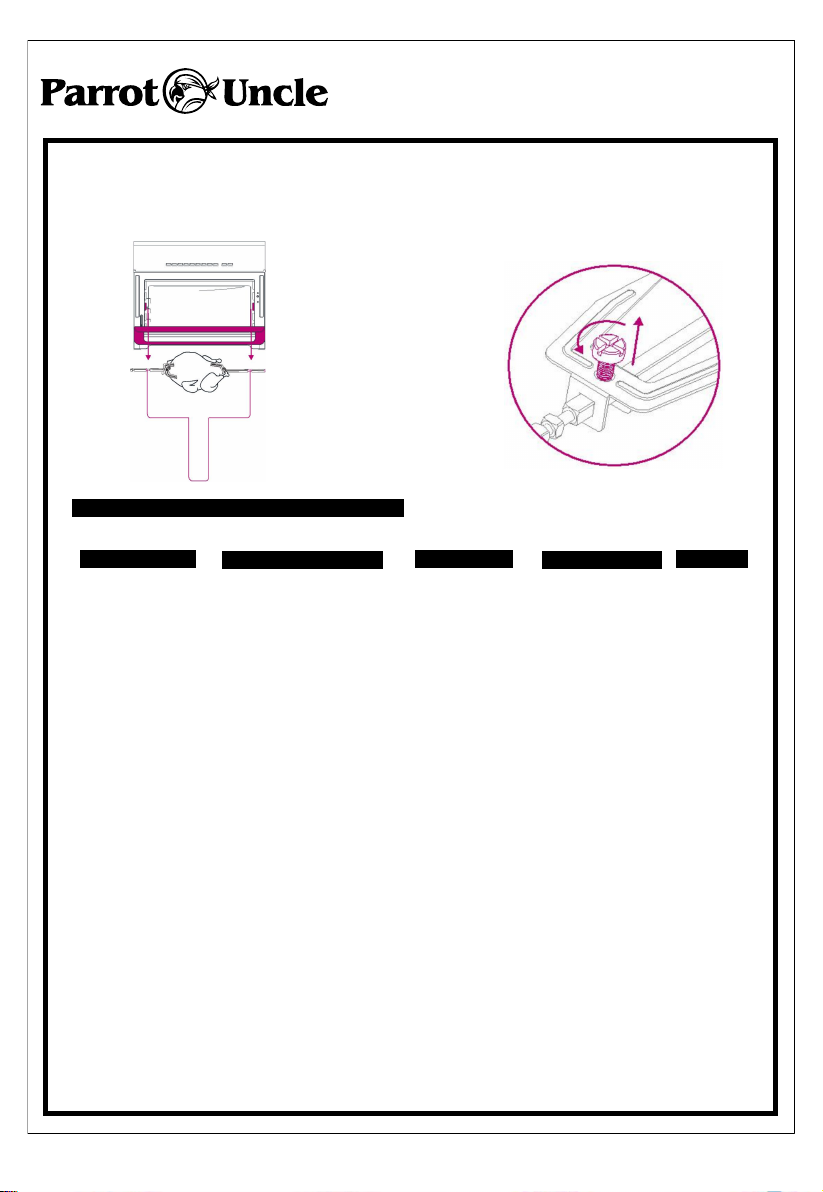
Press the CHICKEN FORK button to turn on the rotisserie function.(slow automatic
rotation).
5. In the process of cooking, press the " ON/OFF" button once to stop cooking.

7
Parrotuncle Owner’s Installation Manual
WARNING: SHUT POWER OFF AT FUSE OR CIRCUIT BREAKER
KATO-1500B-D1
Installation & Operating Instructions for the
Note: The Temp and Time are preset by the Air Fry Smart Program, however, you
can press the Temp/Time to adjust the cooking temperature or time.
Always insert rotisserie accessories and food before preheating the oven.
1. Remove the forks and screws from the package.
Follow these steps to ensure your oven is operating properly.
1.Open the oven door.
Place the cooking pan on the bottom of the cooking chamber. Close door.
2.Plug the power cord into a 120V power source. Display in Standby mode.
3.Choose the Air Fry cooking model.
4.Press the Time button to adjust the cooking time.
Press the Temp button to adjust the temperature.
5.Press the Start button on the right side of the control panel to begin cooking
The display indicates Preheat when the oven is in Preheat mode.
7. The display will count down the last minute of cooking time in seconds. When the
Smart Program is complete, the display indicates off and the fan turns on
automatically to cool the oven.
TEST RUN:
ROTISSERIE COOKING:
6.When the oven reaches the Smart Program cooking temperature, the cooking
time will start to count down on the display.
Note: For the test run, do not add food to the cooking chamber.
2. Push the food item onto the spit.

8
Parrotuncle Owner’s Installation Manual
WARNING: SHUT POWER OFF AT FUSE OR CIRCUIT BREAKER
KATO-1500B-D1
Installation & Operating Instructions for the
3. Slide the forks onto both ends of the spit,
ensuring the prongs are inserted into the food item.
6. Close the oven door.
5. Insert the rotisserie arm with the pointed end in
the rotisserie catch on the right, then place the
square end in the rotisserie catch on the left side.
Ensure the rotisserie spit is securely in place.
8. Lift the rotisserie spit slightly on the left,
and slide it left to remove it from the catch
on the right.
7. Use caution when opening oven door. Door
and accessories will be hot. Position the
rotisserie lift hooks beneath the left and right
arms of the rotisseries spit where the indents
are location (see illustration).
4. With the oven door open, slide the
rotisserie spit into the guides in the
cooking chamber.

9
Parrotuncle Owner’s Installation Manual
WARNING: SHUT POWER OFF AT FUSE OR CIRCUIT BREAKER
KATO-1500B-D1
Installation & Operating Instructions for the
Cooking Mode Temperature Range
Bottom +
Sides of Top
Bottom +
Sides of Top
Pre-Heat
Toast
Heat Resource
Time Range
Proof
Broil
Bagel
Bake
Slow Cook
Yes
Warm
Dehydrate
Con. Bake
Bottom +
Sides of Top
Mid of Top
Bottom +
Sides of Top
9. Pull the accessory towards you and carefully
remove the accessory from the cooking chamber,
then place your food on a tray or heat resistant
surface.
COOKING TIME AND TEMPERATURE:
10. Use the oven mitts to unscrew the
rotisserie forks and remove them from
the food, then remove the food from the
spit.
Air Fry Top
Yes
Bottom +
Sides of Top
Top
Bottom +
Sides of Top
Yes
Bottom
190~450 F
190~450 F
1~20min
Shades 1~7
1~60min
Fixed 450 F
90~110 F 1~24hr
1min~4hr
1~60min
1min~72hr
Fixed 450 F
High 212 / Low 200 F
1min~4hr
Shades 1~7
1~24hr
190~450 F
High 450 / Low 400 F
90~180 F
185~350 F

10
Parrotuncle Owner’s Installation Manual
WARNING: SHUT POWER OFF AT FUSE OR CIRCUIT BREAKER
Installation & Operating Instructions for the
KATO-1500B-D1
TROUBLE SHOOTING
Inspect power cord for damage. If
damage is noticed discontinue
use and contact Customer Care.
POSSIBLE REASONS POSSIBLE SOLUTIONS
SCENARIO
Stop using appliance immediately.
Press Stop,then unplug the toaster oven
and allow it to cool.
Contact Customer Care.
Note:
Do not attempt to repair the appliance.
Faulty circuit or heating
element.
Press Stop, then unplug the
appliance and allow it to cool to
room temperature.
Choose a neutral oil with a high
smoke point, such as Canola,
Avocado, Soybean, Safflower,
or Rice Bran.
Ensure that the Toaster Oven is
plugged in securely and
the oven is in Standby.
Oven is not plugged in.
Ensure the Toaster Oven has
at least 5 inches of space
around all sides while in use.
Move the Toaster Oven to
another outlet to ensure there is
nothing else plugged in on the
same circuit or in the general
area.
Plug in another appliance to the
same outlet to check the outlet
for power.
Ensure the power cord is plugged
firmly into a 120V outlet.
Toaster Oven
does not have
proper ventilation.
Using an oil with a low
smoke point.
Bad power connection
or no power.
The appliance is not
properly plugged in.
Black smoke is
coming from the
Toaster Oven
Oven light will not
turn on
Water is dripping onto
the counter from
under the door
Toaster Oven is
plugged in but
will not turn on
Condensation is
forming on
countertops

Parrotuncle Owner’s Installation Manual
WARNING: SHUT POWER OFF AT FUSE OR CIRCUIT BREAKER
Installation & Operating Instructions for the
KATO-1500B-D1
TROUBLE SHOOTING
11
SCENARIO POSSIBLE REASONS POSSIBLE SOLUTIONS
Black smoke is
coming from the
Toaster Oven
Be mindful when seasoning food.
Spray vegetables and meats
before adding seasoning so they
adhere to the ingredients.
Seasoning on food has
blown into element.
Water is vaporizing
producing thick steam.
Cooking foods with excess
fat, such as bacon,
sausage, and burgers may
result in white smoke.
Food particles orresidue
on the bottom of the
cooking chamber, air fry
basket, oven rack, cooking
pan, rotisserie spit and
forks, or crumb tray.
Avoid air frying foods with a high
fat content.
Check the cooking pan for
excess oil or fat and carefully
remove as needed after cooking.
Pat dry moist food ingredients
before air frying. Do not add
water or other liquid to the
oven's cooking chamber.
Press Stop, then unplug the oven
and allow it to cool to room
temperature.
Remove all accessories from the
cooking chamber and clean the
area as well as all accessories
thoroughly.
Line the crumb tray of your
Toaster Oven with baking paper
for easier clean-up.
It is normal, it could return to right position
after cool down. Don't worry!
Rubber Door Sealer loose
during cooking
White Smoke is
coming from the
Toaster Oven

CAUTION : hot surface
Warning: Hot Surface!
Advertencia: ¡Superficie Caliente!
Avertissement: Surface Chaude!
Parrotuncle Owner’s Installation Manual
WARNING: SHUT POWER OFF AT FUSE OR CIRCUIT BREAKER
KATO-1500B-D1
Installation & Operating Instructions for the
12
1. Before cleaning, unplug the toaster oven and allow it to cool completely.
2. Wash all attachments, including the rack and the tray, with mild soap and water.
3. Do not use abrasive cleansers, scrubbing brushes and chemical cleaner as this will
damage the non-stick coating of grill tray.
4. Using a wet cloth to wipe the inside of the oven.
5. Clean the door by using a wet cloth saturated with detergent or soap.
6. Never immerse the unit in water or other liquid.
7. Any other services should be performed by an authorized service representative.
CARE AND CLEANING
Table of contents
Other Parrot Uncle Kitchen Appliance manuals