Partybag 7 User manual

Partybag 7 - v314_EN
USER MANUAL

2
GENERAL INFORMATION
Partybag 7 is a portable speaker, powered by a rechargeable battery and driven by a DSP-controlled Class D
amplifier, integrated in an easy to carry backpack.
Every Partybag 7 features: a woofer protected by a metal grid (1), a tweeter (2), two bass-reflex ports (3), an
input/output and control panel (4), two side pockets (5), an upper pocket (6) and a carrying handle (7).
Partybag 7 is equipped with the following accessories:
•3.5 mm Mini-Jack audio cable
•Protective cover
•29.4 V battery charger
•User manual
•Warranty certificate and safety information
Partybag 7 can be connected to microphones, pre-amplified and non-pre-amplified musical instruments and any
other kind of audio source capable of providing a line level signal, such as: mixers, PCs with sound cards, MP3
players, smartphones, tablets, etc.
Partybag 7 is also equipped with a Bluetooth® audio receiver and is capable of playing MP3 files from USB
memory devices.
Multiple Partybag can be connected together to form a larger sound system.
❼
❹
❻
❷
❸
❶
❺

3
⎓
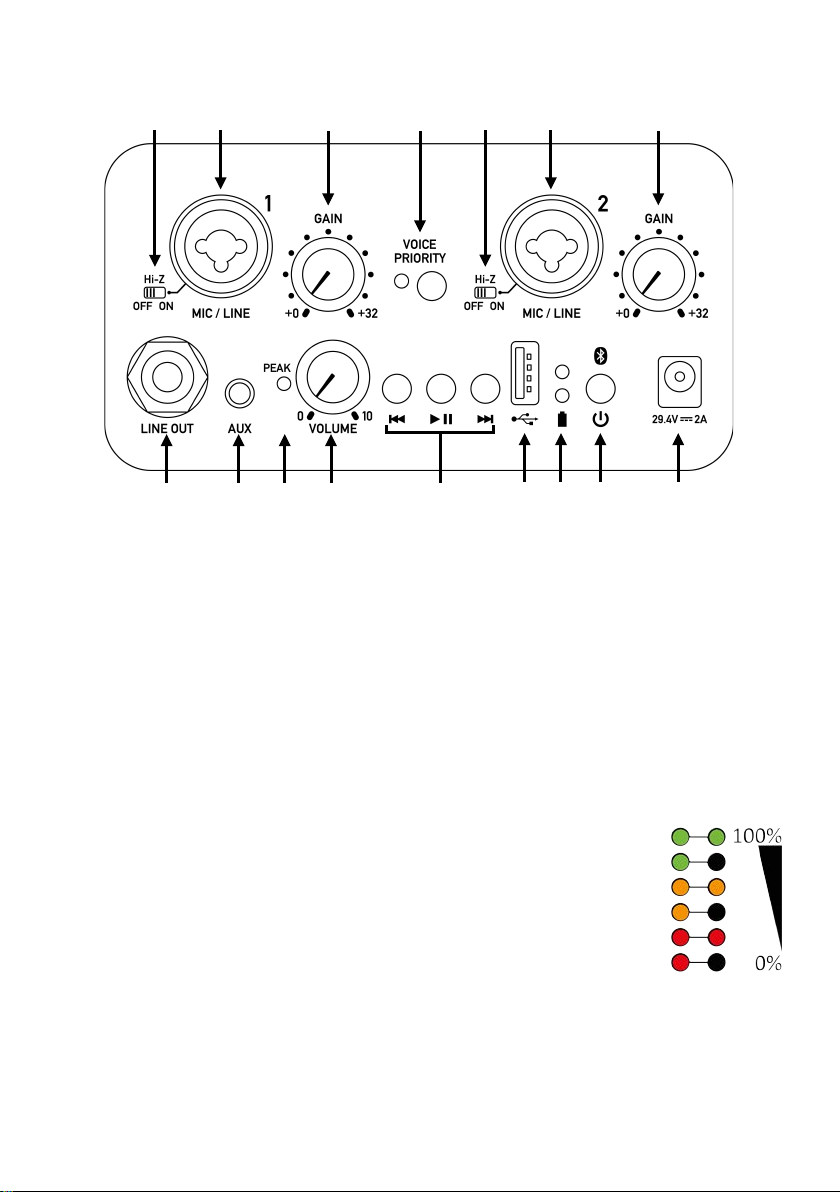
CONTROL AND INPUT/OUTPUT PANEL
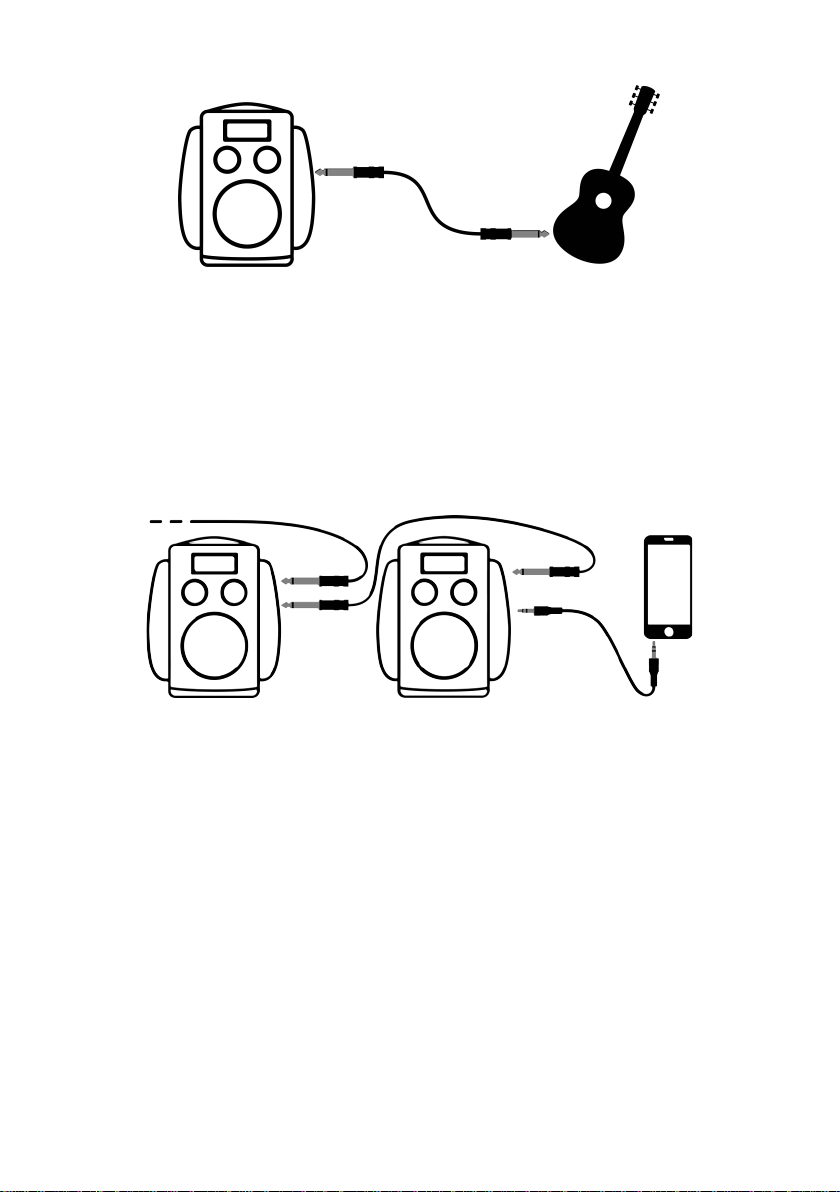
1. [LINE OUT] Mono 6.3 mm Jack output:provides a pre-amplified and mixed audio output to connect
another Partybag or other audio systems.
2. [AUX] Stereo 3.5 mm Mini-Jack input: to connect generic audio devices equipped with line output.
3. [PEAK] LED: shows that Partybag’s internal limiter (compressor) is active. The digital limiter protects
Partybag from excessive distortion and possible malfunctioning and can be active in two cases: if the input
signal level is too high or if the master volume is too high. In case the indicator remains turned on for a
long time it is recommended to reduce the volume of the input audio source and/or the master volume
to preserve optimal audio quality.
If reducing the master volume the limiter indicator remains active, then the level of the audio source is
too high, therefore its output volume should be reduced.
4. [VOLUME] Knob: adjusts the master volume of Partybag.
5. [Back/Play-Pause/Forward] Buttons:goes back one track / play-pause / goes forward one track the
playback of files from USB memory device or Bluetooth®.
6. [USB] Port:allows you to connect USB memory devices and play MP3 files from them. The socket also
allows you to recharge or power external USB devices (e.g. smartphones, MP3 players, USB mixers, etc.).
7. [Battery] LEDs:indicate that Partybag is switched on and, depending on the
combination of colours, show the battery charge level (see the image on the side).
A single blinking red LED indicates that the battery is low and Partybag is about to shut
down.
8. [Power On/Bluetooth®] Button:press and hold the button for about 3 seconds to turn
Partybag on or off.
A single press of the button activates pairing mode of the Bluetooth® receiver for 60
seconds; the [Battery] LEDs blink to indicate activation.
9. [29.4V 2A] Charger socket:to be used to recharge Partybag with the provided battery charger. The
LED on the battery charger indicates the charging status (Red = charging, Green = fully charged).
10. [Hi-Z] Switch: enables/disables the high impedance mode of the corresponding [MIC/LINE] input.
The Hi-Z mode should be activated when directly connecting instruments that require a high impedance
input (e.g. instruments with passive pick-up).
11. [MIC/LINE] Balanced mono XLR/Jack 6.3 mm input: to connect a microphone, a musical instrument or
any line level audio source.
❾
❶
❷
❸
❺
❻
❽
❼
❹
⓬
❿
⓫
⓭
⓬
❿
⓫

4
12. [GAIN] Knob: adjusts the signal preamplification level (gain) of the corresponding [MIC/LINE] input.
13. [VOICE PRIORITY] Button:activates the automatic volume reduction of the audio signals present on [AUX],
Bluetooth® and USB when the signal level on the [MIC/LINE] inputs exceeds a certain threshold.
The corresponding LED turning on confirms its activation.
This function can be useful, for example, for "voice over" applications in which it’s useful to automatically
reduce the volume of the music when an announcer is speaking.
AUDIO SOURCES CONNECTION
SINGLE PARTYBAG
Multiple devices can be connected simultaneously to Partybag using different inputs.
It is recommended to use the cable supplied with Partybag or other robust and reliable audio cables to avoid
connection problems.
1. Generic audio source with line output (MP3 players, PCs, smartphones, DJ consoles, etc.)
•Connect the audio source to the Partybag [AUX] input using the provided 3.5 mm Mini-Jack cable or
another suitable cable
•Turn Partybag on
•Start playback from the audio source used
NOTE: it is suggested to set a sufficiently high volume on the audio source used before intervening on the Partybag
master volume, while still avoiding the [PEAK] LED to lights up.
2. USB memory device (USB stick)
•Turn Partybag on
•Connect the USB memory device to the Partybag USB port
•Playback will start automatically from the first track or from the track where playback was previously
stopped
•Use the [Play-Pause], [Forward] and [Back] buttons to control the playback of MP3 files

5
3. Bluetooth® receiver (smartphones, tablets, Bluetooth® transmitters)
•Turn Partybag on
•Press the [Bluetooth®] button on the Partybag control panel once to activate the pairing mode. The
[Battery] LEDs will blink to confirm activation
•Use the search function of your Bluetooth® device to view the available devices.
•Connect to the device named "PARTYBAG-####", where #### is a 4-digit number that identifies your
Partybag
•Start playback from the Bluetooth® device
•You can use the [Play-Pause], [Forward] and [Back] buttons to manage Bluetooth® playback directly from
the Partybag control panel
NOTE: it is suggested to set a volume high enough on the smartphone or Bluetooth® source before intervening
on the Partybag master volume.
NOTE: Partybag’s Bluetooth® receiver is configured to pair automatically, when available, to the last device that
made a connection.
NOTE: when a device is connected to the receiver, it is possible to deactivate the connection in progress and
activate the pairing mode again by pressing the Bluetooth® button once.
NOTE: if no device pairs with Partybag's Bluetooth® receiver within 60 seconds of pressing the corresponding
button, it will turn off to save battery. To reactivate the pairing mode, press the Bluetooth® button again.
4. Microphones
•Connect the microphone to a Partybag [MIC/LINE] input using an XLR or 6.3 mm Jack cable
•Turn Partybag on
•Adjust the preamplification level using the [GAIN] knob
NOTE: when connecting a microphone, turn off the high impedance mode [Hi-Z] in the corresponding
[MIC/LINE] input.
NOTE: Partybag does not have phantom power, therefore condenser microphones cannot be connected directly.

6
5. Musical instruments (guitar, bass, keyboard, pedal, etc.), mixers or other audio sources
•Connect the musical instrument or audio source to a Partybag [MIC/LINE] input using a suitable cable
•When directly connecting instruments that require a high impedance input (e.g. electric guitar, electric
bass, instruments with passive pick-up), activate the high impedance mode by setting the [Hi-Z] switch to
the ON position
•Turn Partybag on
•Adjust the preamplification level using the [GAIN] knob
WARNING: when activating the Hi-Z mode always use an unbalanced 6.3 mm Jack cable to connect the
instrument. The use of a balanced cable in Hi-Z mode could lead to problems and/or decrease in audio quality.
DAISY-CHAIN CONNECTION
You can connect two or more Partybags in daisy-chain following the steps below:
•Connect one or more audio sources to the first Partybag as previously described
•Use a 6.3 mm Jack cable to connect the [LINE OUT] output of the first Partybag to a [MIC/LINE] input of
the second, setting the corresponding [GAIN] knob to the minimum level [+0]
•Using the same method you can connect the second Partybag to a third and so on
•To avoid unwanted noise, turn on the Partybags starting from the first of the chain and proceeding in order
until the last one
•Proceed in reverse order when the Partybags are turned off, starting from the last Partybag of the chain
and going backwards to the first
•Disconnect the cables only after all Partybags have been turned off
NOTE:increasing the number of Partybag connected in daisy-chain the natural background noise may increase.
NOTE: the volume of each Partybag is independent, therefore adjusting the master volume of the first or any
other Partybag in the chain has no effect on the others. If you want to adjust the volume globally act on the audio
source in use.

7
BATTERY RECHERGE
Partybag includes an internal lithium battery, rechargeable and non-removable.
When the battery charge level indicator shows a single blinking red LED, Partybag must be recharged as the
battery charge is almost depleted.
If you continue to use Partybag in this condition, it will automatically turn off after a few seconds.
NOTE: it is not necessary to completely discharge the battery before it can be recharged. It is not necessary to
take special precautions when using Partybag for the first time.
To recharge the battery, connect the provided battery charger to the power outlet and to the 29.4 V charger
socket on the Partybag control panel. The LED on the battery charger will show the charging status (red = charging,
green = fully charged).
NOTE: while charging, ignore the battery charge level indicator on the Partybag control panel and rely only on
the LED indicator on the battery charger to check when charging is complete.
A full battery charge normally requires about 3 hours. If Partybag is used while charging the process may be
slower.
To increase battery life, it is recommended to keep Partybag at temperatures between 5 °C (41 °F) and 25 °C (77°
F). Exposure to extreme temperatures reduces battery capacity and durability.
WARNING:to preserve battery durability, it is recommended to perform a full charge at least once every 12
months, even if Partybag is not used. Do not leave the battery fully discharged for long periods of time, it may be
damaged permanently.
NOTE: the declared autonomy of the battery is indicative and heavily depends on the volume, on the conditions
of use, on the age of the battery, on the temperature of use and other factors.
POWER SUPPLY FROM THE MAINS
It is possible to use Partybag connected to the mains power outlet via the same charger used for recharging, thus
avoiding battery discharge and allowing to use Partybag for an unlimited time.

8
⎓
⎓
TECHNICAL SPECIFICATIONS
ACOUSTICAL:
Frequency response (-3dB): 70 Hz ÷ 20000 Hz
Max SPL: 120 dB
Tweeter: 1” piezo (Power handling 50 W RMS)
Woofer: 8” by FaitalPRO®(Power handling 130 W RMS)
Amplifier: Class D 2x50 W RMS, DSP controlled
Enclosure: Plywood, with bass-reflex
INPUT/OUTPUT:
Analog inputs: 2 x MIC/LINE: XLR/Jack 6.3 mm (balanced) with gain and Hi-Z
switch
1 x AUX: Mini-jack 3.5 mm stereo
Digital inputs: MP3/USB Player
Bluetooth® 4.2 receiver
Analog outputs: LINE OUT: Jack 6.3 mm (unbalanced)
ELECTRICAL:
USB charging port: 5 V 500 mA
Battery: Li-Ion 25.9 V, 3800 mAh, 98.42 Wh
Battery range at full volume: 8 hours
Battery range at mid volume: 32 hours
Battery charger: Input 100-240 V ∼50/60 Hz 1 A, Output 29.4 V 2A
MECHANICAL:
Height: 48 cm / 18.9 in
Width: 31 cm / 12.2 in
Depth: 25 cm / 9.8 in
Net weight: 6.2 Kg / 13.7 lbs.
Backpack internal volume: 7 liters (divided into 3 pockets)
Backpack fabric: CORDURA®, handcrafted in Italy
Input/output
impedance
Sensitivity Maximum input/output level
MIC/LINE Hi-Z = OFF: 10 kΩ
Hi-Z = ON: 1 MΩ
GAIN = MIN: 400 mV (-6 dBu)
GAIN = MAX: 20 mV (-32 dBu)
GAIN = MIN: 2.45 V (10 dBu)
GAIN = MAX: 120 mV (-16 dBu)
AUX 10 kΩ400 mV (-6 dBu) 2.45 V (10 dBu)
LINE OUT 100 Ω- 2.45 V (10 dBu)
Table of contents